Configuring OMA Login Settings
You may need to enter some information about your connection in OMA prior to use. To open Login Settings page from the Login page, tap the gear button in the upper right corner of the page.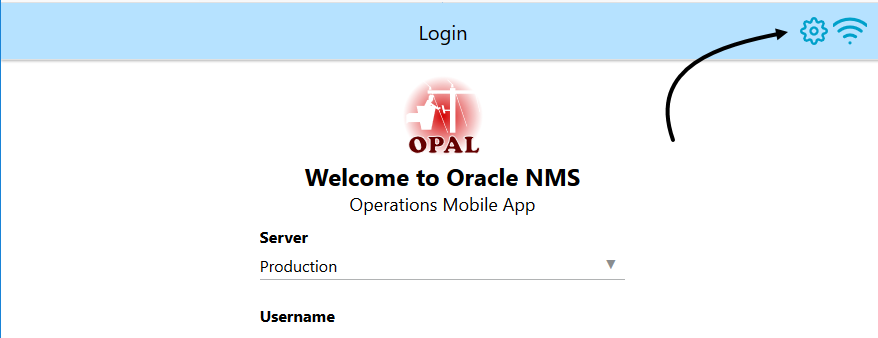
The Login Settings page will appear and it contains two main tabs on the bottom of the page.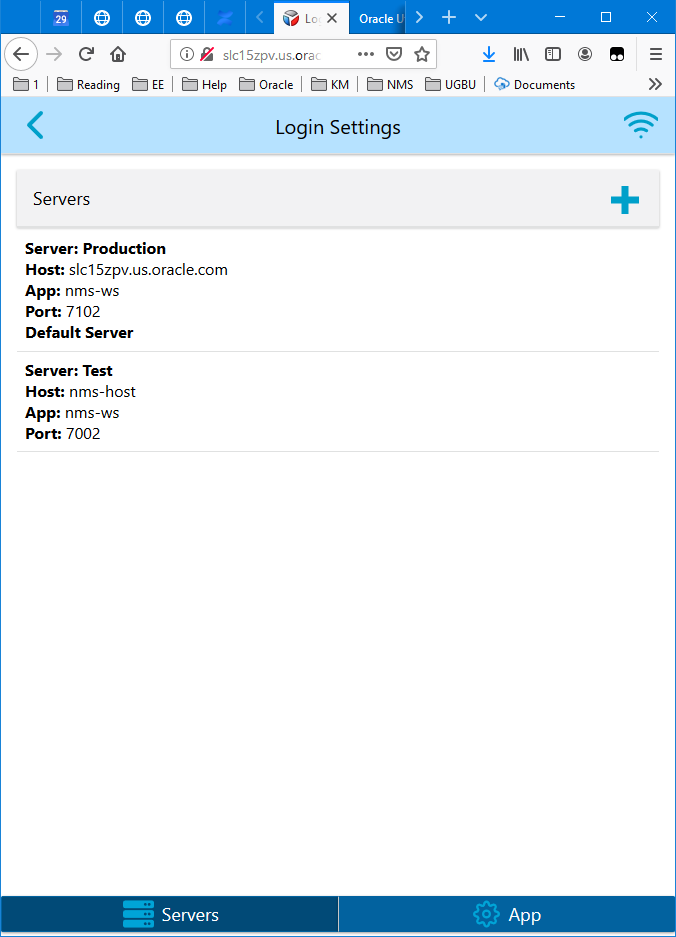
• Servers Tab to add, edit, or modify NMS servers you wish to be connected to.
• App Tab containing settings about the general application and login options.
Login Settings Servers Tab
From the Login Setting Servers tab, you can add, modify, or delete servers that you would like OMA to connect to. To add a server, tap the plus sign button () to open the Server Configuration pane. On the Server Configuration panel, complete the server information.
1. Server Name: Enter a name for the server. This can be any name that is meaningful to you.
2. Host Name: Provide the server URL or IP address.
3. Server Application Path: The path on the server to the web service that the application connects to (typically nms‑ws).
4. Server Port: The server https port that allows you to access the OMA RESTful services.
5. Validate on NMS-WS in addition to NMS Check Box: If LDAP/AD authentication is enabled for OMA, when selected, will attempt to authenticate log ins on nms-ws WebLogic authentication scheme server first, and then the NMS WebLogic server second. When unchecked, the nms-ws WebLogic authentication scheme is not used and only the NMS WebLogic authentication scheme is used.
6. Default Check Box: Allows you to set this server as your default when OMA launches.
7. Action Buttons:
• Check Mark (): Tap to test the server configuration that you have entered.
• Information (): Tap to get an information panel with details on the application, the application server, and the mobile server.
• Delete ( ): Tap to remove the server from the list of servers.
): Tap to remove the server from the list of servers.Once you’ve entered the server information, tap the Save button ( ) to save the server setting.
) to save the server setting.From the Login Settings Servers page, once you have servers defined, you can select one of the server cards and a set of icons will appear on the bottom of the server card:

• The pencil button () will open the editor for the selected server card and allows you to change information about the server connection.
• The trash can button () will delete the server from the OMA server configuration.
) will delete the server from the OMA server configuration.• The check mark button () will test the server configuration and let you know if the server is reachable.
• The information button () will get detailed information about the application, the application server, and the mobile server.
Login Settings App Tab
The App tab allows you to set up certain setting that may be available to you.
• User Interface Scaling: Based on the type of device you are using, you will be able to adjust the OMA user interface scale to better fit your device (such as a phone verses tablet). This section will either provide instructions about how to scale the application or will provide an area to set the user interface scale.
If you are on an Android or iOS device, on initial launch of the application after installation, OMA will detect the size and resolution of the device and will automatically set this value. Once set by OMA, you can override the automatic value and it will remain at your specified value for future launches of the application. If you would like to return to the OMA determined scale, set this value to 99.99, and when you return to the login screen, OMA will set it again. Large screen devices will most likely get this value auto-set to scale value of 100.
• Enable Extended Debug Logging: This check box, when selected, will set OMA to create debug logs that may be used when reporting issues to the application support team.
• Allow Server Selection on Home Screen: This option enables the drop‑down list of servers that you may connect to. If not enabled, only the default server will be displayed on the login screen.
• All Jail Broken or Rooted Device to Run OMA: Jail‑broken or rooted devices are normally not allowed to run OMA, but this may be enabled for development and testing because emulators would otherwise be disallowed. This option may be removed from OMA by your project team so production users would not be able to change it.
• Enable IDCS Login: This check box, when selected, allows the use of the Oracle Identity Cloud Service (IDCS) login. This will be applicable in a future release of OMA when it supports IDCS logins.
• OMAHttpBridge URL - request: Specifies the RESTful service URL to request any messages from third party applications to be processed.
• OMAHttpBridge URL - notloggedin: Specifies the RESTful service URL to inform third pary applications that the OMA user is not logged in.
• GPS Polling Interval (Zero to Disable): Sets the interval in seconds when OMA should check the device GPS coordinates.