Understanding Switching in Flex Operations
Switching sheets may be created, edited, and instructed using Flex Operations. The Switching Sheet List is used to create and open planned and emergency switching sheets. Select Switching Sheet List from the Selection Tool to open the Switching Sheet List.
Switching Sheets display a subset of the tabs shown in the NMS Web Workspace client. The tabs included in Flex Operations are Request, Steps, External Documents, Safety Documents, and Tracking/Audit Log. See “Web Switching Sheets” for details on the included tabs.
Understanding the Switching Sheet List
Once opened, the Switching Sheet List displays the Switching Sheets that are in the system.
From the Switching Sheet List, you may open an existing sheet or create a new emergency or planned sheet.
• To open an existing switching sheet, you may either right-click and select Edit... from the context menu or double‑click the sheet's row.
• To create a new switching sheet, from the File menu, select New, and then select either the Planned or Emergency switching sheet option.
Understanding Switching Sheets
Switching Sheets in Flex Operations are very similar to Switching in Web Workspace. The major differences are in how certain actions are performed. See “Web Switching Sheets” for more information on switching sheets and their components.
The switching sheets have a tabbed layout:
• Request: The Request tab contains information about the event (whether an outage or a planned switching operation). See “Completing the Request Tab” for details on the fields available on the Request tab.
• Steps: The Steps tab allows you to add the operations for the switching job.
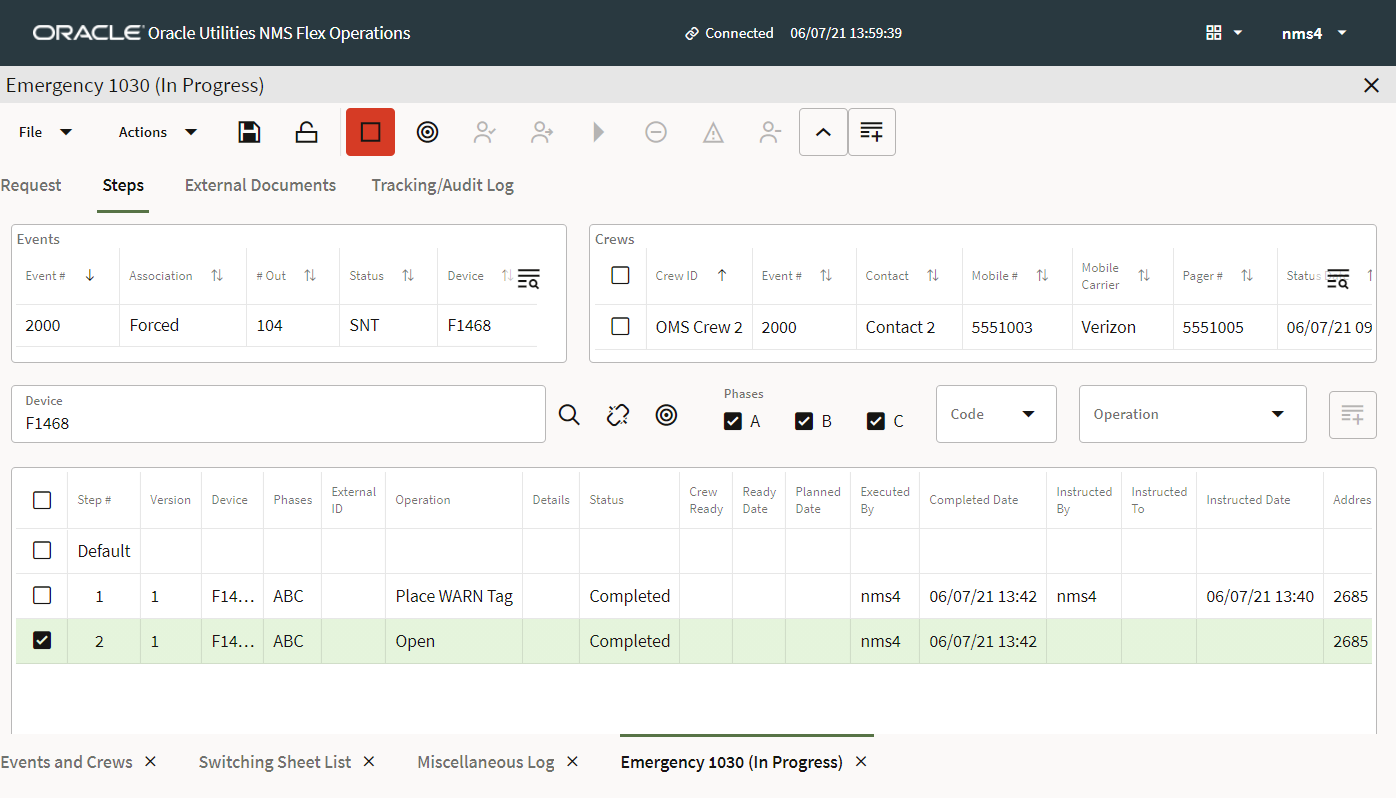
• Toolbar
The toolbar screen capture displays the actions available. The toolbar provides the following options (toggle states shown):
a. Save
b. Lock / Unlock
c. Record / Stop Recording
d. Focus the Map
e. Ready for Instruct
f. Instruct
g. Abort Step
h. Fail Step
i. Uninstruct Step
j. Show/Hide Event and Crew lists (panels). When enabled (shown), the button will be outlined.
k. Show/Hide Manual Step Addition (panel). When enabled (shown), the button will be outlined.
• Event and Crew List: Panel contains tables that allow you to see the events and crews associated with the sheet. Click the toolbar button to toggle between showing and hiding the panel.
• Manual Step Addition: Panel allows you to add step details manually; this is very useful in Planned Switching where you will need to add each step manually. Click the toolbar button to toggle between showing and hiding the panel. 
• Safety Documents: The Safety Documents tab allows you to create, delete, and edit safety documents that are associated to the switching sheet. Select New Safety Document followed by the safety document type from the Actions menu to create a new safety document for the switching sheet.
While the safety document is in the New state, the document can be marked as Deleted. Select the Delete Safety Document option from the Actions menu to initiate this feature.
Select the Edit Safety Document... option from the Actions menu to open the safety document. The safety document can be edited, state transitioned, and/or verified.
• External Documents: The External Documents tab allows you to attach files to the switching sheet. Select Add Attachment from the Actions menu to open the Attachment dialog box. You can either drag the file you want to add to the dialog box or click the + sign to open Windows Explorer and browse for the file. You can add a description, if desired.
• Tracking / Audit Log: The Tracking / Audit Log includes the state transition options available to the sheet type that is loaded. It also shows the changes to the switching sheet over time. A comment field and an Add button are also included for manually adding audit log entries.
Understanding Planned Switching Sheets in Flex Operations
Unlike the NMS Web Workspace client, the Flex Operations client does not have a study mode that would allow you to record steps in a study session. Consequently, you will need to manually add steps to the switching sheet.
To add steps, do the following:
1. Display the Manual Step Addition panel.
2. Add steps by:
a. Selecting a device by doing one of the following:
• Enter the device ID in the Device field.

• Enter part of the device ID in the Device field, click the Search button ( ), and select the device from the returned list of possible matches. For example, search for S290 and select S2902 from the pop‑up list.
), and select the device from the returned list of possible matches. For example, search for S290 and select S2902 from the pop‑up list.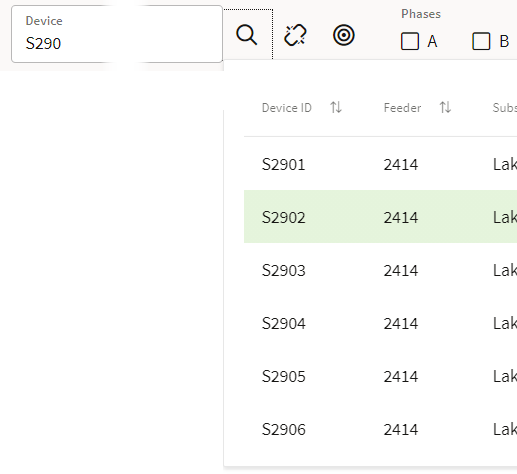
• Select the device in the Map and click the Link button ( ).
).
).3. Choose the Phase(s) to operate.
4. Choose the Code or the Operation to perform.
5. Click the Add Step button ( ) to add the operation to the sheet.
) to add the operation to the sheet.6. Repeat for each step.
You can also add a step by the Default step, right-click, and select Insert Blank Step from the Organize context menu.
To edit steps, do the following:
1. Select the step, right-click, and select Edit Step....
2. In the Edit Step dialog box, enter the data for the operation. When done, click OK or click Cancel to close the dialog box without saving).
Understanding Emergency Switching Sheets in Flex Operations
You can record operations as they are instructed or completed. A new Emergency Switching Sheet opens in recording mode so any actions taken in the Map will be recorded as steps.
Note: When you toggle recording off, any switching actions taken in the Map will be recorded in the Miscellaneous Log.
You can complete, instruct, abort, and cancel steps. Note that when you add an Instruct step, you will need to complete the step before adding the next step.
See “Emergency Switching” for information on creating and executing Emergency Switching sheets.
Understanding Step State Transitions in Flex Operations
Switching sheet steps can be transitioned to the states Instructed, Uninstructed, Completed, Aborted or Failed. These actions can be initiated from the right-click context menu or from the sheet's toolbar. The sheet's toolbar will only show the step related actions when the Steps tab is selected.
When working with aggregate steps, Flex Operations is slightly different than aggregate steps in Web Workspace. In Flex Operations, the parent step is instructed and each child step has to be selected and completed. In Web Workspace, all step state transitions for aggregate steps are initiated from the parent step. Uninstructing, aborting, and failing of aggregate steps are all initiated from the parent step.
Safety state transition steps, when completed, will display a dialog version of the associated safety document. This dialog will not have a toolbar, but will have Execute and Cancel button options. These buttons are used to complete the requested state transition or to cancel it. This is the same for safety state transition steps that are completed from Web Workspace.
Understanding the Switching Sheet 's Events List
The Events list on the Flex Operations switching sheets are a list of events linked to the switching sheet. These same events will show up on the switching sheet in Web Workspace. In Flex Operations, the user is restricted to showing Event Details for the switching event and showing the event on the Map.
Understanding the Switching Sheet 's Crews List
The Crews list on the Flex Operations switching sheets are the list of crews assigned to the switching sheet or to the events listed in the Events list. You can manually assign crews to the switching sheet by right clicking the Crews table and selecting the Select Crew... option. This will display the Select Crew dialog where you can select one or more crews to assign to the switching sheet.
Crews that have manually been assigned to the switching sheet can be removed from the list by selecting them and choosing the Remove Crew option from the right-click context menu.
The selected steps' Instructed To field can be updated with crews after the steps have been completed by using the Update Instructed To in Steps option from the right-click menu. To assign incomplete steps to crews, select the step followed by one or more crews from the Crews List. This will automatically populate the Instructed To field for the selected steps.
Understanding the Manual Steps Addition Form
The Manual Steps Addition form works the same as it does from the Web Workspace switching sheets. See “Adding Steps Manually” for more details.