Understanding the Selection List Panel
The Selection List panel displays when you make a selection in the map or tap the open/close selection panel menu icon:

The Show Lines check box will allow you to show or not show electric line in the selection list. The Selection List allows you to select/deselect all object in the selection list, show the count of selected objects, and has a selection list menu:
• The Highlight Selected Feeder will examine the list of selected objects for feeder names and highlight the feeders in the map. If this is the first highlighted feeder, all other feeders will be un-highlighted.
• Unhighlight Selected Feeder will examine the list of selected objects for feeder names and unhighlight the feeders in the map.
• Highlight All Feeders will reset all feeders to normal highlighting, no feeders will be unhighlighted.
• Mark Lines Assessed will send the selected list of electrical lines to the NMS server identifying them as having been assessed.
• Unmark Lines Assessed will send the selected list of electrical lines to the NMS server identifying them as not having been assessed.
The lower section of the selection panel contains a list of selected objects with a check box next to each selection object. This check box can be used to highlight/unhighlight the object in the map and to make the selected object a target to the top section actions (highlighting feeders, marking objects as assessed, and so forth).
If you select one of the objects in the list, a set of icons will appear under the selected object representing actions that may be performed on the object:

The potential action icons are as follows:
• Displays a panel of attributes about the object.

If you select Show Source Attributes, you will get additional attributes that may help with debugging or support (for example, symbol details, object handle, and so forth):

Opens the devices native map/navigation system to the selected object.
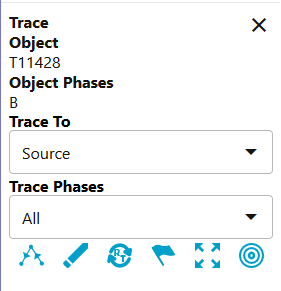
Brings up the trace panel, which allows you to perform predefined traces and inspect the results. See “Executing Traces” for more information on trace options.
Brings up the list of customers under the selected device.
Brings up the control tool for the given device follow by the Look Ahead tool:


Focuses the map to an alternate view of the given object. Typically used to navigate the map between the geographic world and an internal view (substation).
Focus the geographic map on the selected object.
 Focus the map on the object in a general schematic.
 Focus the map on the object in a single circuit schematic.
 Confirm fault location
Mark fault incorrect
Edit Event or Damage Report or Condition Details
Open Patrol Event Details
Assign Event to me
Mark Probable Event as a Real Event
Delete Condition (tag, note, …)
Brings up an extended menu of self-described icons:
