Understanding Common Features
There are several features that are common to nearly all Oracle Utilities Network Management System modules and tool windows.
Understanding Module Window Configuration
All NMS modules (such as Web Workspace, Web Call Entry, Storm Management, and so forth) have a general window layout with a title bar, menus, and toolbars. The menu bar provides options specific to the module, while the User menu provides options that are common to all modules.

NMS module window without any tools displayed.
Annotations:
Annotations:
1. Title Bar 2. Menu Bar 3. Toolbar | 4. User Menu 5. About Link 6. Help Link |
Module Window Configuration
1. Title Bars display the name of the module, tool, or dialog box.
2. Menu Bar provides access to actions you may take in the module. Menu options that are followed by an ellipsis […] indicate that the option opens another window or dialog box.
3. Toolbars provide quick access to common functions. Toolbar buttons are used to perform an action or open a window. Button actions often correspond to Action menu options.
4. User menus provide options for setting preferences and logging out.
5. About link opens a dialog box with information about the module and system.
6. Help menus provide access to information relevant to that window, including context sensitive online help.
Using Date/Time Pickers
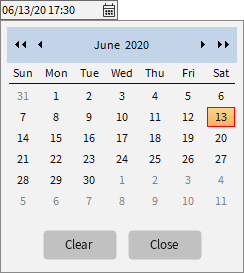
Date/Time Pickers allow you to select the date and time for a date/time field. If you click the Calendar button, the Calendar control opens to allow you to easily select the desired date. You also have the option of clicking the numbers or hash marks in the fields and editing them.

• The Clear button will clear any date and time in the date-time field leaving hash marks: 

• The Close button will close the Calendar control without making any changes.
You may increase or decrease the values in the field by clicking the up and down Nudge buttons ( ) that are below the numbers, by using the up and down arrows on your keyboard, or by using your mouse scroll wheel.
 ) that are below the numbers, by using the up and down arrows on your keyboard, or by using your mouse scroll wheel.
 Note: Where a date or time field is configured to default to larger incremental changes, two sets of Nudge buttons are displayed.
The numbers will increment by a configured value; for smaller increments, press and hold the Ctrl key while using the mouse or keyboard or use the thinner nudge buttons.
When you use a keyboard arrow or the mouse scroll wheel, the arrow beneath the value corresponding to the arrow or scroll direction will be highlighted.
