Understanding the Selection and Traces Panel
The Selection and Traces panel is displayed when you select one or more objects on the Map, or tap Selection Panel icon.
The panel has 2 tabs – Selection and Trace.
Selection Panel
This panel displays information about the selected object(s) in the Map. From here you can select the required object and perform actions on the object.
• Show Lines: When selected, selected conductors are displayed in the list of objects as well as devices and other assets
• Select All: Selects or deselects all items in the list
• Selection Options: Tap  to access Feeder Highlighting Options:
to access Feeder Highlighting Options:• For a selected device or conductor, tap Feeder Highlights ( ) then click Highlight Feeder. Other feeders will be displayed less prominently, but still be selectable (so you can highlight additional feeders).
) then click Highlight Feeder. Other feeders will be displayed less prominently, but still be selectable (so you can highlight additional feeders).• To remove or clear feeder highlighting, click to select the feeder then choose Unhighlight or Clear Highlighting. You can also clear highlighting from the Highlighting indicator displayed in the top-right of the Map.
Perform Actions on a Selected Object
Tap on an object in the list to display a list of actions.
Common actions are displayed as icons beneath the selected item:

Access to all related actions are available by tapping on the  icon:
icon:
icon: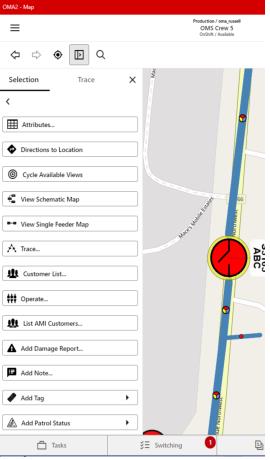
The potential list of actions is here:
• Attributes: Displays the Attribute List for the object.
• Directions to Location: Opens the devices native map/navigation system to the selected object
• Cycle Available Views: Focuses the map to an alternate view of the given object. Typically used to navigate the map between the geographic world and an internal view (substation).
• View Schematic Map: Focuses the Map on the object’s position in the schematic network view
• View Single Feeder Map: Focuses the Map on the object’s position in the Single Line network view
• Trace…: Switches to the Trace tab, which enables you to perform traces. See Traces, below
• Customer List: – Displays the list of customers downstream of the selected device.
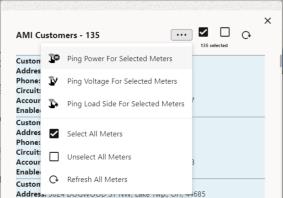
• AMI Customers: Displays a list of customers with smart meters.
• For a selected customer(s) you can send requests (ping) for meter information.
You can select all AMI customers in the list using the icon at the top of the dialog, and then choose the ping type from the icon:
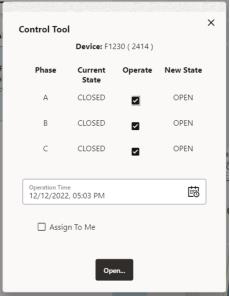
• Operate: Enables you to operate the selected device:
• Select the phases to operate
• Enter the time the device was operated
• Select Assign to Me if you want to add a task to your list of tasks for this device operation.
After tapping Open or Close, the Lookahead dialog is displayed:
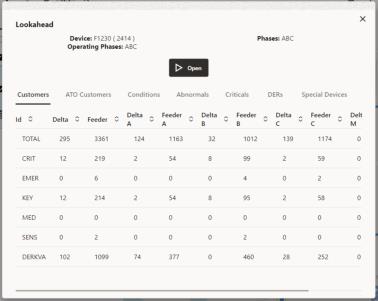
Visually verify the Customers and Conditions, then tap Open or Close to confirm the device operation.
• Add Damage Report: Enables you to create a damage assessment
• Add Note: Enables you to add a note to the Map
• Add Tag: Enables you to add different tag types, as per your configuration.
• Add Patrol Status: Enables you to add different patrolling conditions.
• Confirm Fault Location: Enables you to confirm a predicted fault location
• Mark Fault Incorrect: Enables you to confirm a predicted fault location as incorrect.
• Open Event: Opens the Event Details for the selected object.
• Open Patrol Event Details: Opens the Patrol Event Details
• Assign Event to me: Assigns the event to yourself
• Confirm Outage: Marks Probable Event as a Real Event
• Delete Condition: Delete Condition (tag, note, …)