Using the Default Restoration Times Tab
The Default Restoration Times tab on the Configuration Assistant window displays the current default restoration time configuration and allows you to modify the ERT values for each device class by control zone.
Note: To change the system-wide default restoration time, see Setting the System-Wide Estimated Restoration Time.
Device/Zone Default Restoration Times Pane
The Device/Zone Default Restoration Times pane provides a tabular view that provides the relationship between a control zone, a device, and the default restoration time that has been set for them.
Columns
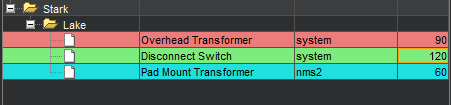
• The Control Zone column displays the control zone name.
• The Device Class column displays the device class name.
• The User column lists the user who configured the default restoration time.
• The Default Restoration Times (minutes) column displays the number of minutes to be used for the default restoration time for this control zone-device class combination.
Buttons
• Add: Opens the Add Default Restoration Time dialog box.
• Remove: Marks the selected default restoration time for deletion.
• Save: Saves any changes you have made.
• Refresh: Refreshes the screen. If you have any unsaved changes, the system asks if you want to save them.
• Export Configuration: Opens the Generated Configuration window, which displays the SQL statements used to generate the current configuration.
Row Highlighting
The table uses row highlighting to indicate changes that have not been saved. Red indicates that the row is marked for removal, green indicates the row has been edited, and light blue indicates that the row has been added.
Adding a Device/Zone-Based Default Restoration Time
To add a default restoration time for a specific device class-control zone combination, follow these steps:
1. Click Add. The Add Default Restoration Time window appears.
2. Click the Control Zone Selection button to display a list of control zones.
3. Select a Control Zone and click OK.
4. Click the Select button to display a list of device classes.
5. Select a device class and click OK.
6. Modify the Restore Time (minutes) field, as necessary.
7. Click OK. The Device/Zone Default Restoration Times pane refreshes with a new row, which is highlighted in light blue to show the addition.
8. Click Save to commit the addition.
Note: If you decide against adding the new Default Restoration Time, click Refresh. The system will prompt you to save changes; click No.
Modifying a Device/Zone-Based Default Restoration Time
To edit an existing default restoration time, do the following:
1. Double-click the Default Restoration Time cell to open it for editing.
2. Edit the value.
3. Click anywhere outside the cell to finish the edit. The row will be highlighted in green to indicate the pending change.
4. Click Save to commit the change.
Note: If you decide not to save changes, click Refresh. The system will prompt you to save changes; click No.
Deleting a Device/Zone-Based Default Restoration Time
To edit an existing default restoration time, do the following:
1. Select the row to be removed.
2. Click Remove. The row will be marked for removal pending saving changes. The row will be highlighted in red to indicate the pending change.
3. Click Save to commit the change.
Note: If you decide against deleting the row, click Refresh. The system will prompt you to save changes; click No to confirm the refresh.
Saving an Exported Default Restoration Time Configuration
To generate and save SQL statements for the current state of the configuration associated with the Default Restoration Times tab, complete the following steps:
1. Click the Export Configuration... button beneath the Device/Zone Default Restoration Times table.
2. Once the generation is finished, the Generated Configuration dialog box appears.
• To save the generated SQL statements to a file, click Save. The Save Configuration File dialog box appears. Type a name for the file into the File name field. The Save Configuration File dialog box disappears.
• To print out the generated SQL statements, click Print. The Print Preview dialog box appears.
• Click the Cancel button to close the Generated Configuration dialog box.