2.1.1.1 Create Account
This topic describes the systematic instructions to create an account for an existing customer.
- From Home screen, under Menu, click Corporate DDA. The Corporate DDA pane displays.
- Under Corporate DDA, click Operations.The Operations pane displays.
- Under Operations, click Services. The Services pane displays.
- Under Services, click Account Creation. The Account Creation screen displays.
- Alternatively, you can search the configuration via Menu Item Search field. Specify the operation name Account Creation and select Corporate DDA-->Operations-->Services-->Account Creation.The Account Creation screen displays.
Figure 2-1 Account Creation for Existing Customer
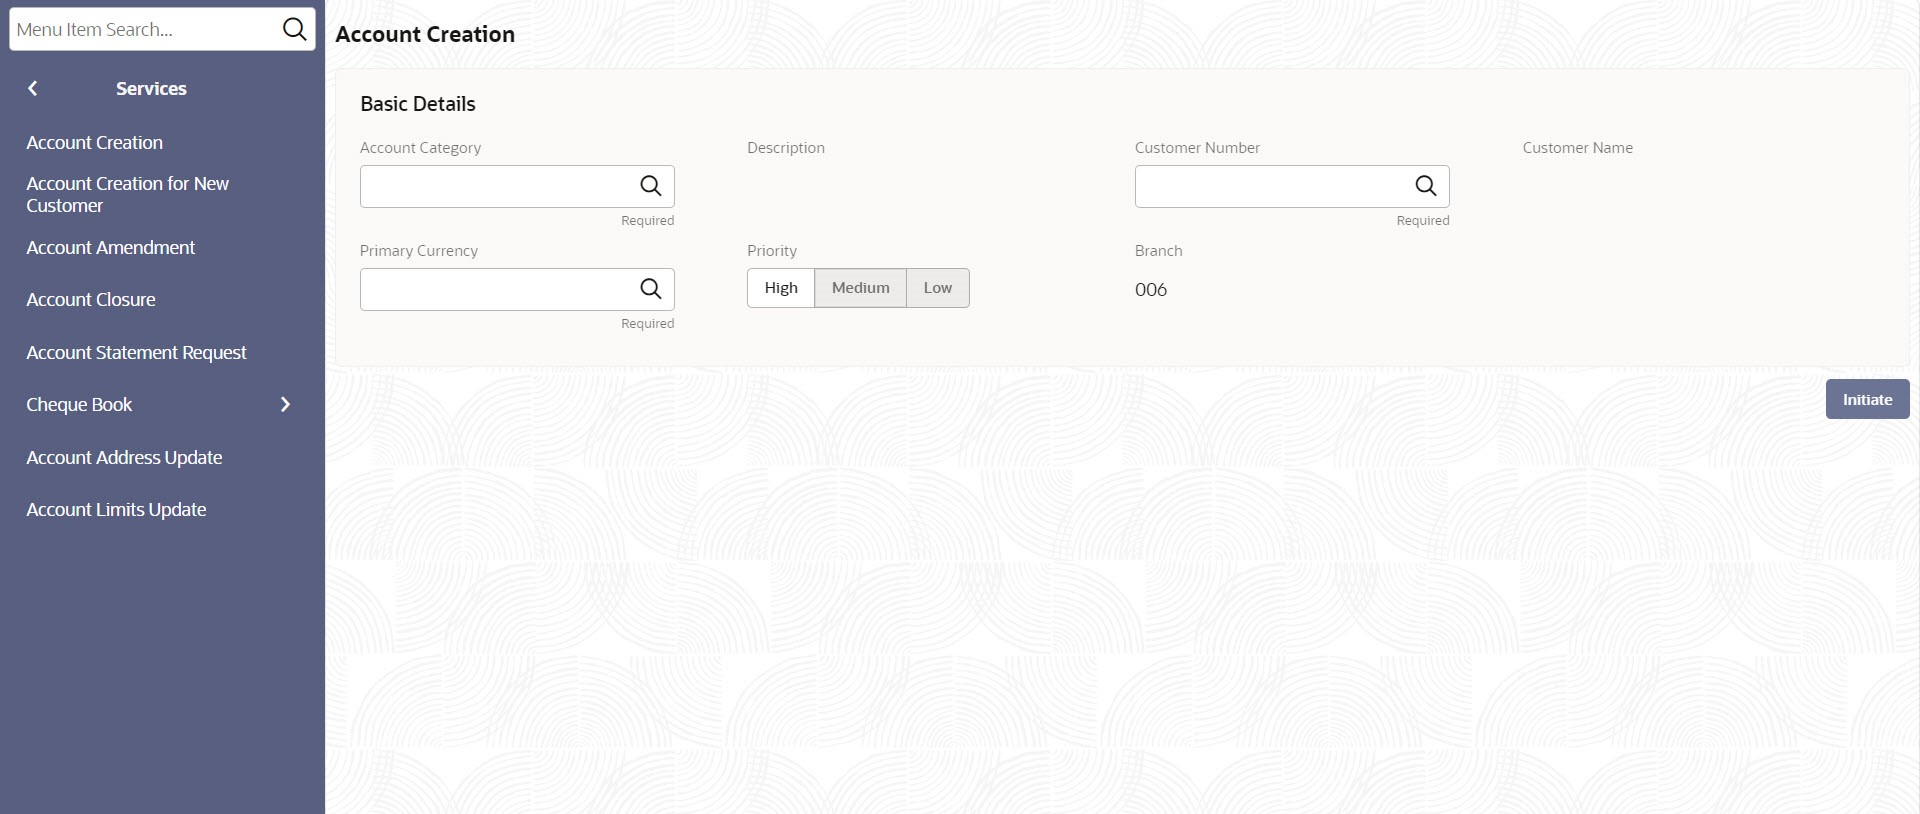
- Specify the fields on the screen.
For more information on fields, refer to the field description table below.
Table 2-1 Account Creation - Field Description
Field Description Account Category Specify the account category name from the list. Description Specify the description for the account category. Customer Number Specify the CIF number of the customer to whom the account is to be created. A list of valid customer codes is displayed. CIF number can be part of the account mask. Customer Name This field displays the customer’s name. Primary Currency Specify the currency of the customer account. A list of all the currencies maintained in the system is displayed from which the currency can be selected. It denotes the currency in which the account can transact. Priority Specify the priority from the options – - High
- Medium
- Low
Branch This field displays the branch code of the account. - Click Initiate.The data segment screens, which are manually configured and listed in the left tab are as displayed below.
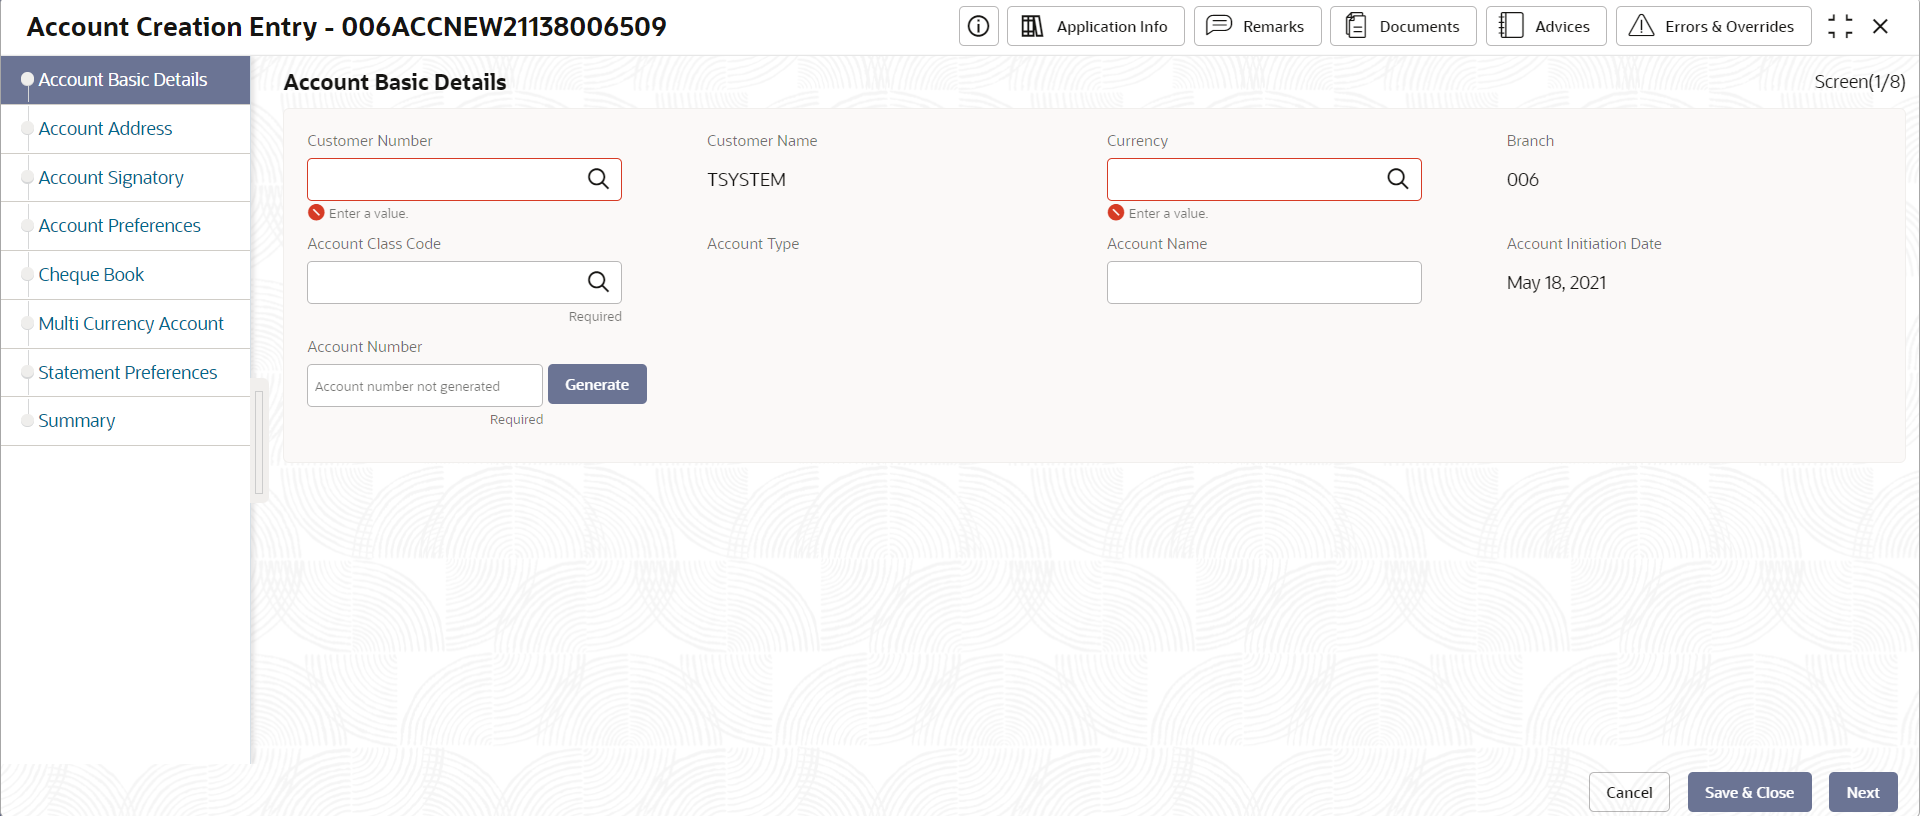
- Account Basic Details
Figure 2-2 Account Creation - Basic Details
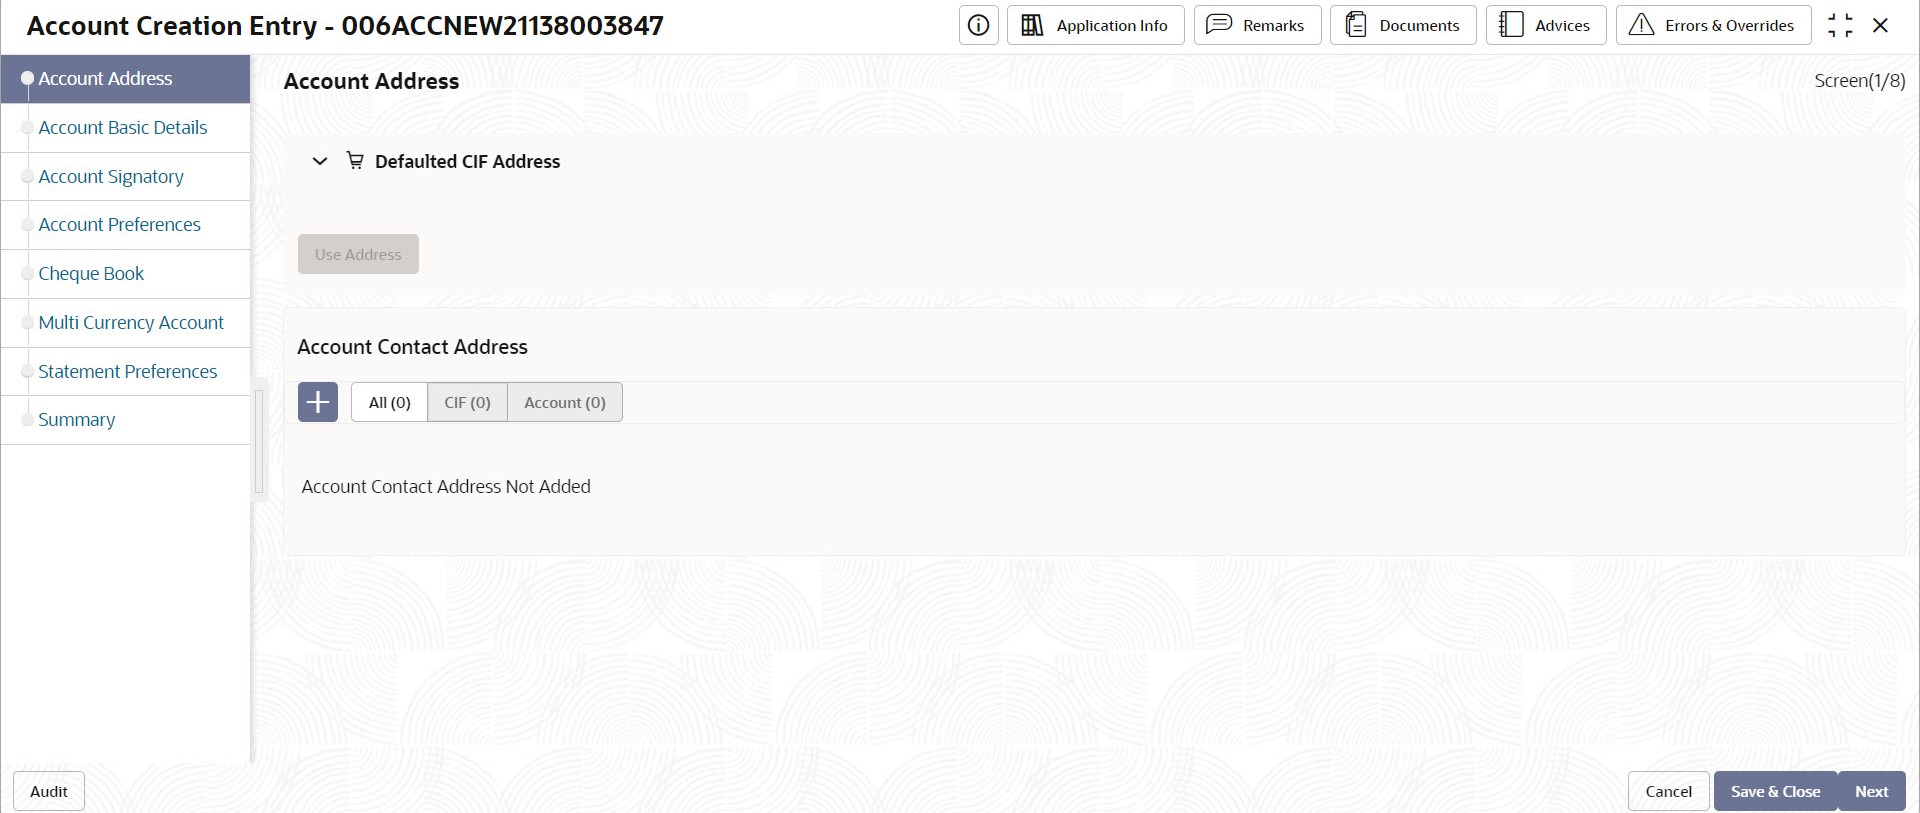
- Account Address
Figure 2-3 Account Address
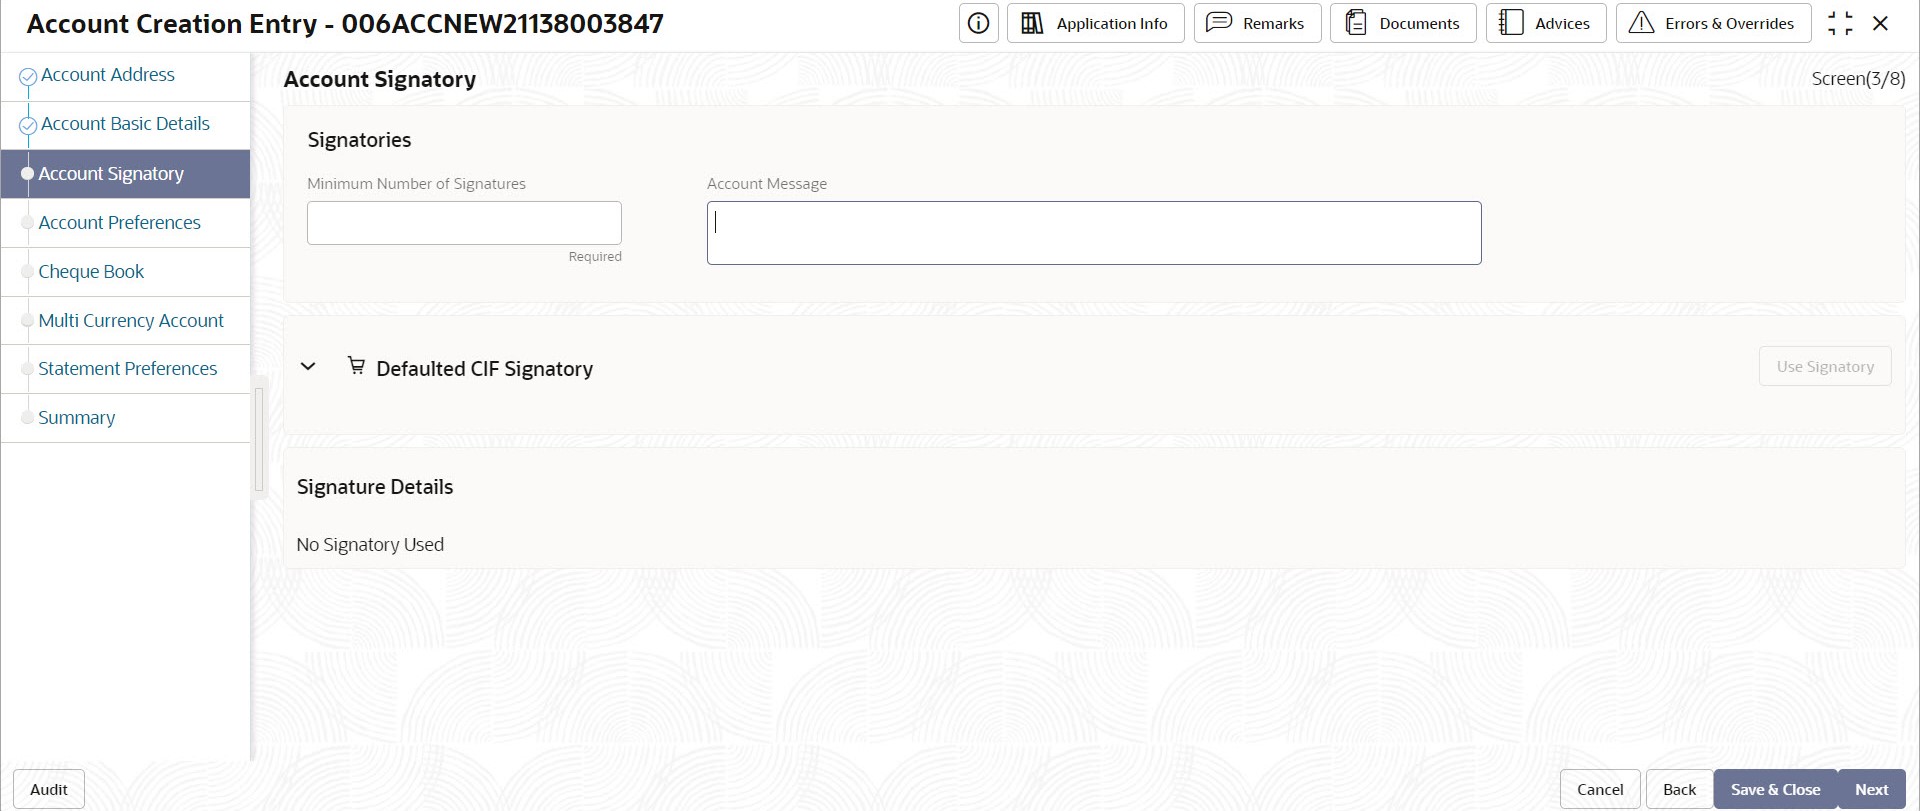
- Account Signatory
Figure 2-4 Account Creation - Account Signatory
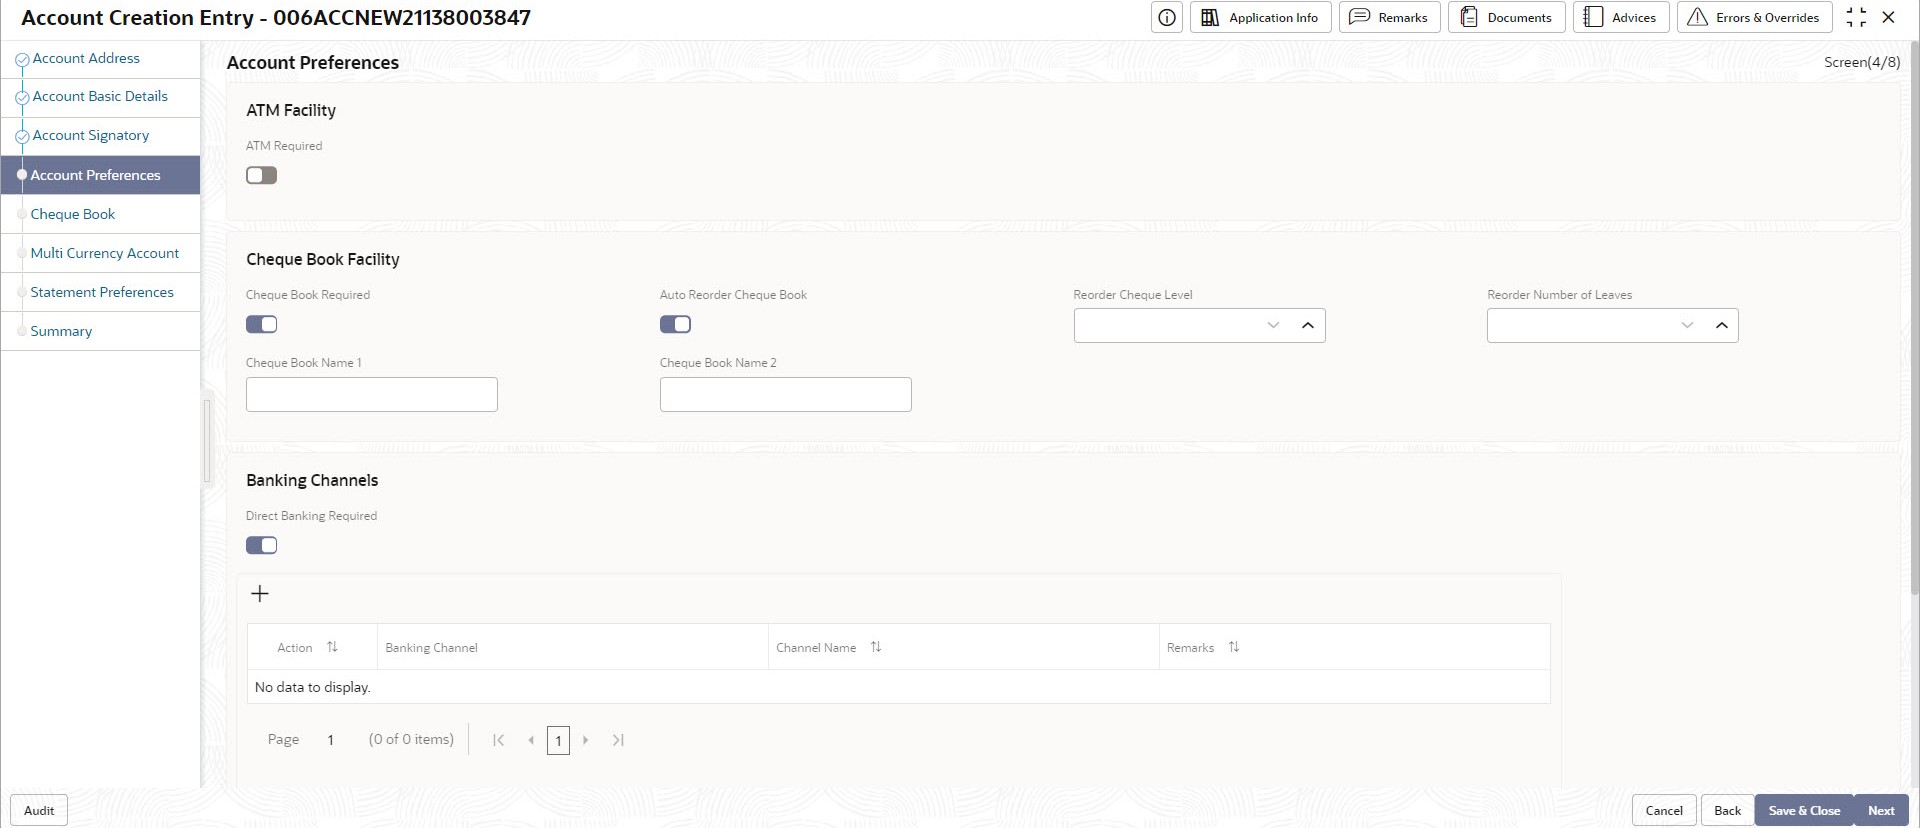
- Account Preferences
Figure 2-5 Account Creation - Account Preferences
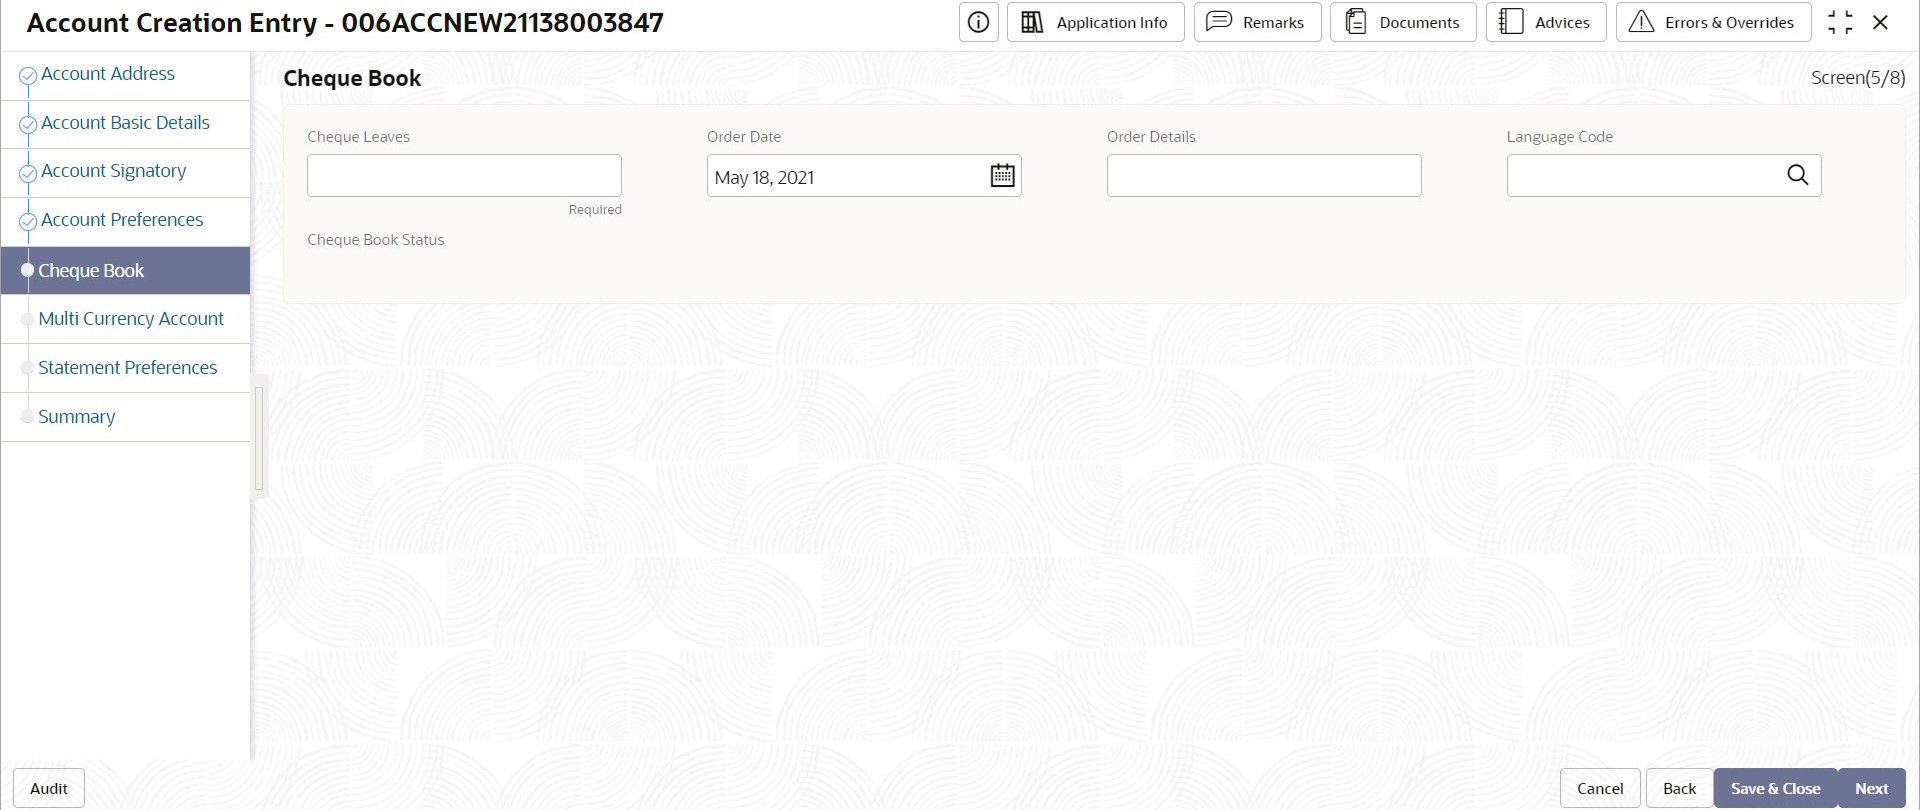
- Cheque Book
Figure 2-6 Account Creation - Cheque Book
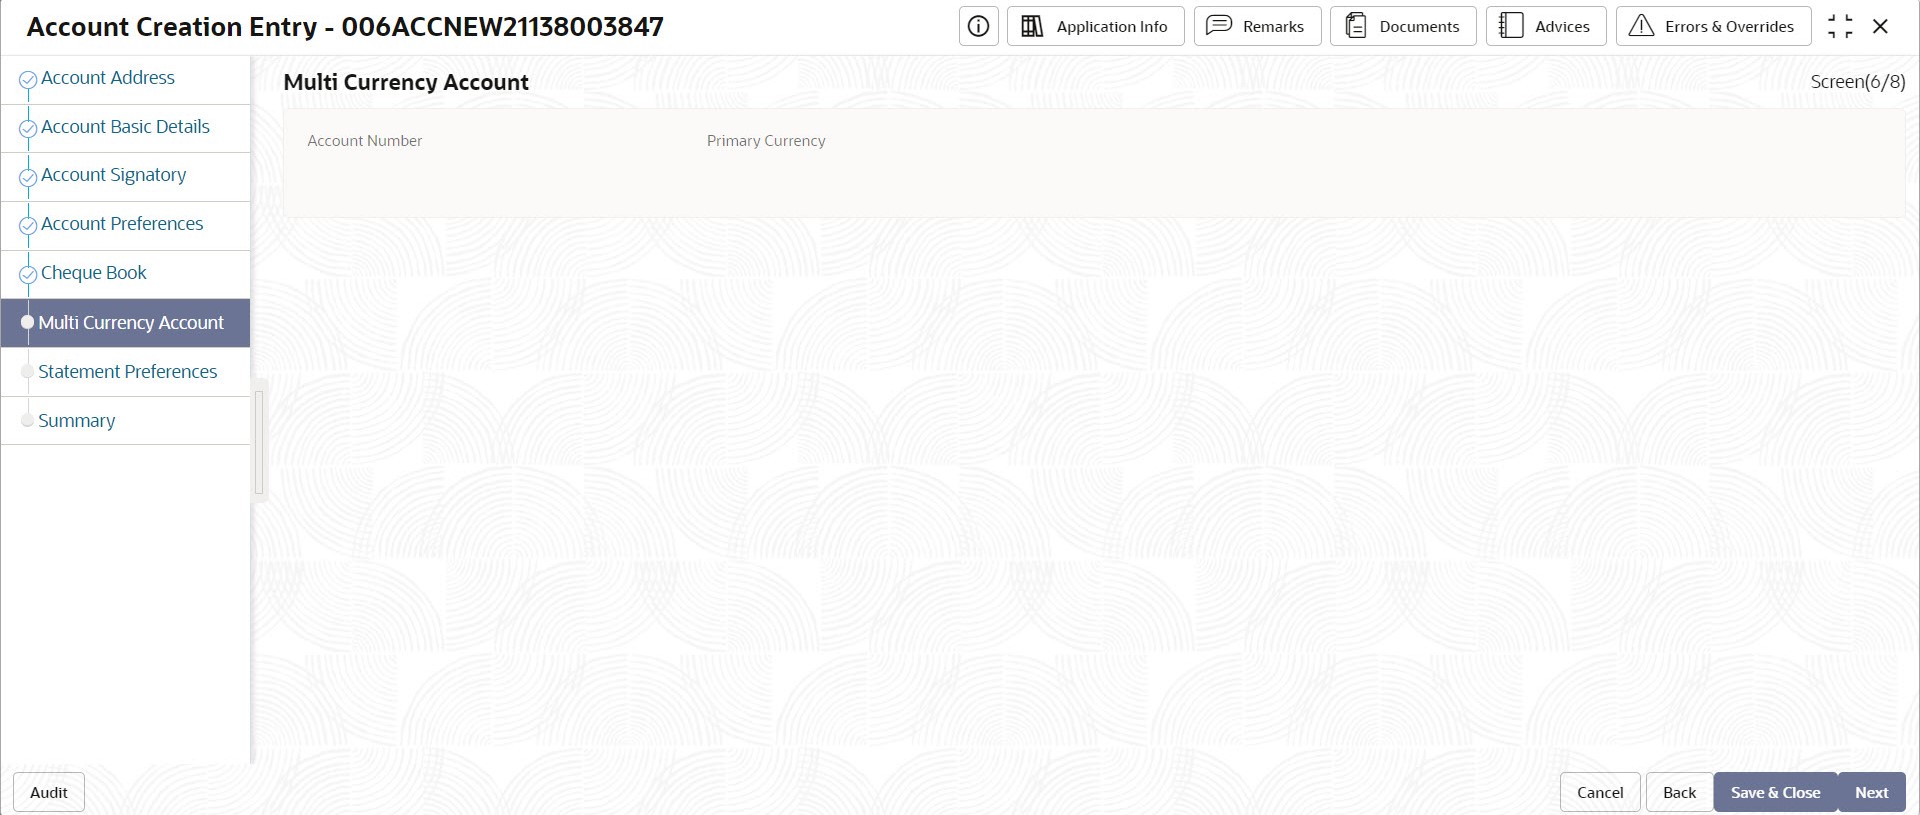
- Multi Currency Account
Figure 2-7 Account Creation - Multi Currency Account
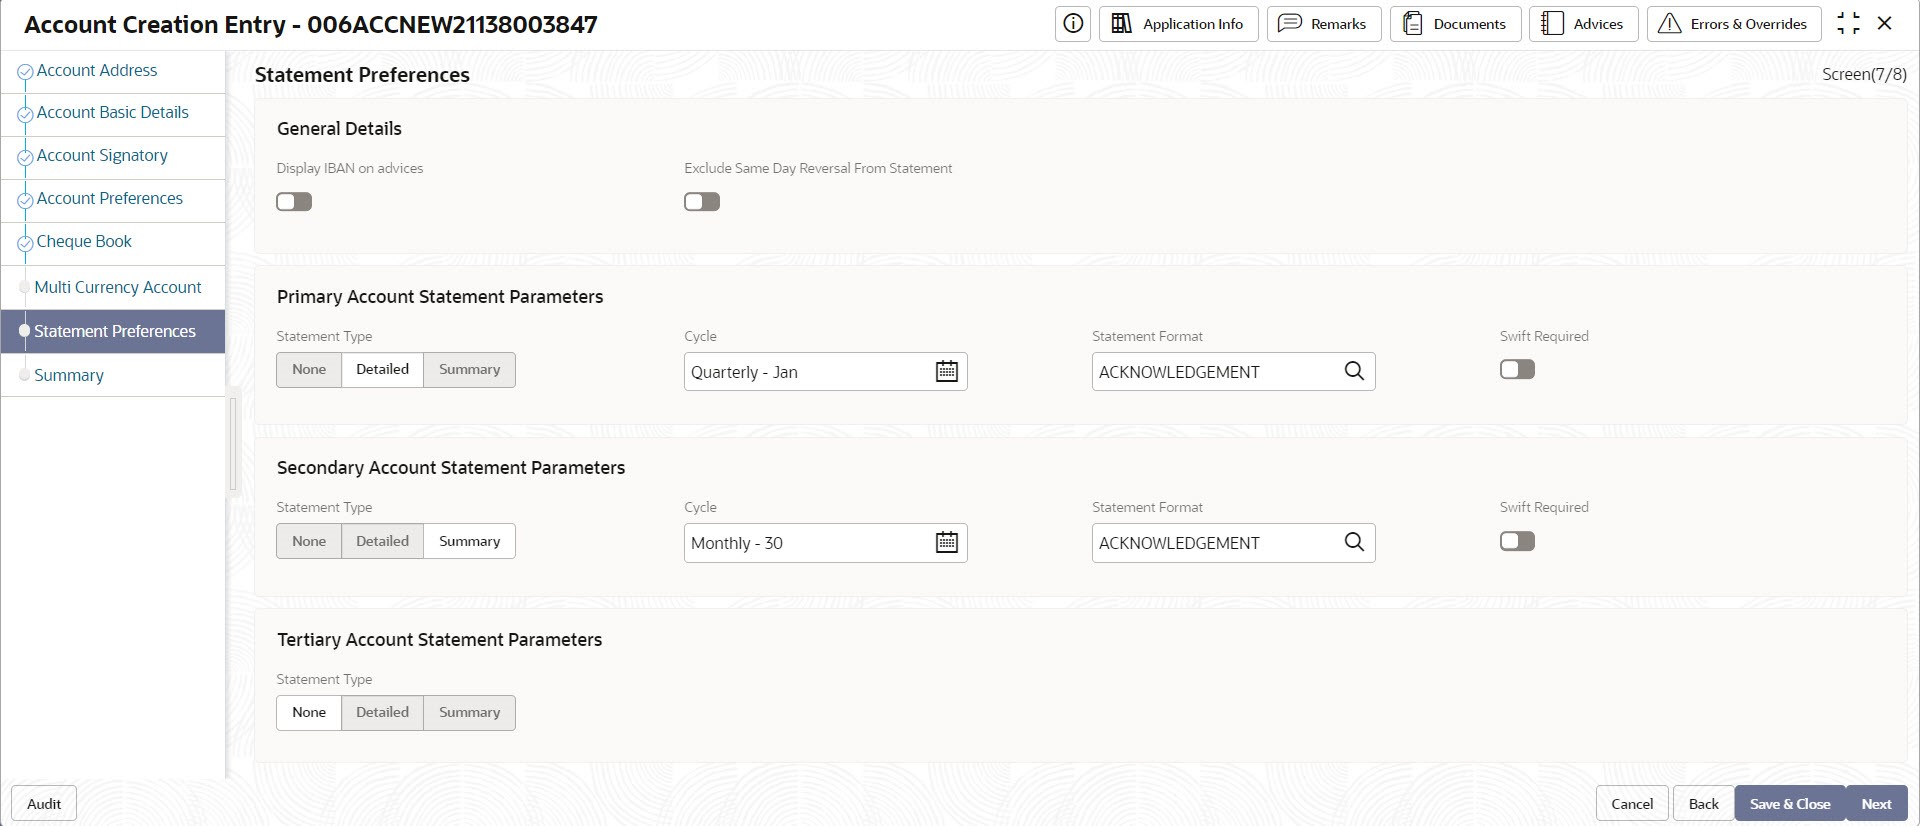
- Statement Preferences
Figure 2-8 Account Creation - Statement Preferences
- Account Basic Details
- Specify the fields on the screen.
For more information on fields, refer to the field description table below.
Table 2-2 Data Segments - Field Description
Field Description Account Basic Details Customer Number This drop-down list displays the CIF number of the customer to whom the account is to be created. The customer from "Initiate" is displayed. However, you can edit the information. Customer Name The customer name is displayed. Currency Specify the currency of the customer account from the drop-down list. The currency from "Initiate" is displayed. However, you can edit the information. Branch The branch code of the account displays. The current branch is defaulted. Account Class Code Account class is an entity which has common fields. Specify the customer account's account class from the list. Customer accounts of the bank can be classified into different groups and each group is called as an account class. For each class, you can define certain common fields applicable to all accounts in the class. Account Type The type of the account is displayed. The type is defaulted from Account Class. Account Name Specify the customer’s complete name which can be modified, if required. Account Initiation Date The date on which the account has been created displays. It defaults to the system date. Account Number Customer can have several accounts. The structure of the account number is specified in the customer account mask maintained in the Bank or Branch parameter screen. An account number can either be auto generated by the system or can be manually specified by the user. In a manual account number generation, the account mask can contain account class, customer code (CIF number), account code, serial number or currency as defined in the customer account mask. The last constituent of the account number is always a system generated check digit (either alphabetical or numeric depending upon the mask defined).
You cannot alter the relative position of the constituents of customer account (as defined in the mask) while maintaining actual customer accounts.Account Address Account Contact Address Specify the account contact address details in this section. Address Type Specify the type from the drop-down list which uniquely relates the address to the customer by its type. The address required for corporate address type is configurable. - HOA → Head Office
- ROA → Registered Office
- BOA → Branch Office
- COA → Communication Address
Department Specify the department which identifies a division of a large organization or building. Sub Department Specify the sub-division of a large organization or building. Street Name Specify the name of a street or thoroughfare. Building Number Specify the number that identifies the position of a building on a street. Building Name Specify the name of the building or house. Floor Specify the floor or storey within a building. Post Box Specify the numbered box in a post office, assigned to a person or organization, where letters are kept until called for. Room Specify the building room number. Post Code Specify the code consisting of a group of letters and/or numbers that is added to a postal Address to assist the sorting of mail. Town Name Specify the name of a built-up area, with defined boundaries, and a local government. Town Location Name Specify the specific Location name within the town. District Name Specify a subdivision within a country sub-division. Country Subdivision Specify a subdivision of a country such as state, region, county. Country Specify the nation with its own government. Account Signatory Minimum Number of Signatures Specify the minimum number of signatories required to endorse an instrument involving the account. If the linked or replicated signatories are less than the specified minimum number, then the system displays an error message. Account Message Specify a brief description about the signatories. It can be related to the name, number and the type of signatory of the customer. A maximum of 4000 characters is allowed in the account message. For example, "This signatory is a joint account holder with Mr. Frazier and Mr. Tim".
Account Preferences ATM Required Select this check box to avail the ATM facility for the account. When it is not selected, the preference is disabled for the account. Cheque Book Required Select this check box if cheque book is required for the account. When it is not selected, the preference is disabled for the account. Auto Reorder of Cheque Book Select this check box for the automatic reordering of cheque book. It is enabled if Cheque Book Required is Yes. Reorder Cheque Level Specify the level at which the reordering of a new Cheque Book should occur. Automatic reordering happens when the unused number of cheque is lesser than or equal to the reorder cheque level. It is enabled when Cheque Book Required and Auto Reorder of Cheque Book both are ‘Y'.
Reorder No of Leaves Specify the number of leaves that is to be reordered for the new Cheque Book. This field is enabled only if Auto Reorder of Cheque Book is ‘Y’. Cheque Book Name 1 Specify the name to be printed on the cheque book. It is the account holder's name and is used for all cheque transactions. Cheque Book Name 2 Specify the name of the joint account holder to be printed on the cheque book; provided that, the customer account is a joint operations account. Max No of Cheque Rejections Specify the maximum number of cheque rejections allowed in the account. It is enabled if Cheque Book Required is ‘Y’. Direct Banking Required Select this check box if the account requires direct banking facility. The system selects this box by default if it is enabled in account class, which can be modified. By availing direct banking facility, you can only view the minimum balance of the account and the system does not allow to perform any other transactions with this facility. Cheque Book Cheque Leaves Specify the number of cheque leaves to be issued. Order Date Specify the date of request for new cheque book. It defaults to system date (application date), if not entered by the user. Order Details Specify any information such as the name of the person who has collected the book, or the details of any special request for additional number of leaves. Language Code Specify the language from the drop-down list. Cheque Book Status The following values are displayed – - Requested (default)
- Generated
- Delivered
- Destroyed
Multi Currency Account Multi Currency Account Number Displays the primary multi currency account number. Primary Currency Displays the currency of the main account number. Statement Preferences Display IBAN on Advices Specify if IBAN should be displayed on advices or not. Exclude Same Day Reversal From Statement Specify if the reversal transaction done on same day should be excluded from account statement or not. Statement Type Specify the type of primary statement. Values are - - None
- Summary
- Detailed
Cycle Specify from the list of values - - Daily
- Weekly
- Fortnightly
- Monthly
- Quarterly
- Semi Annual
- Annual
Statement Format Specify the format in which the account statement should be generated. The list displays advices maintained in Common Core advice maintenance. This field is available only when Statement Type is Summary/Detailed. Swift Required Specify whether statement in swift format is required or not. Default value is No. This field is available only when Statement Type is Summary/Detailed. Swift message Type Specify the swift message type that should be generated. The list displays the swift message type from Type of Type service. This field is available only when Swift Required is set to Yes. - Click Next.The Summary tab displays.
Figure 2-9 Summary
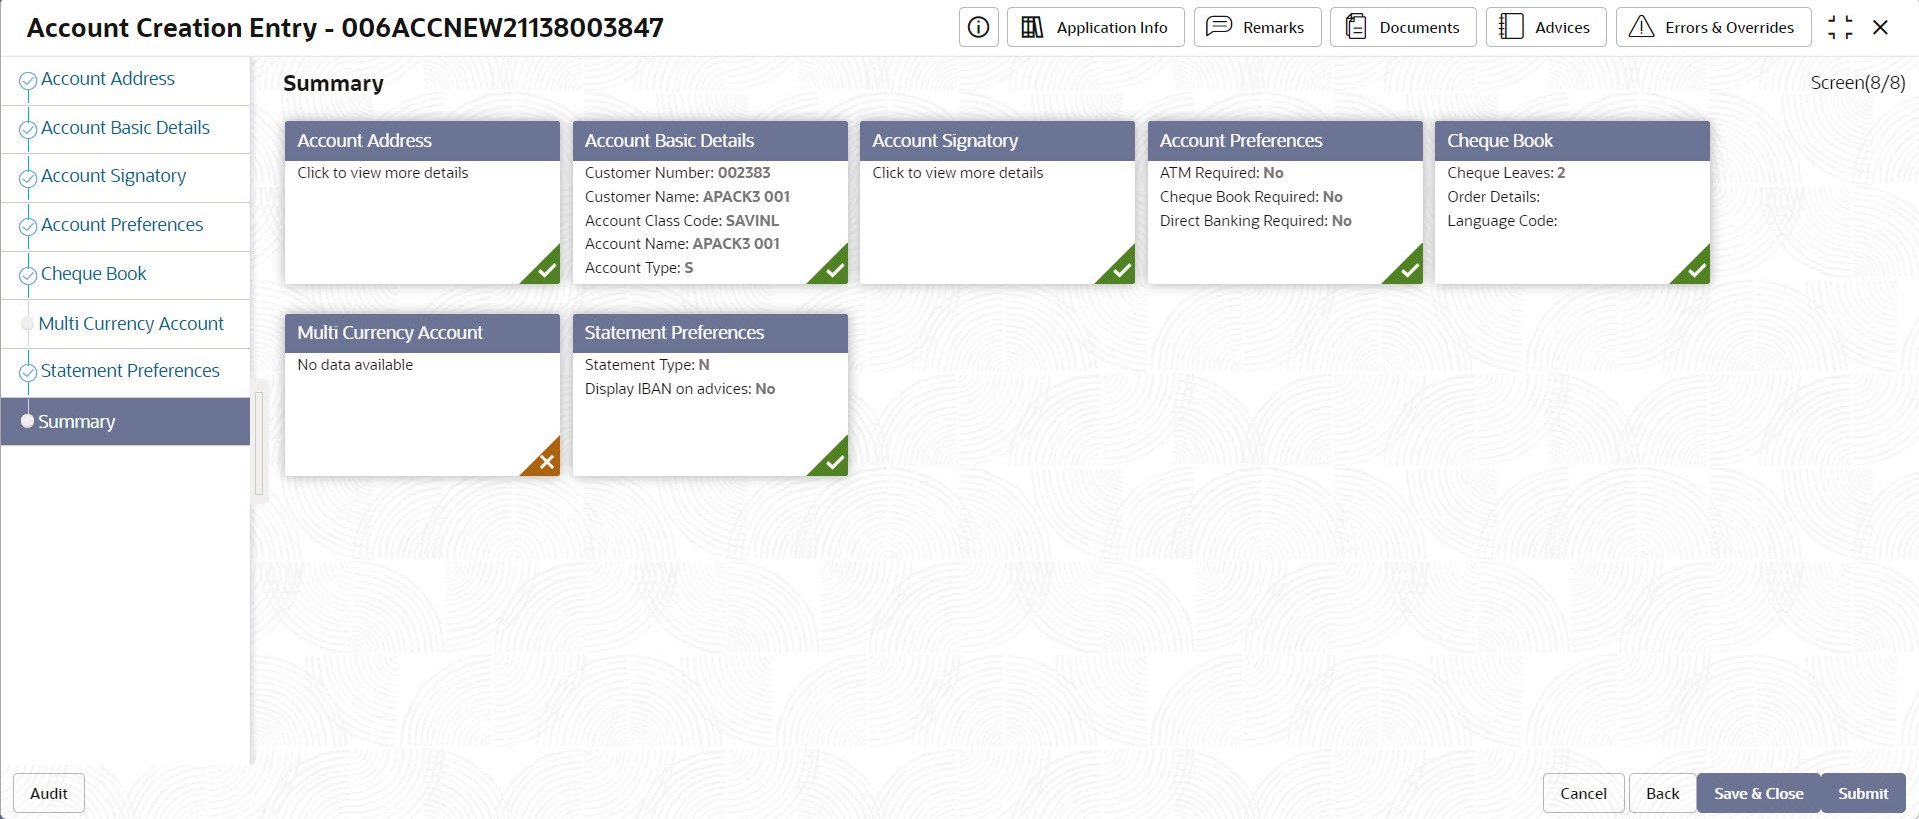
- Click Save & Close/Submit to initiate the account creation or click Cancel to close the details without saving.
Parent topic: Account Creation for Existing Customer