- Nostro Reconciliation User Guide
- Nostro Account Transactions
- Match Entries Manually
4.2 Match Entries Manually
Manually match external transaction statement entries with the corresponding internal transaction entries by following the instructions provided in this topic.
- In the left navigation panel, click Nostro Account
Transactions. Under Nostro Account
Transaction click Manual Matching and
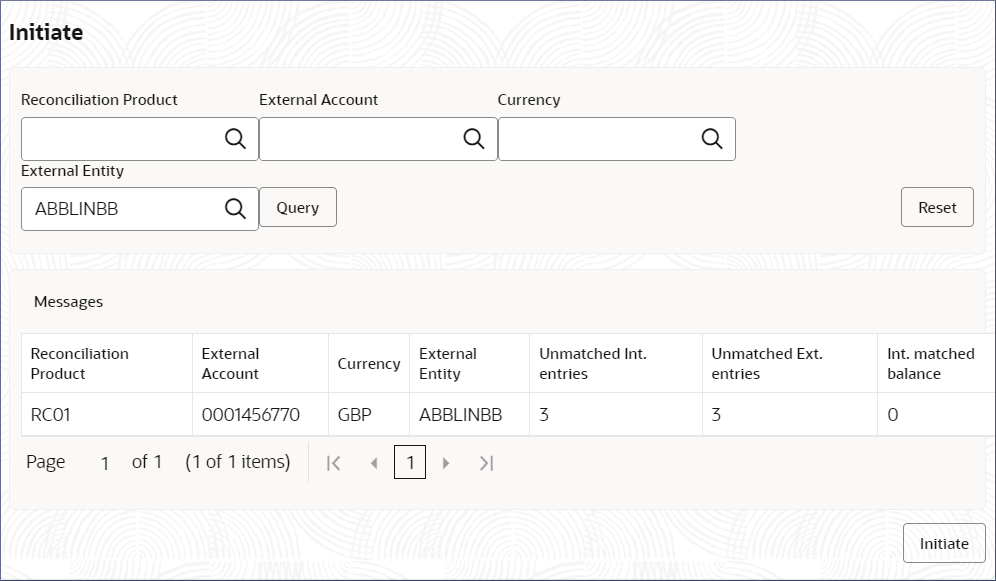
then click Initiate.The Initiate page displays the list of statement messages that contain unmatched entries.
- Specify the following details:
Table 4-2 Field Description table
Field Description Reconciliation Product Specify the Reconiliation Product associated with a transaction. External Account Specify the account code of the external entity. Currency Specify the currency of the external account. External Entity Specify the name of the external entity. - Click Query.The statement message row(s) matching the specified fields display in the Message section.
- To clear the selected fields and query again, click Reset.
- Select the required statement message row and click
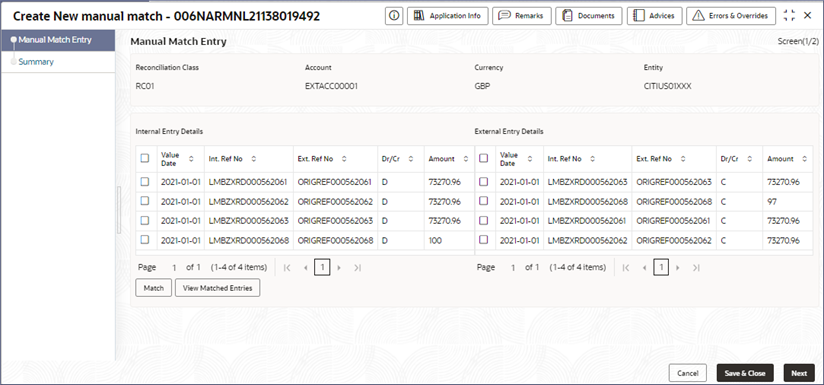
Initiate.The Create New Manual Match <Application Number> page displays the Manual Match Entry tab.
Tip:
Make a note of the Application Number. It is required to identify the task at the entry and approval stages in the matching process, in the Free Tasks page.The rows in the External Entry Details and Internal Entry Details sections are described in the following table.Table 4-3 Column Description table
Column Header Description Value date The value date of the internal and external transaction entries. Internal Reference Number Reference number assigned internally to the transaction. External Reference Number Reference number assigned to the transaction by the external bank. Dr/Cr The transaction type, Debit or Credit.. Amount The transaction amount.
- Click Query.
- Choose one or more entries on the left-hand side to match with entries to choose on the right-hand side.
- Click Match.The Selected Transaction dialog displays.
It lists the selected internal and external entries to match and the Adjustment To Internal Entries section.
- Provide the details described in the following table.
Table 4-4 Field Description
Field Description Adjustment Amount This is populated based on the difference in the internal and external amount entries. Adjustment Date The date on which the adjustment to the entries is to be posted. Adjustment Type Select from the following: - Currency Flux: Adjustment due to fluctuations in the currency.
- Other: Adjustment due to other reasons. For example, late fees, service charges, or the adjustment amount is zero.
Description Descibe the adjustment type. - Click Match with Adjustment.The Manual Match Entry tab displays.
- Click Next.The Summary tab displays.
- Click Submit.The Stage Movement Submission dialog displays for the new manual match entry.
- Confirm the Overrides listed on this screen. Click
Proceed Next.
The Stage Movement Submission dialog displays the Checklist items.
- Confirm the checklist items and click Proceed
Next.
The Stage Movement Submission dialog displays the Outcomes.
- Select one of the outcomes from the dropdown.
- Proceed: To proceed with the submission.
- Reject: To reject the submission.
- Click Submit.The account should be ready for entry if all the changes are verified successfully.
- In the left navigation panel, click Task Management. Under Task Management click View Tasks Status.
- Search the listed tasks for the application number of the new matching entry. This is the number noted down in step 2.c. The Process Name must be Nostro Manual Matching and the Stage must be Manual Matching Application Entry.
- Click Acquire and Edit.
The Nostro Manual Matching Entry - <Application Number> page displays the Summary tab.
- Verify the manual matches made. Make any changes if necessary.
- Click Submit from the Summary
screen.The Stage Movement Submission dialog displays.
- Confirm the Overrides and Checklist items.The Stage Movement Submission dialog displays the Outcomes.
- Select one of the outcomes from the dropdown.
- Proceed: To proceed with the submission.
- Cancel: To cancel the submission.
- Click Submit.The manual match moves to the approval stage. The View Tasks Status displays.
- Search the listed tasks for the application number of the new matching entry. This is the number noted down in step 2.c. The Process Name must be Nostro Manual Matching and the Stage must be Manual Matching Application Approval.
- Click Acquire and Edit.The Nostro Manual Matching APPRVL - <Application Number> page displays the Summary tab.
- Click Submit from the Summary
screen.The Stage Movement Submission dialog displays.
- Confirm the Overrides and Checklist items.The Stage Movement Submission dialog displays the Outcomes.
- Select one of the outcomes from the dropdown.
- Proceed: To proceed with the submission.
- Cancel: To cancel the submission.
- Click Submit.The manual match is approved.
Parent topic: Nostro Account Transactions

