- Retail Deposits User Guide
- Configurations
- Retail Deposits Business Product
- Create Business Product
1.1.1 Create Business Product
This topic describes the systematic instructions to create business product. The maintenance screen allows the user to configure business product parameters.
- On Home screen, under Menu, click Retail Deposits. Under Retail Deposits, click Configurations.
- Under Configurations, click Retail Deposits
Business Product. Under Retail Deposits Business
Product, click Create Business
Product.The Create Business Product screen displays.
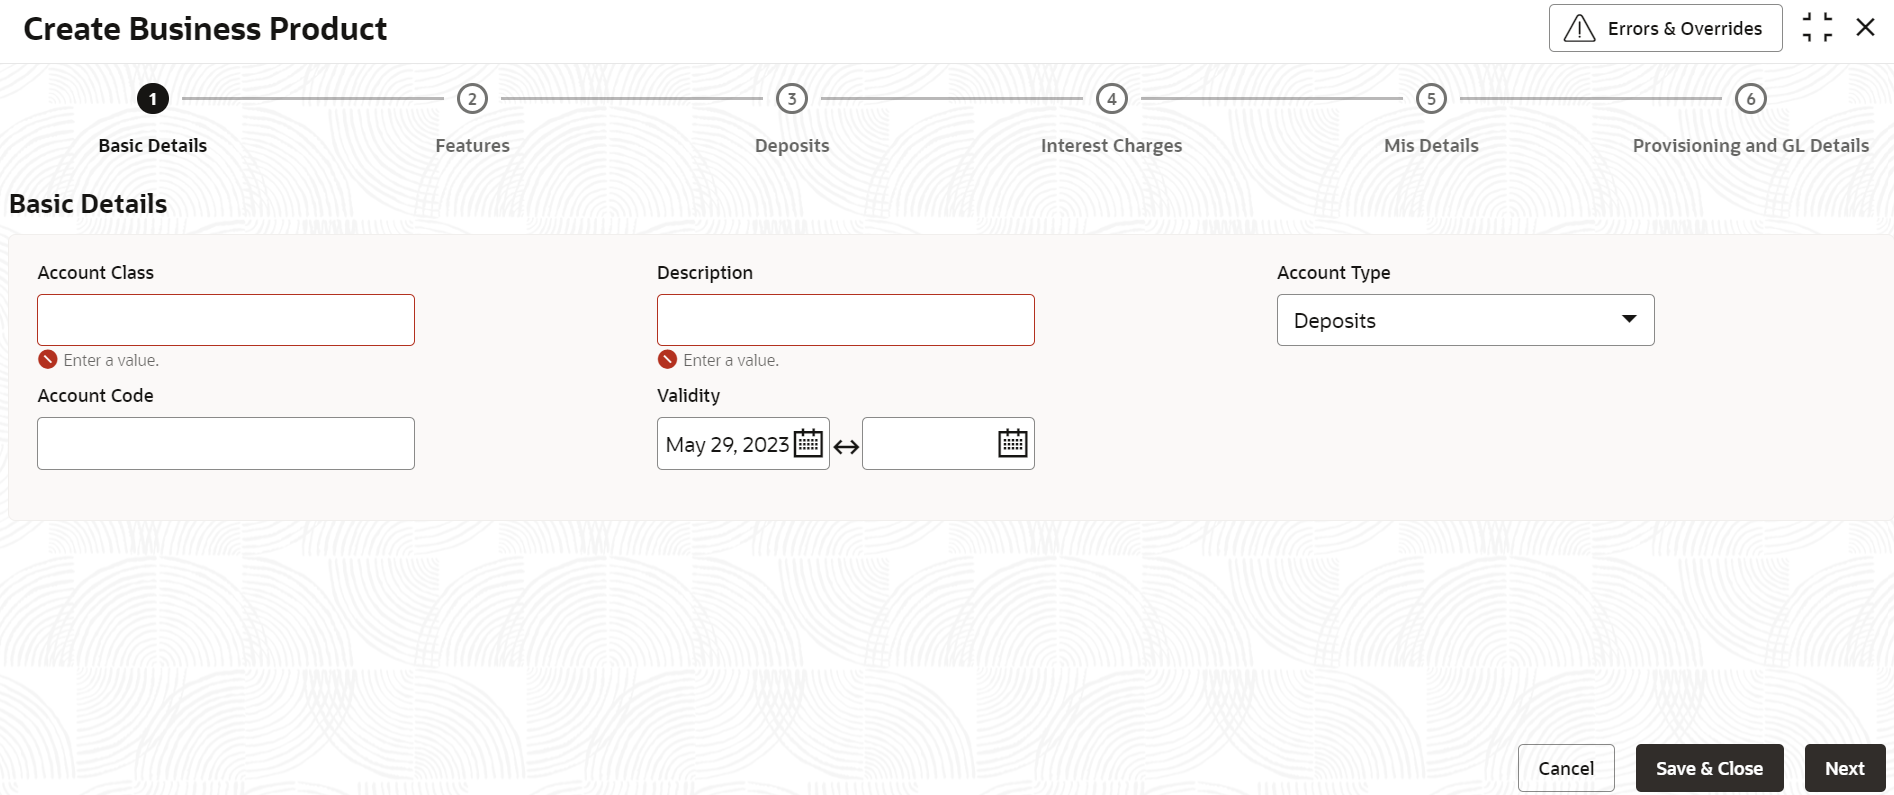
Figure 1-1 Create Business Product - Basic Details
- Specify the fields on the Basic Details screen.
For more information on fields, refer to the field description table below.
Table 1-1 Basic Details - Field Description
Field Description Account Class Specify the business product code to be maintained. This indicates the class code or template code. This code is referenced during the deposit creation. Description Specify the description for the business product. Account Type Specify the type of the account. The different types of accounts are: - Deposits
- Dual Currency Deposits
- Recurring Deposits
Account Code As per your bank’s requirement, you can choose to classify business products into different account codes. The bank can decide the way the business products are to be assigned to different account codes. An account code can consist of a maximum of four characters.
An account class or an account code can be part of the customer account mask.
If the customer account mask consists of an account code, the value in this field is used as part of deposit account number generation.Validity Specify the validity period of the account class by specifying the start date and the end date. End date is optional.
- After specifying the fields in the Basic Details screen,
click Next.The Features screen displays.
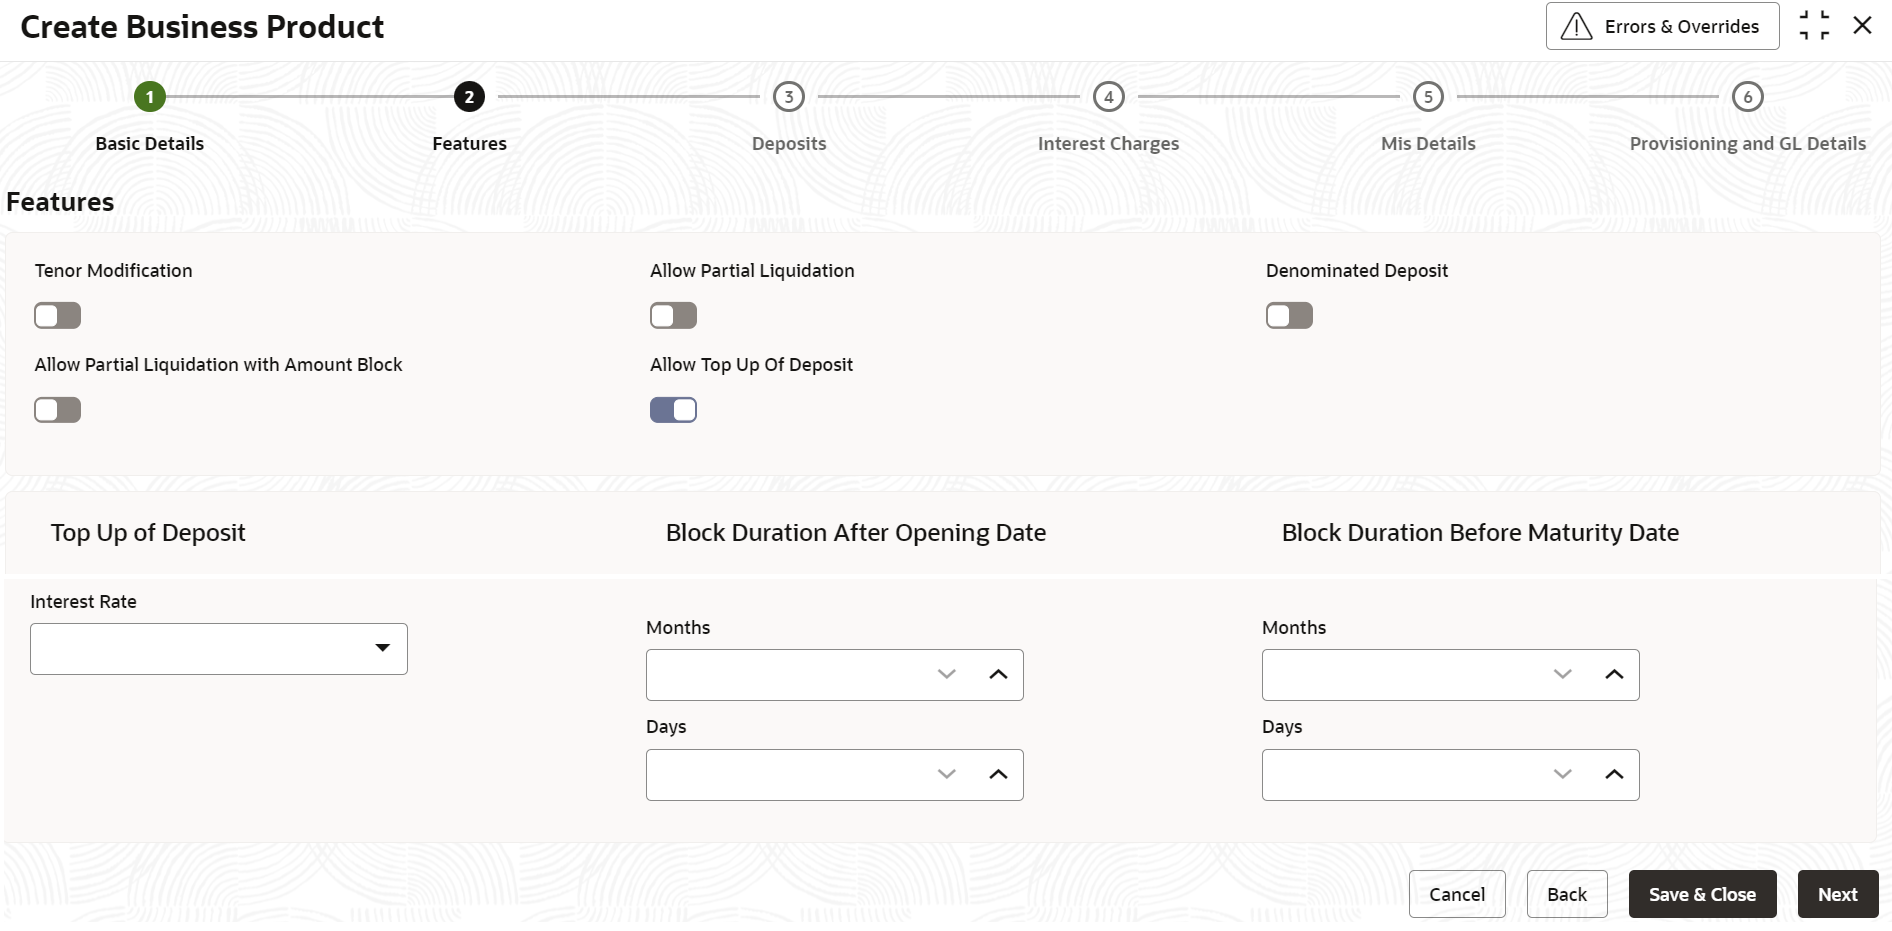
Figure 1-2 Create Business Product - Features
- Specify the fields on Features screen.
For more information on fields, refer to the field description table below.
Table 1-2 Features - Field Description
Field Description Tenor Modification Select this toggle, if you intend to avail a tenor modification facility for a Term Deposit Account. The default value is No.
Allow Partial Liquidation Select this toggle to indicate that partial redemption is allowed. If Allow partial Liquidation is not selected, then partial redemption will not be allowed on term deposits under this business product. The default value is No.
Denominated Deposit Select this toggle to allow opening of denominated deposits. The default value is No.
Allow Partial Liquidation with Amount Block Select this toggle to indicate that partial liquidation is allowed for the deposits with amount blocks. If the Term Deposit is linked partially then partial liquidation of the Term Deposit will be allowed only if you select this toggle. The default value is No.
Allow Top Up Of Deposit Select this toggle to indicate that you can top-up funds to an existing term deposit. The default value is No.
If this toggle is enabled, the below values are displayed.- Top Up of Deposit
- Block Duration After Opening Date
- Block Duration Before Maturity Date
Top Up of Deposit User can top-up an existing Term Deposit by adding funds to the TD account. Interest Rate Select the interest to be applied on the top-up deposit, from the drop-down list. The list of values as follow: - Current - Select this option to apply the current interest rate of the TD on the top-up amount.
- As on Opening Date - Select this option to apply the interest rate based on the slab as on the value date of deposit opening. If top-up is made to a deposit after rollover, the rate as on rollover date will be considered for rate pick up.
- As on Top Up Value Date - Select this option to apply the interest rate based on the slab as on the value date of the top-up.
Block Duration After Opening Date User can specify the duration for which the term deposit top up has to be blocked after the account opening date. The block duration after Opening date (Days / Months) should not be greater than the max tenor at the account class. Months Specify the number of months for which the term deposit top-up has to be blocked after the account opening date. Days Specify the number of days for which the term deposit top-up has to be blocked after the account opening date. Block Duration Before Maturity Date User can specify the duration for which the term deposit top-up has to be blocked before the account maturity date. The top-up can be done any time before the maturity date (i.e. in term) of the deposit if there is no block duration defined. The block duration before maturity date (Days / Months) should not be greater than the max tenor at the business product. Months Specify the number of months for which the term deposit top-up has to be blocked before the deposit maturity date. Days Specify the number of months for which the term deposit top-up has to be blocked before the deposit maturity date. - After specifying the fields in the Features screen,
click Next.The Deposits screen displays.
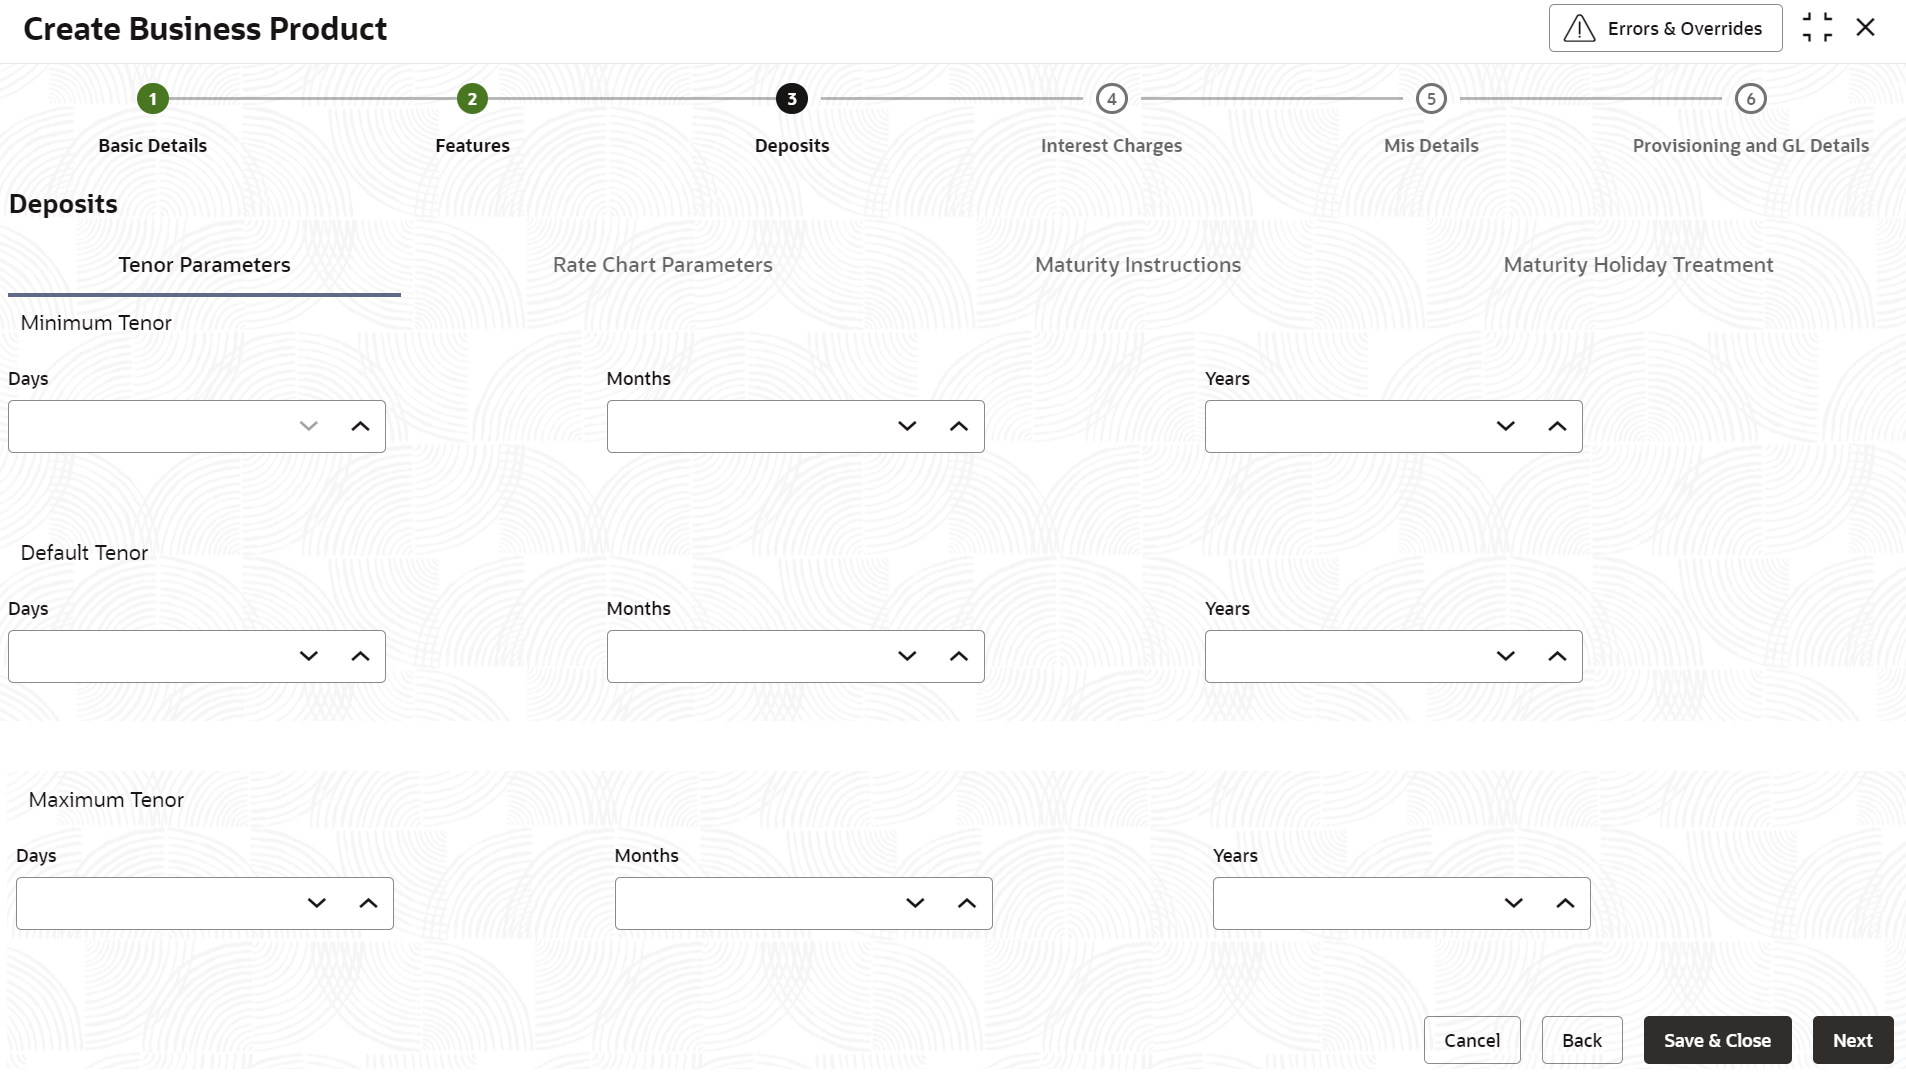
Figure 1-3 Create Business Product - Deposits_Tenor Parameters
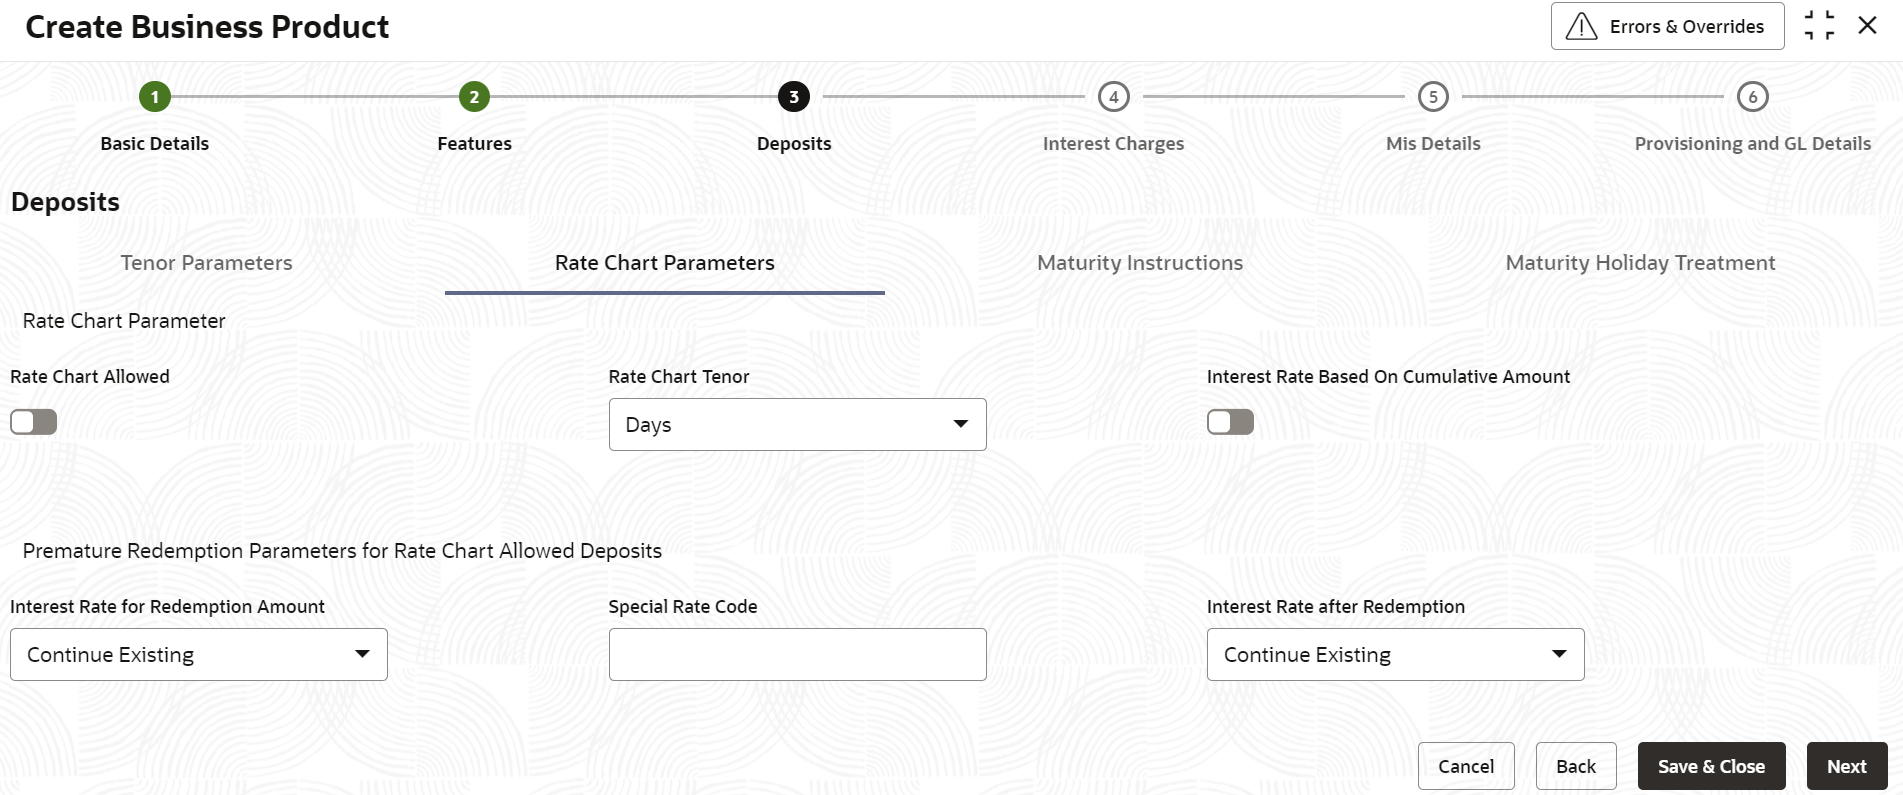
Figure 1-4 Create Business Product - Deposits_Rate Chart Parameters
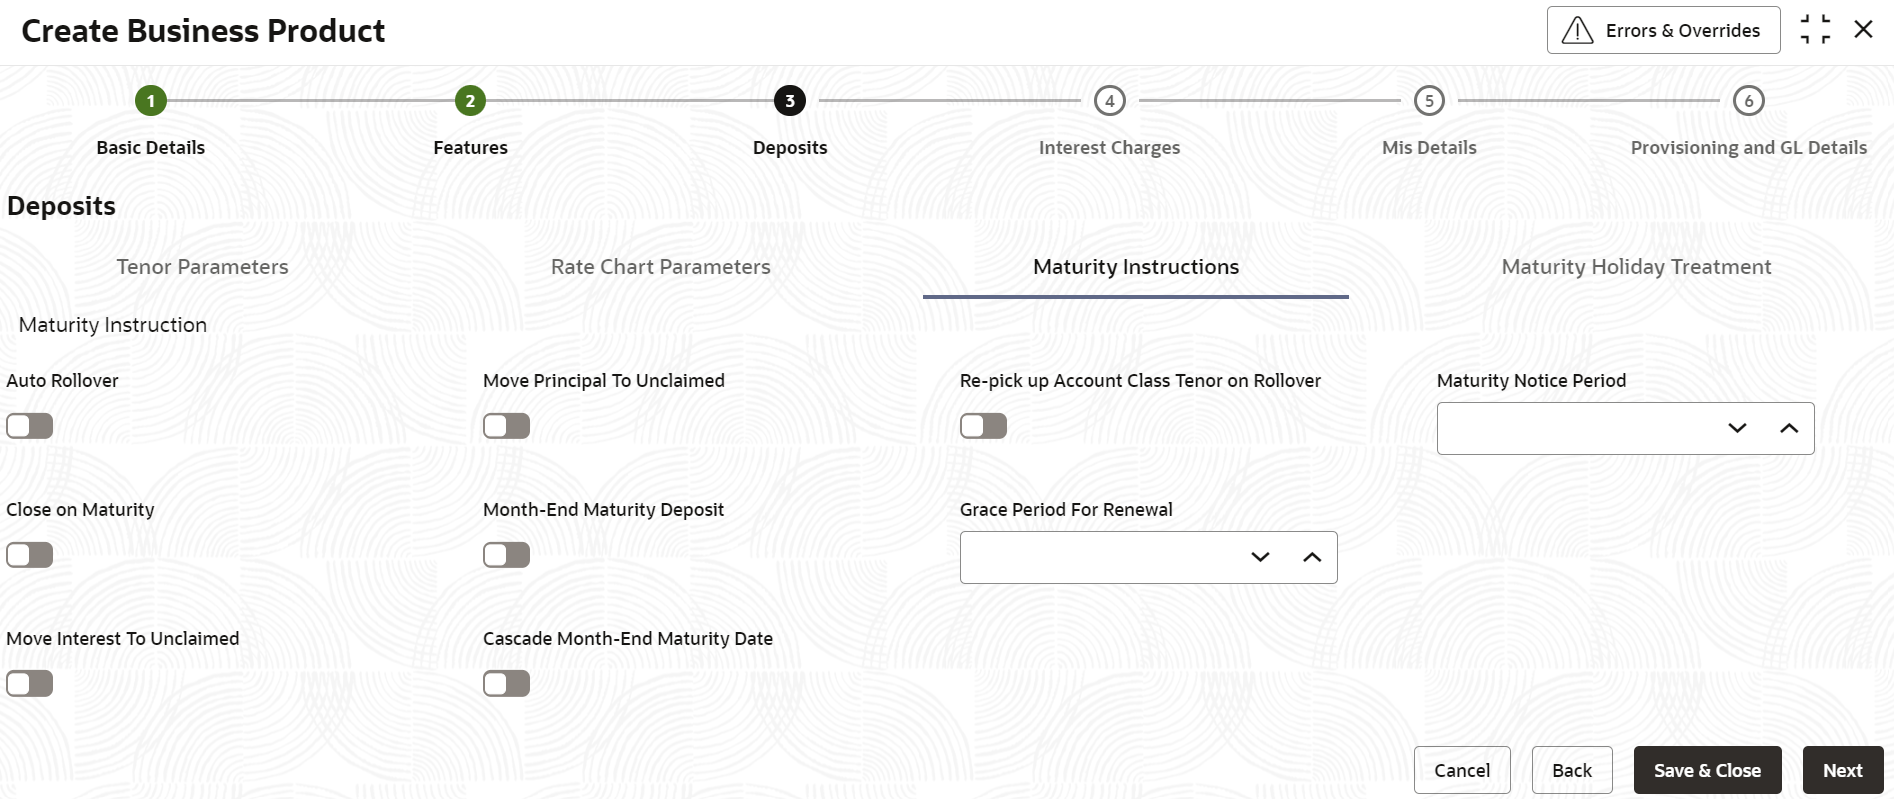
Figure 1-5 Create Business Product - Deposits_Maturity Instructions
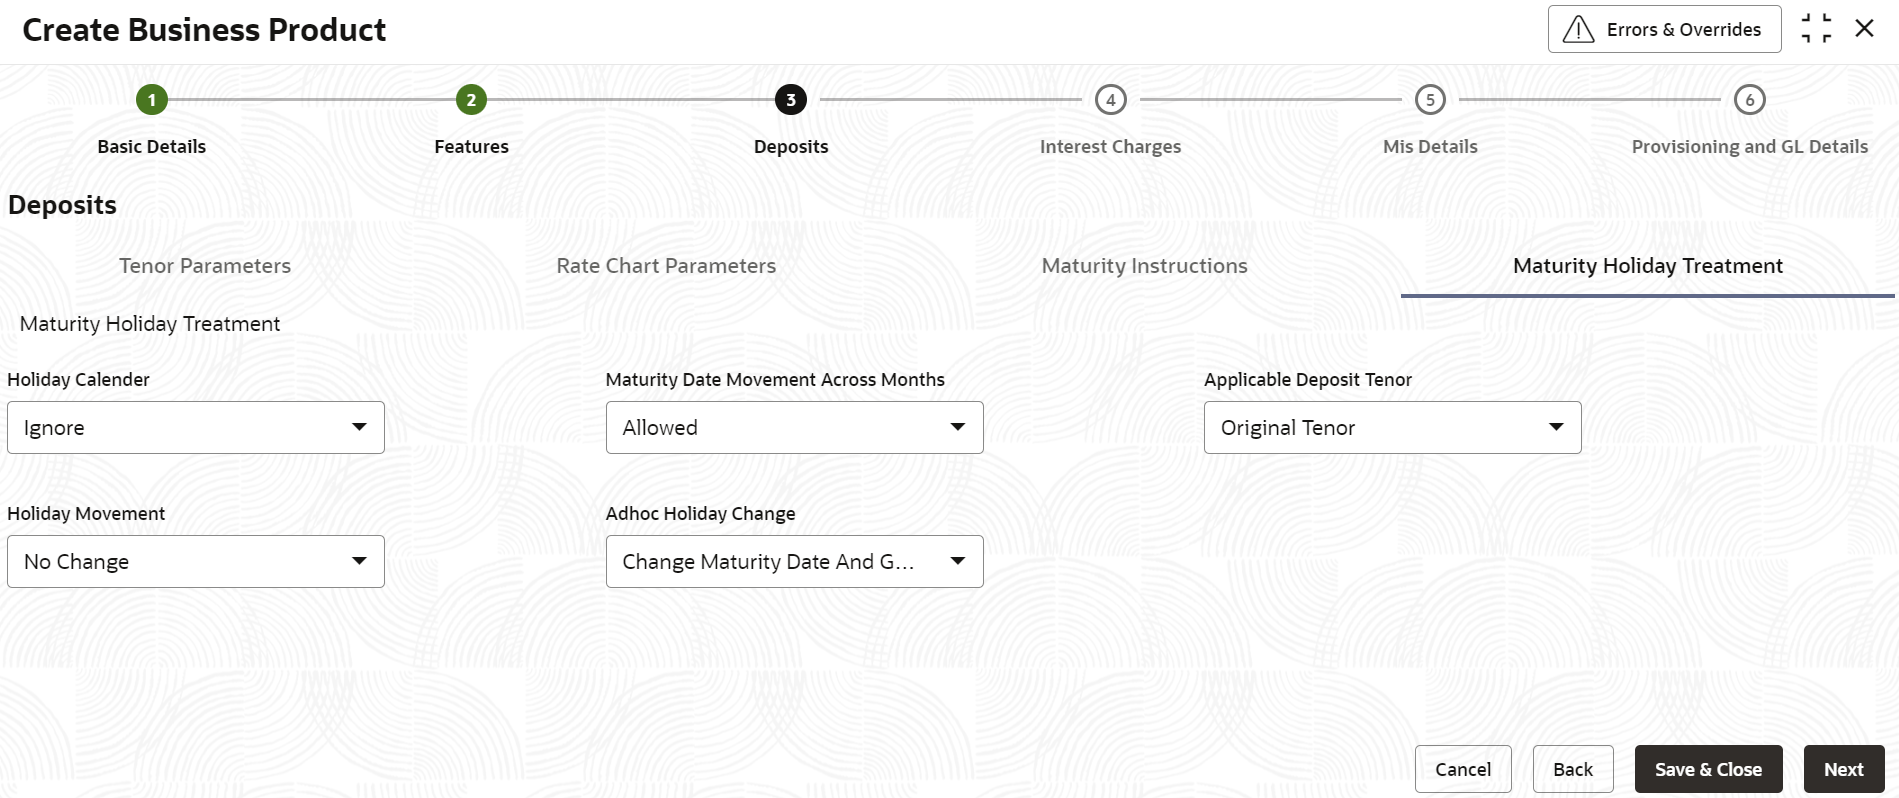
Figure 1-6 Create Business Product - Deposits_Maturity Holiday Treatment
- Specify the fields on Deposits screen.
For more information on fields, refer to the field description table below.
Table 1-3 Deposits - Field Description
Field Description Tenor Parameters This determines the minimum, maximum and default tenor for a business product. Minimum Tenor Specify the minimum tenor for which deposits should be created under this business product. If the term deposit is booked before the minimum tenor then the deposit creation fails with an appropriate error message. Days Specify the minimum tenor in terms of days. Months Specify the minimum tenor in terms of months. Years Specify the minimum tenor in terms of years. Default Tenor User can define a tenor for the deposits that are opened under the business product. Deposits opened under the business product will automatically acquire this tenor. However, user can change the tenor to suit the requirements of a specific deposit. The default tenor should be within the minimum and maximum range specified. Days Specify the default tenor in terms of days. Months Specify the default tenor in terms of months. Years Specify the default tenor in terms of years. Maximum Tenor Specify the maximum tenor for which deposits can be created under this business product. If the term deposit is booked beyond the maximum tenor then the deposit creation fails with an appropriate error message. Days Specify the maximum tenor in terms of days. Months Specify the maximum tenor in terms of months. Years Specify the maximum tenor in terms of years. Rate Chart Parameters This determines if rate chart is applicable for the business product and the premature redemption details for the deposits if rate chart is allowed. Rate Chart Allowed Select this toggle to indicate that the system should calculate TD interest based on the floating rate maintained. If user select this toggle, the system will pick interest rates based on different tenors, amount slab, currency and effective date for a TD. The default value is No.
Rate Chart Tenor Specify the value by which the tenor maintained should be considered. User can select one of the following values: - Days - If user select this, the rate chart tenor will be considered as days for all deposit under this business product.
- Months - If user select this, the rate chart tenor will be considered as months for all deposit under this business product.
The default value is Days.
Interest Rate Based On Cumulative Amount Select this toggle to indicate that the system should arrive at the interest rate of a new deposit using the cumulative amount of other active deposits, under the same business product, customer, and currency. Interest Rate for Redemption Amount Select the interest rate to be applied for the redemption amount, from the drop-down list. The list of values are as follow: - Continue Existing
- As on Opening Date
- As on Redemption Date
- As on Rate Revision Events
- Special Rate Code
The default value is Continue Existing.
Special Rate Code Specify the special rate code for the redemption amount. Interest Rate After Redemption Select the interest rate to be applied after redemption of TD, from the drop-down list. The list of values are as follows: - Continue Existing
- As on Opening Date
- As on Redemption Date
- As on Rate Revision Events
The default value is Continue Existing.
Maturity Instructions This determines the default maturity instructions for accounts opened under the business product. Auto Rollover Select this toggle to automatically rollover the deposits on maturity date. Move Principal To Unclaimed Select this toggle to move the principal amount to the unclaimed GL. Re-pick up Account Class Tenor on Rollover Select this toggle to enable re-pick up of the business product tenor on rollover. During rollover, the system will pick up the default tenor of the business product. Maturity Notice Period Specify the number of days before which the customer notification is to be sent for TD maturity. Close on Maturity Select this toggle to close the term deposit account on maturity date and transfer the amount as per the pay-out details maintained for the TD. Month-End Maturity Deposit Select this toggle to indicate that the deposit is a month-end maturing deposit (i.e., the deposit matures on the last working day of the month). Grace Period For Renewal Specify the grace period for renewing a TD. This option is applicable only for deposits whose interest and principal is moved to unclaimed GLs upon maturity. In other words, grace period will not be applicable on the maturity date in case of auto rollover or closure of the deposit.
Move Interest To Unclaimed Select this toggle to move the interest amount to the unclaimed GL. Cascade Month-End Maturity Date Select this toggle to cascade the month end maturity date of the deposit. If not selected then, the maturity date will fall in line with the account open date. Maturity Holiday Treatment This determines the holiday treatment if the maturity of the deposit falls on a holiday. Holiday Calendar Select the holiday calendar applicable to the business product from the drop-down list. This list displays the following values: - Ignore - Select this option to ignore all other holiday parameters for the business product. By default, this option is selected.
- Branch - Holiday calendar will be based on the branch holiday maintenance of the respective branch.
- Currency - Holiday calendar will be based on the currency maintenance done at bank level for the respective currency.
- Both Branch and Currency - Holiday calendar is based on both branch and currency holiday maintenance.
Holiday Movement Select the working day to which the holiday should be moved from the adjoining drop-down list. This list displays the following values: - No Change - If you select this option, then there is no change in the maturity date. By default, this option is selected.
- Previous Working Day - In case the computed maturity date is a holiday, then system moves the maturity date to the previous working day for the corresponding Holiday Calendar chosen.
- Next Working Day - In case the computed maturity date is a holiday, then system moves the maturity date to the next working day for the corresponding Holiday Calendar chosen.
Note:
User cannot modify the Holiday Movement if there are active account under the business product.Maturity Date Movement Across Months Select the maturity date movement across months from the drop-down list: - Allowed - The maturity date is moved across months. If the computed maturity date falls on a Holiday, then the maturity date can be moved to the next or previous working day, based on the holiday movement option, even if it falls in a different month. By default, this option is selected.
- Previous/Next Working Day of the Same Month - After moving the maturity date, if the adjusted maturity date falls in the previous/next month, then the system moves the maturity date forward or backward to the next/previous working day of the same month.
- No Change in Maturity Date - If the adjusted maturity date falls on next/previous month, then the system ignores the movement and considers the computed maturity date as the maturity date even it falls on a holiday.
Adhoc Holiday Change Select the adhoc holiday change from the drop-down list. The list displays the following values: - Change Maturity Date and Generate Advice - System updates the maturity date and the rollover maturity date as per the TD holiday calendar maintenance, generates an advice to the customer. By default, this option is selected.
- Generate Advice - System generates an advice on deposits having maturity date falling on a holiday.
- No Action - If this is selected, the maturity date does not change. In this case the system will not generate advices for the TD.
Applicable Deposit Tenor Select the deposit tenor, applicable to the deposit for interest rate pick-up, from the drop-down list. This list displays the following values: - Original Tenor - If you select this option, then system considers the tenor which is defaulted from the business product or modified at the account level. By default, this option is selected.
- Deposit Tenor - If you select this option, then system considers the tenor based on the adjusted maturity date.
- After specifying the fields in the Deposits screen,
click Next.The Interest Charges screen displays.
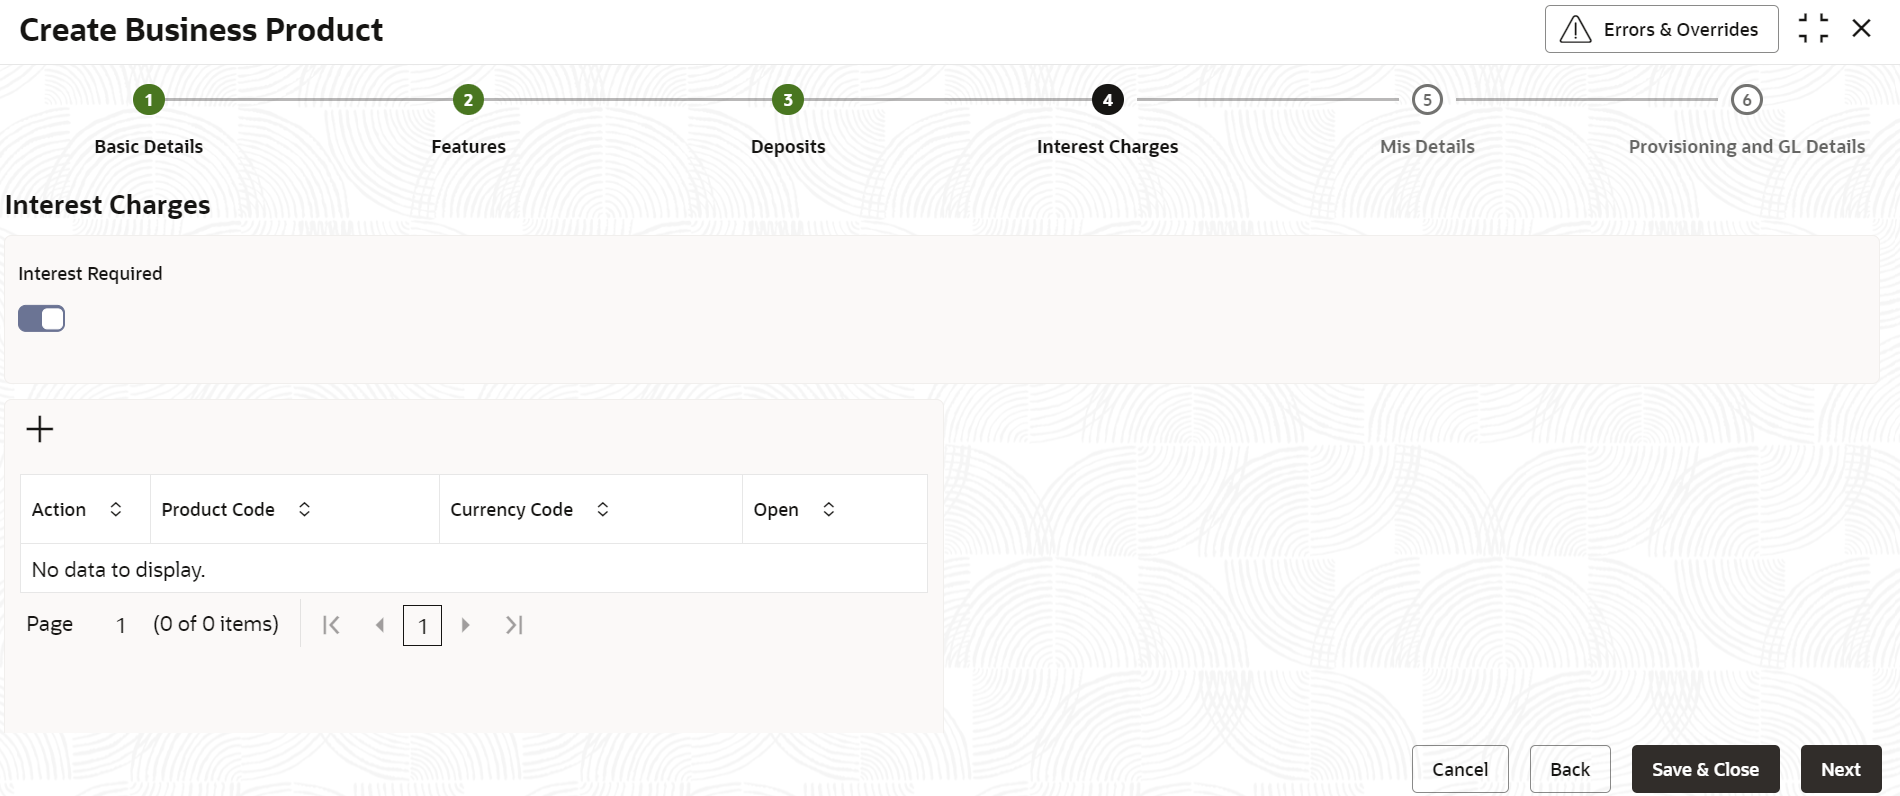
Figure 1-7 Create Business Product - Interest Charges
- Specify the fields on Interest Charges screen.
For more information on fields, refer to the field description table below.
Table 1-4 Interest Charges - Field Description
Field Description Interest Required Select this toggle to indicate that the interest is applicable for the accounts with this business. The default value is Yes. Click add icon to add a sequence. A new row is added with the below fields.- Product Code - Specify the interest/charge product code that should be linked to the account. The adjoining option list displays all valid Interest and Charge (IC) products available in the system. User can select the appropriate one.
- Currency Code - Specify the Currency defined for the interest product.
- Open - Select this toggle to make the product applicable. More than one IC product may be applicable for a business product at the same time.
- After specifying the fields in the Interest Charges
screen, click Next.The MIS Details screen displays.
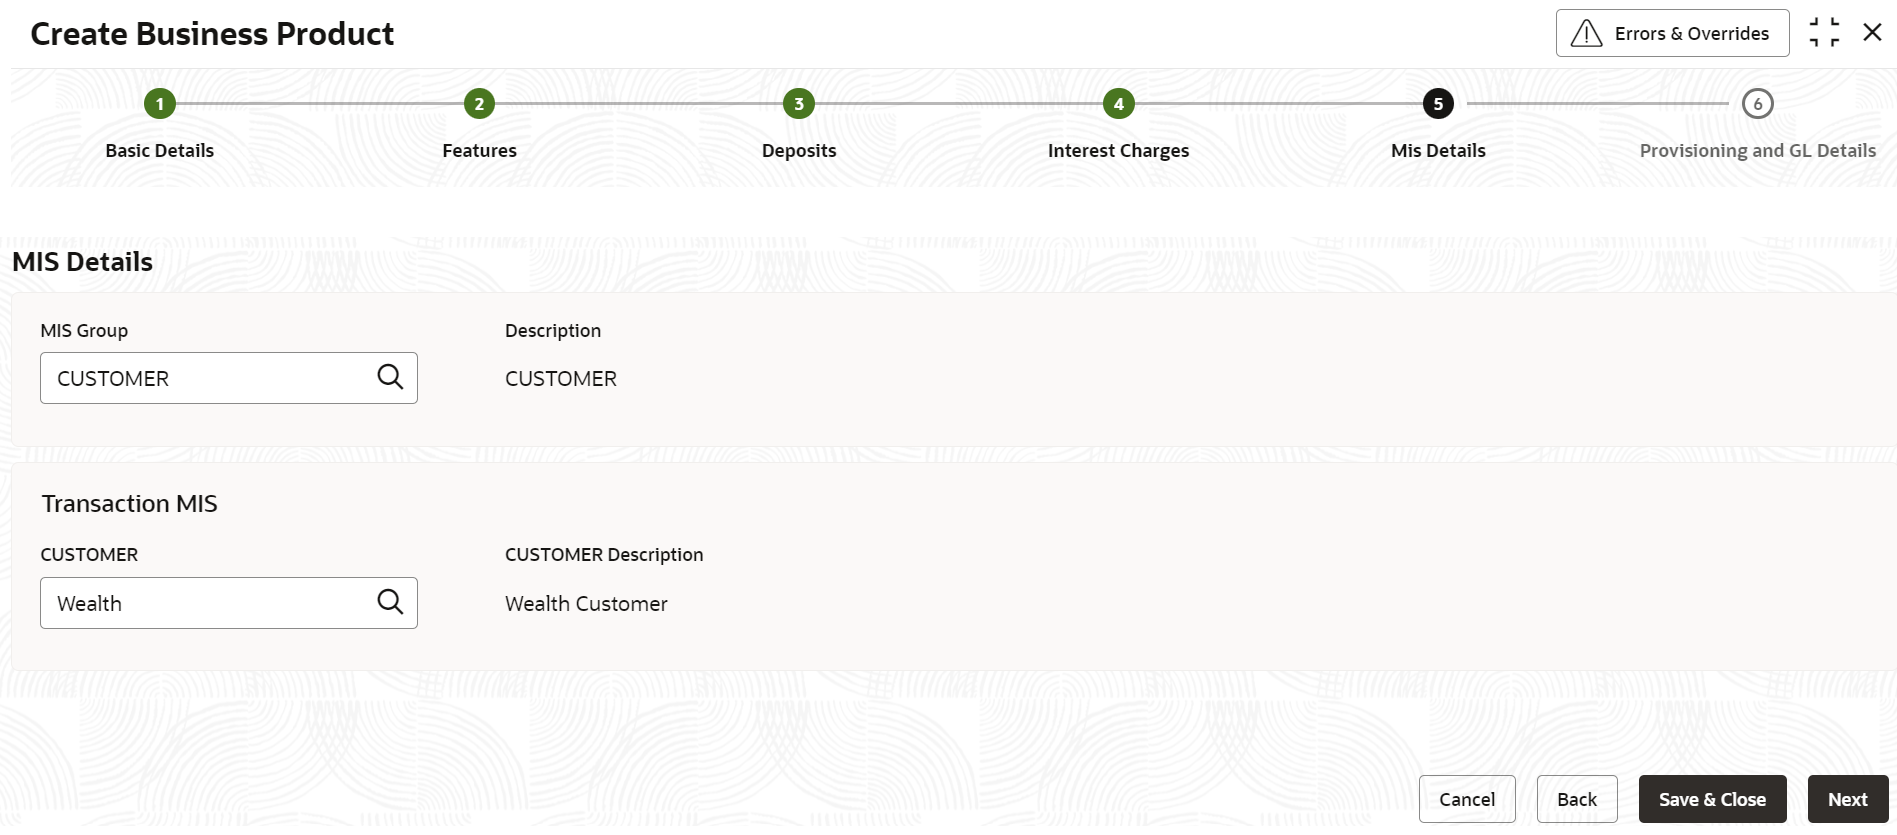
Figure 1-8 Create Business Product - Interest
- Specify the fields on MIS Details screen.
For more information on fields, refer to the field description table below.
Table 1-5 MIS Details - Field Description
Field Description MIS Group Select the MIS group applicable for the deposit business product from the selection list. The list is populated based on the MIS configuration maintained in common core. Description The system displays the description. This is auto populated. <MIS Group> Name Specify the transaction MIS to be associated. Click the search icon to open the MIS Class Code window. Select and click to add the code in the field.
<MIS Group> Description The system displays the description. CUSTOMER Specify the customer to be associated. CUSTOMER Description The description of the customer is displayed. - After specifying the fields in the MIS Details screen,
click Next.The Provisioning and GL Details screen displays.
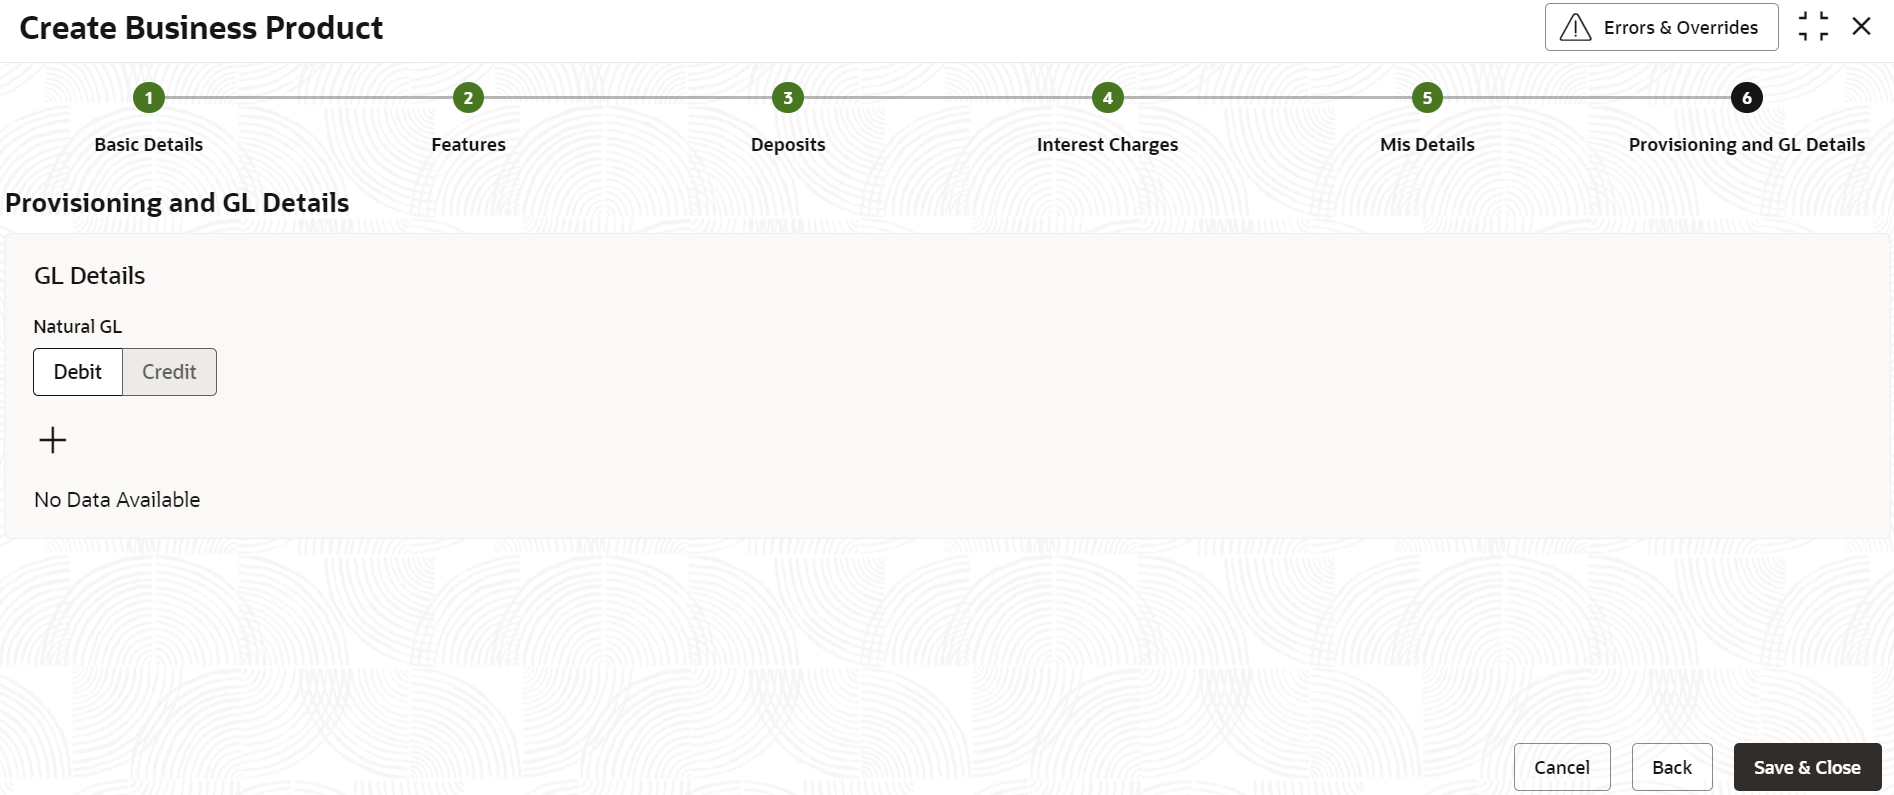
Figure 1-9 Create Business Product - Provisioning and GL Details
- Specify the fields on Provisioning and GL Details
screen.
For more information on fields, refer to the field description table below.
Table 1-6 Provisioning and GL Details - Field Description
Field Description Natural GL The following values are available – - Credit
- Debit
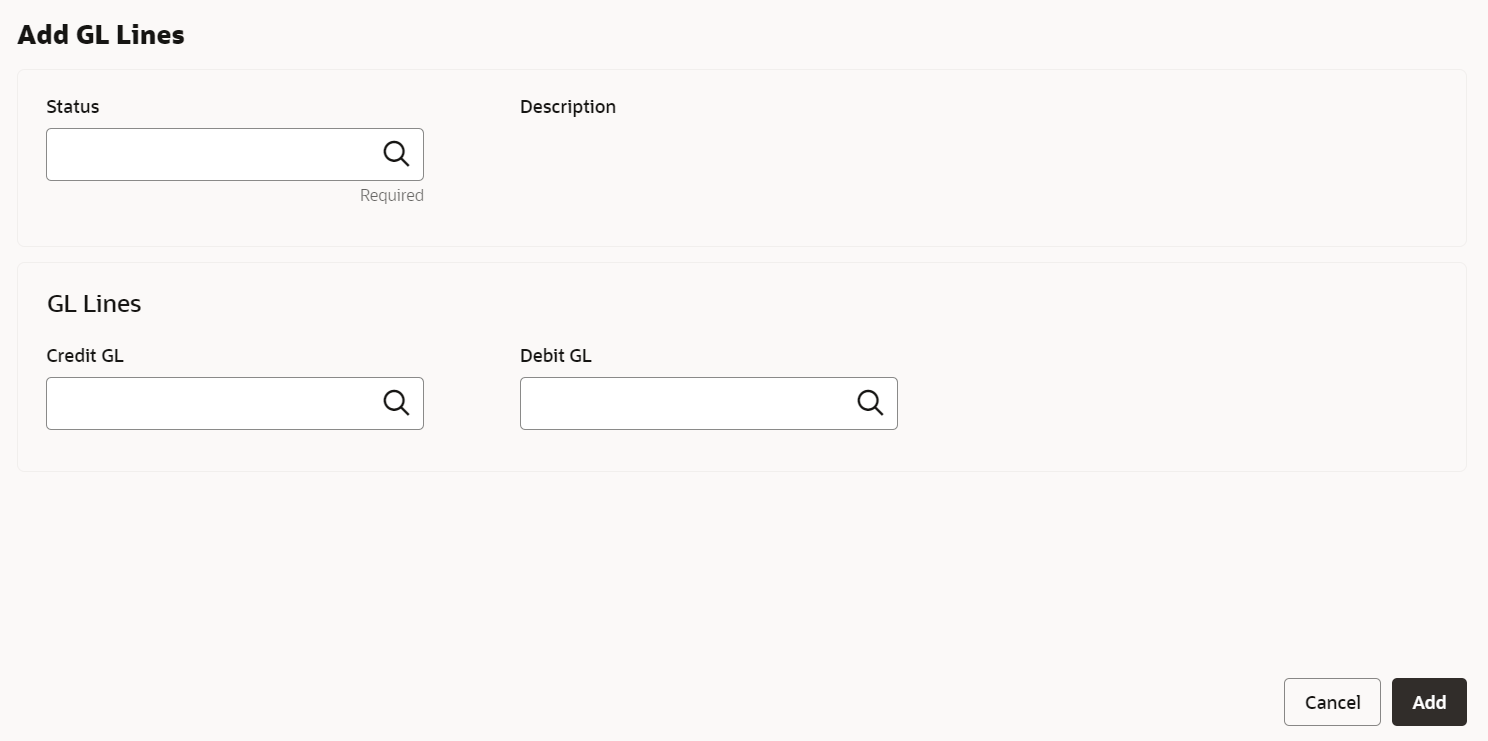
- Click the add icon to add an entry for GL.The Add GL Lines screen displays.
Figure 1-10 Create Business Product - Provisioning and GL Details_Add GL Lines
- Specify the fields on Add GL Lines screen.
For more information on fields, refer to the field description table below.
Table 1-7 Add GL Lines - Field Description
Field Description Status Specify the status. Click the search icon to open the Status window. Select from the list of status associated and click to add the status in the field. Description The system displays the status description. Credit GL Specify the GL to which the account balance should belong. Click the search icon to open the Credit GL window. Select and click to add the entry. Debit GL Specify the GL to which the account balance should belong. Click the search icon to open the Debit GL window. Select and click to add the entry. - After specifying all the details, click Save & Close to complete the steps or click Cancel to exit without saving.
Parent topic: Retail Deposits Business Product
