- Teller User Guide
- Remittances
- Banker's Cheque
- BC Issue Against Walk-in
8.1.2 BC Issue Against Walk-in
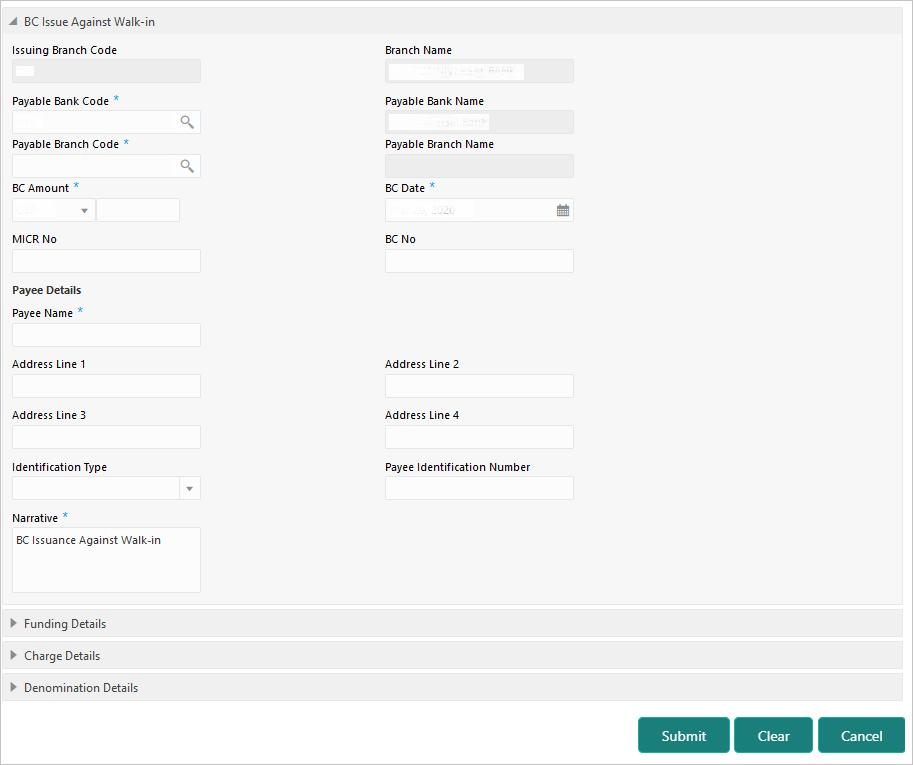
The Teller can use the BC Issue Against Walk-in screen to issue a BC by cash to the walk-in customers.
- On the Homepage, from Teller mega menu, under
Remittances, click BC Issue -
Walk-in or specify BC Issue - Walk-in in
the search icon bar and select the screen.The BC Issue Against Walk-in screen is displayed.
- On the BC Issue Against Walk-in screen, specify the
fields. For more information on fields, refer to the field description
table.
Note:
The fields, which are marked with an asterisk, are mandatory.Table 8-3 BC Issue Against Walk-in - Field Description
Field Description Issuing Branch Code
Displays the code of the logged-in branch.
Branch Name
Displays the description of issuing branch.
Payable Bank Code
Select the payable bank code. The list of values contains the bank codes maintained using the External Bank Code Maintenance screen.Note:
To remit funds within the same bank, select the logged-in bank code as payable bank code. To remit funds across banks, select the necessary bank code as payable bank code. The fields Payable Branch Code and Payable Branch Name will be enabled after you specify the Payable Bank Code.Payable Bank Name
Displays the name of the selected bank code.
Payable Branch Code
Select the branch code of the payable bank. The list of values contains the corresponding branch codes maintained using the Bank Code Maintenance screen.
Payable Branch Name
Displays the branch name of the selected branch code.
BC Amount
Select the BC currency from the drop-down list and specify the BC amount.
BC Date
Select the date that needs to be mentioned in the BC.Note:
By default, the current posting date is displayed.BC No
Specify the instrument number and validate. If not specified, the system generates the BC number based on the maintenance setup.
MICR Number
Displays the MICR number.
Payee Details
Specify the fields.
Payee Name
Specify the payee name on which the BC is drawn.
Address Line 1 to Address Line 4
Specify the address of the payee.
Identification Type
Select the identification type of the payee from the drop-down list.
Payee Identification Number
Specify the identification number of the payee.
Narrative
Displays the default narrative as BC Issuance Against Walk-in, and it can be modified.
- Click on the Funding Details data segment.The Funding Details data segment is displayed.
- In the Funding Details data segment, specify the fields.
For more information on fields, refer to the field description
table.
Note:
The fields, which are marked with an asterisk, are mandatory.Table 8-4 Funding Details - Field Description
Field Description Transaction Amount
Specify the transaction currency in which the walk-in customer deposits the cash.
Drawer Name
Specify the name of the drawer.
Address Line 1 to Address Line 4
Specify the address of the payee.
Identification Type
Select the identification type of the payee from the drop-down list.
Identification Number
Specify the identification number of the payee.
Exchange Rate
Displays the exchange rate.Note:
If the transaction currency is the same as the account currency, the system will display the exchange rate as 1. This field is displayed only ifMulti-Currency Configurationat the Function Code Indicator level is set as Y.Total Charges
Displays the total charges applicable for the BC issuance.Note:
This field is displayed only ifTotal Charges Configurationat Function Code Indicator level is set as Y. - Specify the charge details. For information on the fields in the Charge Details segment, refer to Add Charge Details.
- Specify the denomination details. For information on the fields in the Denomination Details segment, refer to Add Denomination Details.
- Click Submit.
A teller sequence number is generated, and the Transaction Completed Successfully information message is displayed.
Note:
The transaction is moved to authorization in case of any warning raised when the transaction saves.When you submit, the transaction details are handed off to the Oracle Banking Payments system for instruments processing with external system status as Pending.
After the transaction is processed and responded from the Oracle Banking Payments with appropriate status, the Teller selects the transaction from Journal Log and completes the transaction.
Parent topic: Banker's Cheque

