- Teller User Guide
- Remittances
- Cash Remittance
- Cash Remittance Operations
- Cash Remittance Payment by GL
8.3.2.4 Cash Remittance Payment by GL
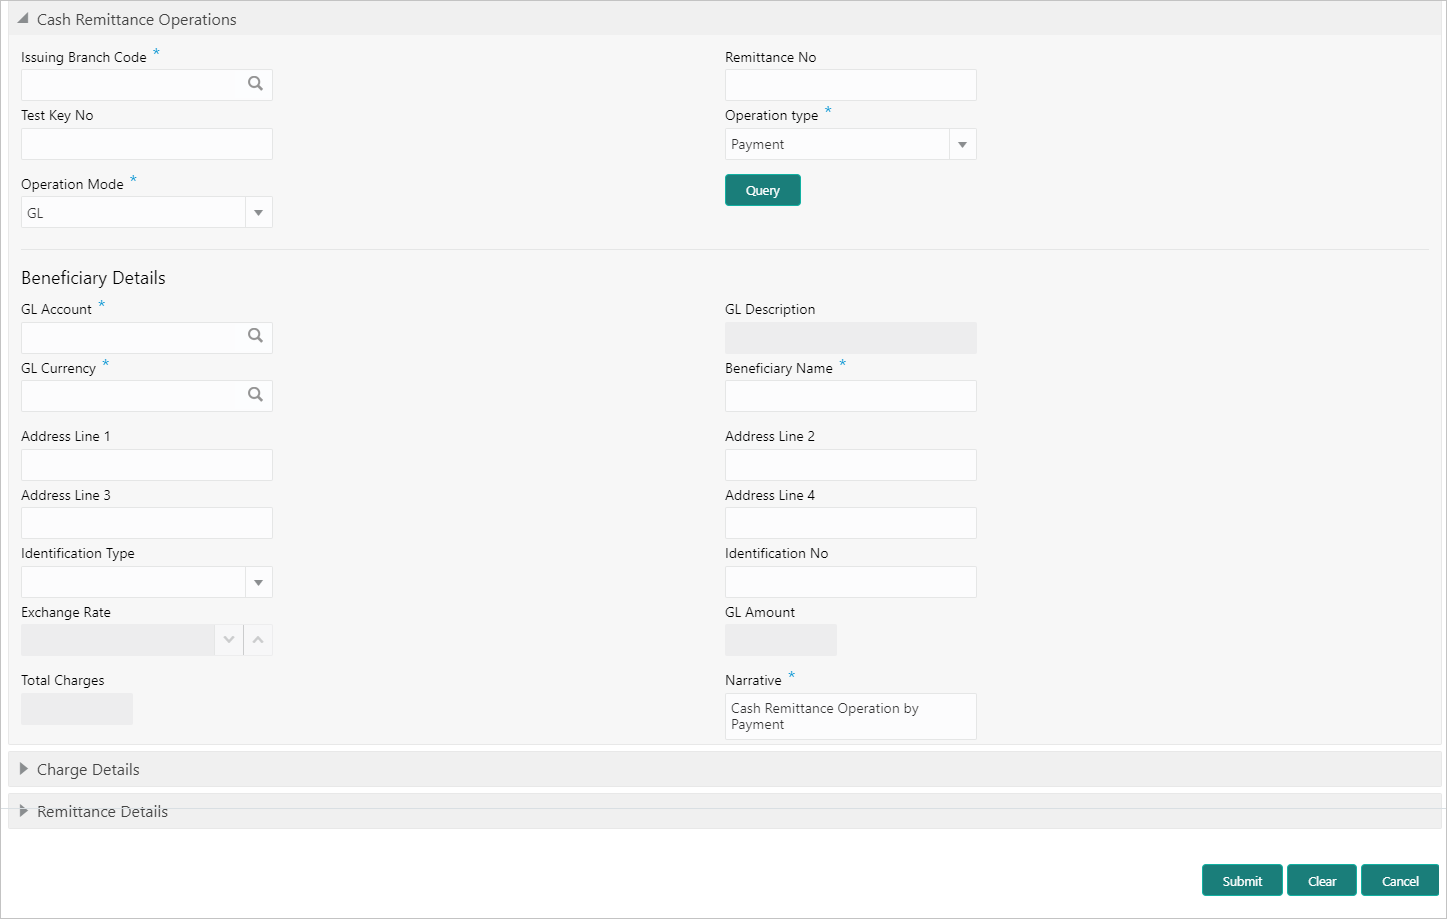
The Teller can use the Cash Remittance Operations screen to make payment against a cash remittance.
The cash remittance payment is credited to the GL account when the operation mode is GL.
To make payment against a cash remittance:
- On the Homepage, from Teller mega menu, under
Remittances, click Cash Remittance
Operations or specify Cash Remittance
Operations in the search icon bar and select the screen.The Cash Remittance Operations screen is displayed.
Figure 8-52 Cash Remittance Operations (Payment by GL)
- On the Cash Remittance Operations screen, specify the
fields. For more information on fields, refer to the field description
table.
Note:
The fields, which are marked with an asterisk, are mandatory.Table 8-50 Cash Remittance Operations (Payment by GL) - Field Description
Field Description Issuing Branch Code
Select the branch code where the remittance is issued.
Remittance No
Specify the remittance number of the instrument.
Test Key No
Specify the test key number.
Operation Type
Select the type Payment from the drop-down list.
Operation Mode
Select the operation mode as GL from the drop-down values.
Query
Click Query to fetch the remittance details.Note:
When you click this icon, after you specify the Issue Branch Code and Remittance No, the system will make a service call to Oracle Banking Payments and fetch the remittance details.Beneficiary Details
Specify the details under this segment.
GL Account
Specify the GL account number.
GL Description
Displays the description of the specified GL account number.
GL Currency
Displays the branch local currency of the specified GL account.Note:
You can also select a currency from the list of values.Beneficiary Name
Specify the beneficiary name.
Address Line 1 to Address Line 4
Specify the address of the beneficiary.
Identification Type
Select the identification type of the beneficiary from the drop-down values.
Identification Number
Specify the identification number of the beneficiary.
Exchange Rate
Displays the exchange rate, and it can be modified.Note:
If the transaction currency is the same as the account currency, the system will display the exchange rate as 1. This field is displayed only ifMulti-Currency Configurationat Function Code Indicator level is set as Y.GL Amount
Displays the GL amount.Note:
This field is displayed only ifMulti-Currency Configurationat Function Code Indicator level is set as Y.Total Charge Amount
Displays the total charge amount.Note:
This field is displayed only ifTotal Charges Configurationat Function Code Indicator level is set as Y.Narrative
Displays the default narrative as Cash Remittance Operation by Payment, and it can be modified.
- Specify the charge details. For information on the fields in the Charge Details segment, refer to Add Charge Details.
- Click on the Remittance Details data segment to view the
additional details of the remittance.
Note:
This data segment is non-editable. - Click Submit.
A teller sequence number is generated, and the Transaction Completed Successfully information message is displayed.
Note:
The transaction is moved to authorization in case of any warning raised when the transaction saves.On transaction submission, the system will hand off the request to Oracle Banking Payments using Instrument Pay Service. If the remittance is issued by another bank, the Oracle Banking Branch has to provide the test key number during handoff for validation. On transaction completion, the Oracle Banking Branch will hand off accounting to FLEXCUBE Universal Banking for the main leg.
Parent topic: Cash Remittance Operations
