- Teller User Guide
- Branch Maintenance
- Maintain Function Code Definitions
20.6 Maintain Function Code Definitions
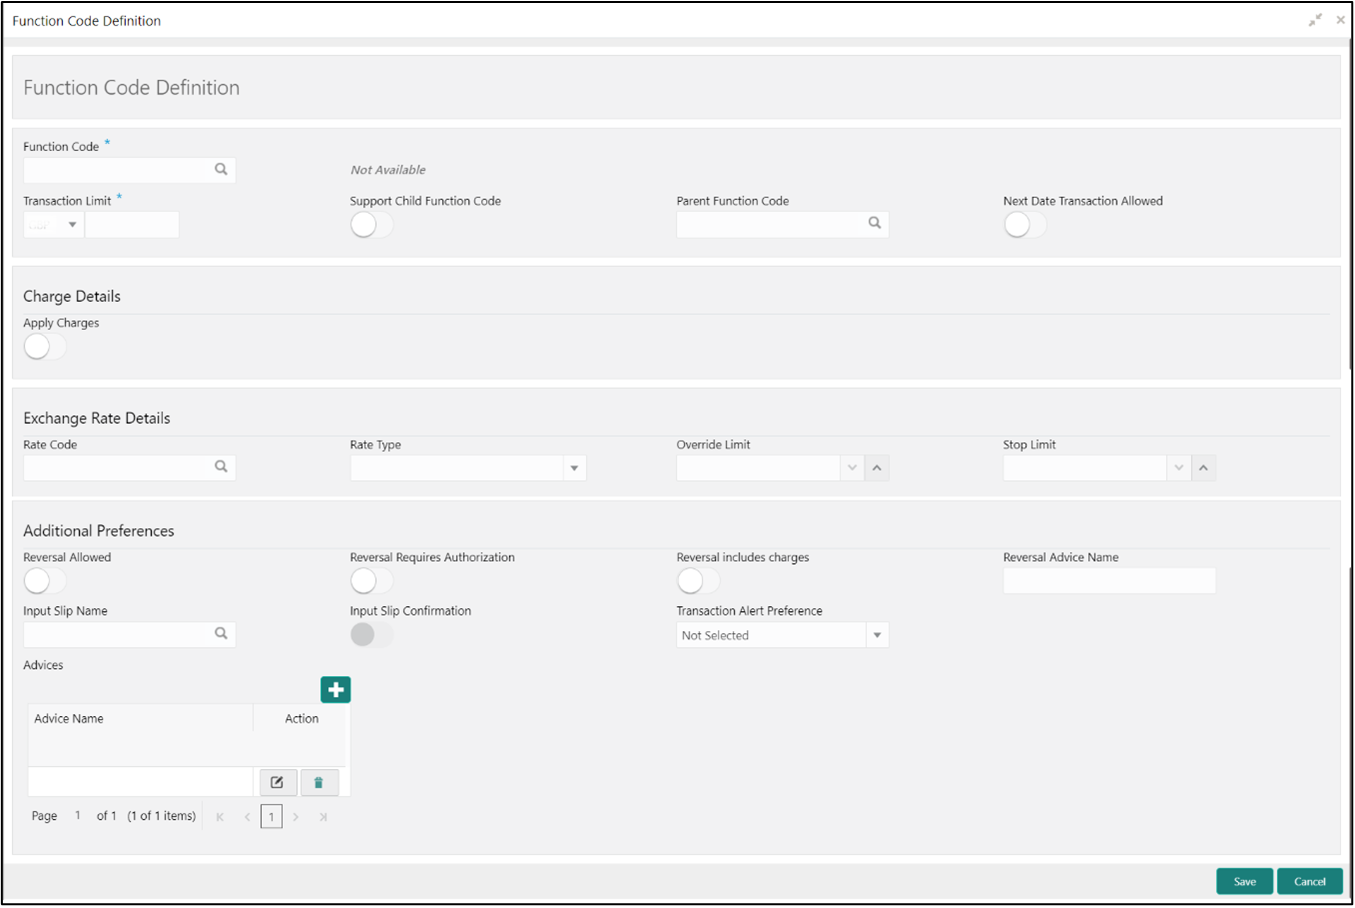
The Function Code Definition screen is used to specify the preferences for the function code.
For the list of function codes and the respective screen names, refer to List of Function Codes.
To maintain function code definitions:
- On the Homepage, from Teller mega menu, under
Branch Maintenance, click Function Code
Definition or specify Function Code
Definition in the search icon bar and select the screen.The Function Code Definition summary screen is displayed.
- Click the
 icon.The Function Code Definition (New) screen is displayed.
Note:
In Function Code Definition screen, reversal allowed flag will not be enabled for BC Payment Reversal, DD Payment Reversal, and Cash Remittance Reversal. The system displays an error message stating that the Reversal is not supported, making reversal allowed as N.
- On the Function Code Definition screen, specify the
fields. For more information on fields, refer to the field description
table.
Note:
The fields, which are marked with an asterisk, are mandatory.Table 20-10 Function Code Definition - Field Description
Field Description Function Code
Select from the list function codes that are factory shipped. For the list of function codes and the respective screen names, refer to List of Function Codes.
Function Code Description
Displays the description of the function code.
Transaction Limit
Specify the maximum transaction amount allowed for this function code in branch currency.
Support Child Function Code
Select if the specified function code needs to act as the parent function code.
Parent Function Code
Specify the applicable parent function code.Note:
This field is enabled only if the Support Child Function Code is not selected.Next Date Transaction Allowed
Select if the next day transaction posting needs to be allowed for the specified function code.
Charge Details
Specify the fields.
Apply Charges
Specify if charges are applicable for this transaction.
Exchange Rate Details
Specify the fields.
Rate Type
Select the rate type for the transaction code.
Rate Code
Select the rate code for the transaction code.
Override Limit
Specify the override limit. The system displays the default override limit currency as GBP.
Stop Limit
Specify the stop limit. The system displays the default stop-limit currency as GBP.
Additional Preferences
Specify the fields.
Reversal Allowed
Specify if the reversal is allowed for the transaction.
Note:
Reversal allowed will be disabled for remittances and clearing transactions. Hence, reversal will not be enabled in the journal log.Reversal Requires Authorization
Specify if the authorization is required for a reversal transaction.
Reversal includes charges
Specify if the charges are to be reversed along with transaction reversal.
Reversal Advice Name
Select the reversal advice name from the list of values.
Input Slip Name
Specify the input slip name.
Input Slip Confirmation
Select if the input slip confirmation is required for the transaction. If this option is selected for a transaction screen, the Input-Slip button will be displayed on the screen.
On the specified transaction screens, you can click Input-Slip to view the input slip before transaction submission. Once you click Input-Slip, the system validates mandatory fields. In addition, you can perform any of the following actions:
-
Confirm and Print – This icon is enabled only if Input Slip Confirmation is selected in the Function Code Definition screen. In addition, the transaction can be submitted only if the receipt is confirmed. Click this button to confirm and print the receipt.
-
Print – Click Print to print the generated slip and provide it to the customer.
-
Close – Click Close to close the generated receipt.
Note:
If the mandatory fields are not filled, the system shows an error message Value is required, wherever applicable.Transaction Alert Preference
Select the alert notification preference from the drop-down list. The values are mentioned below:
-
SMS – the system sends an SMS notification of the transactions to the registered mobile number of the customer.
-
Email – the system sends an email notification of the transactions to the registered email ID of the customer.
-
Both – the system sends SMS and email notifications of the transactions to the registered mobile number and email ID of the customer.
-
None – the system will not send any notifications to the customer.
Note:
The setup for Plato alerts needs to be completed and Kafka topics need to be created to enable e-mail alerts. For information on setup, refer to Oracle Banking Branch Installation Guide.Advices
This section allows selecting advice for multiple Function Codes.
Advice Name
Displays the advice name.
-
- Click Save.The summary view is displayed with the configured function code definitions.
Parent topic: Branch Maintenance

