- Teller User Guide
- Remittances
- Banker's Cheque
- BC Operations
- BC Revalidation by Account
BC Revalidation by Account
The Teller can use the BC Operations screen to revalidate an instrument that is in expired status.
-
Revalidation is allowed at the Instrument type level
-
The instrument is not liquidated, canceled, or refunded
-
The instrument is issued, revalidated, or duplicate issued but not liquidated/refunded/canceled
-
Rule based authorization is not supported for revalidation
To revalidate an instrument:
- On the Homepage, from Teller mega menu, under
Remittances, click BC
Operations or specify BC Operations in
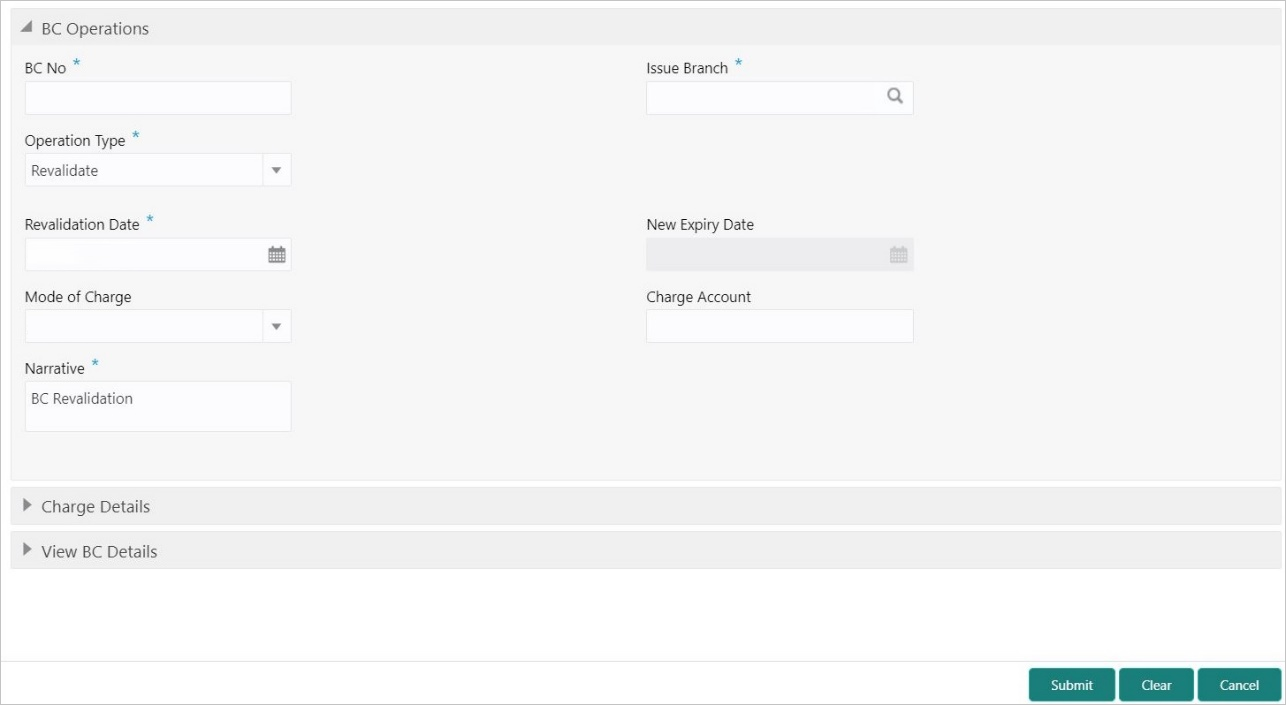
the search icon bar and select the screen.The BC Operations screen is displayed.
- On the BC Operations screen, specify the fields. For more information on fields, refer to the field description
table.
Note:
The fields, which are marked with an asterisk, are mandatory.Table 8-11 BC Operations (Revalidate) - Field Description
Field Description Operation Type
Select the type Revalidate from the drop-down list.
BC No
Specify the BC number of the instrument.
Issue Branch
Select the branch code where the instrument is issued from the LOV.
Revalidation Details
Specify the details under this segment.
Beneficiary Account
Displays the beneficiary account number.
Revalidation Date
Select the revalidation date.Note:
By default, the system date is displayed as the revalidation date.New Expiry Date
Displays the new expiry date based on the specified revalidation date.
Mode of Charge
Select the mode of charge from the drop-down values (Account or Cash).
Charge Account
Specify the charge account number. The following conditions apply based on the value selected for Mode of Charge:
-
If the Mode of Charge is selected as Account, the user needs to capture the account from which the charges are to be deducted.
Note:
If the Mode of Charge is selected as Account, the system displays the Drawer Account by default. Else, this field is kept blank and the user can input the valid account number. -
If Mode of Charge is selected as Cash, the user needs to capture Charge Currency, and denomination details to be picked up based on the charge currency specified.
Narrative
Displays the default narrative as BC Revalidation, and it can be modified.
-
- Specify the charge details. For information on the fields in the Charge Details segment, refer to Add Charge Details.
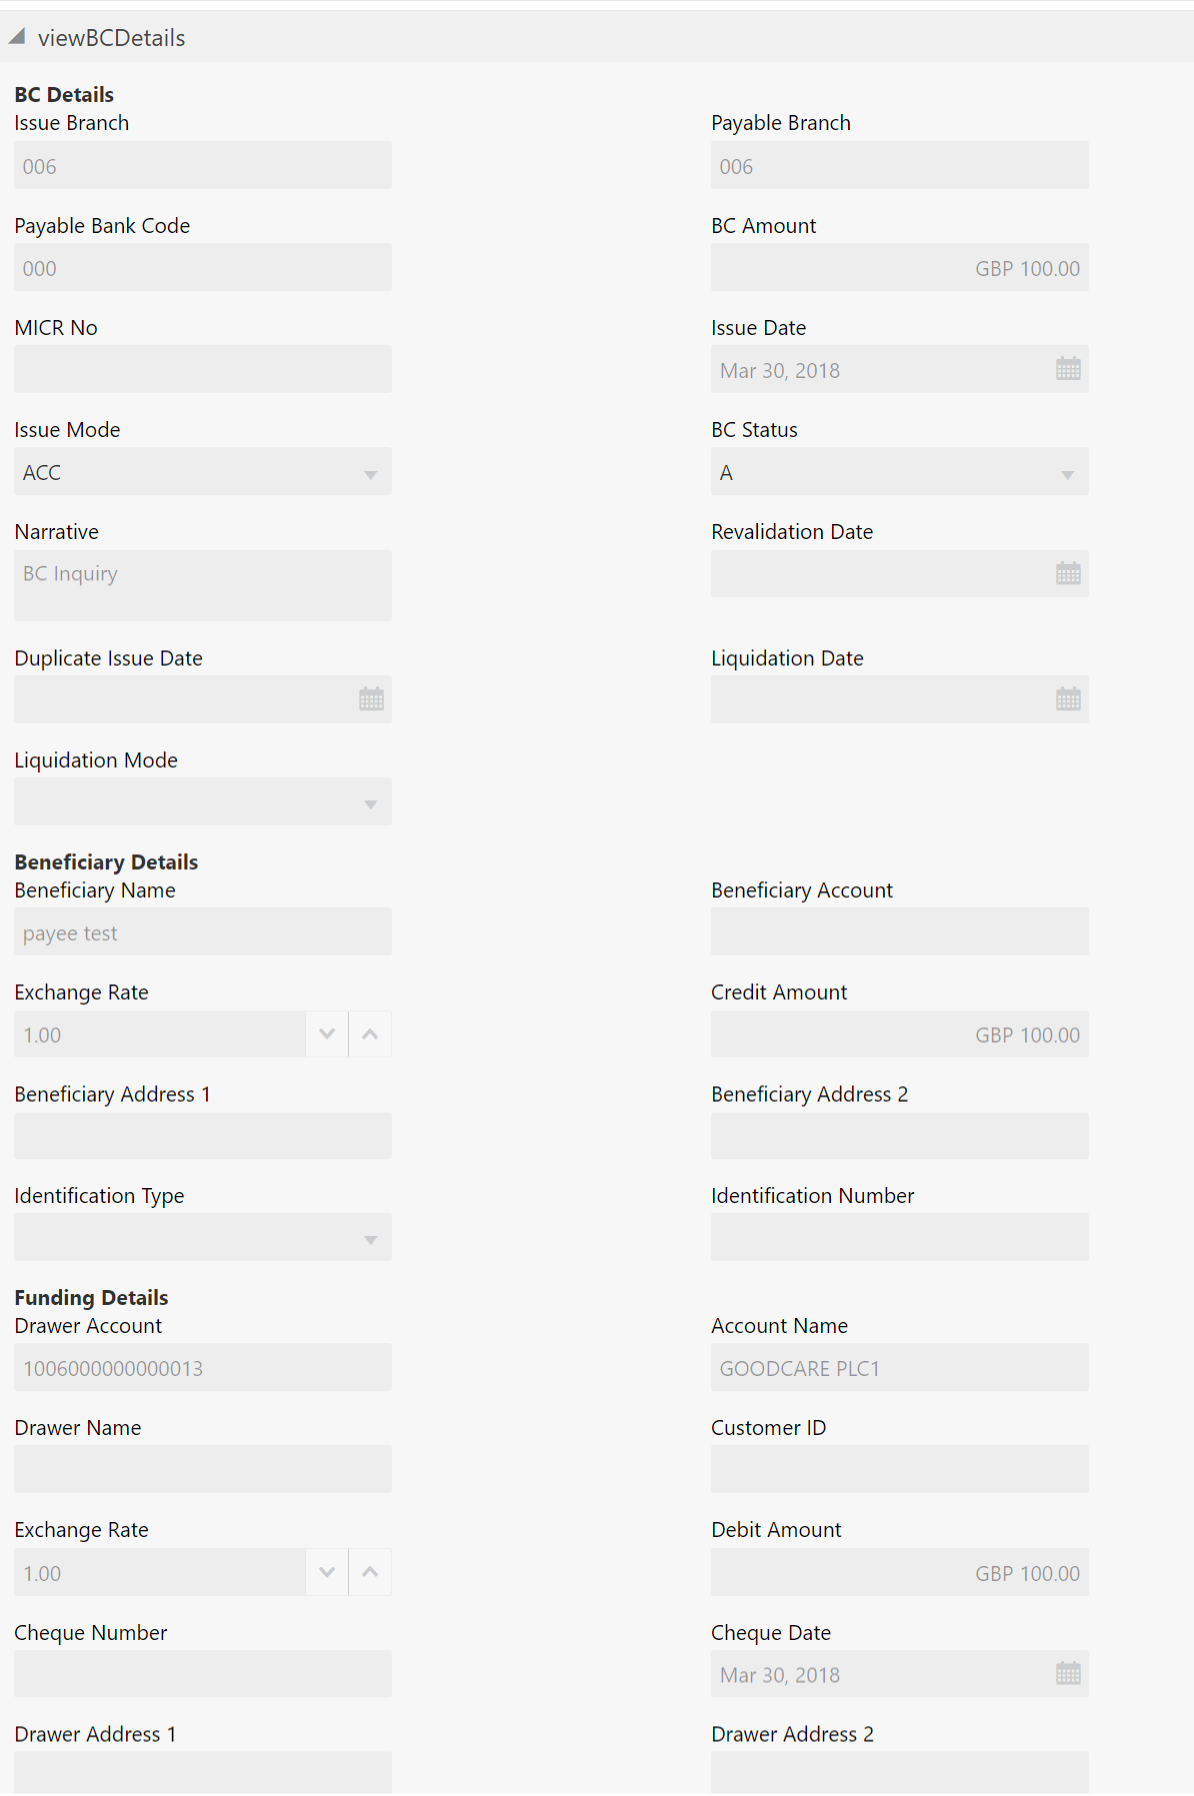
- Click on the View BC Details data segment to view the additional details of the BC when the issue mode as account.
Figure 8-12 View BC Details (Revalidate BC Issued by Account)
- On the View BC Details screen, view the fields. For more information on fields, refer to the field description
table.
Table 8-12 View BC Details (Revalidate BC Issued by Account) - Field Description
Field Description BC Details
Displays the details of BC under this segment.
Issue Branch
Displays the logged-in branch code.
Payable Branch
Displays the payable branch for the BC.
Payable Bank Code
Displays the payable bank code.
BC Amount
Displays the BC currency and the BC amount.
MICR No
Displays the MICR number.
Issue Date
Displays the issue date mentioned in the BC.
Issue Mode
Displays the issue mode as Account.
BC Status
Displays the status of the BC.
Narrative
Displays the default narrative as BC Inquiry, and it can be modified.
Revalidation Date
Displays the date of BC revalidation.
Duplicate Issue Date
Displays the duplicate issue date of BC.
Liquidation Date
Displays the liquidation date of BC.
Liquidation Mode
Displays the liquidation mode of BC.
Beneficiary Details
Specify the fields.
Beneficiary Name
Displays the beneficiary's name.
Beneficiary Account
Displays the beneficiary account number.
Exchange Rate
Displays the exchange rate, and it can be modified.Note:
If the transaction currency is the same as the account currency, the system will display the exchange rate as 1.Credit Amount
Displays the credit amount.
Beneficiary Address 1 and Beneficiary Address 2
Displays the address of the beneficiary.
Identification Type
Displays the identification type of the beneficiary.
Identification Number
Displays the identification number of the beneficiary.
Funding Details
Funding details are displayed under this segment.
Drawer Account Displays the account number of the drawer. Account Name Displays the drawer name.
Drawer Name
Displays the drawer name.
Customer ID
Displays the customer ID of the drawer.
Exchange Rate
Displays the exchange rate.
Debit Amount
Displays the amount that needs to be debited from the drawer account.
Cheque Number
Displays the cheque number.
Cheque Date
Displays the date mentioned in the cheque.
Drawer Address 1 and Drawer Address 2
Displays the address of the drawer.
- Click Submit.
A teller sequence number is generated, and the Transaction Completed Successfully information message is displayed.
Note:
The transaction is moved to authorization in case of any warning raised when the transaction saves.On transaction submission, the system will hand off the details to the payments product processor (Oracle Banking Payments) for processing. When you get a success notification from Oracle Banking Payments, the system will update the transaction status as Success and mark for charges accounting handoff. The transaction accounting is not applicable for the transaction. In case of reject notification from the Oracle Banking Payments, the system will discard the transaction.
Parent topic: BC Operations

