- Receivables and Payables User Guide
- Maintenance for Receivables and Payables
- Relationship Maintenance
- Create Relationship
3.8.1 Create Relationship
This topic describes the systematic instruction to create relationship between corporates and buyers, or suppliers counterparties.
Newly created relationships take effect once authorized and cannot be modified post authorization. However, the counterparty can be added/modified.
Specify User ID and Password, and login to Home screen.
- On Home screen, click Cash Management. Under Cash Management, click Receivables & Payables.
- Under Receivables & Payables, click Maintenance. Under Maintenance, click Relationship Management.
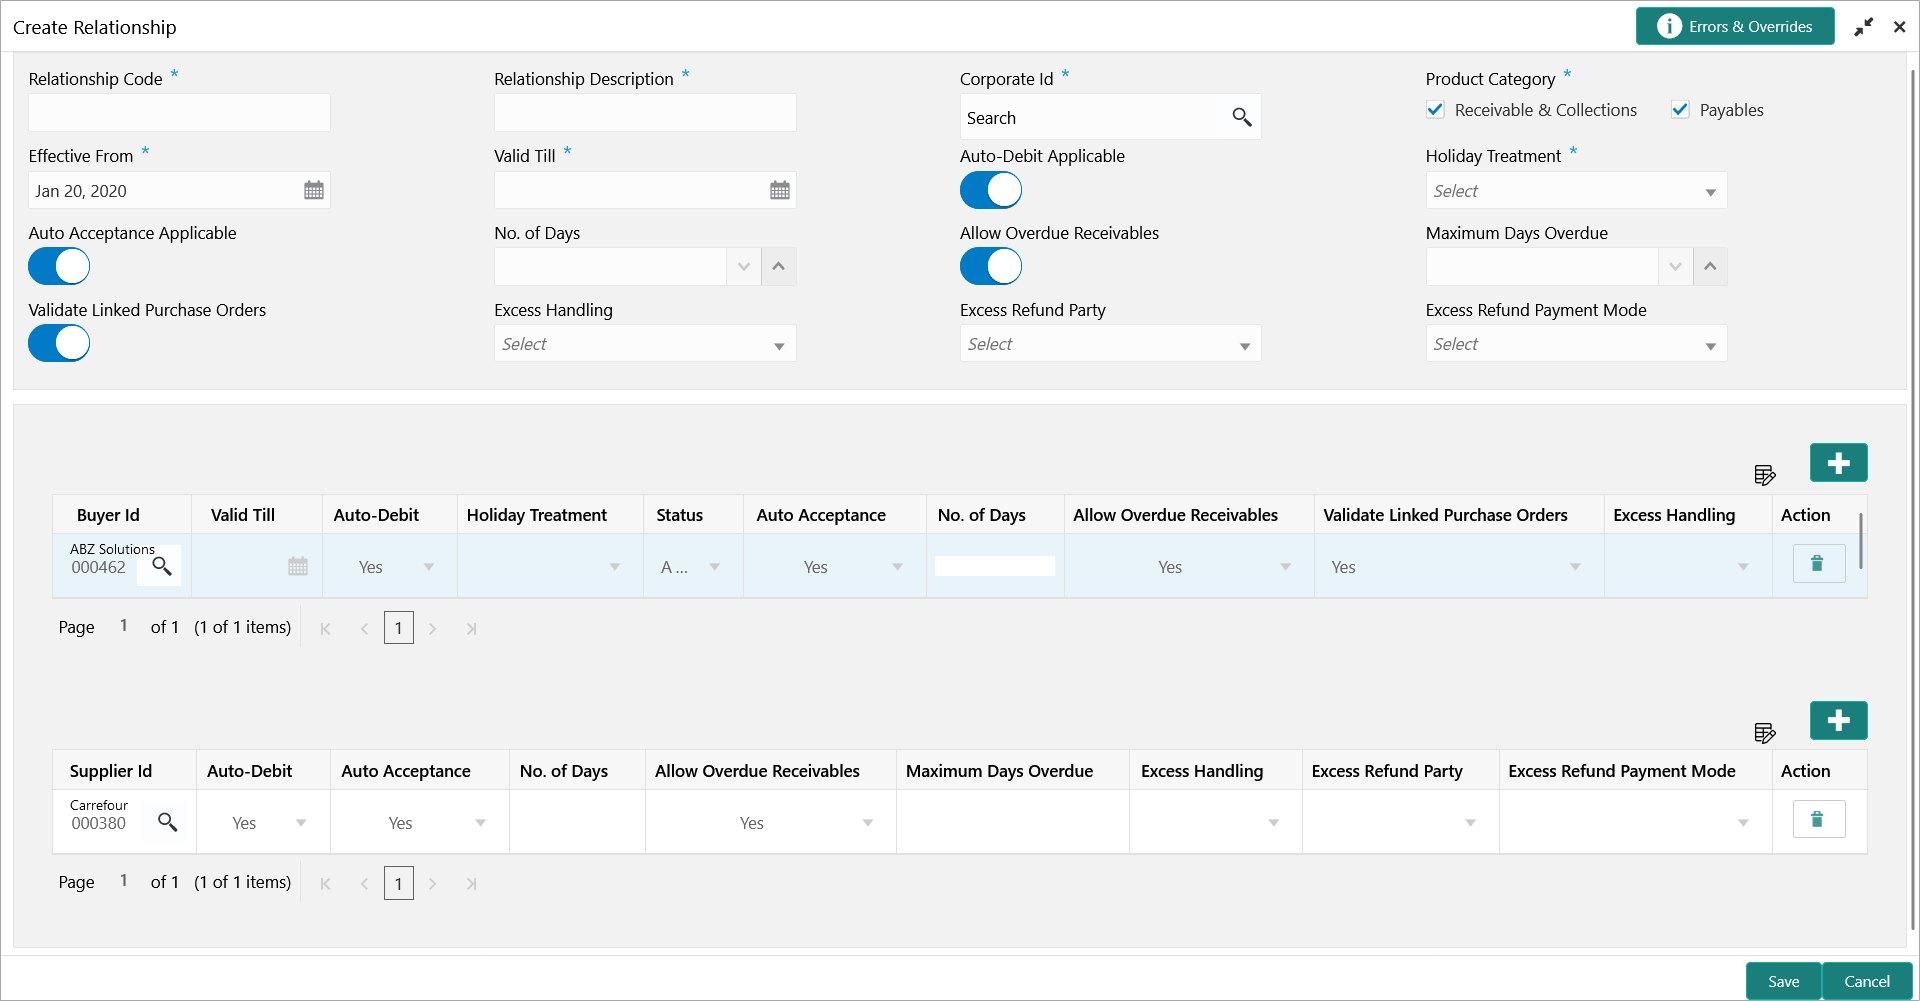
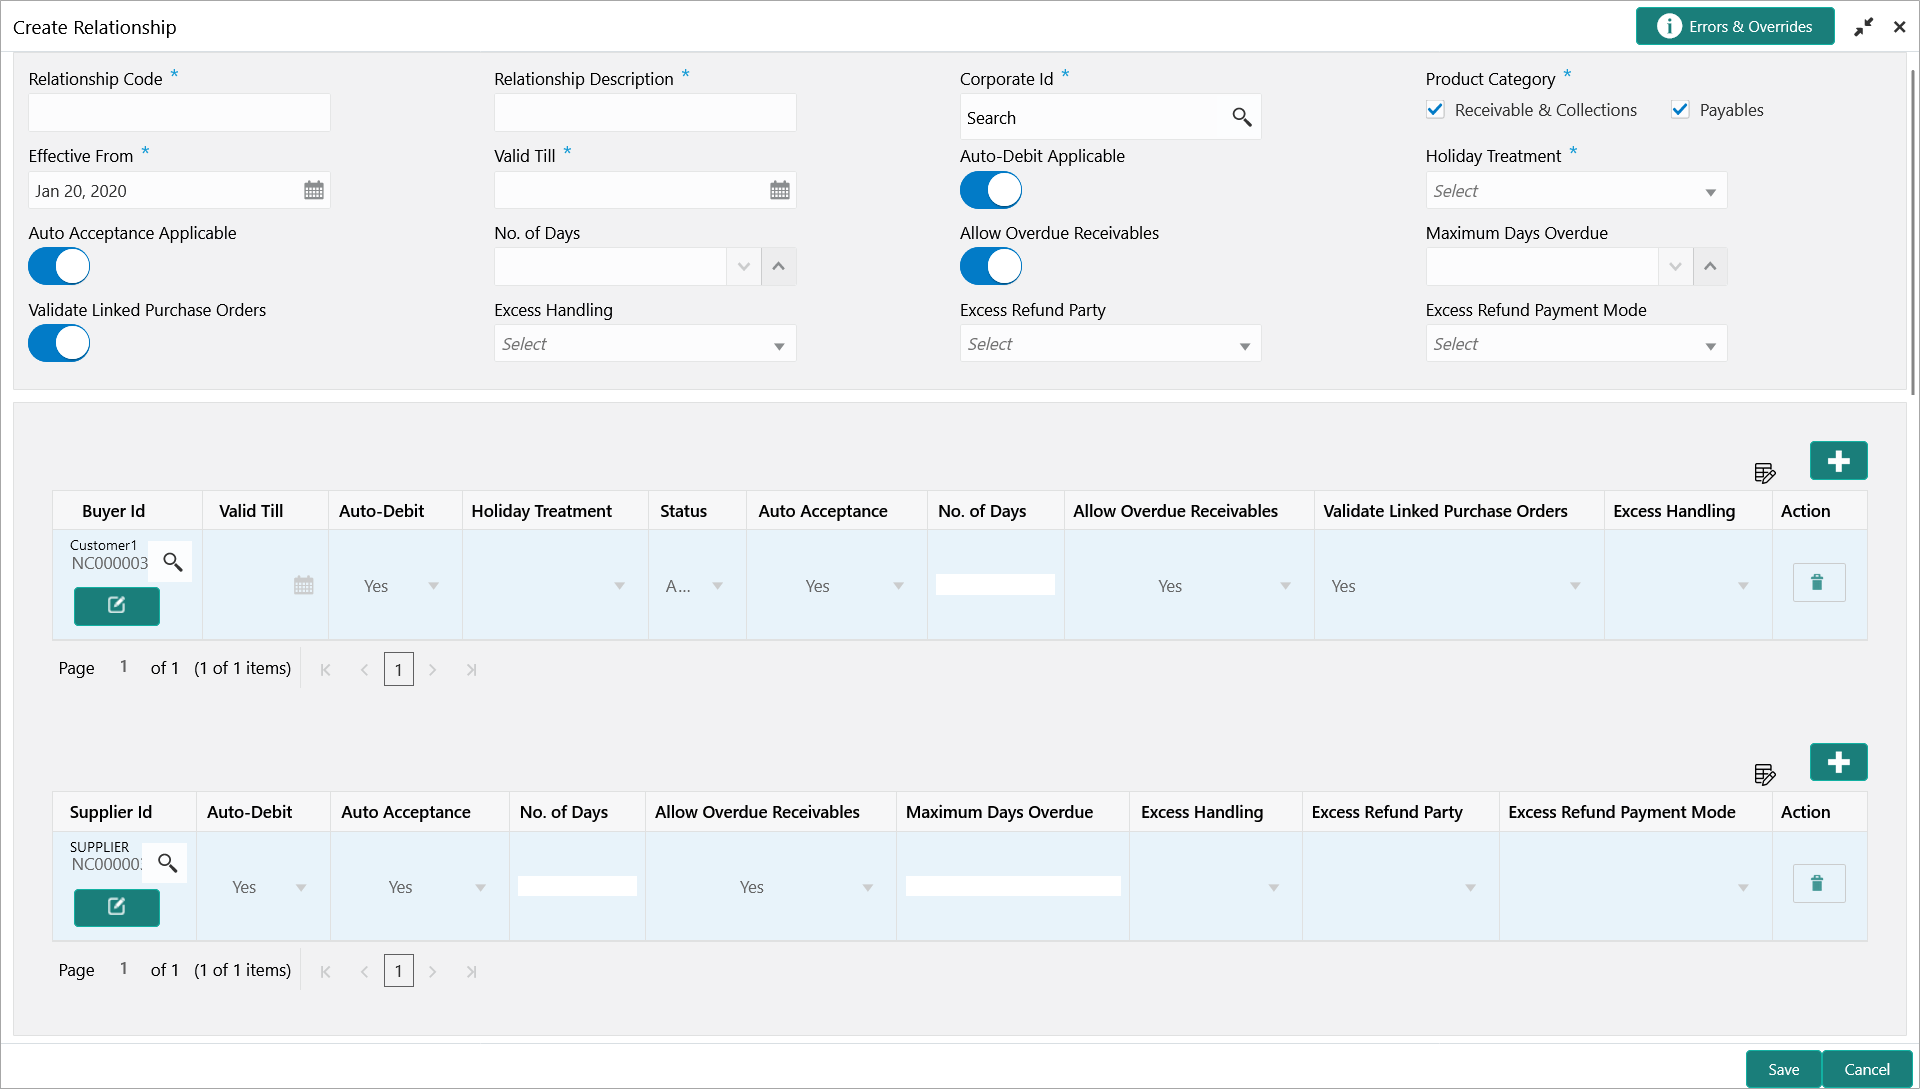
- Under Relationship Management, click Create Relationship.The Create Relationship - Customer screen displays if the Corporate Id is selected with the Customer.The Create Relationship - Non Customer screen displays if the Corporate Id is selected with the Non Customer.
Figure 3-56 Create Relationship - Customer
Figure 3-57 Create Relationship - Non Customer
- Specify the fields on Create Relationship screen.For more information on fields, refer to the field description table.
Note:
The fields, which are marked with an asterisk, are mandatory.Table 3-20 Create Relationship - Field Description
Field Description Relationship Code Specify the unique relationship code to be created. This field cannot be modified once authorized.
Relationship Description Specify the description of the code. Corporate Id Click the Search icon to select the corporate for whom the linkage to counterparty is required. Product Category Select the applicable product categories as ‘Receivables & Collections’ and/or ‘Payables’. The data grid for each category is displayed upon selecting the category.
Effective From Click the Calendar icon to select the date from which the relationship is active. The system considers the branch date, if this field is left blank.
Valid Till Click the Calendar icon and select the date till which the relationship would be valid. Auto Debit Applicable Switch the toggle ON, if automatic debit facility is applicable at relationship level. Holiday Treatment Select the value to specify how to treat transactions falling on holidays. Auto Acceptance Applicable Switch the toggle ON, if auto acceptance should be enabled. No. of Days Specify the number of day(s) post which the auto-acceptance is triggered for an invoice. Allow Overdue Receivables Switch the toggle ON to allow creation of overdue invoices and debit notes for the relationship. Maximum Days Overdue Specify the maximum number of days past the invoice/debit-note due date or the payment due date (if maintained), until when the creation of the receivable is allowed. This field appears only when the ‘Allow Overdue Receivables’ toggle is enabled. - In the grid section, click Add icon to add the selected values in the grid.A message appears enquiring if the relationship parameters should be applied to the counterparty record.
- Click Confirm, if the relationship parameters must be
percolated to the counterparty. Else, click Cancel.
Note:
If you click ‘Confirm’, the values of Auto-Debit Applicable, Holiday Treatment, Auto Acceptance Applicable, No. of Days, Allow Overdue Receivables, and Maximum Days Overdue fields are percolated to the counterparty being added. On clicking ‘Cancel’, these fields remain NULL at the counterparty-level. - Perform the following steps in the grid.
- Click Search icon in the Buyer/Supplier Name and select the buyer/supplier.
- Click Add icon to add Non Customer details.
Note:
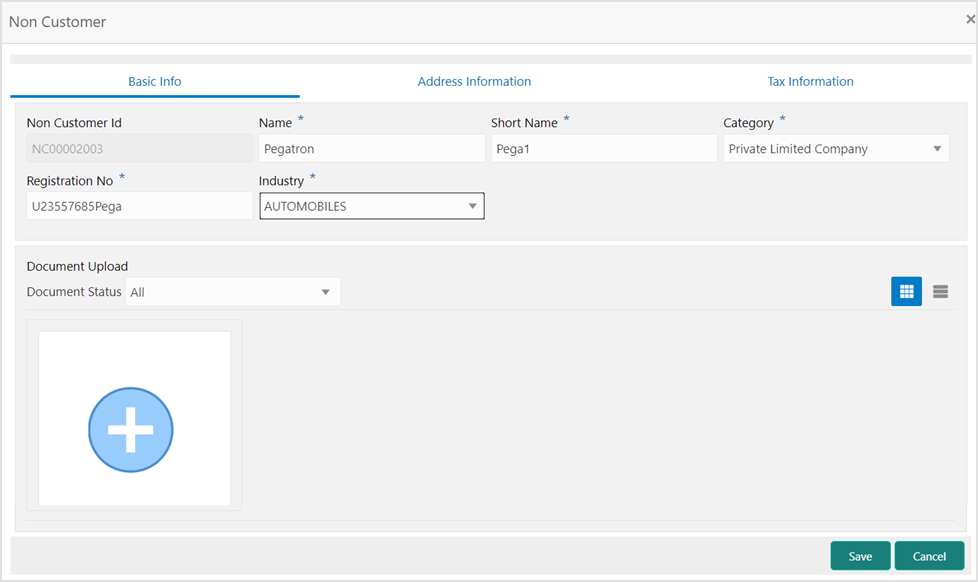
Relationship cannot be created between non-customers, i.e., non-customers cannot be added if the selected Corporate Id is a non-customer.The Non Customer - Basic Info screen displays. - In the Basic Info tab, specify the non-customer basic details such as name, category, registration number, and industry. The user can also upload documents of the non-customers.
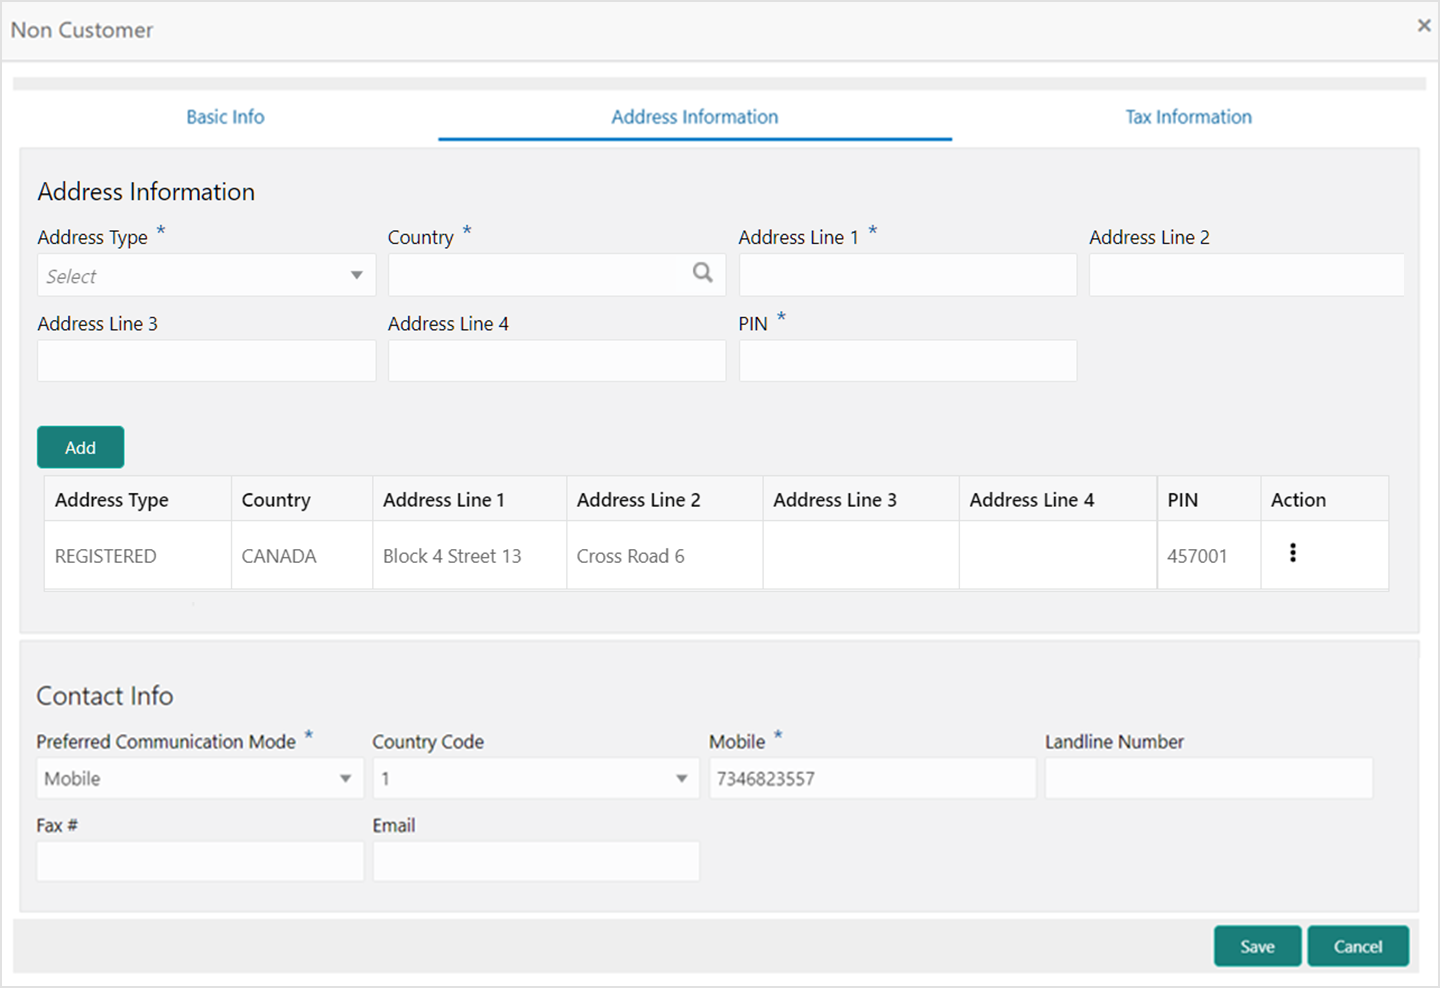
- Click Address Information tab.The Non Customer - Address Information screen displays.
Figure 3-59 Non Customer - Address Information
- In the Address Information tab, specify the address related information of the non-customer.
- Click Tax Information tab.The Non Customer - Tax Information screen displays.
Figure 3-60 Non Customer - Tax Information
- In the Tax Information tab, specify the tax reference numbers and GIIN of the non-customer.
- Click Save to save the non-customer data.
- Click Save to save the record and send it for authorization.
Parent topic: Relationship Maintenance


