- Receivables and Payables User Guide
- Manual Allocation
7 Manual Allocation
This topic describes the systematic instruction to allocate payments in virtual accounts.
Only payments that are unallocated or partially allocated with the ‘Allocation Required’ flag set to "Y" in the payment records can be manually allocated from this screen.
Specify User ID and Password, and login to Home screen.
- On Home screen, click Cash Management. Under Cash Management, click Receivables & Payables.
- Under Receivables & Payables, click Manual Allocation.The Manual Allocation screen displays.
- In the Branch list, select the branch for which payment allocation needs to be done. By default, branch of the logged-in user is selected.
- In the Action list, select the action as Allocate or De-Allocate for allocation or de-allocation of the payment respectively.
- Click Proceed to view the search parameters to search payment record(s).The Manual Allocation - Search screen displays.
- Specify the fields on Manual Allocation screen.For more information on fields, refer to the field description table.
Note:
The fields, which are marked with an asterisk, are mandatory.Table 7-1 Manual Allocation - Field Description
Field Description Payment Reference Number Specify the payment reference number to be searched. Payment Mode Select the mode of payment to search the payment by. Debit-Credit Indicator Select the value to specify whether the payment is for credit or debit. Payment Party Click the Search icon and select the party making the payment. Counter Party Click the Search icon and select the counter-party for the payment. Beneficiary Click the Search icon and select the beneficiary of the payment. Account Owner Click the Search icon and select the owner of the account. Remitter Account Number Click the Search icon and select the remitter’s account number used for the payment. Credit Account Number Click the Search icon and select the account of the beneficiary. Payment Towards Select the entity towards which the payment has been initiated: - None
- Finance
- Invoice
- Expected Cashflow
- Virtual Account
Recon Status Select the current recon status of the payment. Allocation Status Select the allocation status for reconciliation of the payment. Amount Reference Select the value to specify the reference for amount criteria. Currency Select the currency of the amount. Amount From Specify the start of the amount-range within which the payment needs to be searched. Amount To Specify the end of the amount-range within which the payment needs to be searched. Date Reference Basis Select the value to specify the reference for date criteria. Date From Click the Calendar icon and select the starting-range of the payment/value date. Date To Click the Calendar icon and select the range-ending of the payment/value date. - Click Search to view the payment records.The List of Payments section displays.
Based on the option selected from the Action list, perform the following steps:
If Allocate option is selected:
- Select the payment record and then under the Allocation Basis column, select the value to specify whether the allocation needs to be done based on account or attribute.
- In the Amt to be Allocated column, enter the amount to allocate.
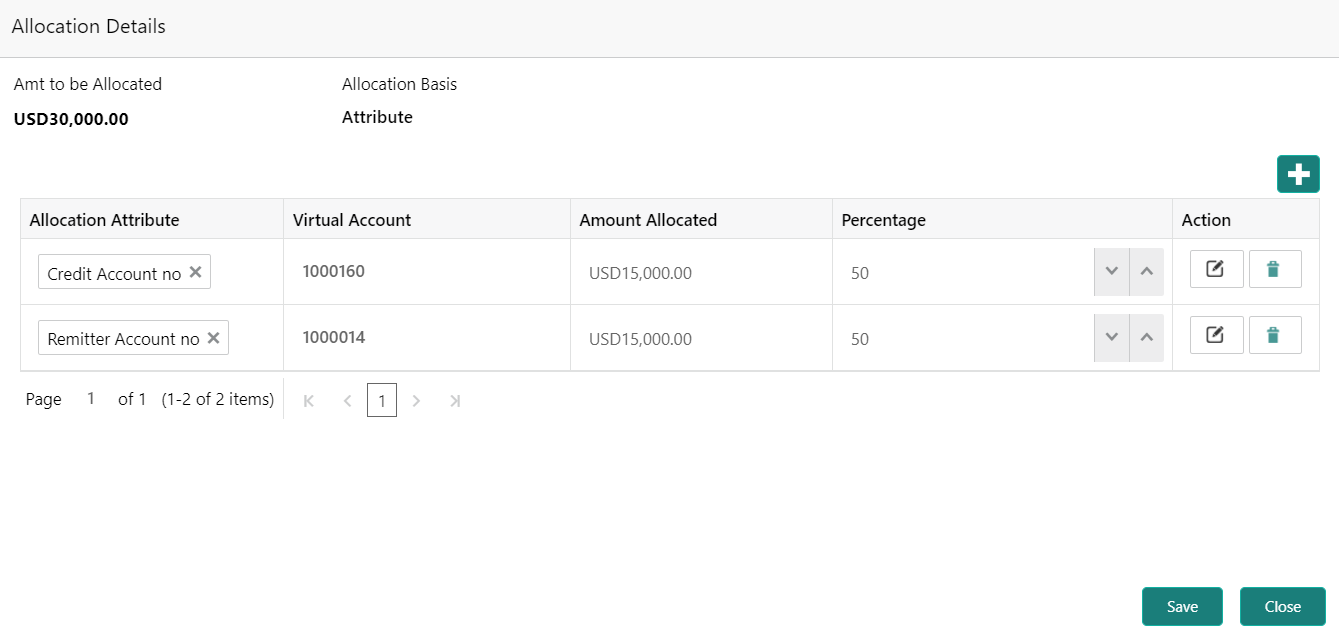
- In the Allocation Details column, click the Rule Details link to specify the allocation details.The Allocation Details screen displays.
- Perform the following steps in the Allocation Details pop-up screen.
- Click Add icon to add a row for a virtual account and double click in each field of the row to add/edit the details.
- In the Allocation Attribute field, select the attribute to allocate the virtual account for. This field is displayed only for attribute based allocation selection.
- In the Virtual Account field, click the Search icon to fetch and then select the virtual account to be allocated. This fields is displayed only for account based allocation selection.
- In the Amount Allocated field, enter the amount to be allocated to the selected virtual account.The Percentage field is auto-calculated based on total amount to be allocated.
- In the Percentage field, enter the percentage of the amount being allocated.The Amount Allocated field is auto-calculated based on total amount to be allocated.
- If required, repeat the above steps to add more rows.
- Click Delete icon to remove a row or Edit icon () to modify the allocation details.
- Click Save to save the allocation details.
- Click Proceed to view the allocation summary.The Allocation Summary section displays.
- If required, click Expand All to view allocation details or Collapse All to hide the same.
- Click Submit to send the record(s) for authorization.
If De-Allocate option is selected:
- On List of Payments section, select the payment to be de-allocated.
- Click Proceed.The Confirmation message for de-allocation displays.
- Click Confirm.The status of the transaction message displays.


