- Collections User Guide
- Maintenance for Collections
- Charges Maintenance
- Charge Decisioning
- Create Charge Decisioning
3.5.3.1 Create Charge Decisioning
This topic describes the systematic instruction to map the charge rule and charge code to a specific product for instrument collections (both cash and cheques).
The charge party (buyer/supplier/insurance company) can also be defined. The calculation and collection frequencies for the charge can be defined as well.
Charges are not levied for instruments that are returned due to technical reasons on the bank’s end. Such instruments are not charged for re-lodging either.
- On Home screen, click Cash Management. Under Cash Management, click Collections.
- Under Collections, click Maintenance. Under Maintenance, click Charges.
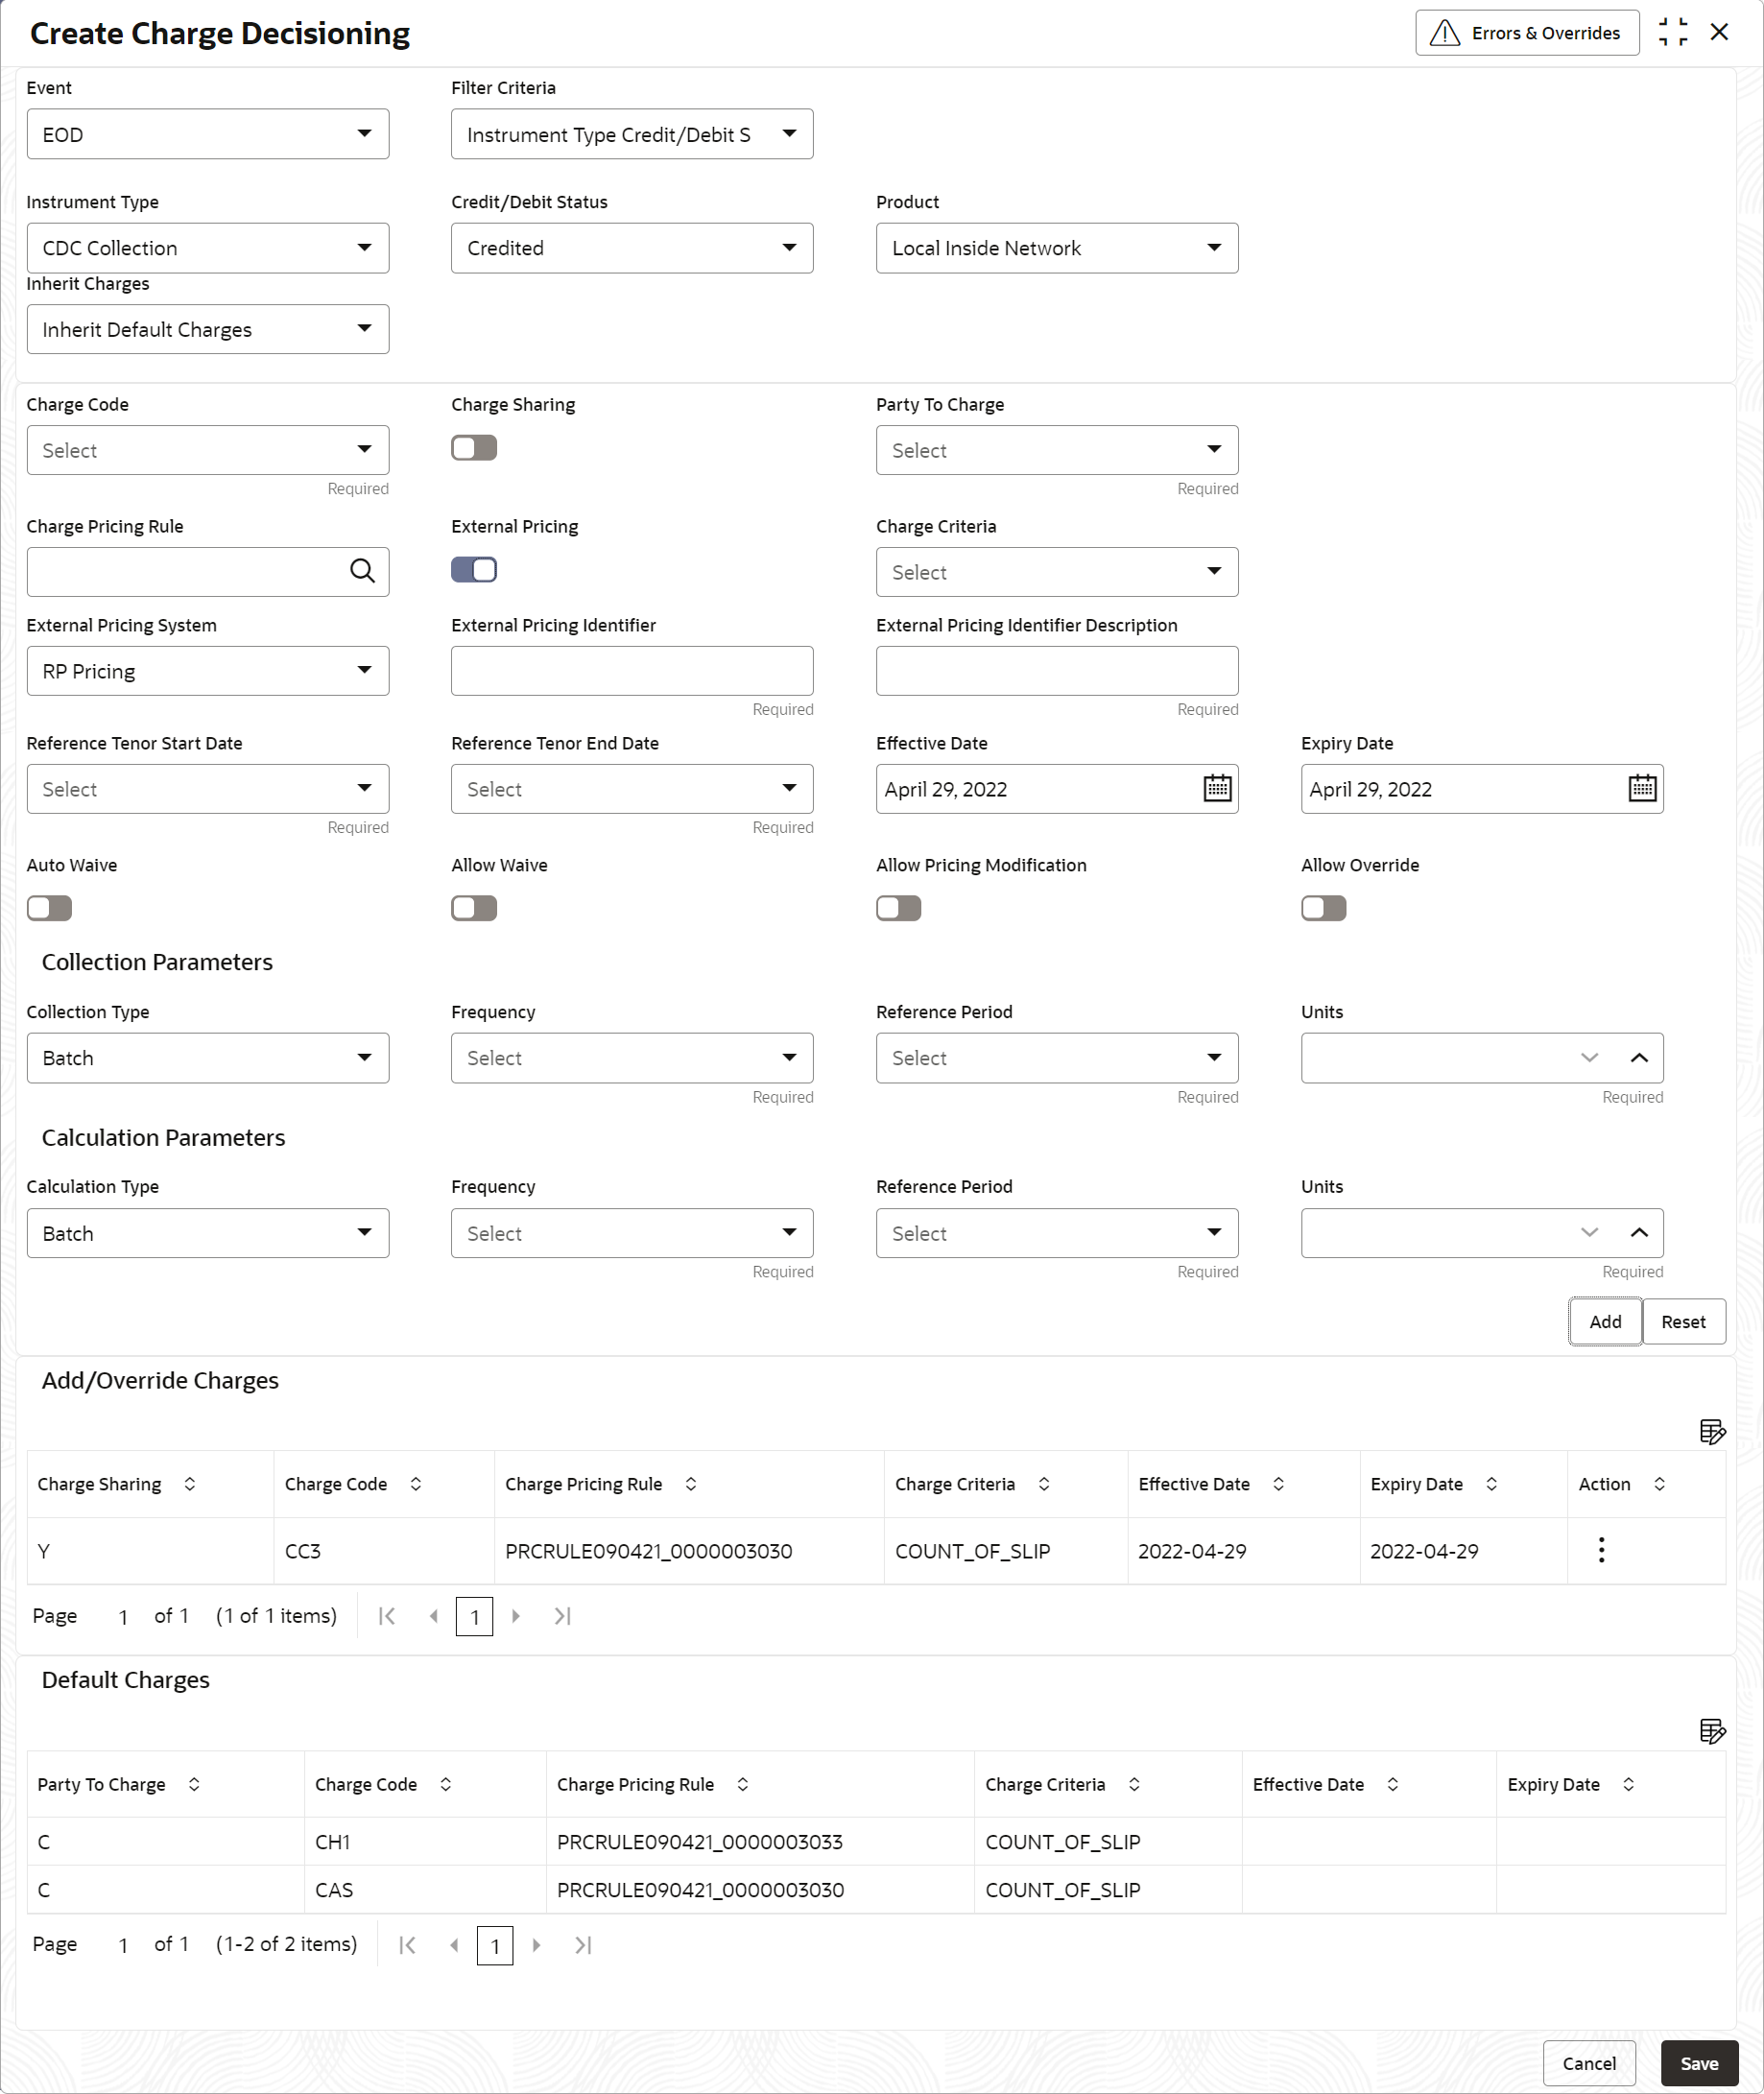
- Under Charges, click Charge Decisioning. Under Charge Decisioning, click Create Charge Decisioning.The Create Charge Decisioning screen displays.
- Specify the fields on Create Charge Decisioning screen.For more information on fields, refer to the field description table.
Note:
The fields marked as Required are mandatory.Table 3-14 Create Charge Decisioning - Field Description
Field Name Description Event Select the event on the occurrence of which, the charge should be applied. Filter Criteria Select the appropriate filter criteria on which the charge is required to be calculated and debited. The available options are: - Instrument Type Instrument Status based
- Instrument Type Instrument Status Product-based
- Instrument Type Credit/Debit Status based
- Instrument Type Credit/Debit Status Product-based
- Default
Instrument Type Select the instrument type for which the charge is to be mapped. This field appears if the selected filter criteria contains ‘Instrument Type’. This list displays values based on the option selected in the Filter Criteria, as follows:
- For Instrument Type Instrument Status based, the options displayed are: PDC Collection and CDC Collection.
- For Instrument Type Instrument Status Product-based, the options displayed are: PDC Collection and CDC Collection.
- For Instrument Type Credit/Debit Status based, the options displayed are: CDC Collection, Cash Deposit, and Cash Withdrawal.
- For Instrument Type Credit/Debit Status Product-based, the option displayed is: CDC Collection.
Credit/Debit Status Select the credit or debit status of the instrument to map the charge with. This field appears if the selected filter criteria contains ‘Credit/Debit Status’. The available options are:- For CDC Collection: Credited, Reversed and Partially Reversed
- For Cash Deposit: Credited
- For Cash Withdrawal: Debited
Instrument Status Select the relevant status of the instrument based on which the charge would get levied. Different charges and pricing can be configured for combination of instruments and their status. This field appears if the selected filter criteria contains ‘Instrument Status’: The available options for CDC Collection:- Booked
- Hold
- Returned
- Realized
The available option for PDC Collection:- Booked
Product Select the relevant product to map the charge to. This field appears if the selected filter criteria contains ‘Product-based’. Inherit Charges Specify if default charges should be inherited as set up for default filter criteria or should be overridden as well. Charge Code Select the charge code for which the decisioning is to be configured. Charge Sharing Switch the toggle ON if charge sharing is applicable. Sharing Percentage Allocation Click the link to specify the sharing percentage for each party. This link is displayed only if the Charge Sharing toggle is enabled.
Party To Charge Select the party to be charged. This field is displayed if you disable Charge Sharing. This field is set to ‘Corporate’ by default, if the Instrument Type is selected as either CDC Collection, PDC Collection, Cash Collection, or Cash Withdrawal.
Charge Pricing Rule Click the search icon to select the charge pricing rule to be applied. External Pricing Switch the toggle ON to allow the user to configure the external pricing. By default, this toggle will be OFF.
Charge Criteria Select the criteria to be considered based on which the charge should be calculated. The available options are: - Instrument Type: PDC/CDC Collection
- Count of Instrument
- Count of Slip
- Instrument Amount
- Slip Amount
- Instrument Type: Cash Collection/Withdrawal
- Count of Slip
- Slip Amount
- Count of Instrument
- Count of Slip
- Instrument Amount
- Slip Amount
External Pricing System Select the external pricing system from the dropdown list for which the external charges needs to be configured. This field appears only if the External Pricing toggle is ON.
External Pricing Identifier Specify the unique identifier for the external pricing system. This field appears only if the External Pricing toggle is ON.
External Pricing Identifier Description Specify the brief description about the external pricing identifier. This field appears only if the External Pricing toggle is ON.
Reference Tenor Start Date Specify which date should be considered to calculate the start of charge tenor duration. The options displayed depend on the selected Instrument Type. Reference Tenor End Date Specify which date should be considered to calculate the end of charge tenor duration. The options displayed depend on the selected Instrument Type. Effective Date Click the calendar icon to select the start date of the charge decisioning validity. Expiry Date Click the calendar icon to select the end date of the charge decisioning validity. Auto Waive Switch the toggle ON to enable automatic charge waiving at the time of transaction processing. This field is displayed only if filter criteria is selected as Instrument Type Status Based.
Allow Waive Switch the toggle ON to enable manual charge waiving at the time of transaction processing. If the Auto Waive toggle is switched ON, then this toggle is switched OFF and disabled by default. Allow Pricing Modification Switch the toggle ON to allow pricing rule modification at the time of transaction processing. If the Auto Waive toggle is switched ON, then this toggle is switched OFF and disabled by default. Allow Override Switch the toggle ON to enable overriding of charge amount at the time of transaction processing. If the Auto Waive toggle is switched ON, then this toggle is switched OFF and disabled by default Collection Parameters Displays the fields related to Collection Parameters under this section. Collection Type Specify how the charge should be collected. The available options are: - Batch
- Online
Frequency Specify the frequency of charge collection. This field is displayed only when the collection type is Batch.
Reference Period Specify when the collection should take place for the selected frequency. For monthly or half-yearly frequency, the collection can take place either at the beginning of the period (BOP) or end of the period (EOP).
For weekly frequency, the collection can happen on a specific day of the week.
This field is displayed only if the Collection Type is selected as Batch.
Units This field specifies whether the charge collection should take place as per units of specified frequency. If monthly frequency is specified and the number of units is 2, then the charge would be collected once in two months. This field is displayed only if the Collection Type is selected as Batch.
Calculation Parameters Displays the fields related to Calculation Parameters under this section. Calculation Type Specify how the charge should be calculated. The available options are: - Batch
- Online
Frequency Specify the frequency of charge calculation. This field is displayed only if the Calculation Type is selected as Batch.
Reference Period Specify when the calculation should take place for the selected frequency. For monthly or half-yearly frequency, the calculation can take place either at the beginning of the period (BOP) or end of the period (EOP).
For weekly frequency, the calculation can happen on a specific day of the week.
This field is displayed only if the Calculation Type is selected as Batch.
Units Specify whether the charge calculation should take place as per units of specified frequency. If monthly frequency is specified and the number of units is 2, then the charge would be calculated once in two months. This field is displayed only if the Calculation Type is selected as Batch.
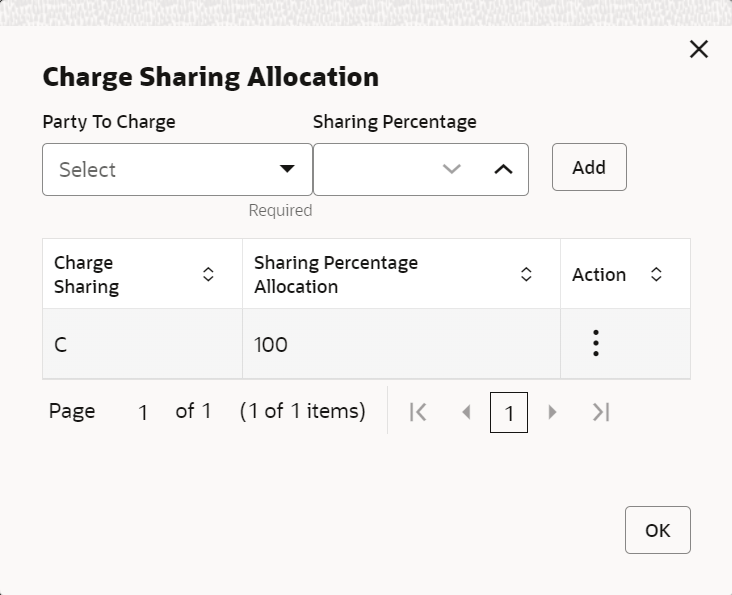
Add/Override Charges Displays the details of new charges added in this grid. Default Charges Displays the default charges configured for the selected event in this grid, if the Inherit Charges is selected as Inherit Default Charges. These charges cannot be modified. - Click Sharing Percentage Allocation link to specify the sharing percentage for each party.The Charge Sharing Allocation popup screen displays.
- From the Party to Charge list, select the party to be charged.
- In the Sharing Percentage, enter the percentage to be allotted to the selected party.
- Click Add to add the details in the grid.
- Repeat these steps to add more parties to be charged.
Note:
The sum of percentages of all added parties should be 100. - If required, click
 icon under the Action column in the grid and then click Edit to modify details or click Delete to remove the record.
- Click OK to save the charge sharing details.
- Click Add to add the details to the grid.
- Click
 icon in the Action column to edit or delete the row.
- Click
- Click Reset to reset the fields, if required.
- Click Save to save the data and send it for authorization.
Parent topic: Charge Decisioning

