- Collections User Guide
- Cash Transactions
- Deposit Entry
5.1 Deposit Entry
This topic describes the systematic instruction to enter the cash deposit data in the system.
- Branch: Cash can be deposited directly at the branch by the corporates.
- Courier: Corporates can avail a doorstep banking service wherein a courier person picks up the cash and deposits it at the branch.
Basic Info
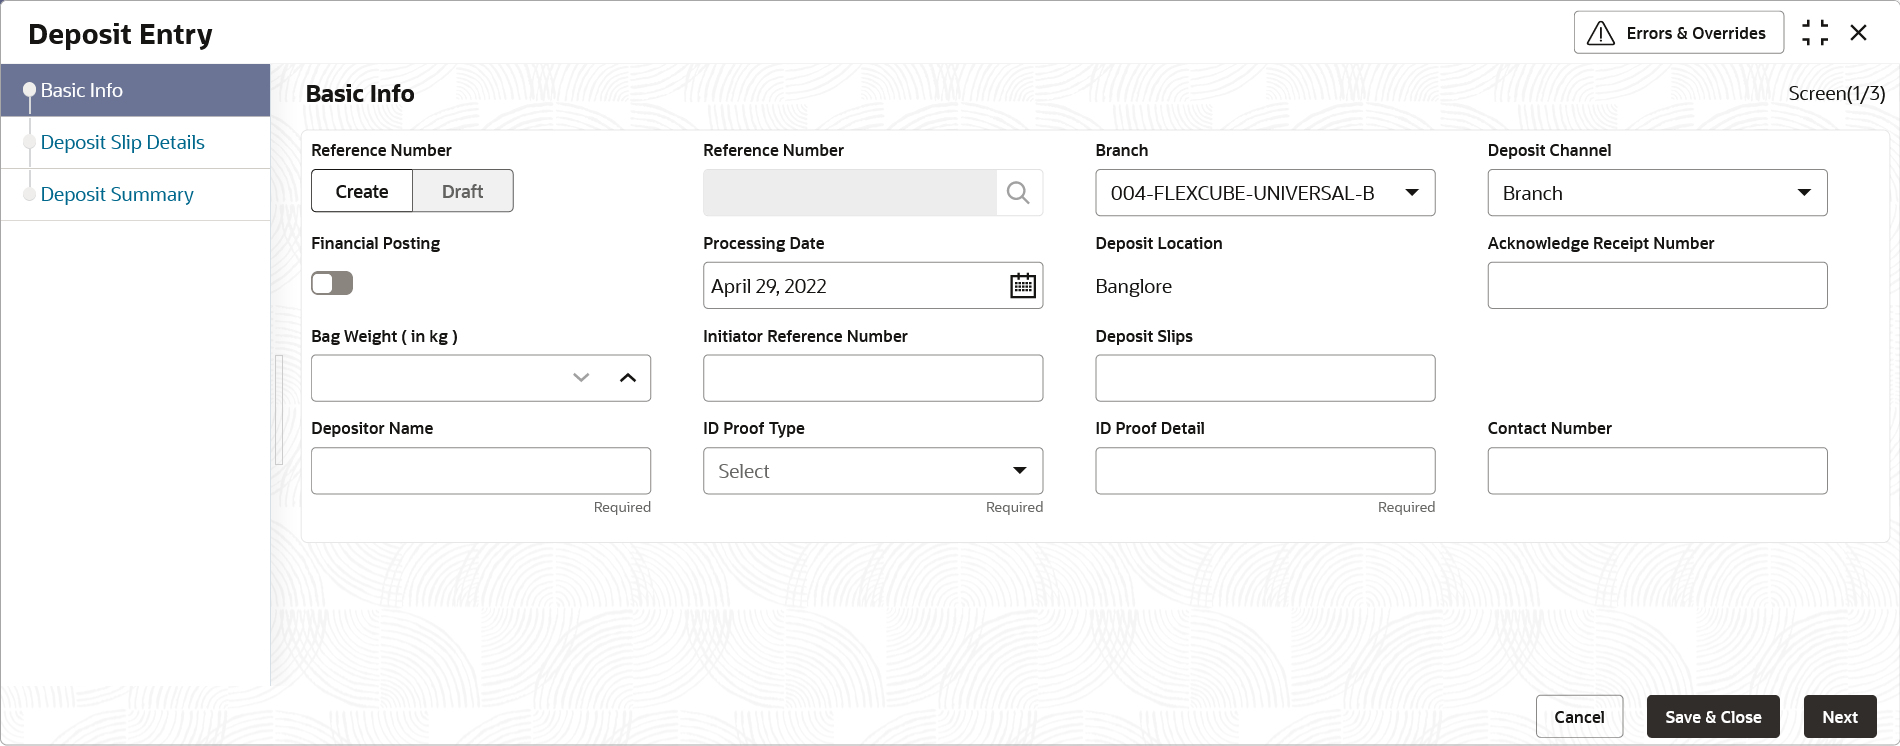
This screen helps you to input batch related information i.e. whether it is single deposit entry or multiple deposit entry (from multiple deposit slips), channel of receipt etc. The branch is defaulted as per login Id and can be changed to another branch based on access right.
- On Home screen, click Cash Management. Under Cash Management, click Collections.
- Under Collections, click Cash Transaction. Under Cash Transaction, click Deposit Entry.The Deposit Entry - Basic Info screen displays.
- Specify the fields on Deposit Entry - Basic Info screen.For more information on fields, refer to the field description table.
Note:
The fields marked as Required are mandatory.Table 5-1 Basic Info - Field Description
Field Name Description Reference Number Click Create to auto-generate a reference number or click ‘Draft’ to select an existing reference number. Reference Number Click the search icon to select an existing reference number. This field is displayed only when the Existing option is selected. Branch Select the bank’s branch where the cash is being deposited. This field displays values based on your access rights. This field cannot be modified once authorized.
Deposit Channel Select the deposit channel, whether ‘Courier’ or ‘Branch’. This indicates whether the cash is being picked up by a courier agency or deposited in the branch by the corporate. The field relevant to the selected channel, is displayed.
This field cannot be modified once authorized.
Financial Posting Switch the toggle ON if accounting entries need to be posted. Processing Date Click the calendar icon to select the date on which the cash is deposited. By default, the current branch date is displayed and cannot be beyond the same. You can manually select the processing date only if the ‘Financial Posting’ toggle is switched OFF. This field cannot be modified once authorized.
Deposit Location Displays the location based on the selected branch. Acknowledgment Receipt Number Specify the acknowledgment number, if any. Bag Weight (in kg) Specify the weight of the package in kilograms upon receipt. Initiator Reference Number Specify the reference number assigned for receiving the package, if any. Deposit Slips Specify the total number of deposit slips to be processed. This field is displayed only when the Deposit Channel is selected as Branch.
Depositor Name Specify the name of the person who is depositing the cash. This field is mandatory and appears only when the Deposit Channel is selected as Branch.
ID Proof Type Select the type of ID proof displayed/submitted by the depositor. This field is mandatory and appears only when the Deposit Channel is selected as Branch.
ID Proof Detail Specify the ID proof details of the depositor. This field is mandatory and appears only when the Deposit Channel is selected as Branch.
Contact Number Specify the contact number of the depositor. This field is mandatory and appears only when the Deposit Channel is selected as Branch.
Courier Click the search icon to select the courier company. This field is mandatory and appears only when the Deposit Channel is selected as Courier.
Consignment Number Specify the consignment number allocated by the courier company. This field is mandatory and appears only when the Deposit Channel is selected as Courier.
This field cannot be modified once authorized.
Consignment Date Click the calendar icon to select the date on which the consignment is received. This field is mandatory and appears only when the Deposit Channel is selected as Courier.
This field cannot be modified once authorized.
- Perform one of the following action:
- Click Save and Close to save the populated data and close the window.
- Click Cancel to close the window without saving the entered data.
Deposit Slip Details
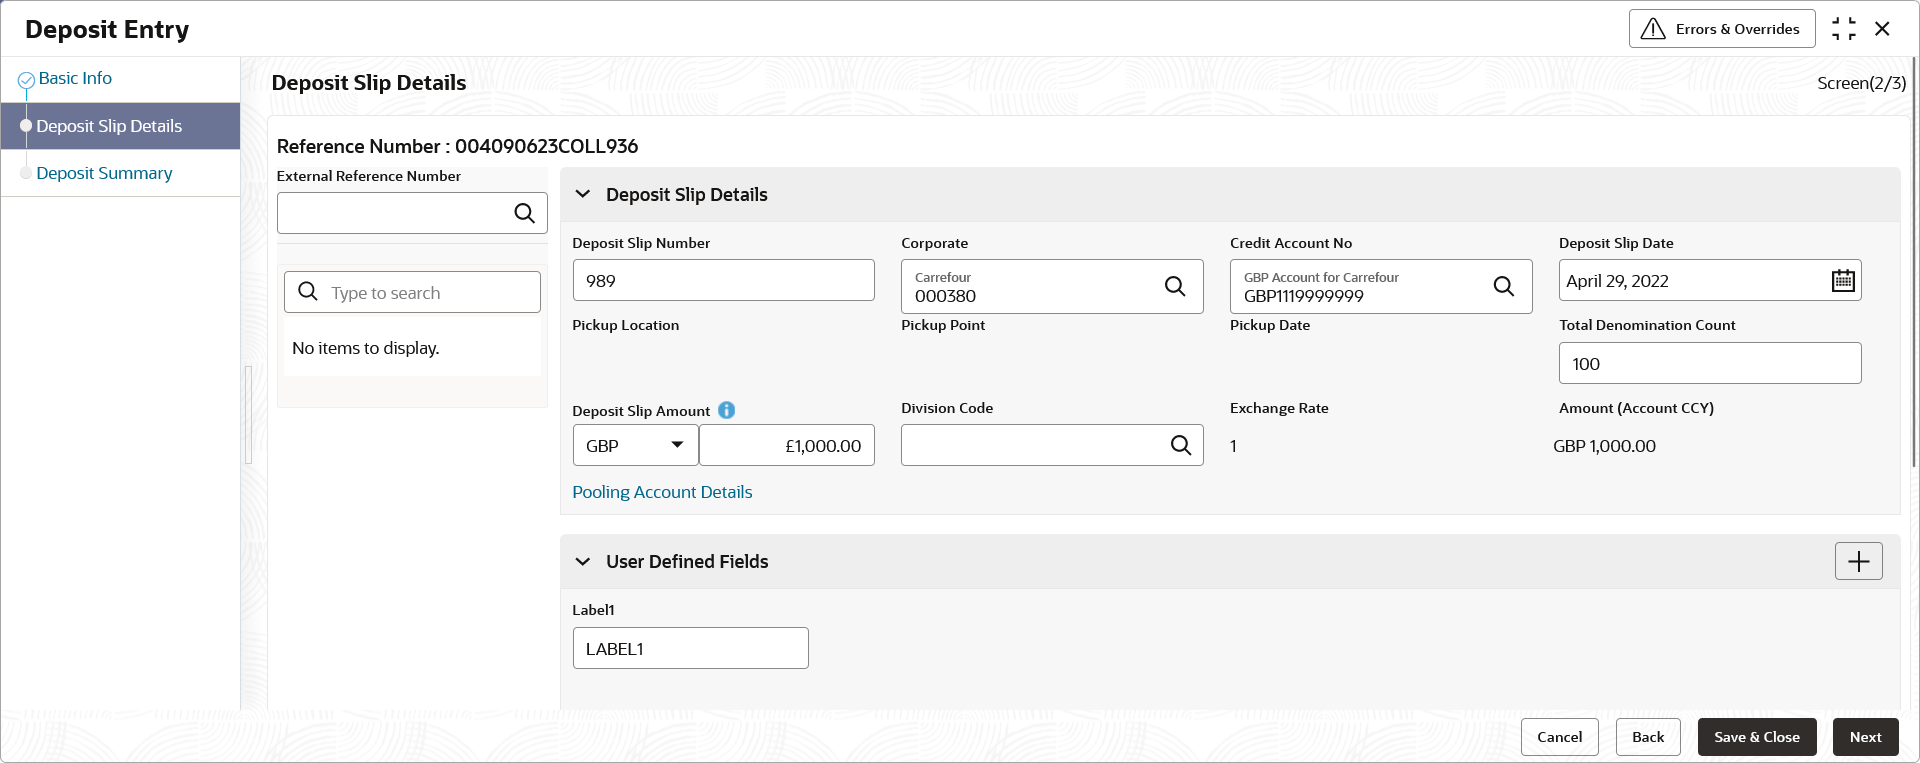
This screen helps you to input the information related to the deposit slip. Additionally, you can select an external reference number to load deposit slips received through an external channel, and enrich the data and send for further processing. The number of deposit slips entered/selected in this tab, should match the number entered in the Basic Info tab.
- Click Next to save the data and move to the next screen.The Deposit Entry - Deposit Slip Details screen displays.
Figure 5-2 Deposit Entry - Deposit Slip Details
- Specify the fields on Deposit Entry - Deposit Slip Details screen.For more information on fields, refer to the field description table.
Note:
The fields marked as Required are mandatory.Table 5-2 Deposit Slip Details - Field Description
Field Name Description External Reference Number Click the search icon and select the reference number generated by an external application. Upon selecting a reference number, all associated deposit slips appear in the left pane. OR
Click the search icon and select the deposit slips associated with the external reference number.
Deposit Slip Number Specify a new deposit slip number or select an existing one from the left pane. Selecting an existing deposit slip number auto-populates the data in the Deposit Slip Details pane on the right. A delete icon is present beside each deposit slip in the left pane. Upon selecting a deposit slip, if you wish to clear the Deposit Slip Details pane on the right, you can click this icon. This refreshes the right pane and makes it editable again. This field cannot be modified once authorized.
This field cannot be modified once authorized.
Corporate Click the search icon to select the corporate for whom the cash collection entry is being made. This field cannot be modified once authorized.
Credit Account No. Click the search icon to select the real/virtual credit account number where the entire fund should be credited at deposit slip level. This field cannot be modified once authorized.
Deposit Slip Date Click the calendar icon to select the date mentioned on the deposit slip. This field cannot be modified once authorized.
Pickup Location Click the search icon to select the location from where the deposit slip has been collected by the courier agency or the branch location where the cash is deposited by the corporate. This field cannot be modified once authorized.
Pickup Point Click the search icon to select an exact pick-up point of the corporate from where the deposit slip along with the physical cash is being picked up by the courier agency. This field cannot be modified once authorized.
Pickup Date Click the calendar icon to select the date on which the deposit slip or cash is being collected. This field cannot be modified once authorized.
Total Denomination Count Specify the total number of cash denominations. This field cannot be modified once authorized.
Deposit Slip Amount Select the currency and enter the total amount of the cash deposited through the deposit slip. Click the info (
 ) icon to view all the currencies maintained for the deposit branch.
Division Code Click the search icon to select the division code in case Division Code is mandatory in the Corporate Enrichment screen else leave this blank. The selected division code can be used for MIS purpose or for pooling of funds to the specific Division code.
This field cannot be modified once authorized.
Exchange Rate Displays the exchange rate based on the credit account currency and deposit slip amount currency. Amount (Account CCY) Displays the amount in account currency, after application of exchange rate. It is displayed if credit account number along with deposit slip amount is captured. Pooling Account Details Click this link to view the pooling maintenance details along with the expected pooling credit details. User Defined Fields Click the Add icon to add user defined fields. Miscellaneous Fields In the No. Of Miscellaneous Fields, enter the number of fields required. In each miscellaneous field box, enter the name of the field.
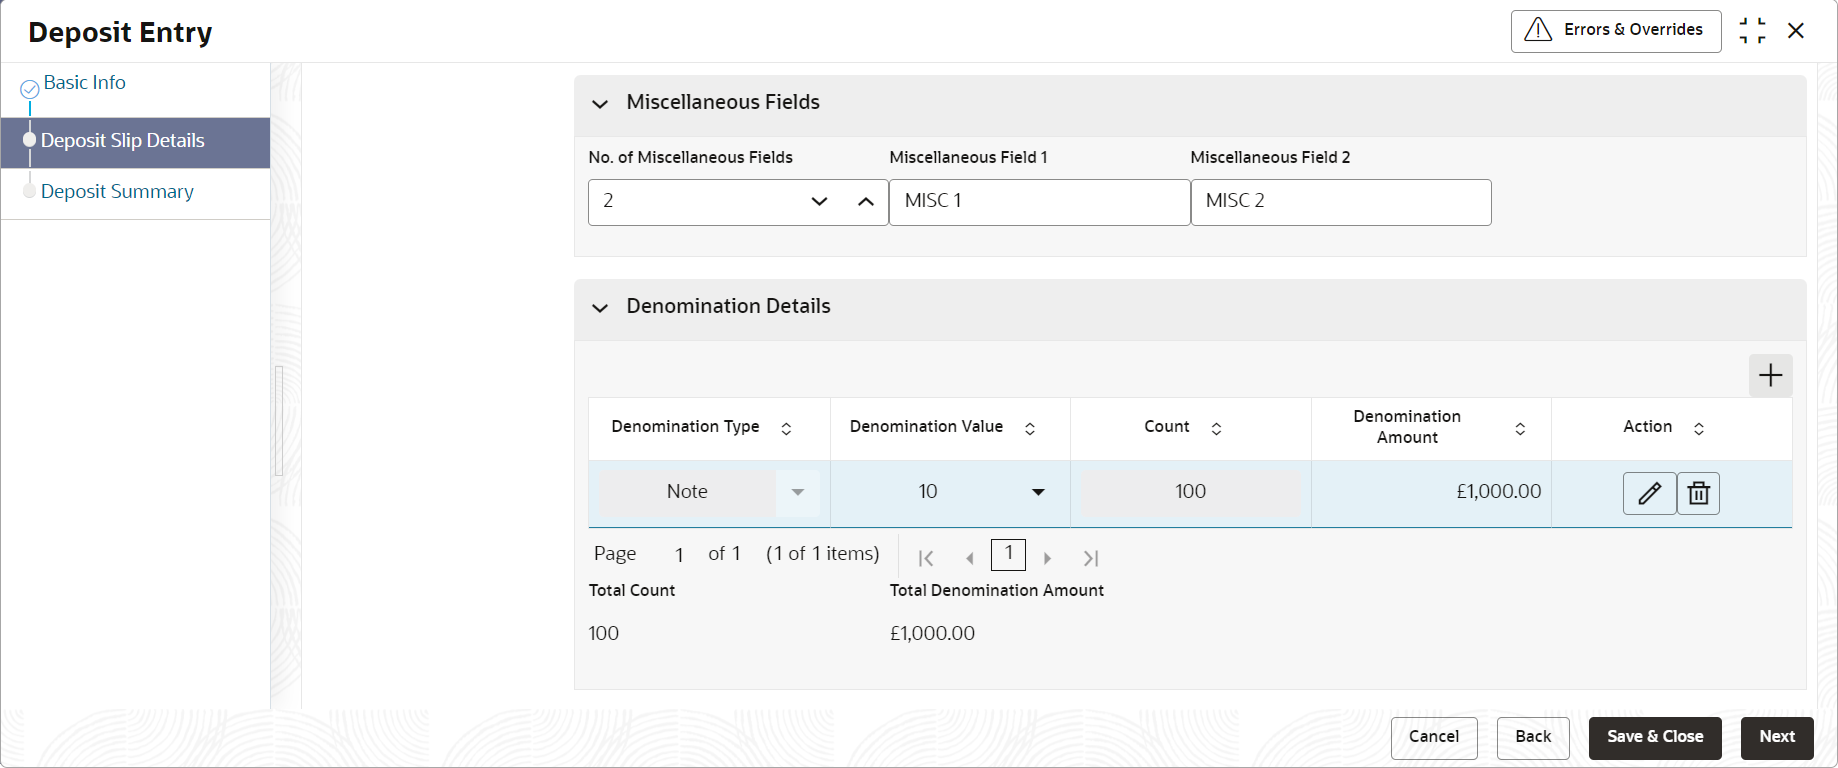
- In the Denomination Details section, click the Add (
 ) icon to add a row of denomination.The Deposit Slip Details - Denomiation Details screen displays.
Figure 5-3 Deposit Slip Details - Denomiation Details
Table 5-3 Denomination Details - Field Description
Field Description Denomination Type Select the denomination type as Note or Coin. Denomination Value Specify the total value of the selected denomination. Count Specify the number of notes or coins of the specific denomination. Denomination Amount Displays the amount as the denomination value multiplied by the count. Action Click  to edit the denomination record, or
  to delete the record.
Note:
Adding the denomination details is mandatory or non-mandatory, based on the value of a system parameter flag. If the flag is set to ‘Y’ then entering the details is mandatory, and if set to ‘N’, it is non-mandatory. - Click Add/Edit to add denomination details in the left pane or to modify a selected record.
- Click Reset to clear the selected values.
- Perform one of the following:
- Click Back to move to the Basic Info screen.
- Click Save and Close to save the populated data and close the window.
- Click Cancel to close the window without saving the entered data.
Deposit Summary
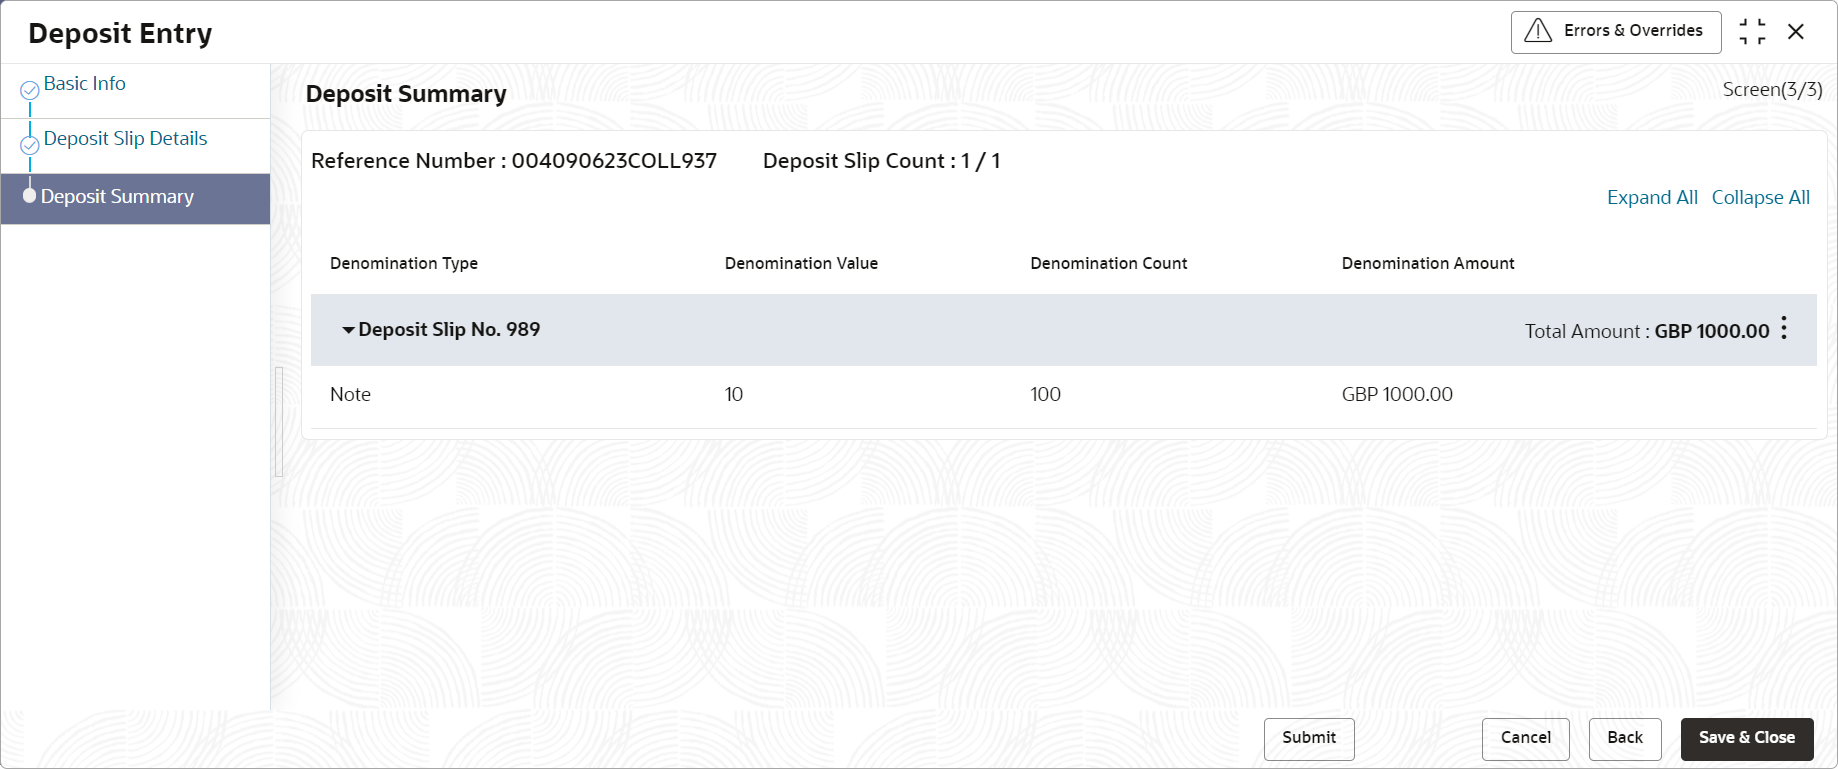
This screen displays the summary of details entered on the Basic Info and Deposit Slip Details screen. Double click the tile to view the complete cash deposit details.
- Click Next to move to the next screen.The Deposit Entry - Deposit Summary screen displays.
Figure 5-4 Deposit Entry - Deposit Summary
- Perform one of the following:
- Click Submit to submit the record for authorization.
- Click Back to move to the Deposit Slip Details screen.
- Click Save and Close to save the populated data and close the window.
- Click Cancel to discard the deposit slip creation and close the window.
Parent topic: Cash Transactions


