2 Add Billers

This topic provides the systematic instructions to corporate users to add billers within specific categories for the purpose of electronic bill payments and prepaid recharges.

Following types of billers are added.

  • Presentment type: Billers presents the bill or invoice to the customer/ user online before paying the bill
  • Payment type: Biller does not present bills. Biller allows the users to pay their bills anytime using their current and savings or credit card account that is credited to the billers account
  • Presentment and Payment type: Billers has features similar to both Presentment as well as Payment type of billers. The bills/ invoice can be presented to the users for bill payment or the users can pay bills without the invoice
  • Recharge type: Billers allows users to do Recharge their prepaid services like Mobile, DTH or Internet

While adding a biller, option to map multiple CIFs available under the GCIF will be provided. This feature allows the corporate user to associate multiple CIFs with a single biller account, providing flexibility and convenience for billing and payment processes. User can even map all the CIFs available under a GCIF to a biller account if needed.

Corporate users can add billers by specifying the Nickname of the biller(nickname should be unique), biller specific single /multiple unique customer IDs e.g. Relationship no, Account number etc., and other Biller labels as maintained in the Biller Maintenance administration screen. Multiple but unique registrations with the same biller are allowed.

When a channel customer does an Add Biller transactions, he is essentially registering with the biller to make online bill payments. At this stage some billers may want to validate that the customer is a genuine customer. The behaviour is based on how customer validation has been set up when biller got on-boarded.

Auto: When a biller is of Customer Validation type as Auto, customers who add this biller do not need any validation from biller and their registrations are auto-approved and they can initiate online bill payments to this biller

Offline: When a biller is on boarded with Validation type as Offline, for retail or corporate customers who add this biller, their registration status will be Pending. This means that the biller will have to do an offline validation of these registrations and can approve or reject them. OBDX does not provide any OOTB (Out of the box) mechanism for downloading the Pending registrations and changing their status by banker or biller.

Online: When a biller is on boarded with Validation type as Online, for retail or corporate customers who add this biller, their registrations need to be validated by biller online. The online validation could be a redirect to the biller’s website where he can do the validation through REST type web service through which validation happens. OBDX does not provide for OOTB implementation of the online validation.

Pre-requisites:

  • Transaction access is provided to the retail user
  • Billers are maintained in OBDX by administrator
  • Admin Biller Category maintenance is done

Features supported in the application

  • Add Biller

To add a biller:

  1. Perform anyone of the following navigation to access the Add Billers screen.
    • From the Dashboard, click Toggle menu, click Menu, then click Bill Payments.

      Under Bill Payments , click Add Billers.

    • From the Search bar, type Bill Payments – Add Billersand press Enter.
    • Access through the kebab menu of transactions available under the Bill Payments module.

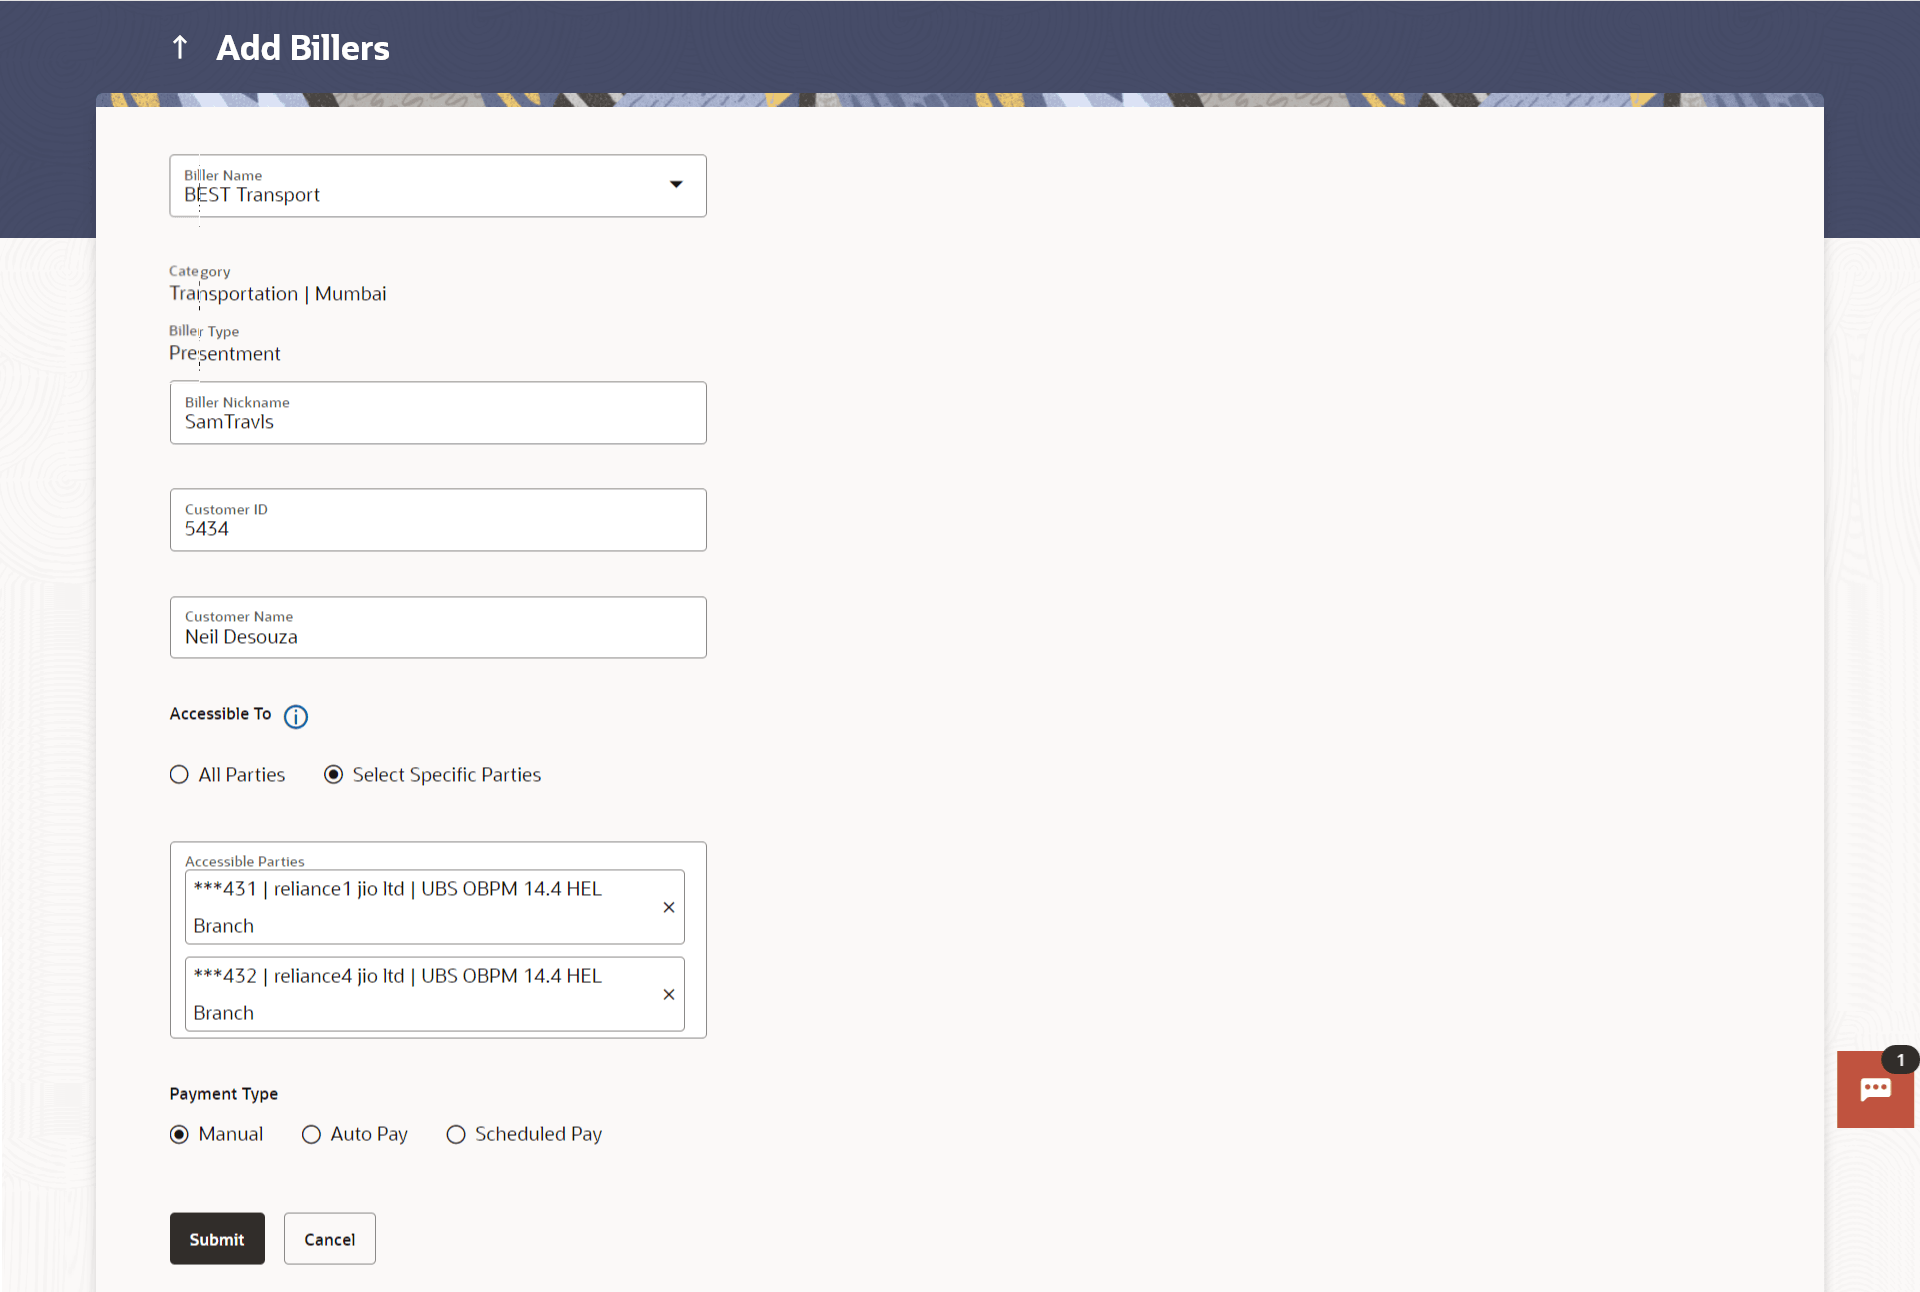
    The Add Billers screen appears.

    Note:

    The fields which are marked as Required are mandatory.

    For more information on fields, refer to the field description table.

    Table 2-1 Add Billers - Field Description

    Field Name Description
    Biller Name Select the biller as maintained in administrator biller maintenance

    Each biller name value in the dropdown will consist of the following -

    • Biller Name
    • Biller Category
    • Biller Sub-Category (if maintained)
    • Biller Location
    Category On selecting a biller from the Biller Name dropdown, the category, sub-category & location of the biller as maintained in the administrator biller maintenance screen are displayed.

    The Sub-Category is displayed if sub-categories are maintained under the selected Biller Category.

    Biller Type On selecting the biller name, the biller type is displayed.

    The biller type can be:

    • Presentment: Biller is of Presentment type
    • Payment: Biller is of Payment type
    • Presentment and Payment: Biller is of Presentment and Payment type
    • Recharge: Biller is of Recharge type
    Biller Nickname Specify a nickname for the selected biller. The nickname has to be unique i.e. same nickname cannot be used for more than one biller.
    Biller Specific Fields The fields will be dependent on the biller type selected. E.g. in case of Recharge, you will be required to specify the mobile number registered with the biller along with customer name, etc.

    Enter information as required.

    Party ID The unique id of the customer/Party.
    Party Name The unique id of the customer/Party.
    Accessible to Name of the accessible party.

    The options are:

    • All Parties
    • Select Specific Parties
    Following fields appear for Presentment and Presentment and Payment type of billers.  
    Payment Type Specify whether payments towards the biller are to be automatically paid or if you would like to schedule payments.

    The options are:

    • Manual
    • Auto Pay
    • Scheduled Pay

    This feature is available for Presentment and Presentment and Payment type billers only.

    Payment Method Specify the payment methods accepted as maintained for the biller by Bank Administrator.

    The payment type can be:

    • Account: The user can pay bills using their current and savings bank account
    • Credit Card: The user can pay bills using their credit cards; user has to select the month and year of expiry.
    • Debit Card: The user can pay bills using their debit cards.

    This field will appear if you have selected Auto Pay or Scheduled Pay under thePayment Type field.

    Pay From Depending on the payment method selected, the values in the drop-down will list either the user’s CASA accounts, Credit Cards or Debit Cards.

    This field will appear if you have selected Auto Pay or Scheduled Pay under thePayment Type field.

    Pay Select the desired option to identify whether you would like to pay the entire bill amount at every cycle or want to specify a maximum amount upto which the bill should be paid automatically.

    The options are:

    • Bill Amount: Select this option if you would like the entire bill amount to be paid automatically at every billing cycle.
    • Limit Amount: Select this option if you would like to specify a limit amount so that if the bill is generated above this amount, it wont get paid.

    This field will appear if you have selected Auto Pay under thePayment Type field.

    Limit Amount Specify a limit amount to ensure that if a bill of this biller, is ever generated above this specified amount, the bill will not get paid automatically.

    This field will appear if you have selected Limit Amount under the Pay field.

    Amount Specify the bill amount.

    This field will appear if you have selected the Scheduled Pay option under the Payment Type Pay field.

    Occurrence The facility to specify when the bill payment will be processed. This field will appear if you have selected the Scheduled Pay option under the Payment Type Pay field.

    The options are:

    • One Time: Bill payment to be processed on a user specified future date.
    • Recurring: Bill payment to be processed on user specified future date and at a set frequency.
    Scheduled Date Future date on which the bill payment will be processed.

    This field appears if you select the option One Time under the Occurrence field.

    Start Date - End Date The user can select future start date and end date.

    This field appears if you select the option Recurring under the Occurrence field.

    Select Frequency The frequency for future bill payments.

    The frequency can be:

    • Daily
    • Weekly
    • Fortnightly
    • Monthly
    • Bi-Monthly
    • Quarterly
    • Semi-Annually
    • Yearly

    This field appears if you select the option Recurring in the Payment Type field.

  2. From the Biller Name list, select the registered biller name.
  3. In the Biller Nickname field, modify the biller nickname.
  4. In the biller specific fields, enter information as required.
  5. If you have selected the Presentment or Presentment or Payment type of biller from the Biller Name list:
    1. From the Payment Type field, select the option of choice;
      Perform one of the following actions:
      • Select the option Manual if you wish to make bill payments manually every time the bills are due.
      • Select the option Auto Pay to set up automatic bill payments.
      • Select the option Scheduled Pay, if you wish to schedule bill payments for either a single instance or recurring instances.
    2. Perform one of the following actions:
      • If you have selected the option Auto Pay under the Payment Type field:
        1. From the Payment Method list, select an option of choice to identify the mode through which payment will be made. The options can be Account, Debit Card and Credit Card, depending on the administrator maintenance for the specific biller.

          The values in the Pay From list will be populated on the basis of selection.

        2. From the Pay From list, select the CASA account/Debit Card/Credit Card, which is to be debited for bill payment.
        3. If you have selected the option Credit Card, select the month and year of card expiry in the Expiry Date fields.
        4. From the Pay field, select an option as follows:
          1. Select the Bill Amount option, if you want the entire amount of the generated bill to be paid at every cycle.

            OR

          2. Select the Limit Amount option, if you want to specify a maximum amount for bill payment.
            1. Enter an amount in the Limit Amount field.
      • If you have selected the option Scheduled Pay under the Payment Type field:
        1. From the Payment Method list, select an option of choice to identify the mode through which payment will be made. The options can be Account, Debit Card and Credit Card, depending on the administrator maintenance for the specific biller..

          The values in the Pay From list will be populated on the basis of selection.

        2. If you have selected the option Credit Card, select the month and year of card expiry in the Expiry Date fields.
        3. In the Amount field, enter the amount to be paid towards the bill at every instance.
        4. In the Occurrence field, select the desired option:
          1. If you select the One Time option, select a date on which the payment towards the biller is to be made.
          2. If you select the Recurring option:
            1. From the Frequency list, select the frequency at which payments towards the biller are to be made.
            2. Enter the date from which recurring payments are to be made towards the biller in the Start From field.
            3. Enter the date upto which recurring payments are to be made towards the biller in the End Date field.
  6. Perform one of the following actions:
    • Click Submit to add the biller.

      The Review screen appears.

    • Click Cancel to cancel the transaction.
  7. Perform one of the following actions:
    • Verify the details and click Confirm.

      The success message appears along with the biller details.

    • Click Back to navigate back to the previous screen.
    • Click Cancel to cancel the transaction.
  8. Perform one of the following actions:
    • Click Pay Bill to make a payment towards the biller.
    • Click Add Another Biller to add more billers.
    • Click Home to navigate to the dashboard.