15.1 Example for e-receipt generation
This topic provides the systematic instructions to user with an example, on how to generate an e-receipt after initiating a transaction.
To transfer the money to single payee:
- Perform one of the following actions:
- In the Transfer To section, select the Saved Payee
option.
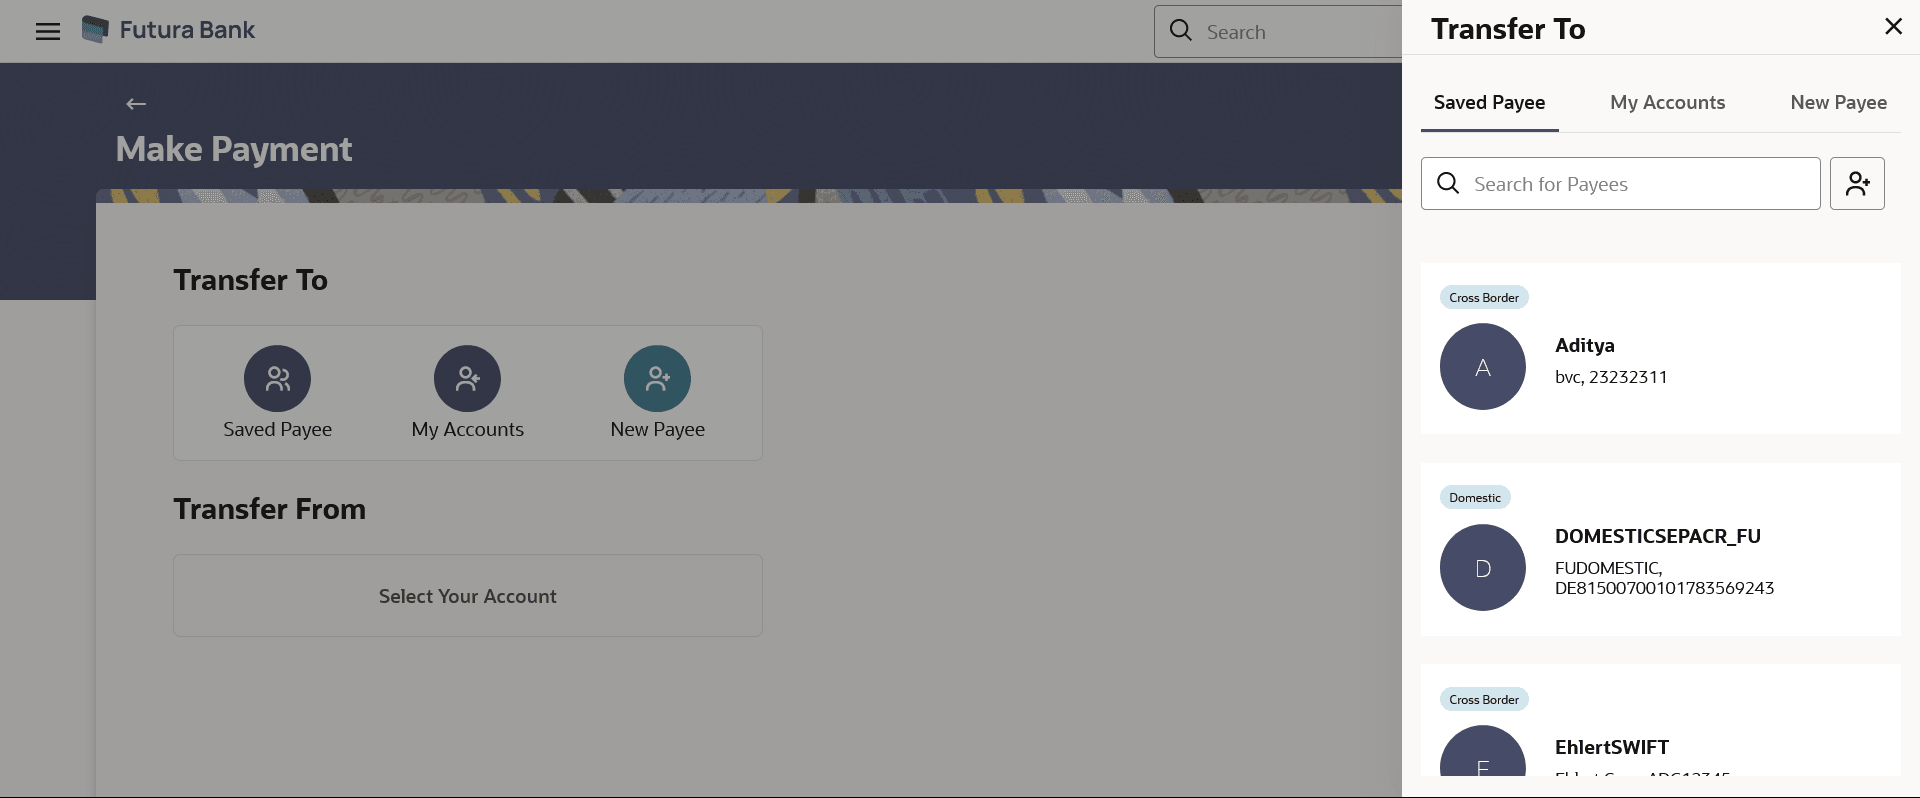
The Transfer To overlay screen will display with the Saved Payee tab.
Note:
- Users can also add new payee from the New Payee tab.
- Users can search the specific payees by typing a few characters (type to search). This can be done in fields such as Payee Type, Nickname, Account Name, Account Number.
-
Click the
 icon to add the new payee.
The system redirects to Add Bank Account Payee screen.
Figure 15-1 Make Payment- Transfer To overlay screen
Note:
The fields which are marked as Required are mandatory.For more information on fields, refer to the field description table.
Table 15-1 Make Payment- Transfer To overlay screen - Field Description
Field Name Description Search for payee Allow user to search payee with the Payee Type, Nickname, Account Name, Account Number. All the saved payees listed on the Saved Payees overlay screen.
Below details are displayed for each payee -
Payee Type Displays the payment type associated with the payee. It Could be:
- Within Bank
- Domestic
- Cross Border
Payee Photo/Initials Displays the payee's photo, if uploaded, against each payee name. If the payee’s photo is not uploaded, the initials of the payee will be displayed in place of the photo. Bank Name Displays bank name of the payee in case of Domestic and Cross Border Payee Nickname Displays the payee by their nick names defined at the time of payee creation. Account Name, Account Number Displays the Account name or nick number of the source account from which the funds are to be debited. - In the Transfer To section, select the Saved Payee
option.
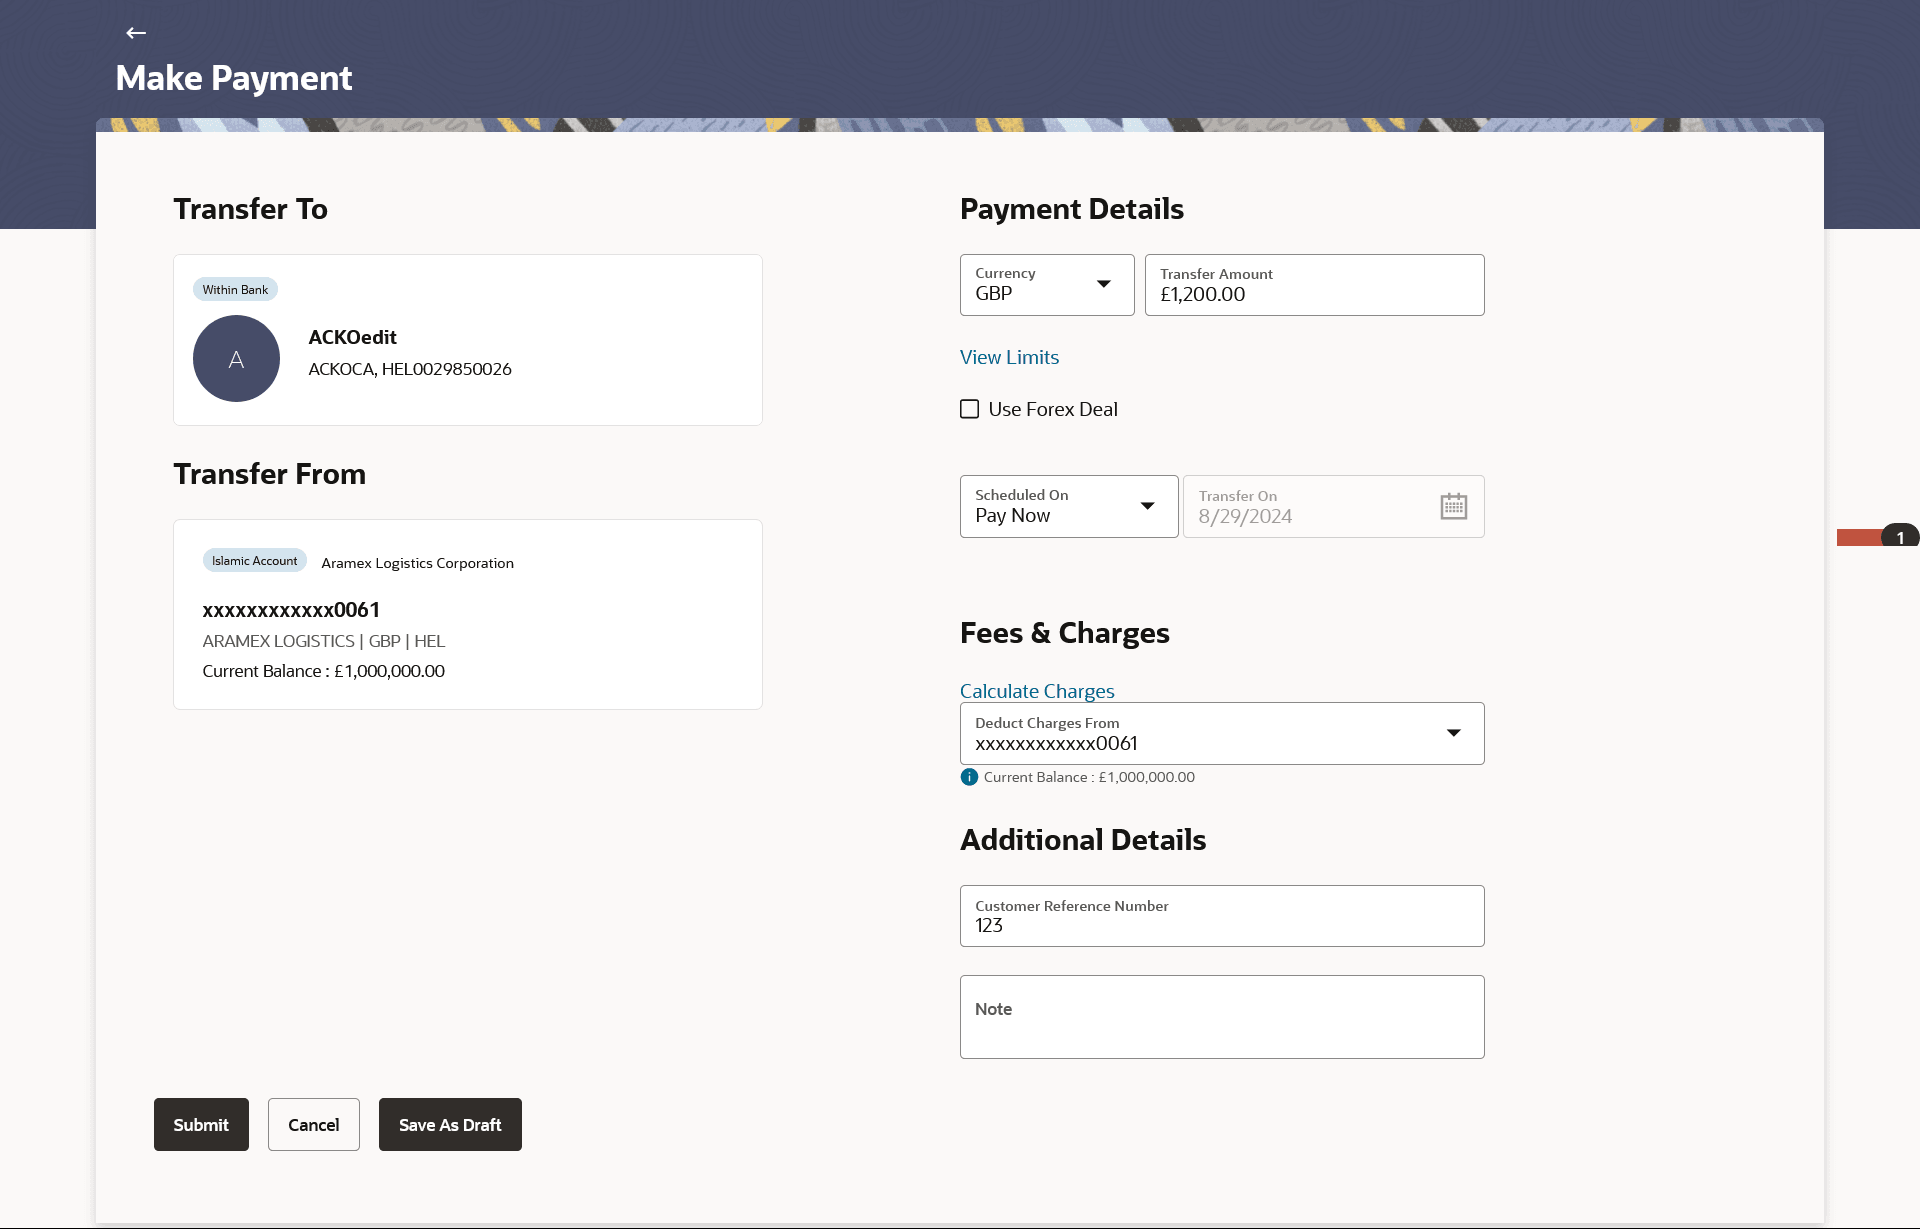
- On selection of payee, the screen populates the Transfer From
and Payment Details.
Note:
The fields which are marked as Required are mandatory.For more information on fields, refer to the field description table.
Table 15-2 Make Payment- Saved Payee - Field Description
Field Name Description Transfer To Payee Type Displays the payee type.
The options are:
- Within Bank
- Domestic
- Cross Border
Bank Name The name of the payee’s bank. Photo/name Initials The profile photo of the payee. Payee Nickname The nickname of the payee. Account Name, Account Number Displays the Account name and account number of the payee. Transfer From
Displays the debit account details such as Type, Nickname, Account name, Account number, Currency, Branch name, etc as configured in the day 0 configuration of account.
Based on the payee selected the account will be defaulted, and on click all available accounts will be available to select. Refer Transfer From Drawer section.
Badge Type Displays the type of the source account from which the funds are to be debited towards the payee. The values could be -
- Islamic
- Conventional
Account Details Displays details like - nick name, account number, branch, currency, etc. based on configuration for account in day0. Current Balance The net balance in the selected source account is displayed against the Transfer From field once an account is selected. Payment Details Currency Select the currency in which the payment is to be made.
For My Account and Within Bank payments it will display debit account and credit account currency.
For Domestic and Cross Border payments it will display debit account and network currencies.
Debit/Transfer Amount Specify the amount for which the payment is to be made. This could be Debit amount or transfer amount based on currency selected.
When Debit currency is selected, it will be Debit amount.
When Credit currency or network currency is selected, it will be Transfer amount.
Transfer Currency Select transfer currency. This will come in case the debit account currency is selected and network allows different currency transfers. Low Value Payment Select if the payment is low value payment.
This field is enabled for cross border payment as per regionalisation configuration and the amount is below the maximum amount defined for low value payment.
View Limits Link to view the transaction limits.
For more information on Limits, refer View Limits section.
Exchange Rate Display indicative exchange rate in case of cross currency transfer. Use Forex Deal Select if pre-existing deal applies for the exchange rate. Lookup Deal Number Lookup for the Forex deals. Displays all the deals.
Select the deal number from the list.
Deal Number Displays the deal number selected. Network Type Select the network type for the payment. Refer section Regionalization for Domestic Payments for region specific networks.
Applicable for domestic payments.
Scheduled On The facility to specify the date on which the payment is to be made.
The options are:
- Pay Now: Select this option if you wish to make the payment on the same day.
- Pay Later: Select this option if you wish to make the payment at a future date. If you select this option, you will be required to specify the date on which the payment is to be made.
- Recurring: Select this option if you wish to make the recurring payments.
For domestic and cross border - options in Scheduled On comes based on the regionalisation configuration.
Transfer On Specify the date on which the payment is to be made.
This field appears if the option PayLater is selected from the Scheduled On list.
Select Frequency The frequency in which the repeat transfers are to be executed.
The options are:
- Daily
- Weekly
- Fortnightly
- Monthly
- Bi-monthly
- Quarterly
- Semi-Annually
- Annually
- Advanced
Note:
If the Advanced option is chosen, one can configure a frequency for the transaction to occur, specifying intervals such as once every X day, weeks, or months.This field appears if the option Recurring is selected from the Scheduled On list.
Start Transferring The date on which the first recurring transfer is to be executed. Stop Transferring Select the option by which to specify when the recurring transfers are to stop being executed.
The following two options are available:
- On Date: Select this option if you wish to specify a date on which the last transfer is to be executed.
- After Instances: Select this option if you wish to specify the number of recurring transfers that are to be executed as part of the instruction.
This field appears if the option Recurring is selected from the Scheduled On list.
Date Specify the date on which the last transfer is to be executed.
This fields appears if the option On Date is selected in the Stop Transferring field.
Instances Number of instances.
This field appears if the option After Instances is selected in the Stop Transferring field.
Also Transfer Today Select this option to also initiate a one-time transfer towards the payee for the same amount. This option is enabled when recurring is selected in Scheduled On. Fees & Charges Calculate Charges Click on the link to calculate the fees and charges applicable for the transaction. This field is network dependent field, comes from regionalisation. Correspondence Charges This field will be displayed for Cross Border payments. Select who will bear the charges in case of Cross Border payments.
- Payee: transfer charges are to be borne by the payee
- Payer: transfer charges are to be borne by the payer
- Shared: transfer charges are to be borne by both the payee and payer
Deduct Charges From The Bank may levy charges for certain payment networks.
The user can choose which debit account to use when paying the charges. The accounting entries for the charge’s components will be reflected in the statement of the account selected here.
This field is enabled for all Payment Types – Within Bank, Domestic and Cross Border. In case of Cross Border Payments, it is enabled when Payer or Shared option is selected in the Correspondence Charges.
Current Balance The net balance of the source account. Additional Details Payment Purpose The purpose of payment. It will be a list of allowed purpose codes. Payment Details You can add up to 4 fields each of length not more than 35. These will carry the unstructured remittance information to the Payment Processor. Customer Reference Number The reference number assigned to the customer. Note Specify a note or remarks for the transaction, if required. Compliance Questions For Cross Border payments the screen asks few compliance questions. OBDX supports configuring a list of questions from backend for On-premises. Once configured and enabled in regionalisation, the questions will show up on the screen. Upload Documents For Cross Border payments the screen lets the user attach documents. OBDX supports configuring a list of mandatory/non-mandatory documents from backend for On-premises. Once configured and enabled, the list will show up on the screen.
Note: When the payment is submitted, the documents will be stored to a configured Document Store (DMS or DB or any other repository depending on the implementation). The document reference numbers will be passed to the back-end payment processor along with the payment request.
- Fill the details in the respective fields.
- Perform one of the following actions:
- Click Proceed to Pay to initiate the request for
the payment.
The Make Payment - Review screen appears.
- Click Cancel to cancel the transaction.
- Click Save as Draft to store the unfinished transaction for later completion.
- Click Proceed to Pay to initiate the request for
the payment.
- Perform one of the following actions:
- Verify the details and click
Confirm.
The success message appears of request of payment transfer along with the reference number, host reference number.
- Click Cancel to cancel the transaction.
- Click Back to navigate back to previous page.
- Verify the details and click
Confirm.
- Perform one of the following actions from the confirmation page:
- Click Transaction Details to view the details of the transaction.
- Click Go to Dashboard to go to the Dashboard screen.
- Click Payments to go to the Payment Overview page.
- Click Make Another Payment to make new payment.
- Click Check Status to view the status of the
payment transaction.
System redirects to the Payment Details screen.
- Click Save as Favourite to save payment as favourite transaction.
- Click Add as Payee to save the payee to whom the payment is made.
Note:
- The Add as Payee option is displayed during the ad hoc payment procedure. By clicking on Add as Payee, user will be taken to the Add Bank Account Payee screen to include a new payee.
- The functionality to share payment details is not available for My Account payment transfers.
- Click Share icon to share to share payment details. It opens default mail client with relative message in the body.
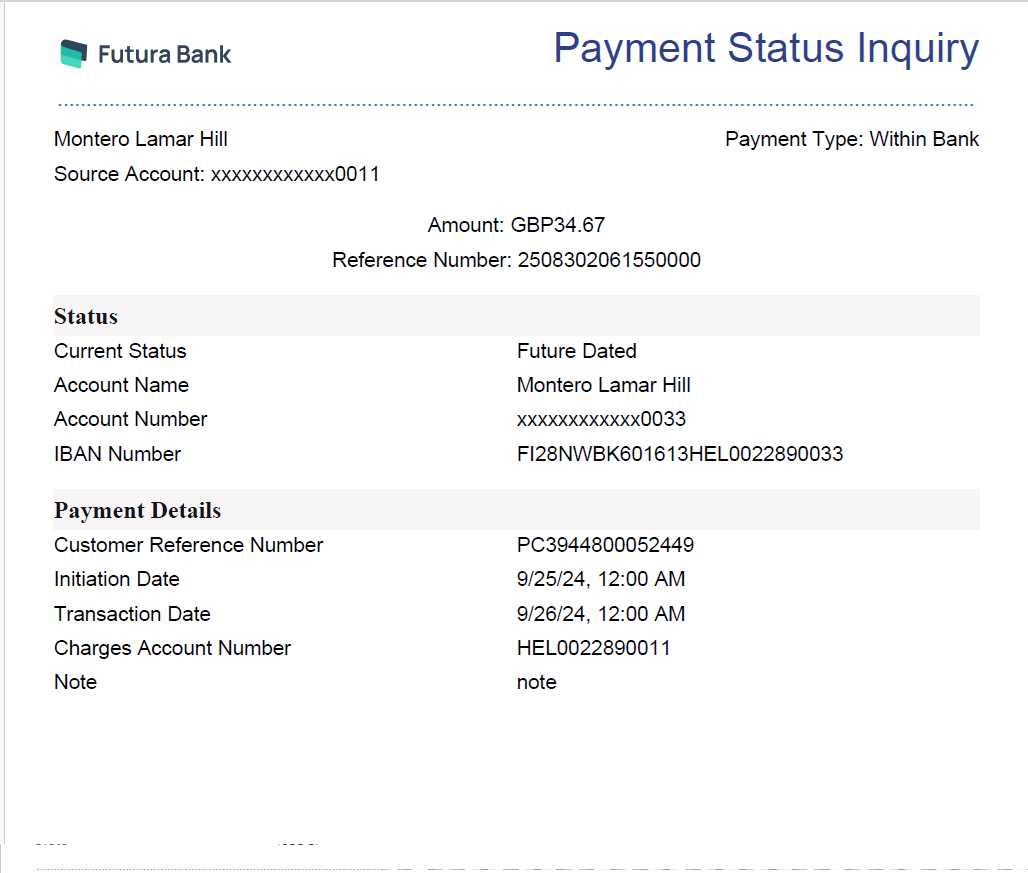
- Click the e-Receipt link to download the electronic receipt.
Parent topic: E-Receipts


