1.1 Transfer Money
This topic provides the systematic instructions for initiating fund transfers using email or mobile contact links.
The customer must simply specify the email address or the mobile number of the intended payee and specify other transfer related details such as the transfer amount and source account. Once the transfer is initiated, a payment link is sent to the email/mobile to the payee, for him/her to provide the credit account details. The funds are transferred once payee provides the account details for receiving funds using the payment link.
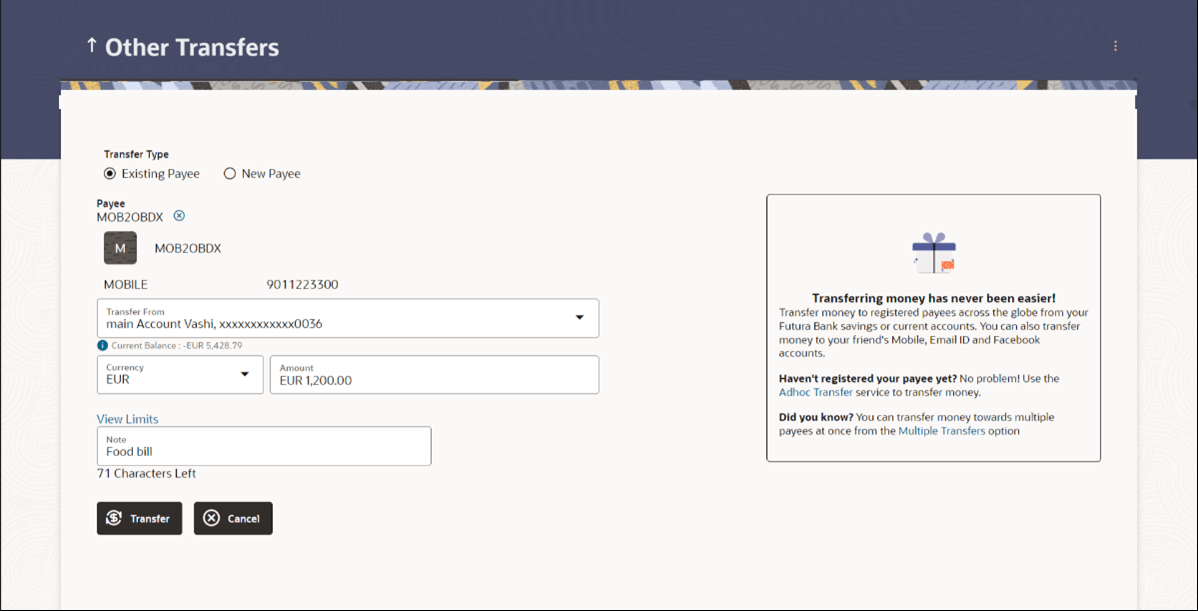
Transfer Money - Existing Payee
This feature enables users to initiate payments for Existing Payee. Peer to Peer (P2P) transaction enables the retail user to initiate a payment towards the payee’s contact ID, namely, email ID, mobile number. The specific type of transfer is triggered based on the selected payee and the corresponding payee account details.
- Perform anyone of the following navigation to access the Transfer
Money screen.
- From the Dashboard, click Toggle menu, click Menu, then click Transfers & Bill Payments . Under Transfers & Bill Payments , and then click Overview, then click More Actions, and then Other Transfers.
- From the Search bar, type Transfers - Other Transfers and press Enter
The Transfer Money - Existing Payee screen appears.
Figure 1-3 Transfer Money - Existing Payee
Note:
The fields which are marked as Required are mandatory.For more information on fields, refer to the field description table.
Table 1-1 Transfer Money - Existing Payee - Field Description
Field Name Description Transfer Type Select the type of transfer that you wish to initiate. The options are:
- Existing payee
- New Payee
Existing Payee Following fields gets enabled if the Existing Payee option is selected in the Transfer Type field.
Payee Select the payee to whom you wish to initiate transfer. Note:
Click on the X icon to change the payee selection by removing the added payee.Payee Photo Displays the payee account photo, if uploaded. If the photo has been deleted or if no photo is uploaded, the initials of the payee account will appear in place of the photo. Payee Name Displays the payee name. Payee Mode The payee mode through which funds are to be transferred. Transfer Via The email ID or mobile number of the Peer to Peer Payee mode through which funds are to be transferred. Transfer From Account from which money will be debited. Current Balance On selecting a source account, the net balance of the account appears below the Transfer From field. Currency The currency in which the transfer is to take place. Transfer Amount The amount to be transferred. View Limits Link to view the transaction limits applicable to the user. For more information on Limits, refer View Limits section.
Transfer Date The date on which the transfer is to take place. This field appears if the option Later is selected from the Transfer When list.
Note Narrative for the transaction.
To transfer funds to a existing payee:
- From the Transfer Type field, select the payee as Existing Payee.
- From the Payee list, select the payee towards whom you
wish to transfer funds. The payee details of the selected payee appears.
- Enter Payment details.
- Perform one of the following actions:
- Click Transfer to make a payment towards the
payee.
The Review screen appears.
- Click Cancel to cancel the transaction.
- Click Transfer to make a payment towards the
payee.
- Perform one of the following actions:
- Verify the details, and click Confirm.
A success message along with Reference Number, and transfer details appear on the confirmation page.
- Click Cancel to cancel the transaction.
- Click Back to navigate back to the previous screen.
- Verify the details, and click Confirm.
- Click Home to navigate to the dashboard.
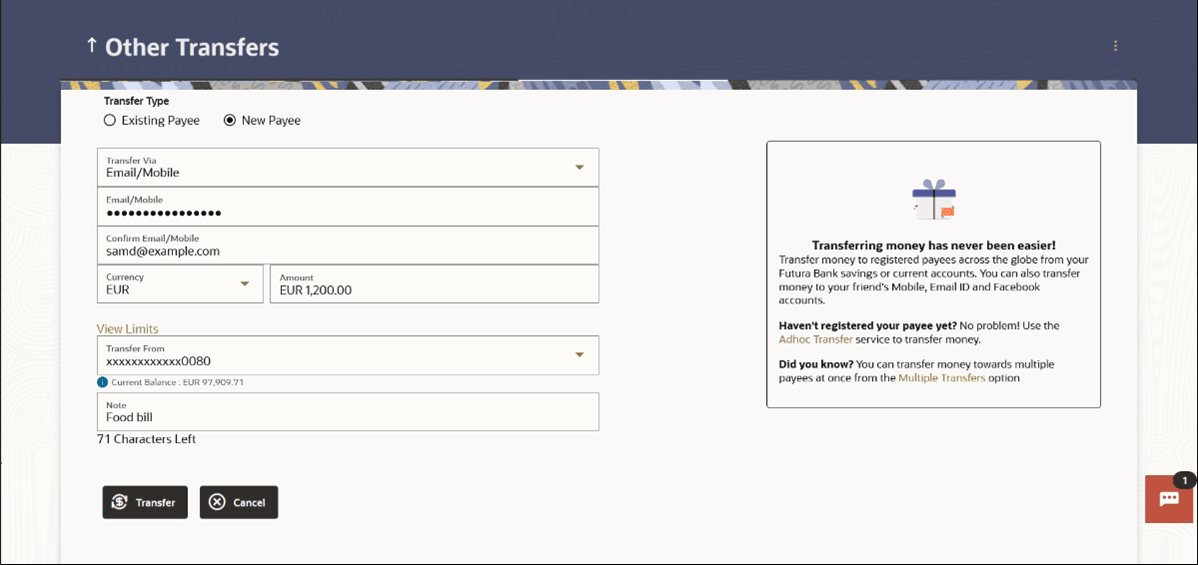
Transfer Money - New Payee
By selecting the New Payee option, the user is provided with the following choices by which to initiate a fund transfer. They are as follows:
Email/Mobile
The Email/Mobile option enables the user to initiate a funds transfer towards an email or mobile contact. The user has to simply specify the email address or the mobile number of the intended payee and specify other transfer related details such as the transfer amount and source account. Once the transfer is initiated, the funds are transferred to the account number associated with that email address or mobile number.
To transfer funds to a new payee:
- Select the New Payee option.The fields by which to transfer funds to a new payee appear.
Note:
The fields which are marked as Required are mandatory.For more information on fields, refer to the field description table.
Table 1-2 Transfer Money - New Payee - Field Description
Field Name Description Transfer Type Select the type of transfer that you wish to initiate. The options are:
- Existing payee
- New Payee
New Payee Following fields gets enabled if the New Payee option is selected in the Transfer Type field.
Transfer Via Select the mode through which funds are to be transferred. The options are:
- Email/ Mobile
Email / Mobile Enter the email ID or mobile number of the payee to initiate the money transfer. Confirm Email/Mobile Re-enter the email ID or mobile number as entered in the Email/Mobile field so as to confirm the same. Currency Select the currency in which the transfer is to take place. Amount Specify the amount to be transferred. View Limits Link to view the transaction limits of the user. Transfer From Select the source account from which the funds are to be transferred. Current Balance On selecting a source account, the net balance of the account appears below the Transfer From field. Note Add a narration, if required, for the transaction. - From the Transfer Type field, select the payee as New Payee.
- From the Transfer Via list, select the type of
payee.
- If you select the Email or
Mobile option:
- In the Email /Mobile field, enter the email id or mobile number of the recipient.
- Re-enter the recipient’s Email ID or Mobile number in the Confirm Email/Mobile field.
- From the Currency field, select the currency in which the transfer is to take place.
- In the Amount field, enter the transfer amount.
- From the Transfer From account list, select the source account.
- From the Currency field, select the currency in which the transfer is to take place.
- In the Amount field, enter the transfer amount.
- From the Transfer From account list, select the source account.
- In the Note field, specify a note or remarks.
- If you select the Email or
Mobile option:
- Perform one of the following actions:
- Click Transfer to make a payment towards the
payee.
The Review screen appears.
- Click Cancel to cancel the transaction.
- Click Transfer to make a payment towards the
payee.
- Perform one of the following actions:
- Verify the details, and click Confirm.
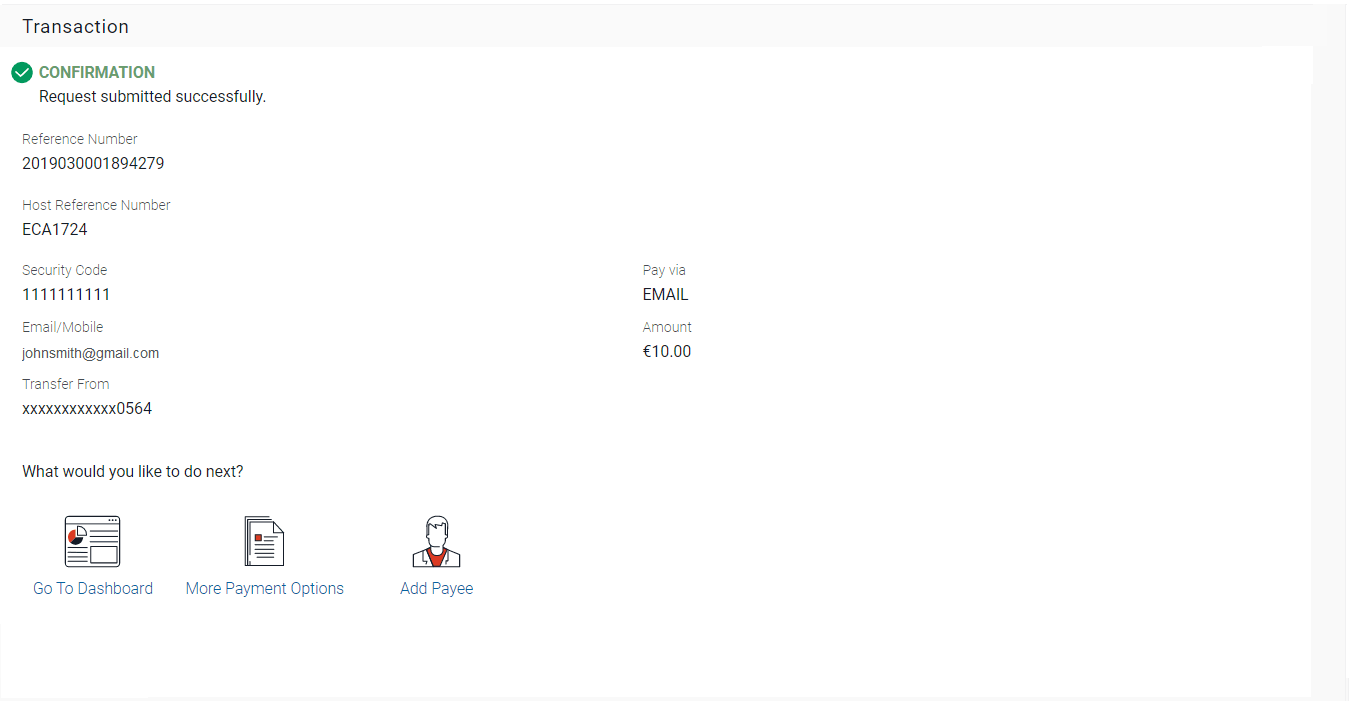
A success message along with Reference Number, and transfer details appear on the confirmation page.
- Click Cancel to cancel the transaction.
- Click Back to navigate back to the previous screen.
- Verify the details, and click Confirm.
- Perform one of the following actions from the Confirmation screen:
- Click Home to navigate to the dashboard.
- Click Add Payee to register the beneficiary as a
payee.
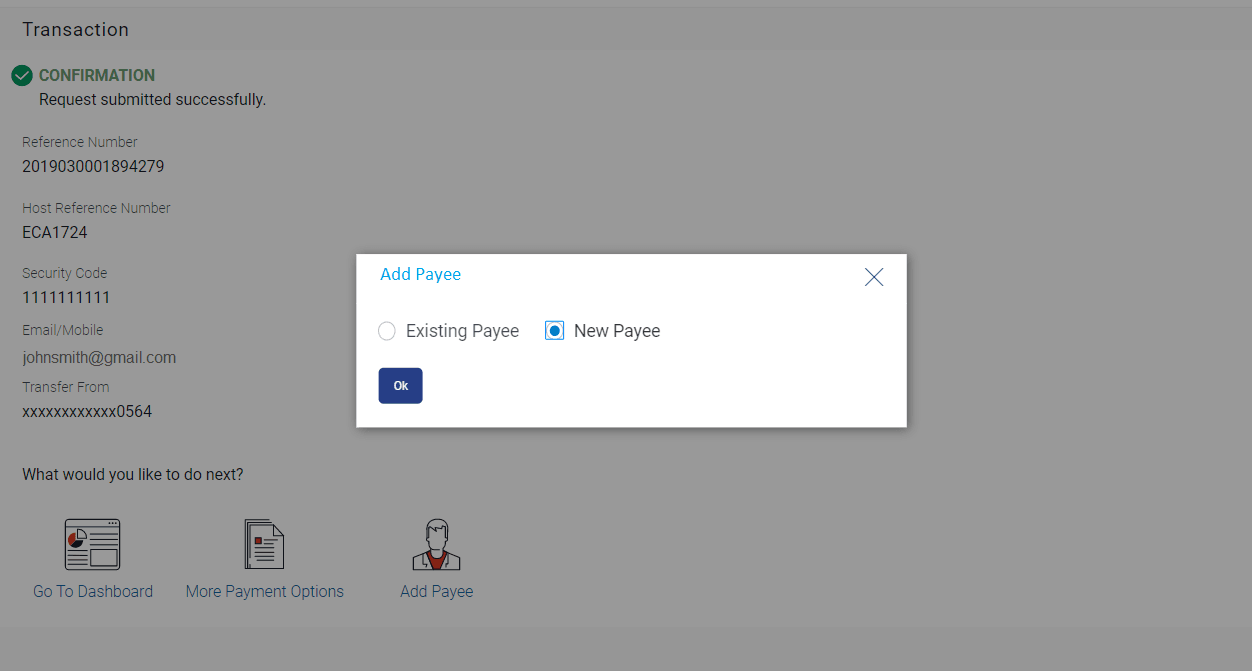
A pop up window appears on which you can identify whether the beneficiary details are to be mapped to an existing payee or whether the beneficiary is to be registered as a new payee.
Figure 1-6 Add Payee - Addition of New Payee
Note:
The fields which are marked as Required are mandatory.For more information on fields, refer to the field description table.
Table 1-3 Add Payee - Addition of New Payee - Field Description
Field Name Description Add to an Existing Payee or create a New Payee? Select the option to identify whether the beneficiary is to be mapped to an existing payee or whether the beneficiary is to be added as a new payee.
- Select the desired option under the Add to an Existing Payee or
create a New Payee? field.Perform one of the following actions:
- If you select the New Payee
option;
The Add Payee screen appears in which you can register the beneficiary as a new payee.
- If you select the Existing Payee option;
Select the payee to whom the beneficiary details are to be mapped.
- If you select the New Payee
option;
- Click OK.The Add Payee screen appears with all the beneficiary details pre-populated in the required fields.
Figure 1-7 Addition of New Payee - Peer to Peer Payment
Note:
The fields which are marked as Required are mandatory.For more information on fields, refer to the field description table.
Table 1-4 Addition of New Payee - Peer to Peer Payment - Field Description
Field Name Description Upload Photo Select this option to upload a photo against the payee. Email / Mobile Enter the email ID or mobile number of the payee. Nickname The nickname assigned to the payee’s account for easy identification. - Click on the Upload Photo link to upload a photo against
the payee.
Note:
The Upload option will appear if you have selected the New Payee.Perform one of the following actions:
- Click Change to modify the uploaded payee photo.
- Click Remove to delete the uploaded payee photo.
- In the Nickname field, enter a nickname of the payee, if you have selected the New Payee option.
- Perform one of the following actions:
- Click Add to add a
payee.
The Review screen appears.
- Click Cancel to cancel the transaction.
- Click Add to add a
payee.
- Perform one of the following actions:
- Verify the details, and click
Confirm.
A message confirming the addition of the new payee appears.
- Click Cancel to cancel the transaction.
- Click Back to return to the Add Payee screen.
- Verify the details, and click
Confirm.
- Perform one of the following actions from the Confirmation screen:
- Click Go To Dashboard, to navigate to the Dashboard.
- Click More Payment Options to go to the other payment options.
Parent topic: Peer To Peer Payments


