6.5 Corporate Preferences
Navigation Path:
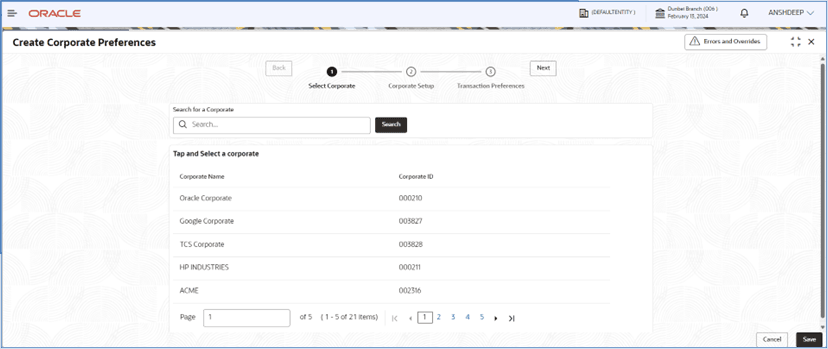
From the Electronic Data Exchange, select Maintenance, click Corporate Preferences , and then click Create Corporate Preferences
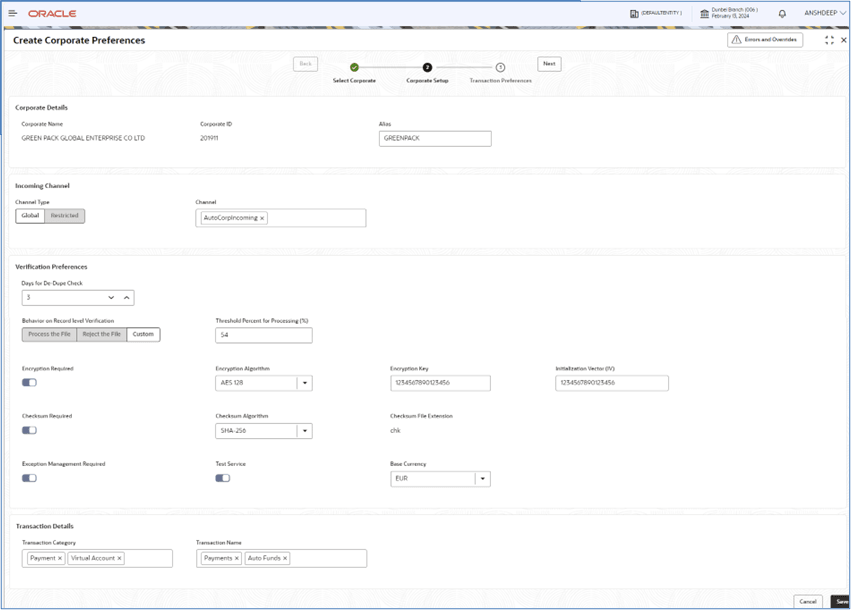
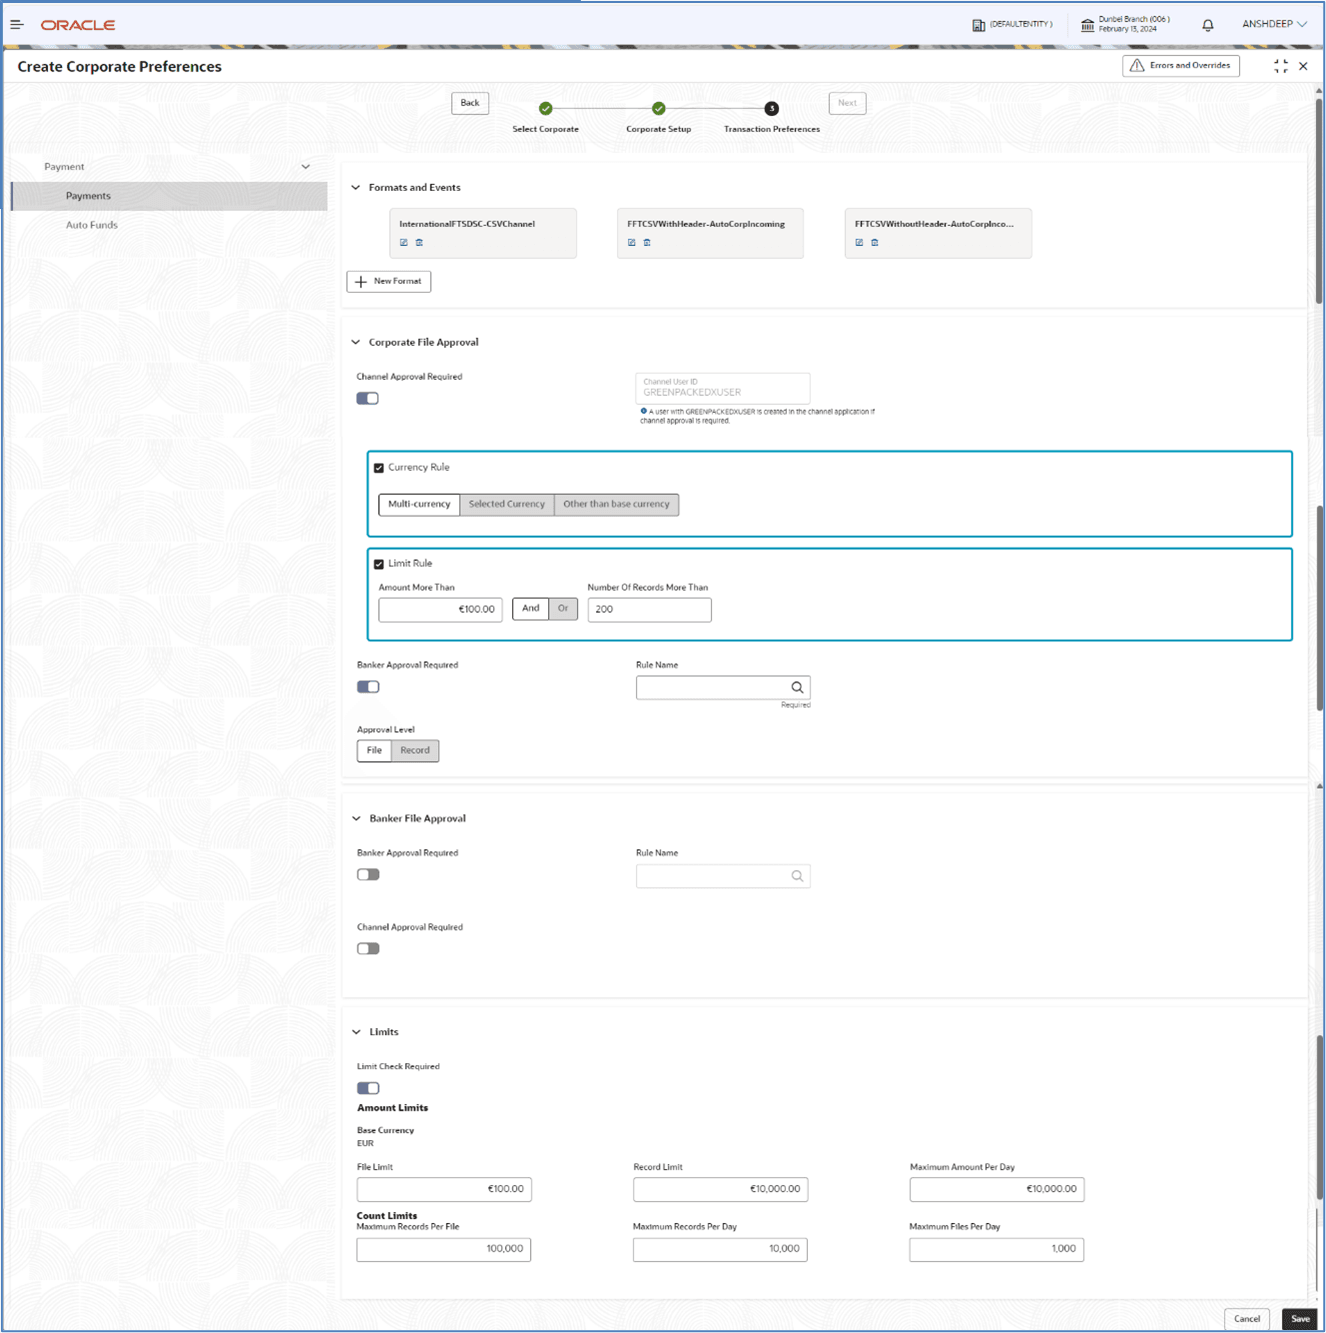
Figure 6-2 Create Corporate Preferences
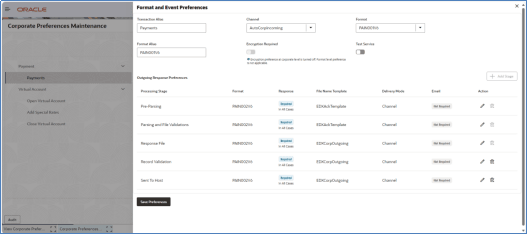
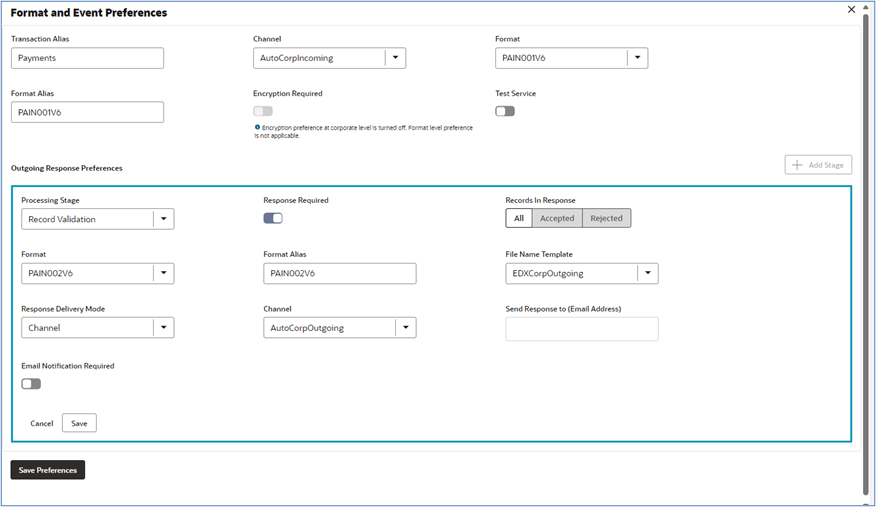
Figure 6-3 Formats and Alerts Screen
- Refer to the following table for specifying details in the above
screen:
Note:
Fields marked with ‘*’ are mandatory.Table 6-1 Field Description
Field Name Description Corporate Details Corporate ID * Search Corporate ID, for whom corporate preference is need to be created. Corporate Name * Displays Corporate Name, for whom corporate preference is, needs to be created. Alias Name * Enter Alias name of the Corporate. It should be unique Incoming Channel Details Channel Type * Select if the Channel is Global or Non -Global. Global channels can be mapped to multiple corporates and non global channels are specific to a Corporate Channel * Select Channel Name to associate channels. Multiple channels can be associated to a corporate Note:
- In the case of a Non Global channel, if it is once mapped to a Corporate then it should not be available for mapping with another corporate
- If the channel type is selected as Global, then application will list down only global channels in this list and vice versa.
Verification Preferences Days for De-Dupe Check * Set up the number of days within which the system should perform the duplicate check with the previously received files. For e.g., if 180 days are maintained in this field then system will run the de-dupe rules with the files received in last 180 days. Behavior on Record Level Verification Select the behaviour of the file when there is any record in the file that is rejected. - Process the File – It will process the file for the success records.
- Reject the File – It will reject the whole file when there is any one record rejected in the file.
- Custom – Based on the Threshold percent given in the next field, file will be processed.
Threshold Percent for Processing (%) Enabled when Custom is selected in the above field. Setup the threshold percent based on which file will be processed. Enter number between 1 to 99
Encryption Required Select if encryption is required for the file. Encryption Algorithm Select the encryption algorithm based on which encryption will be done. Allowed Values:
- AES 126
- AES 256
Encryption Key Provide the encryption key based on which encryption will be done. Initialization Key (IV) Provide the IV key based on which encryption will be done. Checksum Required Select if checksum validation is required for the file. Checksum Algorithm Provide the checksum algo based on which checksum will be derived and verified with the value given in the checksum file. Checksum File Extension Static field displaying the extension of the checksum file. Exception Management Required Select whether Exception management is required for the error files. Test Service Select whether Test Service is required for the corporate to test the files. Base Currency Select the Base Currency to define on which will be used for limit validations and Channel approval criteria Transaction Details Transaction Category* Select Transaction Category(s) for which the corporate wishes to send files. Transaction Name * Select Transaction name (s) from available List. Note:
The transaction name list will populate depending on the Transaction Category selected in the previous selection.
Multiple Transactions Names will be segregated and arranged with respect to Transaction Category
Formats and Events New Format* Setup the format for each transaction type in which the corporate will send the file. Click on this button to add new Incoming Format for Transaction Name selected from the available list at the Left side Transaction Alias* User can provide the transaction alias which will come in the incoming file name and through which Transaction Name will be identified Channel * Select the channel name for outgoing response file. Format * Select Format to Map with Customer Response File Format Alias* User can provide the format alias which will come in the incoming file name and through which Format will be identified Encryption Required Select if Encryption is required for the format. If selected as No encryption will not be applicable for this format.
Note:
In case Encryption preference at corporate level is turned off, then Format level preference is not applicable.Test Service Select whether Test Service is required for the format to test the files. Note:
Test service selected at Corporate level supersedes Test Service selected at format level.Outgoing Response Preferences
Note:
- Mandatory Processing Stages will be listed first and those cannot be deleted by the user. User can add new processing stages and can modify all the processing stages.
Processing Stage* Select the processing stage from the list for which response preferences are required to be configured. - Pre-Parsing
- Parsing & File Validation
- Host Response
- Record Validation
- Sent to host
Response Required* Select whether acknowledgement/response is required or not for the selected processing stage Records In Response Select what type of records are required in the response file. - Accepted – only accepted records will be sent in the response file
- Rejected – only rejected records will be sent in the response file
- All – All types of records will be sent in the response file
Format * Select the Format in which Customer Response File will be generated Format Alias * Provide the format Alias which will be mapped to the Response File name File Name Template * Select outgoing file name template to map with Customer Response File Response Delivery Mode * Select the response mode where the Response File will be generated from the available list –
- Channel
- Both
Channel* Required if Channel/Both is selected in the Response mode. Provide the channel where the response file will be generated.
Send Response To (Email Address) * Required if Email/Both is selected in the Response mode. User can provide multiple email addresses separated by comma, where the response file will be sent.
Email Notification Required* Select Yes/No as per the requirement - Yes – If Email notification required
- No – If Email notification is not required
Email on Event* Select the event when the notification will be triggered - Rejected – Notification will be triggered whenever the file/transactions are rejected
- Always – Notification will be triggered in both the case of accept or reject
Send Notification To (Email Address) * User can provide multiple email addresses separated by comma, where the notification will be sent. Approval (Corporate Uploaded File) & Approval (Banker Uploaded File) - Specify the conditions to send file for channel or banker approval before processing.
Channel Approval Required Toggle if channel approval is required Channel User ID * This is the corporate user id for Channel Approval for internet banking (Oracle Banking Digital Experience– corporate user ID). Note:
- It is a system generated user ID for Oracle Banking Digital Experience maker user for approval of file
- It is a created in the system only when the channel approval is required
- It is available only in view mode and cannot be entered or modified by the user.
Currency Rule Toggle if currency rule is required Select Currency Rule Condition Multi-currency
Selected Currency
Other than base Currency
Choose Currency Select the desired currency from the dropdown Limit Rule Toggle if limit rule is required Amount More Than Enter the Threshold Amount for the Corporate to check before applying approval rule. If the File amount is greater than the defined amount here, it will be sent for approval And Or Select either And or Or If And is selected, then it will be sent for approval only if both conditions are met.
If Or is selected, then it will be sent for approval if either of the condition is met.
Number Of Records More Than Enter the number of records, above which the file needs to be sent for approval Note:
If both file amount and records criteria is maintained system will look for both conditions to be met before sending a file for approval.Banker Approval Required Toggle if Banker approval is required Rule Name Select the rule using the search option. Available rules in the Plato will be displayed in the search screen.
Approval Level Select the approval level – File or Record Note:
– Banker Approval Required and Channel Approval Required sequence will change based on the tab selection.
If Approval (Corporate Uploaded Files) is selected, Channel Approval Required will be first and Banker Approval Required will be second.
If Approval (Banker Uploaded Files) is selected, Banker Approval Required will be first and Channel Approval Required will be second.Limits – Specify the Limit conditions check to performed on File, before processing further in application Limit Check Required Select the Check box if Limit check is required for Corporate Base Currency* Base currency selected above will be displayed here. Amount Limit File Limit Define maximum File limit allowed for corporate in case of financial transactions to validate the File limits before processing the file Record Limit Define record level limits, for financial transactions, with the Maximum amount, so that system can validate the Record limits before processing the records in the file Maximum Amount Per Day Define the maximum amount of transaction allowed per day for an individual corporate; hence, the system will restrict the file crossing the predefined maximum amount range. Count limits Maximum Records Per File Define the maximum number of records allowed in an individual file for the corporate, including Financial and Non-Financial Transactions Maximum Records Per Day Define the maximum number of records allowed in a single day for the corporate for Financial and Non-Financial Transactions Maximum Files Per Day Define a maximum number of files that can be processed for the individual corporate in a single day with Financial and Non- Financial Transactions.
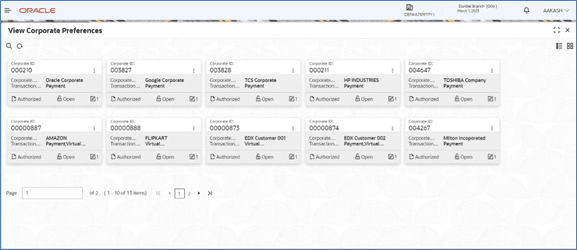
View Corporate Preferences:
By using this screen, user can View, Modify, Delete or Authorize the Corporate Preferences Maintenance.
From the Electronic Data Exchange, select Maintenance, click Corporate Preferences, and then click View Corporate Preferences
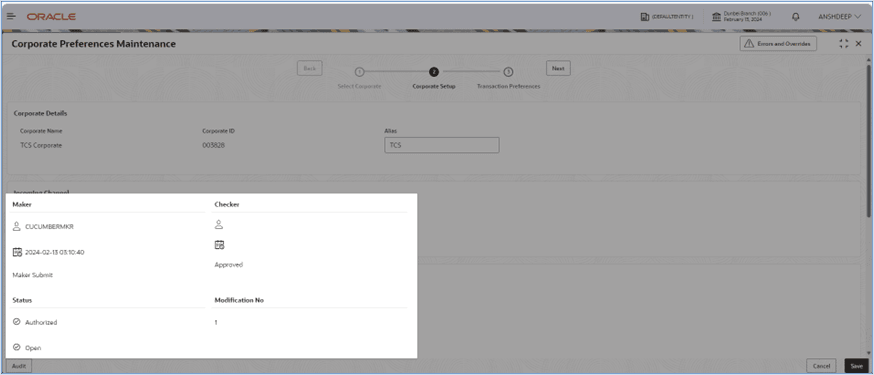
- Click on Audit to view the event of operation
performed on maintenance.
Perform the following steps to take actions on the Corporate Preferences Details. Click the Options (
 ) icon and then click any of the below option:
1. Unlock To modify the record details. Refer to the Create Corporate Preferences section for field level details. 2. Authorize To authorize the record. Authorizing requires necessary access rights. - Optional: Click View to view the record details.
- Select the record to authorize and then click Approve.
- Record can also be Rejected by clicking Reject.
3. Delete To delete the data permanently, which is not yet authorize. 4. Close To close record temporary - Optional: On the confirmation pop-up window, enter the remark for closing.
- Click Confirm to close the record.
5. Reopen To reopen the maintenance record which is temporary Closed 6. View To view the Corporate Preferences details.
Parent topic: Corporate Preference
