- Installer Database Setup
- Install Oracle FLEXCUBE Database
- Basic Setup Using GUI Installer
2.2 Basic Setup Using GUI Installer
This topic explains the systematic instructions about basic setup using the GUI installer.
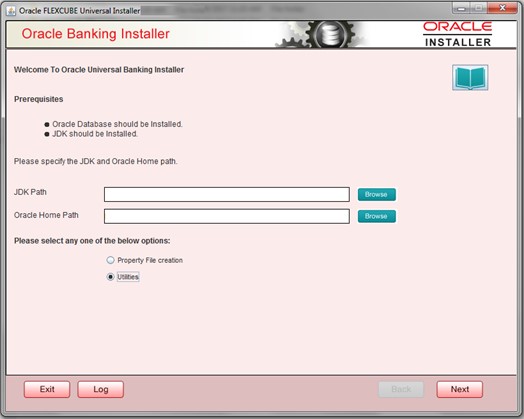
- Double-click the FCUBSInstaller.bat batch file to launch Oracle FLEXCUBE Universal Installer.Select the Utilities option and click the Next button.Oracle FLEXCUBE Universal Installer - Welcome screen is displayed.
Figure 2-1 Oracle FLEXCUBE Universal Installer - Welcome
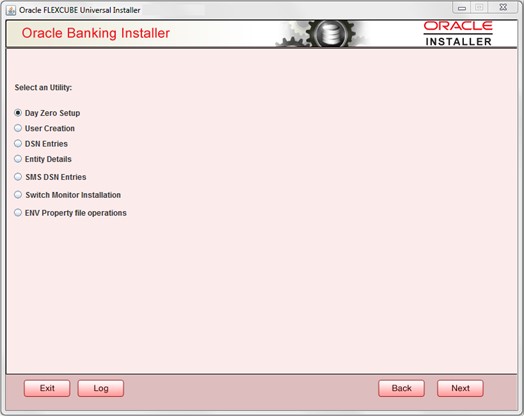
- Select Day Zero Setup in Utility Screen and click the Next button.Oracle FLEXCUBE Universal Installer - Select an Utility screen is displayed.
Figure 2-2 Oracle FLEXCUBE Universal Installer - Select an Utility
- Click the Next button on the below screen. The ROFC Schema details to be entered is displayed:Oracle FLEXCUBE Universal Installer - Database Installation screen is displayed.
Figure 2-3 Oracle FLEXCUBE Universal Installer - Database Installation
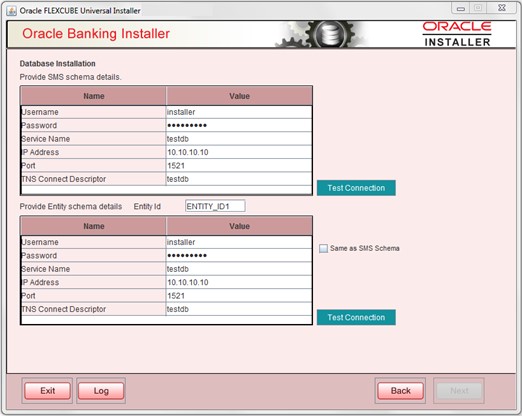
- On the Oracle FLEXCUBE Universal Installer - Database Installation screen, specify the schema details.
Table 2-2 Database Installation - Schema
Fields Description Username Specify the user name to access the schema. Password Enter the schema password. Service Name Provide service name of database. IP Address Specify the IP address of the system where the database schema is installed. Note:
IP Address should be the same as mentioned in the TNSnames.ora.Port Specify the port number. TNS Connect Descriptor Specify the TNS Connect Descriptor. - Here Entity Schema is mandatory; at least a minimum of one entry should be provided.
- The Entity Id value is default i.e., ENTITY_ID1 for the first entry.
- Provide the JNDI Name for the ENTITY_ID1. By default the jndi name is jdbc/fcjdevDS.
- Give the Schema Details for the Entity1.
- Here Compile In All Entities Field is N. (As using the Single Entity Concept).
- Click the Next button.Oracle FLEXCUBE Universal Installer - Basic Setup Details screen is displayed.
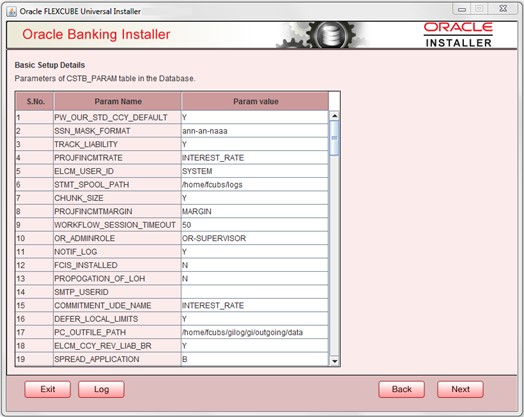
Figure 2-4 Oracle FLEXCUBE Universal Installer - Basic Setup Details
- The screen displays basic setup details for table CSTB_PARAM.
- Here Oracle directory name(present in all_directories table in the schema) must be added for WORK_AREA and TRACE_AREA. Oracle directory name must be added for other required parameters also.
- Oracle directory creation in the schema can be done as below :Create or replace directory dir_name as directory_path.
If the target database is Autonomous Database then WORK_AREA and TRACE_AREA value should be blank, and USERDEBUGMODE must be given as DB for Autonomous Database. - Click on the Next button to display the LIMITS INTEGRATION PARAMETERS screen.Oracle FLEXCUBE Universal Installer - LIMITS INTEGRATION PARAMETERS screen is displayed.
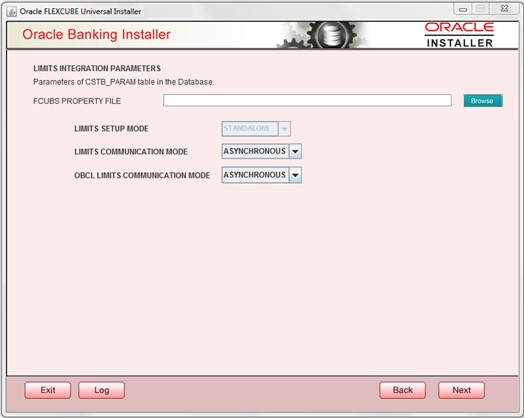
Figure 2-5 Oracle FLEXCUBE Universal Installer - LIMITS INTEGRATION PARAMETERS
- The Limits Integration Parameters will be set based on values read from fcubs.properties file browsed.In the case of ELCM Embedded, the Limit Communication mode will be Asynchronous by default. These parameters will be updated in the CSTB_PARAM table.
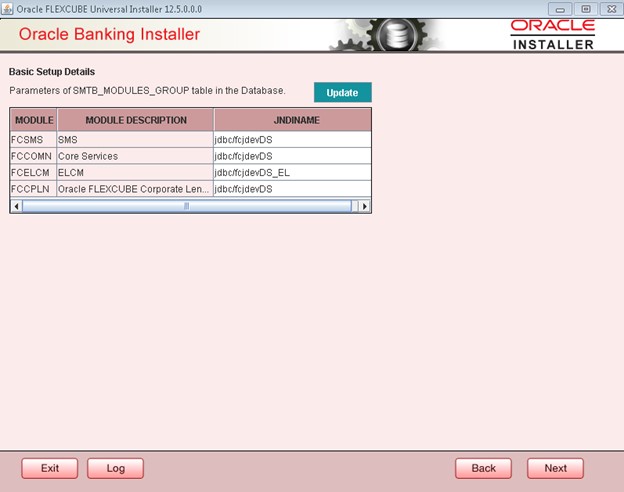
- Click on the Next button. The screen displays parameters for table SMTB_MODULES_GROUP.If any change is required in the JNDI name, edit the same and click on Update.
Note:
SMTB_MODULES_GROUP for FCELCM (Oracle ELCM) with the JNDI name ‘_EL.’ For example, if the ENTITY_ID JNDI name is jdbc/fcjdevDS, then you need to update the JNDI name jdbc/fcjdevDS_EL.Figure 2-6 Oracle FLEXCUBE Universal Installer - Basic Setup Details - SMTB_MODULES_GROUP
- Click the Next button.Oracle FLEXCUBE Universal Installer - Basic Setup Details - Bank and Branch screen is displayed.
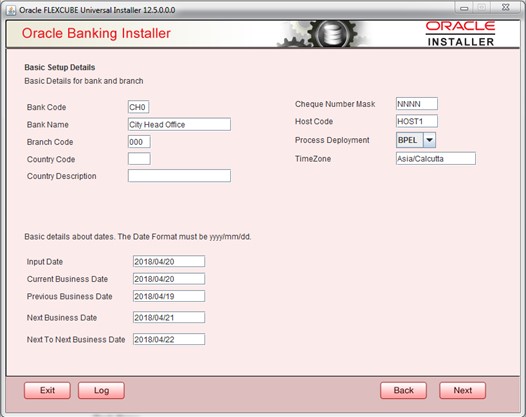
Figure 2-7 Oracle FLEXCUBE Universal Installer - Basic Setup Details - Bank and Branch
- On the Oracle FLEXCUBE Universal Installer - Basic Setup Details - Bank and Branch screen, specify the bank, branch and date details.
Table 2-3 Basic Setup Details - Bank, Branch and Dates
Fields Description Bank Code Enter the bank code. Bank Name Enter the bank name. Branch Code Enter the branch code. Country Code Enter the Country code. Country Description Enter the Country Description. Cheque Number Mask Enter the Cheque Number Mask. Process Deployment Choose mode of process deployment between BPMN Input Date Enter the input date. Current Business Date Enter the current business date. Previous Business Date Enter the previous business date. Next Business Date Enter the next business date. Next to Next Business Date Enter the next to next business date. - Click the Next button.Oracle FLEXCUBE Universal Installer - Basic Setup Details - Currency Details screen is displayed.
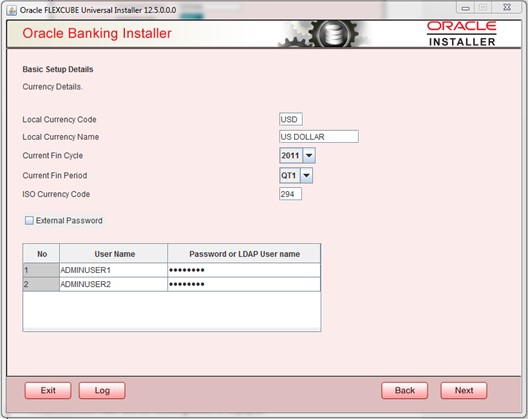
Figure 2-8 Oracle FLEXCUBE Universal Installer - Basic Setup Details - Currency Details
- On the Oracle FLEXCUBE Universal Installer - Basic Setup Details - Currency Details screen, specify the fields.
Table 2-4 Basic Setup Details - Currency Details
Fields Description Local Currency Code Enter Local Currency Code. Local Currency Name Enter Local Currency Name. Current Fin Cycle Enter Current Financial Cycle(any year from 2011 to 2050) Current Fin Period Enter Current Financial Period(QT1 to QT4,M01 to M12). ISO Currency Code Enter ISO Currency Code. The screen also displays basic setup details for creating a user in Oracle FLEXCUBE Universal Banking.
The creation of a SYSTEM user is mandatory for payments processing. It needs to be created as part of a static data setup.
External Password Check this box to specify the external password. User Name Displays the user name. Change the user name if required. Password or LDAP User Name Specify the password and it is mandatory. You can use the following characters in the password: - Alphabets in uppercase
- Alphabets in lowercase
- Numerals
Note:
You cannot use ‘_’ (underscore) in the password. - Click the Next button.Oracle FLEXCUBE Universal Installer - Basic Setup Details - Status screen is displayed.
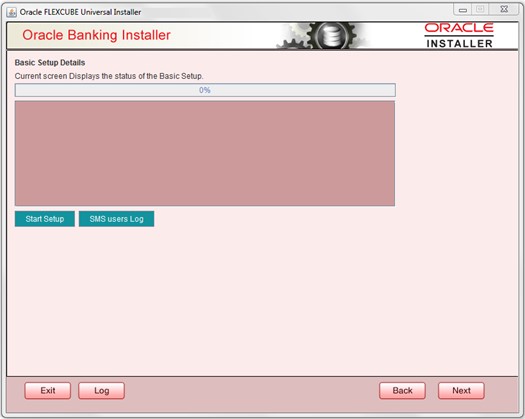
Figure 2-9 Oracle FLEXCUBE Universal Installer - Basic Setup Details - Status
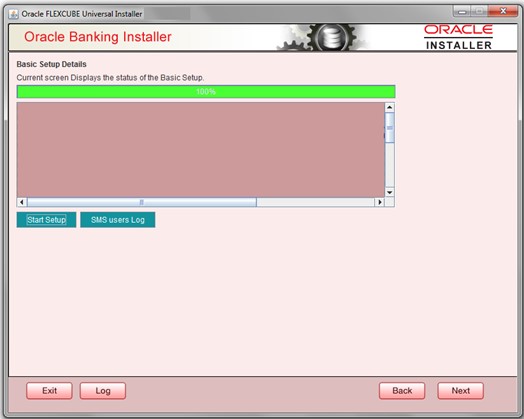
- Click the Start Setup button to compile the entries. On completion, the below screen will be seen. User created logs can be viewed by clicking the SMS users Log button.Oracle FLEXCUBE Universal Installer - Basic Setup Details - Status Completed screen is displayed.
Figure 2-10 Oracle FLEXCUBE Universal Installer - Basic Setup Details - Status Completed
Parent topic: Install Oracle FLEXCUBE Database
