- Current Account Origination User Guide
- Initiating Current Account Opening Process
- Application Entry Stage
- Applicant
- For Small and Medium Business (SMB) Customer Type
2.1.1.2 For Small and Medium Business (SMB) Customer Type
The topic describes the process to capture or edit customer information of Small and Medium Business type of customers.
To capture customer information details
- In the Current Application Entry stage, update the customer details in
the Customer Information data segment based on the respective customer
type.
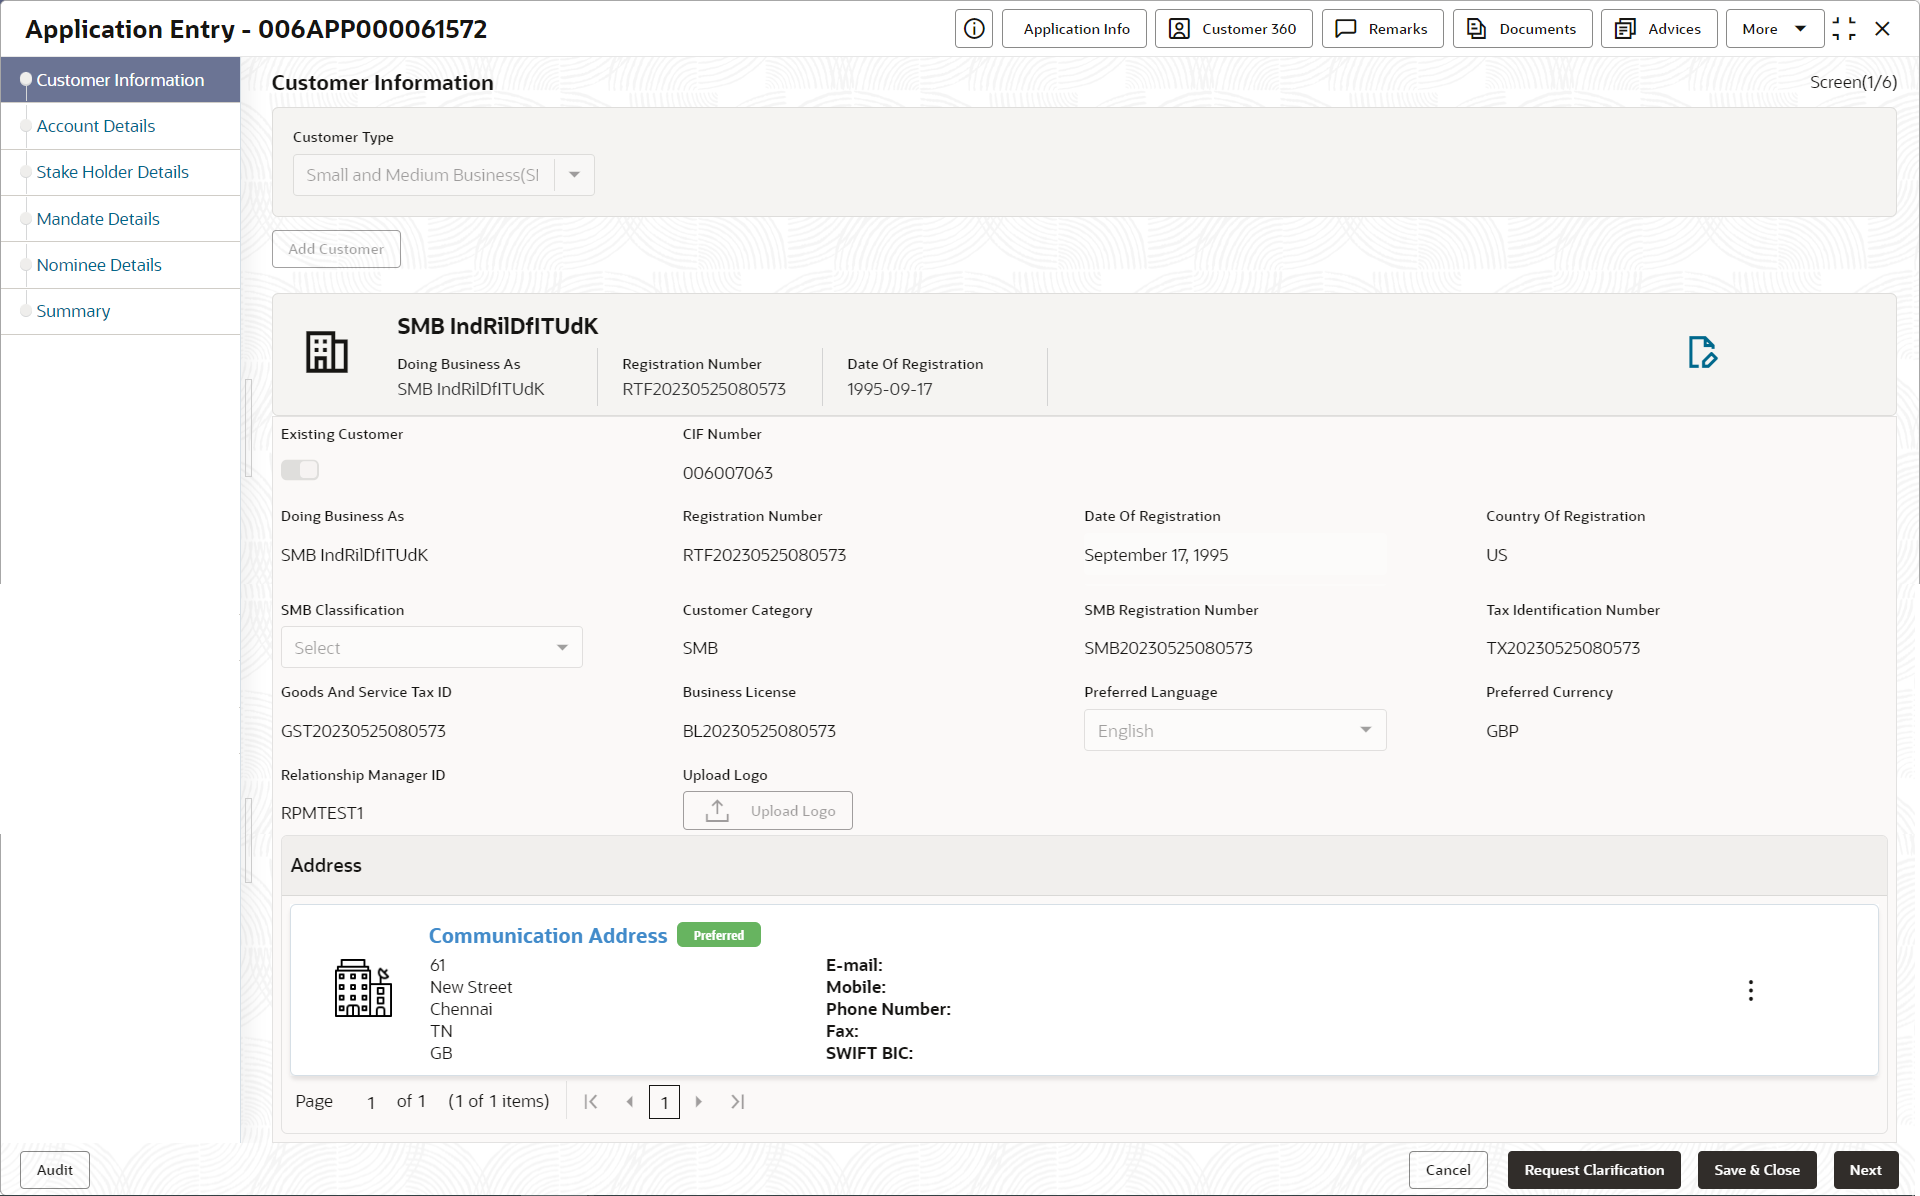
The Customer Information - Small and Medium Business (SMB) screen is displayed.
Figure 2-4 Customer Information - Small and Medium Business
- Specify the details in the relevant data fields. For more information on fields, refer
to the field description table below.Advanced Search
Table 2-2 Small and Medium Business – Field Description
Field Description Customer Type Displays the customer type based on the product selected. Doing Business As Displays the business name of the SMB customer. Registration Number Displays the registration number of the business. Date of Registration Displays the registration date of the business. Edit Click Edit to modify the existing customer details and address details.
Click Save to save the modified details and click Cancel to cancel the modifications.
The Edit appears only for existing customers.
Existing Customer Select to indicate if customer is existing customer. CIF Number Search and select the CIF number. Advance Search Click this button to perform party using advance parameters. For more information on advance search, refer the Advanced Serach section below.
Doing Business As Specify the name of the business. Registration Number Specify the registration number of the business. Date of Registration Select the registration date of the business. Country of Registration Search and select the country code where the business is registered. SMB Classification Select the SMB Classification from the dropdown list.
Available options are:
- Micro
- Small
- Medium
Customer Category Search and select the customer category. SMB Registration Number Specify the SMB registration number. Tax Identification Number Specify the tax identification number of the SMB customer. Goods and Service Tax ID Specify the goods and service tax ID. Business License Specify the business license. Preferred Language Select the preferred language. Preferred Currency Select the preferred currency. Relationship Manager ID Specify the relationship manager ID. Upload Logo Click Upload Logo button to upload the logo for the business. Address This section displays the added address of the applicant. It is mandatory to add communication address of the applicant.
Click

to add address details.Click

to perform below actions on the added address details,- To view the address details, click View.
- To edit the address details, click Edit.
- To delete the address details, click Delete.
Address Type Select the address type for the applicant from the drop-down list.
- Residential Address
- Communication Address
Location Select and search the location. Current Address Select to indicate if you want to mark entered address as current address type. Preferred Address Select to indicate if you want the selected address type as preferred address type. Address From Select the date from when you are connected with the given address. Address To Select the date till when you were connected with the given address. Address Specify the address to search for the already captured address.
Based on the configuration, on entering a few letters, the system fetches the related address that is already captured.
Based on the selection, the fields are fetched in the address section.
Address Line 1 Specify the building name. Address Line 2 Specify the street name. Address Line 3 Specify the city or town name. Country Select and search the country code. State / Country Sub Division Specify the state or country sub division. This field appears based on the selected country code. Zip Code / Post Code Specify the zip or post code of the address. Contact Details In this section you can provide digital contact details. Click add contact button to add new contact details.
<Communication Mode> Select the communication mode from the drop-down list. The available options are:- Mobile Phone
Country Select the country along with international subscriber dialing code of the mobile phone from the drop-down list. The drop-down list option consist of countrycode, country name and subscriber dialing code.
This field appears only if you select the Mobile Phone option as communication mode.
Mobile Number Specify the mobile number. Preferred Select to indicate if the given mobile number is the preferred number. Action You can edit or delete the added mobile details. Email Id Specify the email ID. This field appears only if you select the Email option as communication mode.
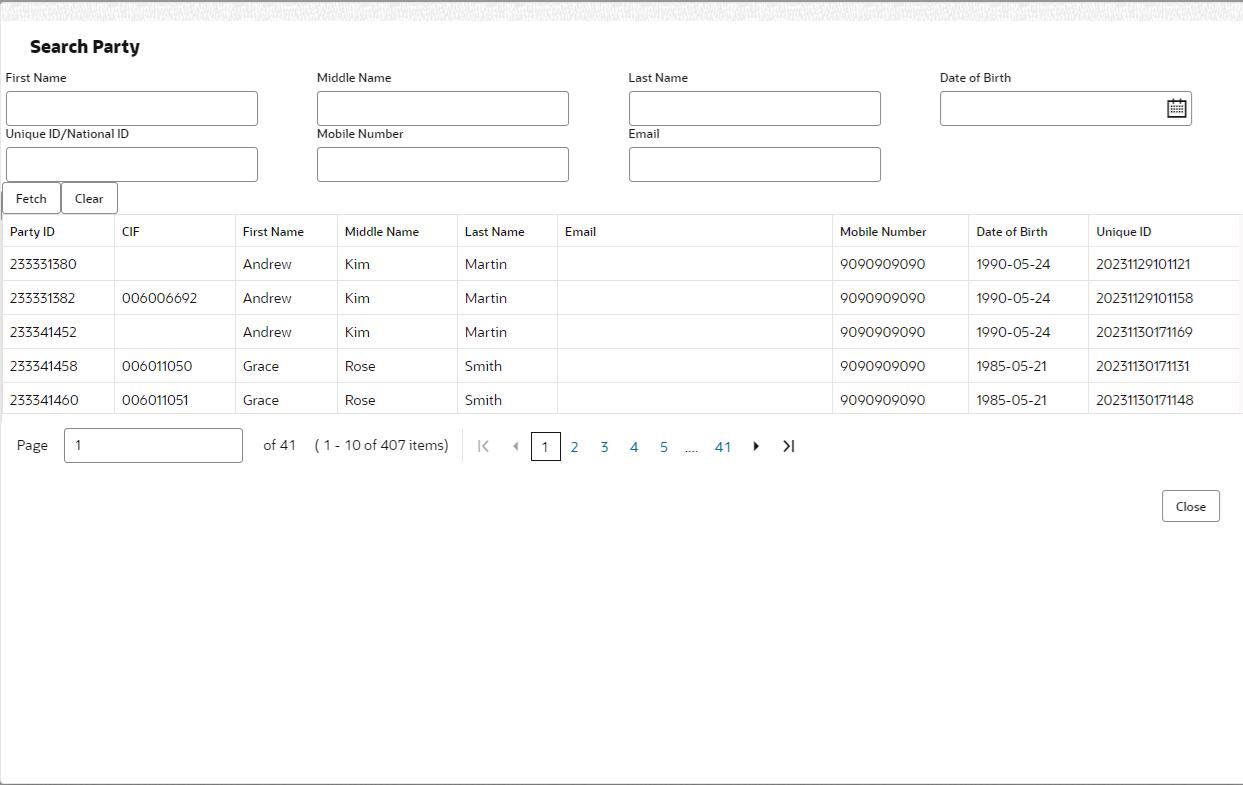
Preferred Select to indicate if the given email ID is the preferred ID. Action You can edit or delete the added email details. You can perform an advanced search for the party by providing additional information.
You can perform search on below party types:
For Individual- First Name
- Middle Name
- Last Name
- Date of Birth
- Unique ID or National ID or SSN ID
- Mobile Number
For Non- Individual- Party ID
- Business or Organization Name
- Registration Number
- Registration Date
- Customer Category
To search for a party using the advanced search:
- Click the Advanced Search.The Search Party window appears based on the selected party type.
- Click Fetch to search all the parties. All the parties in system appears in the
table. OREnter the specific search criteria in the respective field and click Fetch. The search result appears based on the search criteria.
- Click Next to navigate to the next data segment, after successfully capturing the data. The system will validate all mandatory data segments and data fields. If mandatory details are not provided, the system displays an error message for the user to take action. User will not be able to proceed to the next data segment, without capturing the mandatory data. If the Customer Dedupe check is enabled, the application will perform the Dedupe check for the new customer details on clicking Next button. For more information, refer the Customer Dedupe Check section.
Customer Dedupe Check:
Based on the configuration set in the Origination Preference screen, the customer dedupe serivce is enabled.
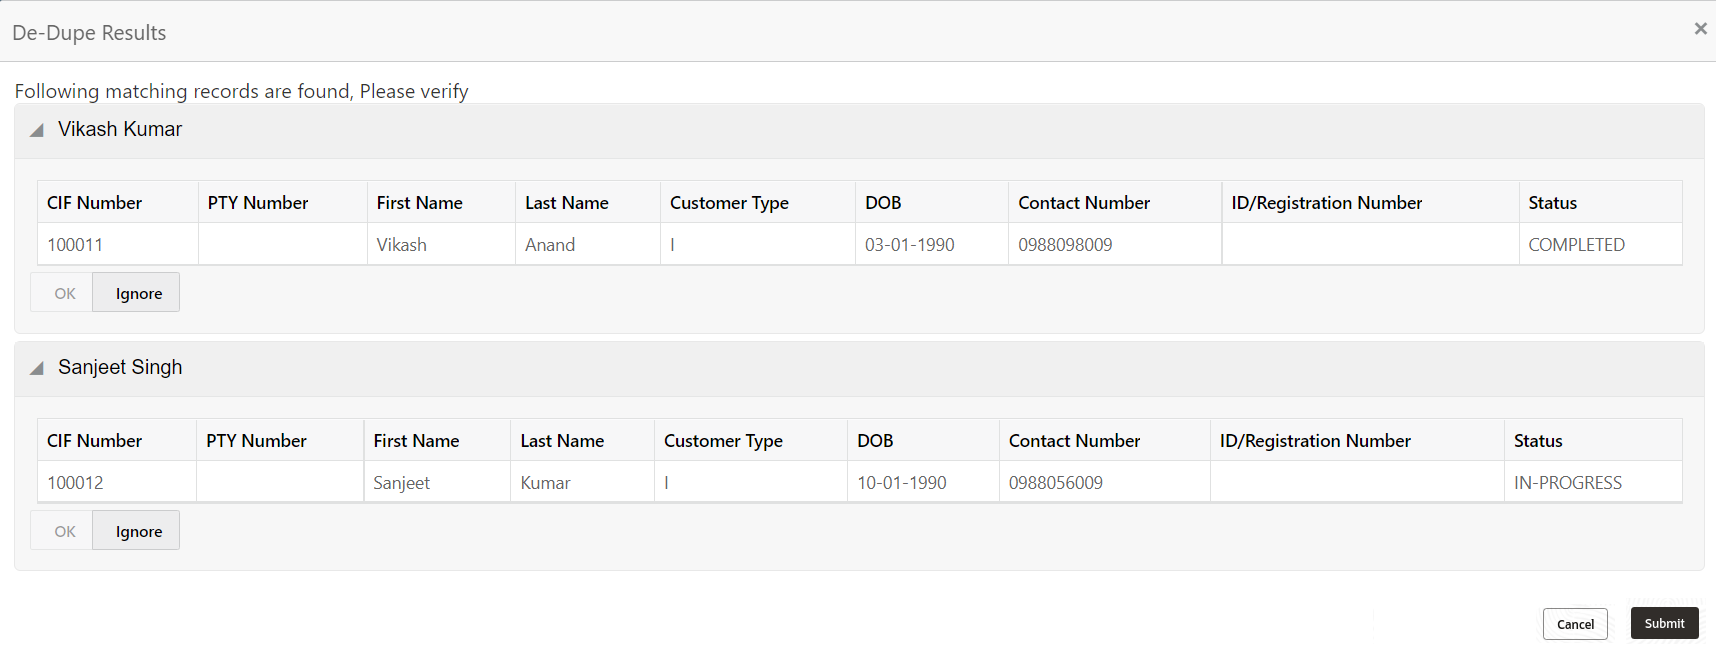
If the Customer Dedupe service check is enabled, upon capturing the New Customer details, the system compares the same with the existing customers records. If there are any matching hits, the list of Duplicate records which matches to the New Customer Details will be displayed.
The customer details are compared based on a set of attributes configured. (Refer to Oracle Banking Party Documentation for Dedupe attributes configuration).- Click Next to perform the dedupe check and display the result.
The De-Dupe Result screen is displayed
For more information on fields, refer to the field description table below.
Table 2-3 De-Dupe Results – Field Description
Field Description CIF Number Displays the CIF Number. PTY Number Displays the PTY Number. First Name Displays the First Name. Last Name Displays the Last Name. Customer Type Displays the Customer Type. DOB Displays the Date of Birth. Contact Number Displays the Contact Number. ID/Registration Number Displays the Registration number. Status Displays the Status of the De-Dupe check.
Parent topic: Applicant


