- Operations User Guide
- Oracle Banking Origination
- Application Initiation
- Product Details
- Loan Product Details
1.2.4.2 Loan Product Details
This topic describes the systematic instructions to configure the loan product.
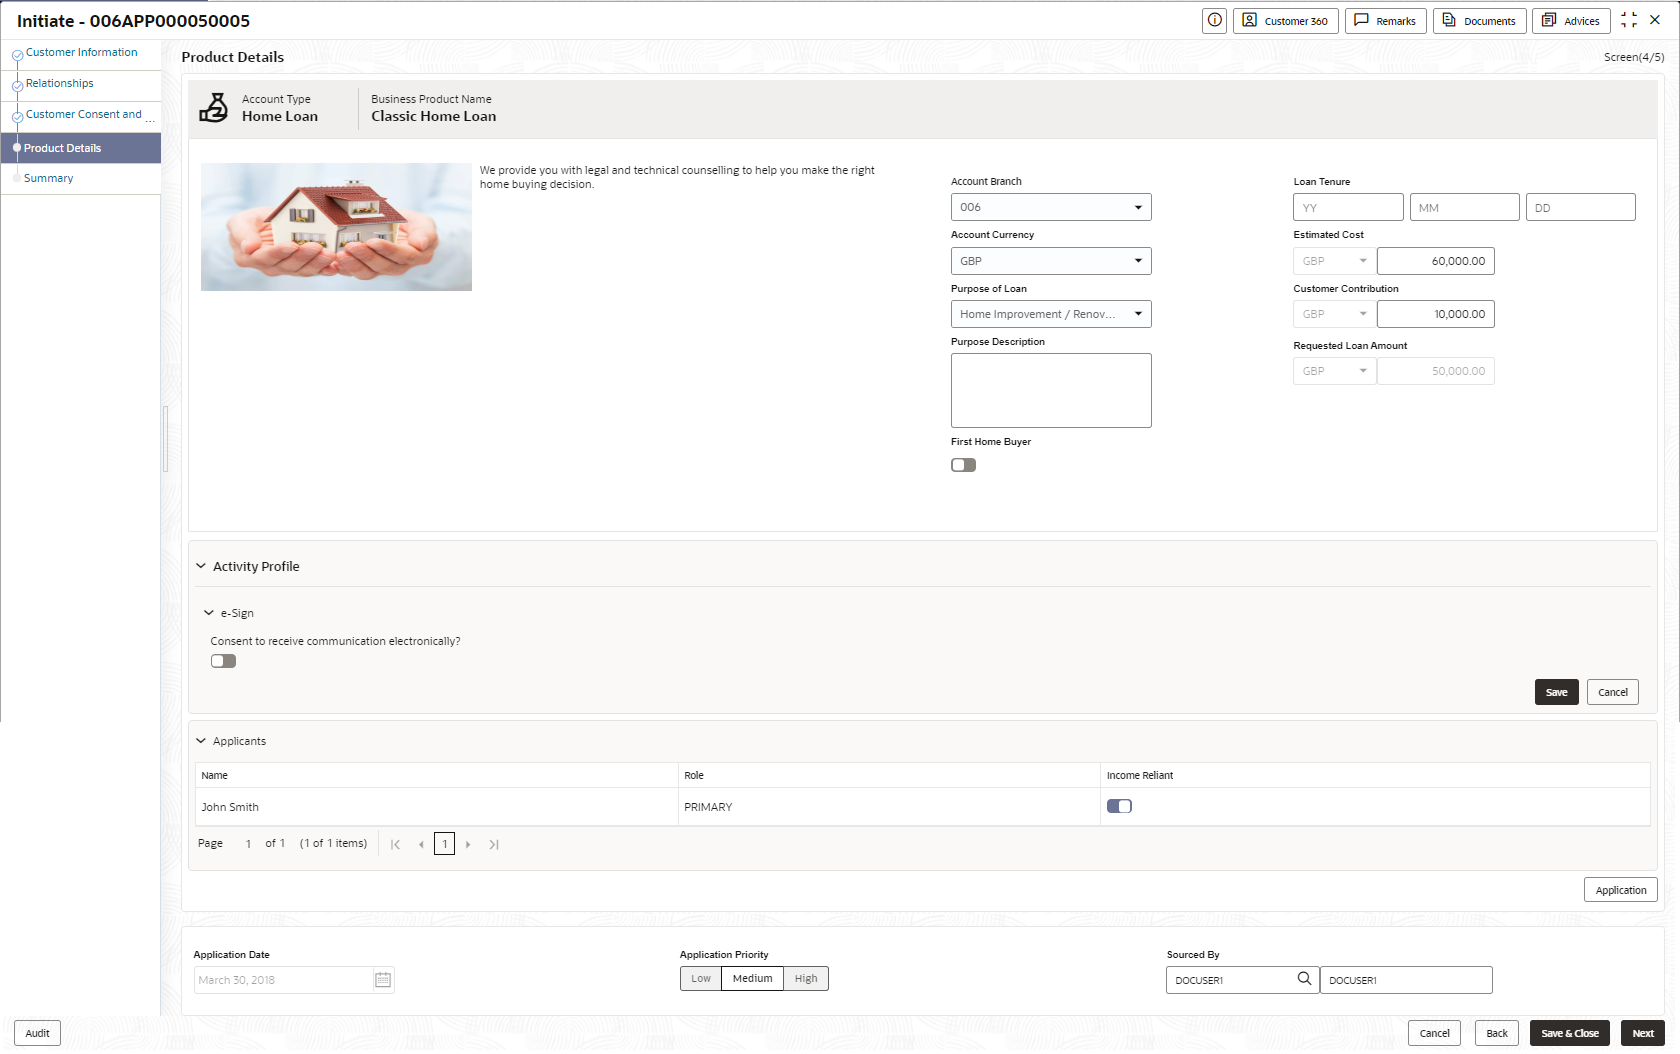
If the Loan Account product is selected then Product Details screen is displayed.
Figure 1-31 Product Details (Loan Account)
- Specify the fields on Loan Details screen.For more information on fields, refer to the field description table.
Table 1-14 Product Loan Details – Field Description
Field Description Account Type Displays the account type based on the product selected in the Product Catalogue. Business Product Name Displays the business product name based on the product selected in the Product Catalogue. Image Displays the business product image. <Product Description> Displays the short description captured for the product in the Business Product configuration. Account Branch Search and select the account branch from the branch list.
By default, the logged-in user’s home branch is displayed.
Loan Tenure Select the loan tenure in year, months and days.
The system will validate the minimum and maximum tenure for the selected currency.
This field is mandatory.
Account Currency Select the currency from the drop-down list, if required. Available options in the drop-down list are based on the currency allowed for the selected business product. By default, the base currency of user logged-in branch is displayed. This field is mandatory. Estimated Cost Specify the estimated cost for the Home Project/Education or Vehicle. Purpose of Loan Specify the loan purpose.
The options in this list appears based on the preference set while configuring product in the Business Product Preference screen.
Customer Contribution Specify the margin amount contributed by the customer.
- Customer Contribution can be zero also.
Purpose Description Specify the description for the select purpose of loan. Requested Loan Amount Displays the calculated loan amount.
Loan Amount = Estimated Cost – Customer Contribution
The system will validate the minimum and maximum loan amount.
First Home Buyer Select to indicate whether the applicant is first home buyer.
This field is applicable only for Individual type of customer.
External Refinance Select to indicate whether the applicant is opting for external refinance.
This field is applicable only for Individual type of customer.
Armed Forces Benefits Applicable Specify whether armed force benefits are applicable to this application. E-Sign Specify whether the customer needs electronic communication.
If the answer is Yes then it is mandatory to capture the e-mail ID for communication in the application.
In case of joint applicants, if any one of the applicant has given consent for e-sign in the Customer Consent and Preference data segment then by fault this field is select as yes.
Applicants This section displays the list of applicants that are involved in this account opening application. Name Displays the name of the applicant. Role Displays the role of the applicant in the application. Income Reliant Select to indicate whether the applicant is income reliant. The applicant’s financial details are captured only if this indication is selected.
This field appears if the Overdraft Requested is selected.
It is mandatory to select at least one applicant as Income Reliant.
Application To add application details while initiating the application, click this button. The Application Entry page appears
The stage for the selected product appears based on the business process configured for the product.
Based on the product configuration it is mandatory to capture Application Details while initiating the account opening application.
- Click Next to navigate to the next data segment, after successfully capturing the data.
The system validates for all mandatory data segments and data fields. If mandatory details are not provided, the system displays an error message for the user to take action.
The user cannot proceed to the next data segment, without capturing the mandatory data.
- Click Save and Close to save the data captured.The captured data is available in the My Task list for the user to continue later.
- Click Cancel to terminate the application and the status of the application. Such applications cannot be revived later by the user.
Parent topic: Product Details
