- Supply Chain Finance User Guide
- Maintenance for Supply Chain Finance
- Product Parameters Maintenance
- Create Product Parameters
2.2.1 Create Product Parameters
This topic describes the systematic instruction to create products and maintain its parameters.
- Basic Details
- Finance Parameters
- Repayment Parameters
- Credit Limit Mapping
- On Home screen, click Supply Chain Finance. Under Supply Chain Finance, click Maintenance.
- Under Maintenance, Click Product
Parameters. Under Product Parameters,
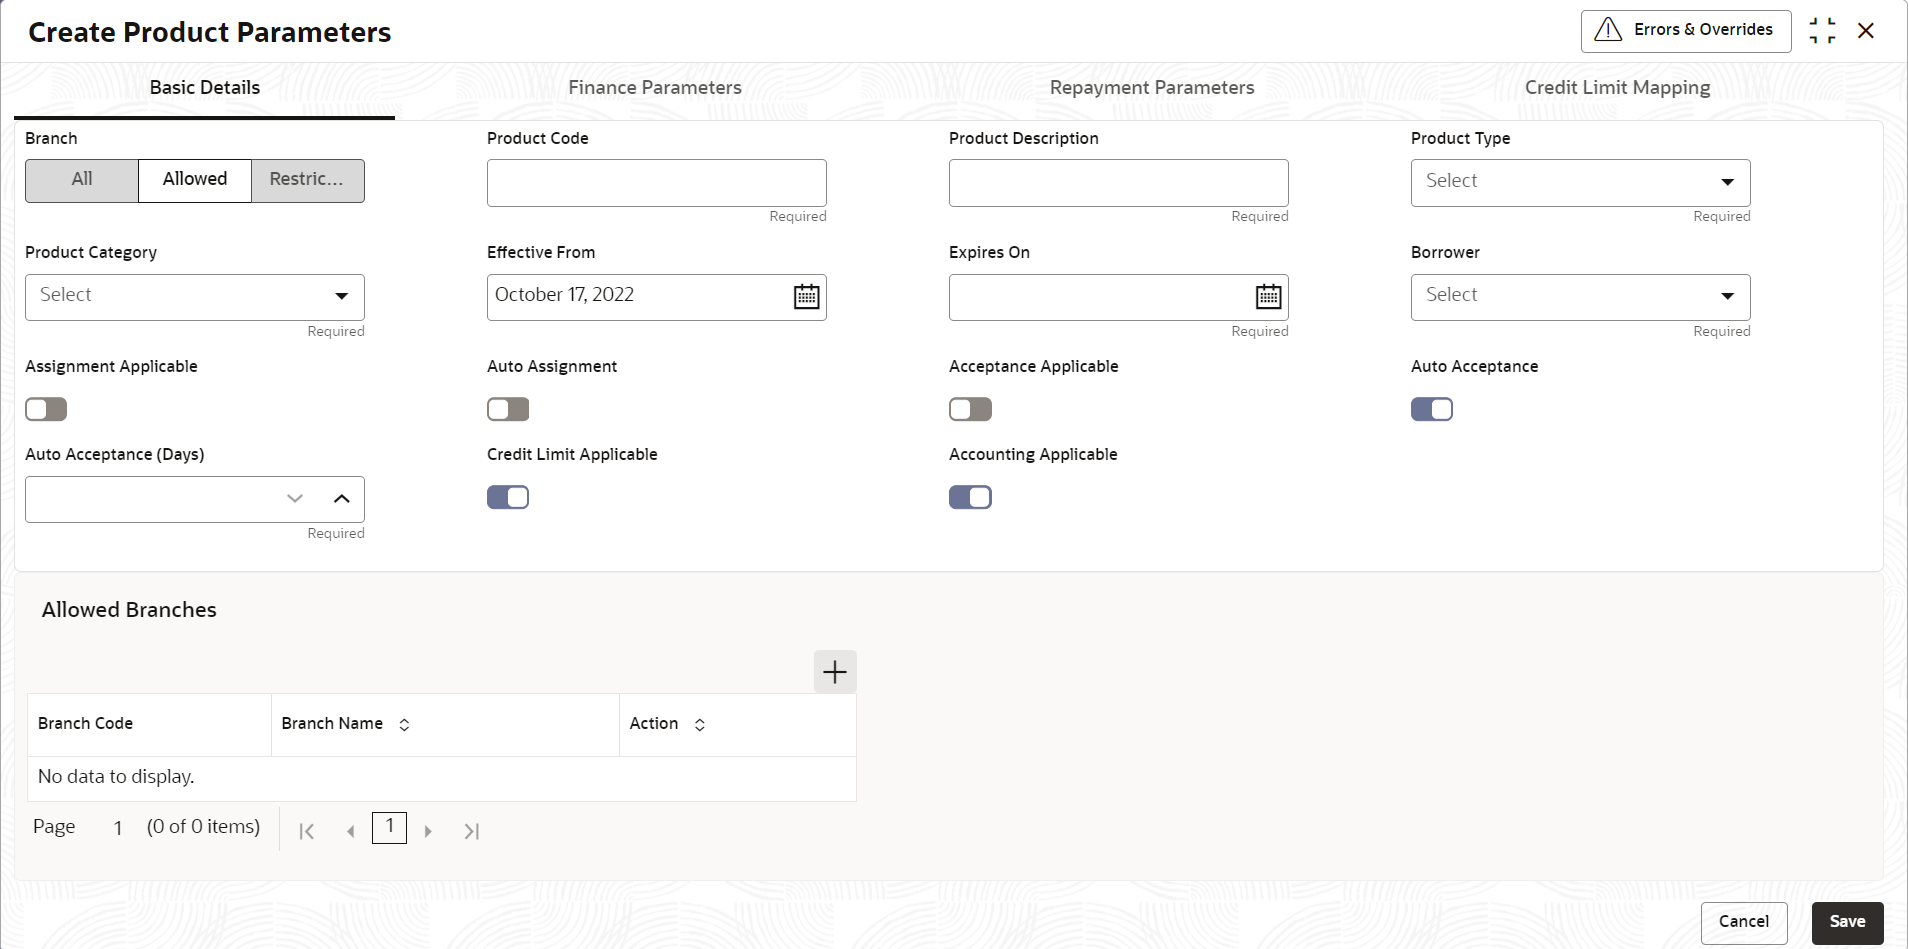
Click Create Product Parameters.The Create Product Parameters - Basic Details screen displays.
Figure 2-7 Create Product Parameters - Basic Details
- On Basic Details tab, specify the fields to configure
the basic details for the product being created.For more information on fields, refer to the field description table.
Note:
The fields marked as Required are mandatory.Table 2-6 Basic Details - Field Description
Field Name Description Branch† Select the option under which the product is to be created.- All - Product defined is applicable to all the branches.
- Allowed - Product defined is applicable to only the selected branches.
- Restricted - Product defined is applicable to all the branches except the selected branches.
You can select only one of the options at any given time.
Product Code Specify a unique code to identify the product. Product Description Specify a description for the product. Product Type Select whether the product is Buyer Centric or Supplier Centric. Product Category Select the category to be financed under the product, whether Invoice or Purchase Order. Effective From Click the Calendar icon to select the date from when the product is active.
If the field is left blank, then the branch date is considered by default.
Expires On Click the calendar icon to select the date up to when the product is valid. Borrower Select the borrower to be associated with the product, whether Anchor or Spoke. Assignment Applicable Switch the toggle ON if assignment on invoice is applicable for financing. Auto Assignment Switch the toggle ON if the assignment is to be performed automatically post invoice upload. Acceptance Applicable Switch the toggle ON if acceptance on invoice is applicable for financing. Auto Acceptance Switch the toggle ON if the acceptance is to be performed automatically post invoice upload. Auto Acceptance (Days) Specify the number of days after which the instrument is automatically deemed as accepted. Credit Limit Applicable Switch the toggle ON to map credit limits to the product.
If you enable this toggle, the Credit Limit Mapping tab appears. You can map the limit type and related entities.
Accounting Applicable Switch the toggle ON if accounting is applicable. Note:
† On maintenance screens where product selection is required, only products relevant to the logged-in user's branch will be displayed.Note:
For existing implementations where the application is used in a single branch, the existing products can be mapped to either ALL or Allowed branch options at the discretion of the bank or Financial Institution during upgrade to current release version.
For existing implementations where the application is used in multiple branches, the existing products must be mapped to respective branches under Allowed branch option at the discretion of the bank or Financial Institution during upgrade to current release version. Refer to Services Installation Guide for migration support.
- On selection of Allowed or
Restricted branch type, the
Allowed/Restricted Branches section displays. Perform
the below actions to add branch(es) for the product being created.
- Click Add to add a row.
- In the Branch Code field, click
Search.The Branch Code pop-up screen displays.
- Enter the partial or complete code/name of the branch in the respective fields.
- Click Fetch. The relevant branch(es) appears.
- Select the required branch.
- Click Save in the Action column to save the row.
- Click Edit in the Action column to edit the row or click Delete in the Action column to delete the row.
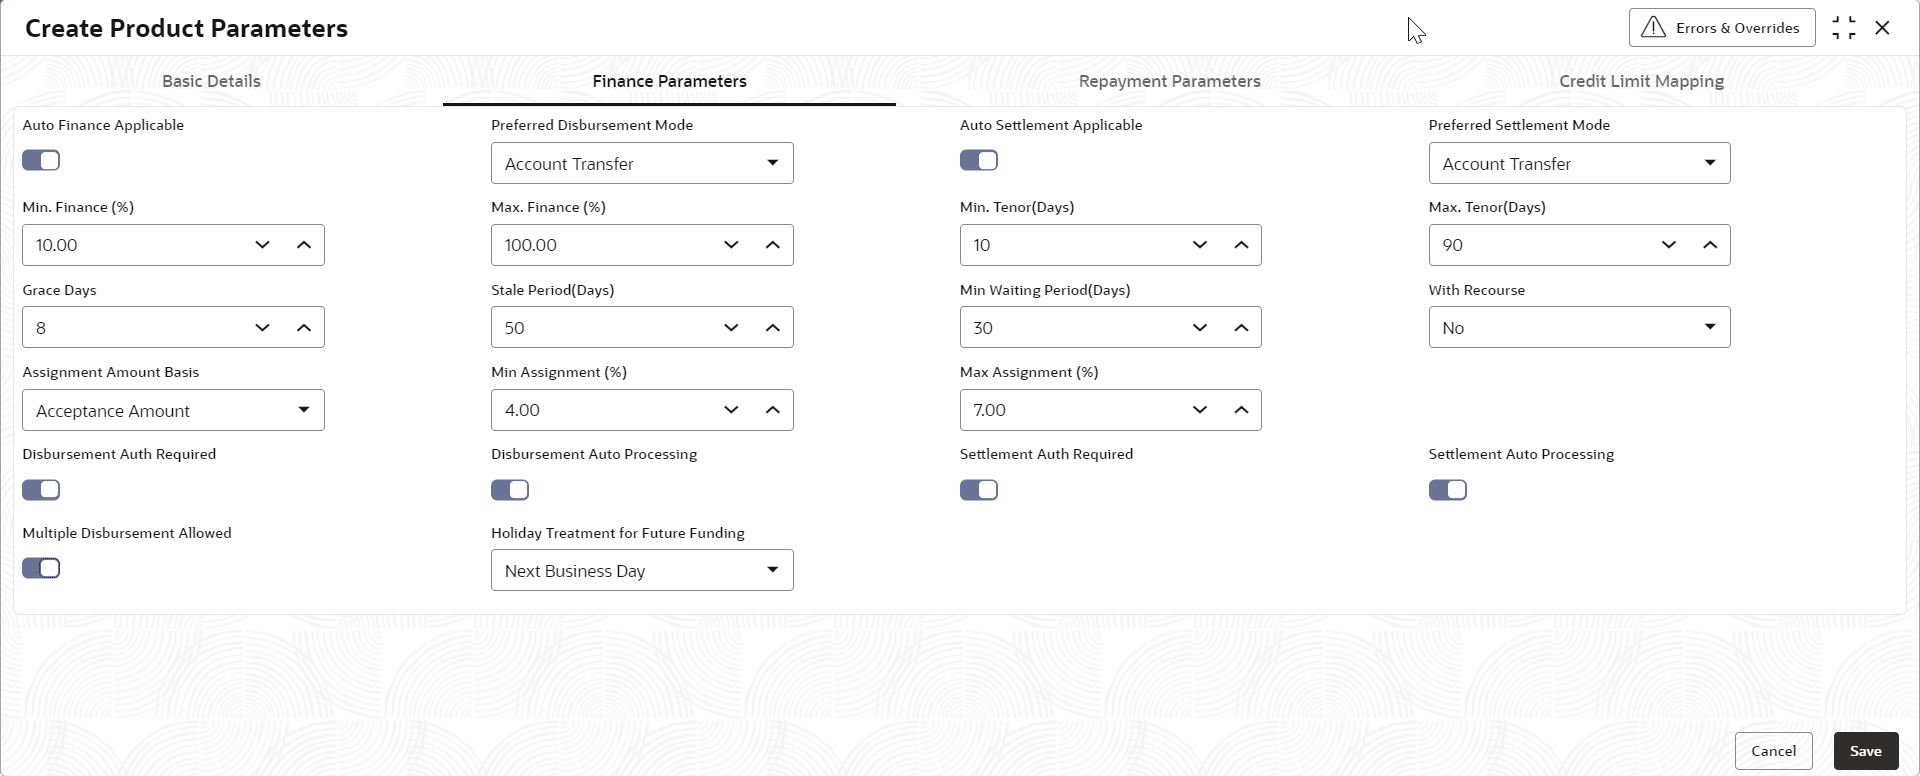
- Click Finance Parameters tab.The Create Product Parameters - Finance Parameters screen displays.
Figure 2-8 Create Product Parameters - Finance Parameters
- On Finance Parameters tab, specify the fields to
configure the finance parameters for the product being created.For more information on fields, refer to the field description table.
Note:
The fields marked as Required are mandatory.Table 2-7 Finance Parameters - Field Description
Field Name Description Auto Initiate Finance Switch the toggle ON to enable automated financing (Straight Through Processing) of instruments such as invoices, debit notes, and so on. Preferred Disbursement Mode Select the preferred mode of disbursement for this product.
The available options are:- Account Transfer
- Cheque
- EFT
This field is mandatory when Auto Initiate Finance is enabled.
Auto Settlement Applicable † Switch the toggle ON to enable automated settlement (repayment) for this product. Preferred Settlement Mode Select the preferred mode of settlement for this product.
The available options are:- Account Transfer
- Cheque
- EFT
Min. Finance (%) Specify the minimum finance percentage allowed for financing a transaction of this product. Max. Finance (%) Specify the maximum finance percentage allowed for financing a transaction of this product. Min. Tenor (Days) Specify the minimum tenor allowed for financing a transaction of this product. Max. Tenor (Days) Specify the maximum tenor allowed for financing a transaction of this product. Grace Days Specify the number of grace days.
This is the period post the finance due date, within which the finance can be settled without penalty.
Stale Period (Days) Specify the number of stale days.
This is the period post the invoice date, after which the invoice becomes stale and will not be financed automatically any more for this product.
Min Waiting Period (Days) Specify the minimum period up to which the finance cannot be closed for this product. With Recourse Select Yes to specify that the finance is allowed with recourse, else select No. Assignment Amount Basis Select the assignment amount type for financing a transaction of this product.
The available options are:- Acceptance Amount
- Net Invoice Amount
Min. Assignment (%) Specify the minimum percentage of the assignment amount allowed for financing a transaction of this product. Max. Assignment (%) Specify the maximum percentage of the assignment amount allowed for financing a transaction of this product. Disbursement Auth Required Switch the toggle ON to enable authorization for STP disbursement transactions. Disbursement Auto Processing Switch the toggle ON to enable automatic processing of disbursement transactions. Settlement Auth Required Switch the toggle ON to enable authorization for STP finance settlement transactions. Settlement Auto Processing Switch the toggle ON to enable automatic processing of settlement transactions. Amendment Applicable Switch the toggle ON to enable amendment for this product. Amendment Auth Required Switch the toggle ON to enable authorization for the finance amendment transactions. Amendment Auto Processing Switch the toggle ON to enable automatic processing of finance amendment transactions. Multiple Disbursement Allowed Switch the toggle ON to enable multiple finance disbursements for an invoice. Holiday Treatment for Future Funding Select the day to consider if the finance disbursement falls on a holiday.
The available options are:- Next Business Day
- Previous Business Day
Note:
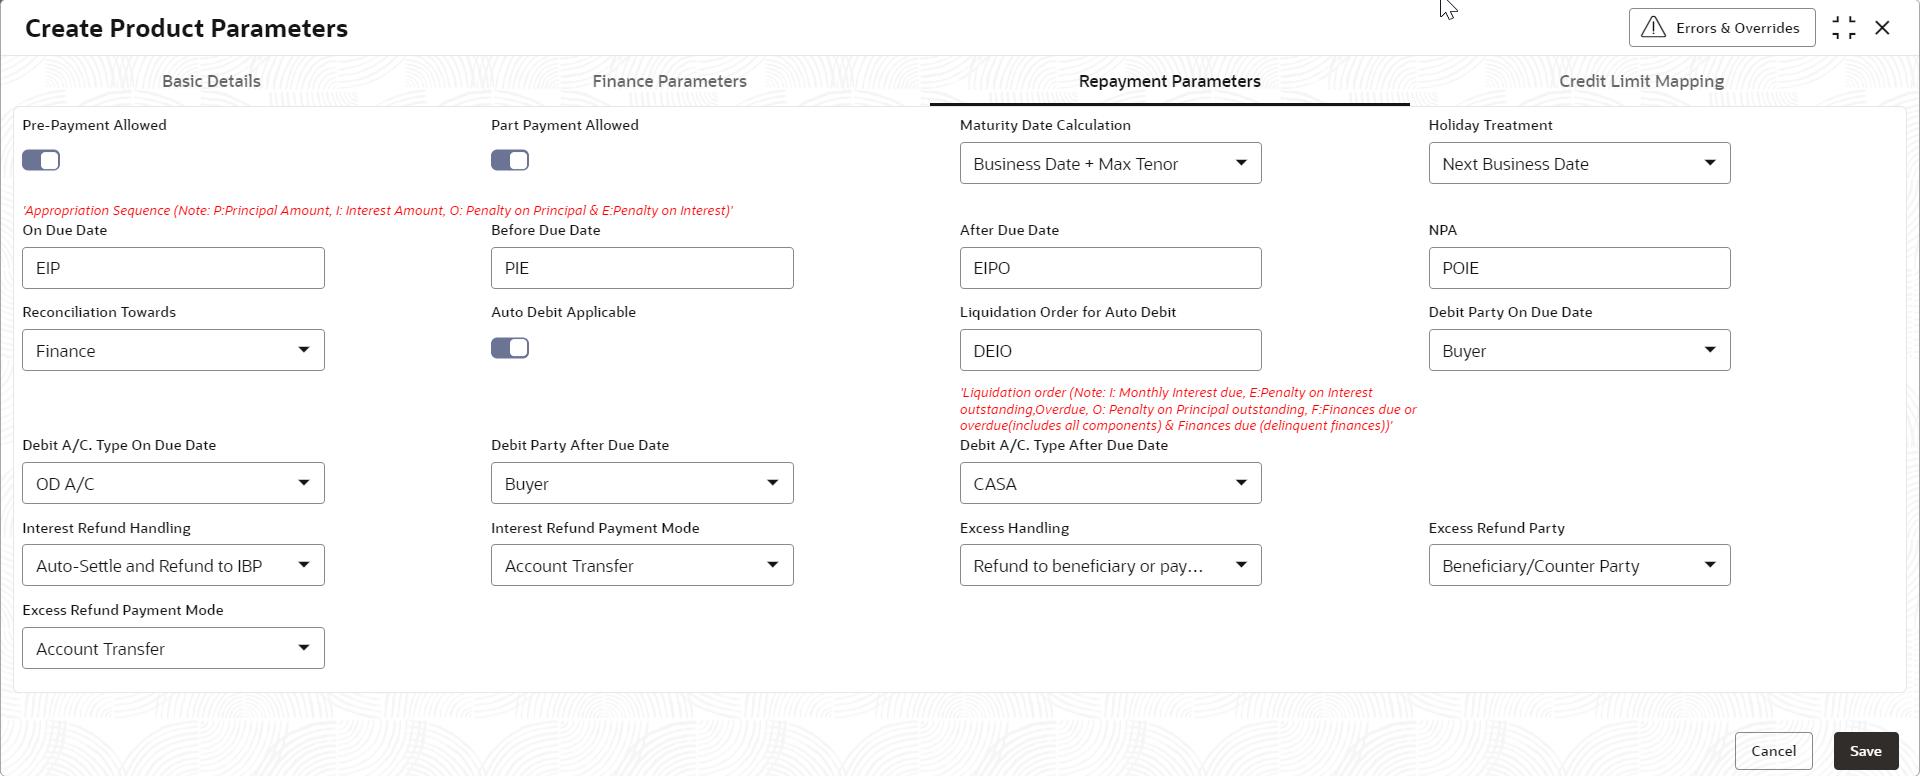
† Pre-Shipment settlement gets initiated only if the Auto Settlement Applicable is enabled. - Click Repayment Parameters tab.The Create Product Parameters - Repayment Parameters screen displays.
Figure 2-9 Create Product Parameters - Repayment Parameters
- On Repayment Parameters tab, specify the fields to
configure the repayment parameters for the product being created.For more information on fields, refer to the field description table.
Note:
The fields marked as Required are mandatory.Table 2-8 Repayment Parameters - Field Description
Field Name Description Pre-Payment Allowed Switch the toggle ON if prepayment is allowed for finances availed under this product, i.e., part, or full repayment before the finance due date. Part Payment Allowed Switch the toggle on if part payment is allowed for finances availed under this product. Maturity Date Calculation Select the basis for calculating the maturity date of the finance.
The available options are:- Invoice
option selected in Product Category:
- Invoice Due Date
- Business Date + Max Tenor
- Invoice Due Date + Max Tenor
- Payment Due Date
- PO option
selected in Product Category:
- PO Date
- PO Date + Max Tenor
- Business Date + Max Tenor
Holiday Treatment Select the value if the maturity date falls on a holiday for this product.
The available options are:- Next Business Date
- No Change
- Previous Business Date
On Due Date Specify the appropriation sequence for the repayment amount if the payment is received on due date.
The available options are:- P – Principal Amount
- I – Interest Amount
- E – Penalty on Interest
Before Due Date Specify the appropriation sequence for the repayment amount if the payment is received before due date.
The available options are:- P – Principal Amount
- I – Interest Amount
- E – Penalty on Interest
After Due Date Specify the appropriation sequence for the repayment amount if the payment is received after due date.
The available options are:- P – Principal Amount
- I – Interest Amount
- O - Penalty on Principal
- E – Penalty on Interest
NPA Specify the appropriation sequence for the repayment amount if the payment is received after the finance has turned NPA.
The available options are:- P – Principal Amount
- I – Interest Amount
- O - Penalty on Principal
- E – Penalty on Interest
Reconciliation Towards Select whether the reconciliation is towards Invoice or Finance. Auto Debit Applicable Switch the toggle ON if the account should be auto debited on the finance due date for this product. Liquidation Order for Auto Debit Specify the default auto-debit liquidation order to be applied in case partial funds are debited from the payment party on auto-debit.
The available options are:- E - Penalty on Interest Outstanding
- O - Penalty on Principal Outstanding
- I – Monthly Interest Due
- D - Overdue Finance (Delinquent finances)
- F - Finance Due or Overdue (Outstanding Finances)
This field is mandatory if Auto Debit Applicable is enabled.
Debit Party On Due Date Select the party from whose account the amount should be debited.
The available options are:- Buyer
- Supplier
This field is mandatory if Auto Debit Applicable is enabled.
Debit A/C. Type On Due Date Select the account Type to be debited.
The available options are:- CASA
- OD A/C
This field is mandatory if Auto Debit Applicable is enabled.
Debit Party After Due Date Select the party from whose account the amount should be debited, if the business date is greater than finance maturity date for this product.
The available options are:- Buyer
- Supplier
This field is mandatory if Auto Debit Applicable is enabled.
Debit A/C. Type After Due Date Select the account type to be debited if the business date is greater than finance maturity date for this product.
The available options are:- CASA
- OD A/C
This field is mandatory if Auto Debit Applicable is enabled.
Margin Handling Select how the margin should be handled.
The available options are:- Auto-Settle and Refund to Supplier
- Manually Settle O/s Finances
- Refund to the Supplier
- Settle with Outstanding Finances
This field is displayed only if Product Category is selected as Invoice in Basic Details tab.
Margin Payment Mode Select the mode of payment for the margin amount.
The available options are:- Account Transfer
- Cheque
- EFT
This field is displayed only if Margin Handling is selected as Refund to the Supplier or Auto-Settle and Refund to Supplier.
Interest Refund Handling Select how the interest refund should be handled.
The available options are:- Auto-Settle and Refund to IBP
- Manually Settle O/s Finances
- Refund to the Interest Bearing Party
- Settle with Outstanding Finances
Interest Refund Payment Mode Select the mode of payment for the interest refunds.
The available options are:- Account Transfer
- Cheque
- EFT
This field is displayed only if Interest Refund Handling is selected as Refund to the Interest Bearing Party or Auto-Settle and Refund to IBP.
Excess Handling Select how the excess payment made towards settlement of outstanding invoice/finance, should be handled.
The available options are:- Auto-Reconcile
- Auto-Reconcile and Refund
- Manually-Reconcile
- Refund to beneficiary or payment party
Excess Refund Party Select the party to refund the excess amount to.
The available options are:- Beneficiary/Counter Party
- Payment Party
Excess Refund Payment Mode Select the mode of payment for the excess payment refund.
The available options are:- Account Transfer
- Cheque
- EFT
- Invoice
option selected in Product Category:
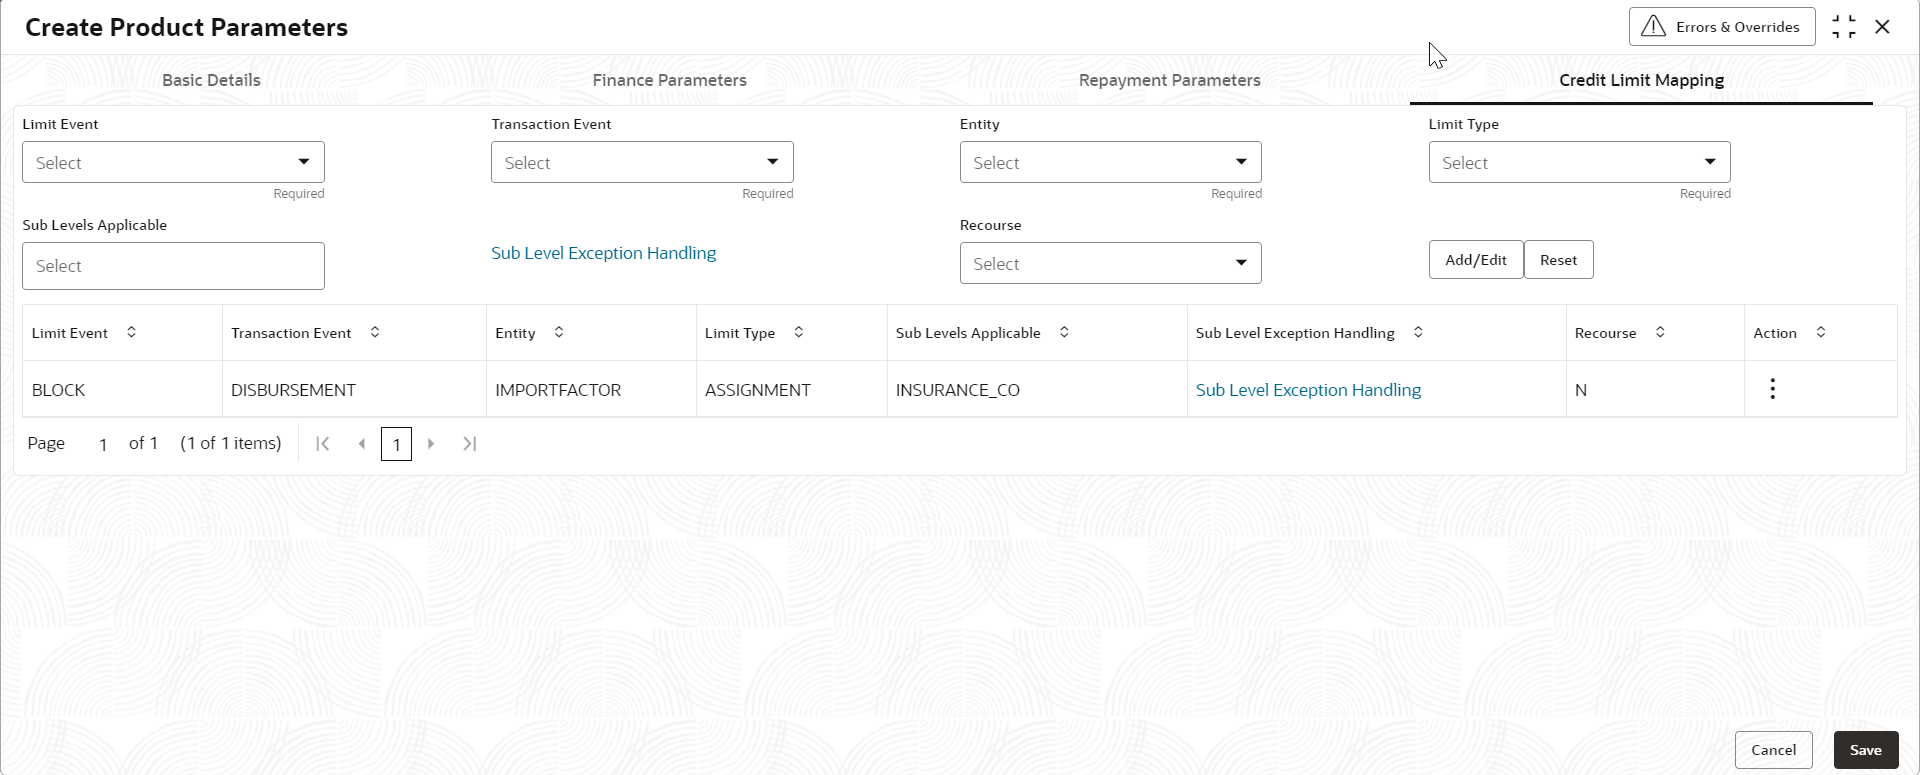
- Click Credit Limit Mapping tab.The Create Product Parameters - Credit Limit Mapping screen displays.
- On Credit Limit Mapping tab, specify the fields to
configure the credit limits for the product being created. This tab is displayed
only if Credit Limit Applicable is enabled in the
Basic Details tab.For more information on fields, refer to the field description table.
Note:
The fields marked as Required are mandatory.Table 2-9 Credit Limit Mapping - Field Description
Field Name Description Limit Event Select the event for which the limit is to be applied. Transaction Event Select the transaction event for which the limit event is to be applied. Entity Select the main entity for which the limit is to be applied. Limit Type Select the type of limit. Sub Levels Applicable Select the applicable sub-level entities/nodes. Recourse Select whether recourse is applicable. - Click Sub Level Exception Handling link to specify the
exception handling behavior for the sub-level entities/nodes.The Sub Level Exception Handling pop-up screen displays.
- On Sub Level Exception Handling screen, specify the
fields to set the exception handling behavior.For more information on fields, refer to the field description table.
Table 2-10 Sub Level Exception Handling - Field Description
Field Name Description Sub Levels Applicable Displays the selected sub-level entities/nodes. Expired Limit Exception Handling Select the exception handling behavior when the limit is expired.
The available options are:- Skip
- Stop
- Utilize
Breach Limit Exception Handling Select the exception handling behavior when the limit is breached.
The available options are:- Skip
- Stop
- Utilize
Expired and Breach Limit Exception Handling Select the exception handling behavior when the limit is both expired and breached.
The available options are:- Skip
- Stop
- Utilize
- Select the required exception behaviors and click Ok to save the details.
- Click Add/Edit to add the details to the grid.
- Click Reset to clear the selected values, if required.
- Perform the following steps to take action on the records in the grid.
- Click Options icon in the Action column to edit or delete the row.
- Click Save to save the record and send it for authorization (if applicable).
Parent topic: Product Parameters Maintenance


