- Securities Repo User Guide
- Overview of Repo
- Products
- Securities Repo Product attributes
2.2.1 Securities Repo Product attributes
This topic provides the instructions to process securities Repo product definition screen.
- On the Home page, specify SRDPRMNT in the text box, and click next arrow.
The Security Repo Product Definition screen is displayed.
Figure 2-1 Security Repo Product Definition
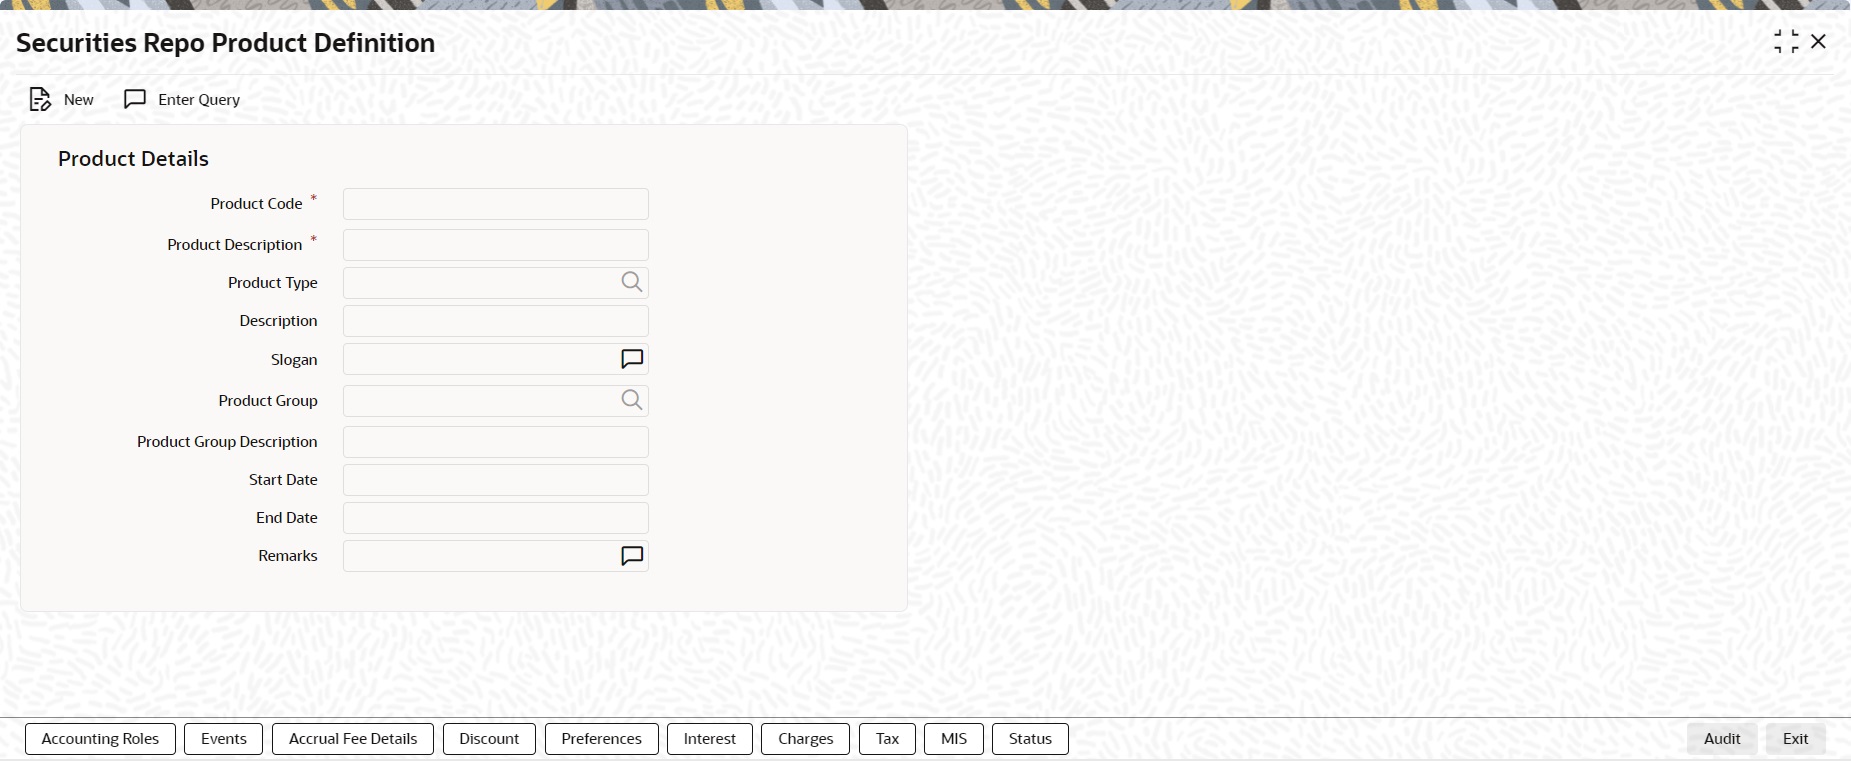
Description of "Figure 2-1 Security Repo Product Definition" - On Security Product Definition screen, specify the fields.
For more information on fields, refer the below table.
In the Product Definition screen, enter the basic information about a product like the Product Code, the Description, etc. Information relating to specific attributes of a product can be defined in subsequent screens. For further information on the generic attributes the user can define for a product, please refer the following Oracle Banking Treasury Management User Manuals under Modularity:
- Products
- Interest
- Charges and Fees
- Tax
- User Defined Fields
- Settlement
Table 2-1 Securities Repo Product Definition - Field Description
Field Description Product Code
Enter a unique code to identify the product throughout the module.
Note:
This code must be four Characters.
The user can follow his conventions for devising this code.
Product Description
This description is associated with the product for Information retrieval purposes.
Product Type
A product that is defined can belong to either of the following types:
- Repo
- Reverse Repo
Description
The description of the selected product type is displayed.
Slogan
Click the next icon to invoke the free format text. Enter the Slogan description to be associated with the product. This slogan is printed on all the advices that are sent to the customer for a deal involving this product.
Product Group
Click the search icon and select the Product Group details as required from the list of values displayed.
Product Group Description
The description of the selected product group is displayed.
Start Date
The Start Date for this product is specified in this field.
End Date
The End Date for this product is specified in this field
Remarks
Click the next icon to invoke the free format text. A window is displayed in which the user can enter information about the product intended for your banks’ internal reference.
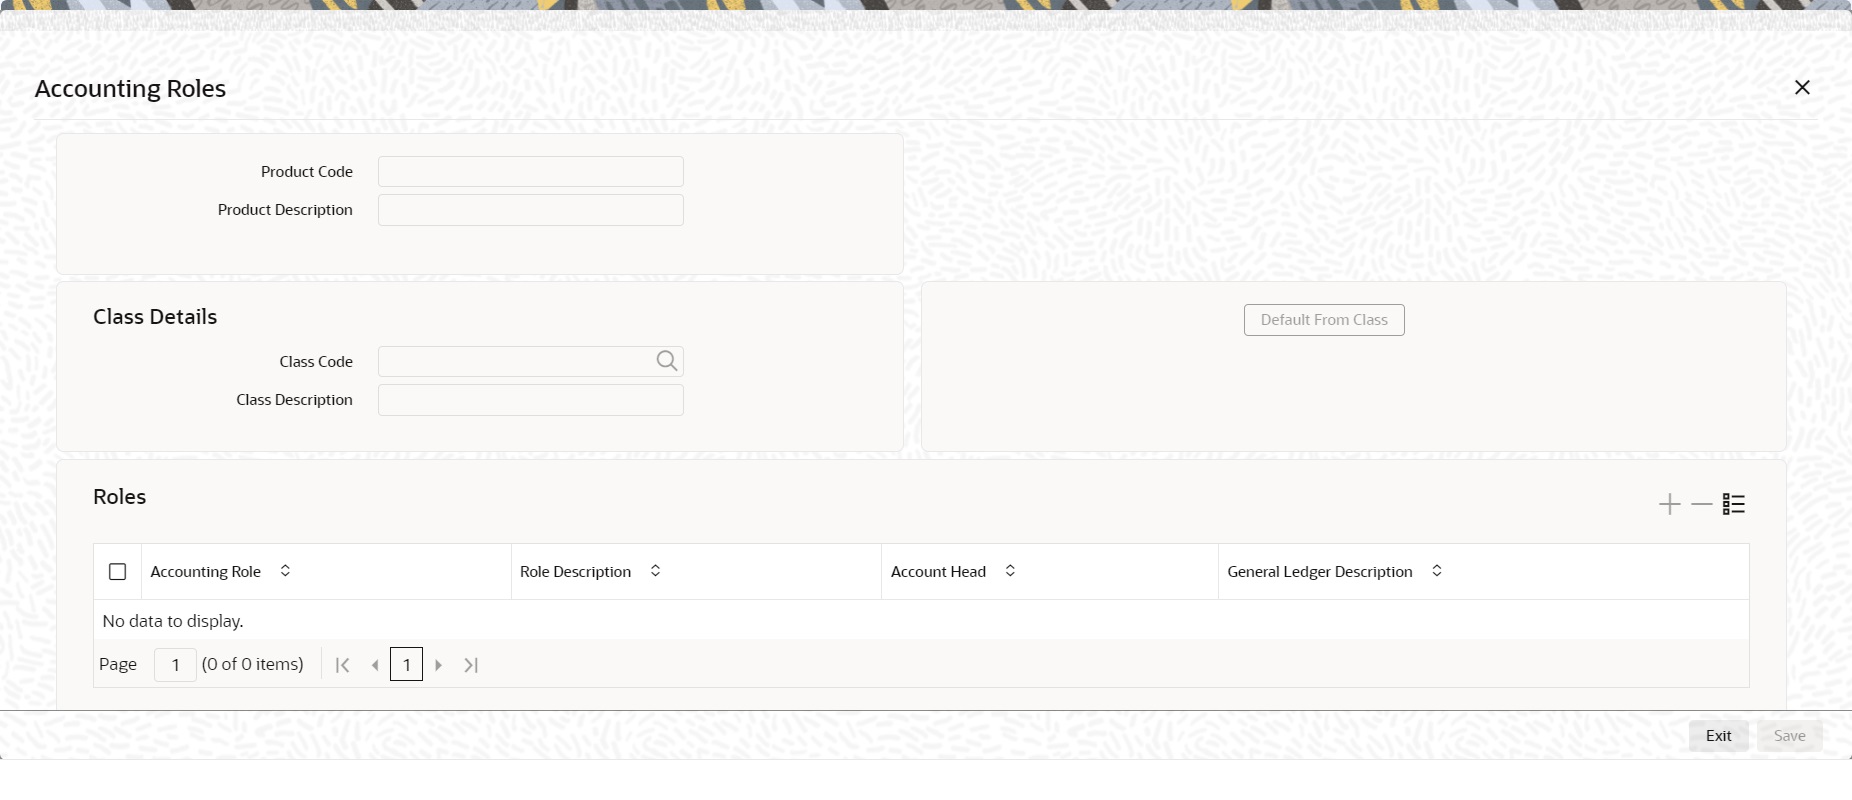
- On Securities Repo Product Screen, click Accounting Roles.
The Accounting Roles screen is used to define accounting roles for the product created. The user can map the Accounting Roles to Accounting Heads in this screen.
The Accounting Roles screen is displayed.
- On the Accounting Roles screen, specify the details.
For information on fields, see the below table:
Table 2-2 Accounting Roles - Field Description
Fields Description Product Code
The Product code which is specified for the product is displayed here in this field.
Product Description
The Product Description associated to the product code is displayed.
Class Code
Click the search icon and select the class code as required. This Identifies a security preference class that the user build with a unique ten-character Class Code. The user can follow the convention for devising the code according to his choice.
Class Description
Briefly describe the Security Preference Class that is defined. The description that the user specify is for information purposes only and will not be printed on any customer correspondence.
Accounting Role
Click the search icon and select the accounting role from the list of the roles displayed.
At different stages in the life cycle of a contract, accounting entries are generated. Depending on the type of event, one leg of the entry may be passed into the customer account and the other leg into an internal account of the bank. Alternatively, both the legs may be passed into internal accounts (during an accrual, for example). Through this table, the user can define the GL/SL head to which the internal account is linked and the type of account (accounting role) is used.
Role Description
The description of the Accounting Role is displayed.
Account Head
Click the search icon and select the account head from the list of the roles displayed.
General Ledger Description
The selected account head description is displayed
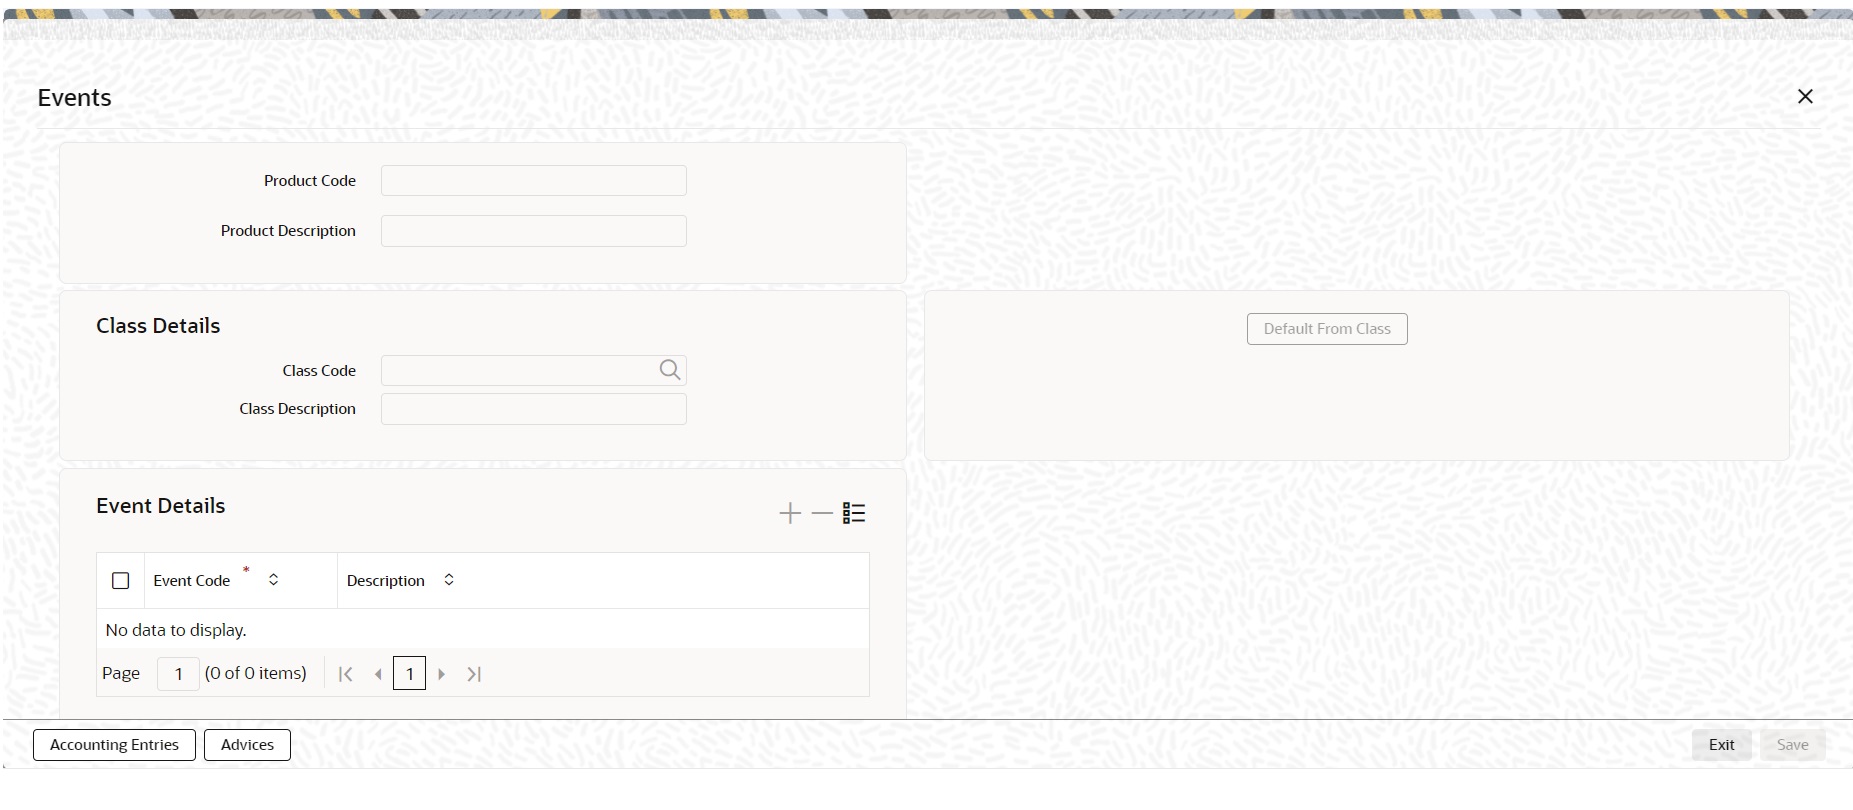
- On Securities Repo Product Screen, click Events.
The user can specify the details of the Accounting Entries and Advice, to be generated for the events that take place during the life cycle of a Repo in this screen.
Events screen is displayed.
- On the Events screen, specify the details as required.
For information on fields, see the below table:
Table 2-3 Events - Field Description
Field Description Product Code
The Product code which is specified for the product is displayed here in this field.
Product Description
The Product Description associated to the product code is displayed.
Class Code
Identify a security preference class that the user build with a unique ten-character Class Code. The user can follow the convention for devising the code according to his choice.
Class Description
Briefly describe the defined Security Preference Class.
WARNING:
The description specified is for information purposes only and will not be printed on any customer correspondence.
Event Code
This is a Mandatory field.
Click the search icon and select the Event Code from the list of the roles displayed.
Description
The description details of the event code is displayed in this field.
- On the Events screen, in the Events Details section, select an Event Code from the list displayed.
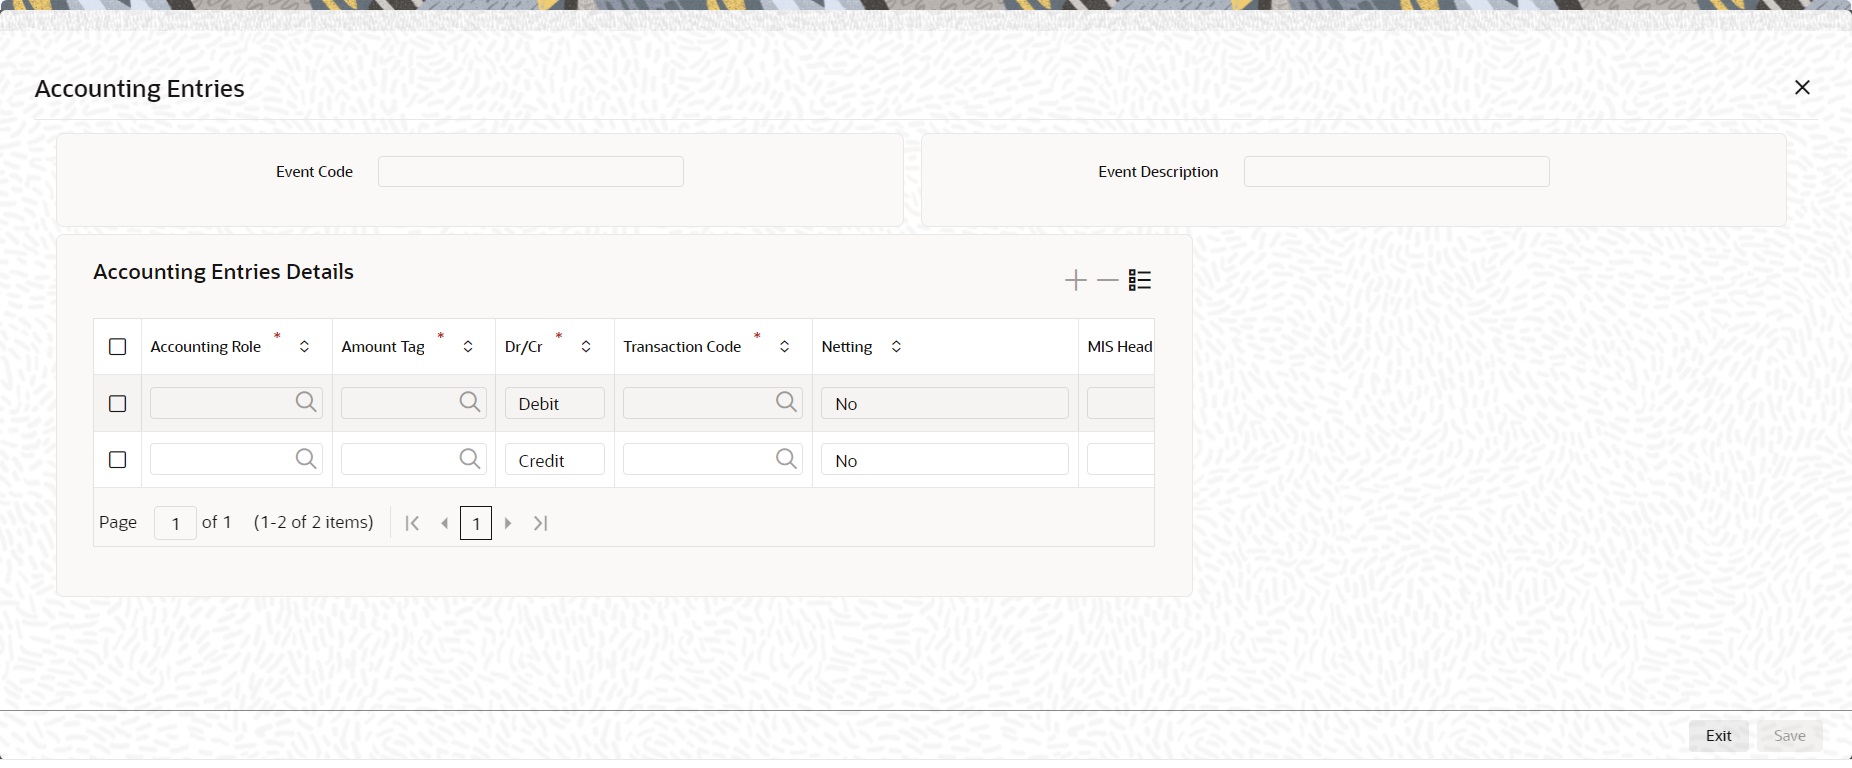
- Once done, on the Event screen, click Accounting Entries.
Accounting Entries is displayed.
- On the Accounting Entries screen, refer to the details required.
For information on fields, see the below table:
Table 2-4 Accounting Entries - Field Description
Field Description Event Code
The selected event code from the list is displayed.
Event Description
The selected event code description is displayed in this field.
Accounting Role
This is a mandatory field
Click the search icon and select the Accounting Role from the list of displayed.
Amount Tag
This is a mandatory field
Click the search icon and select the Amount Tag from the list of displayed.
Dr/Cr
This is a mandatory field
Select the option from the drop-down box.
The options are:
- Credit
- Debit
Transaction Code
This is a mandatory field
Click the search icon and select the Transaction Code from the list of displayed.
Netting
Select the option Yes / No from the drop-down box.
MIS Head
Click the search icon and select the details from the list of displayed.
The user must specify the MIS Head under the accounting entries (generated at an event) are reported.
Profit GL
Click the search icon and select the profit GL from the list of displayed.
Loss GL
Click the search icon and select the loss GL from the list of displayed.
Rate Code
Click the search icon and select the Rate code from the list of displayed.
Revaluation Transaction Code
Click the search icon and select the Revaluation Transaction Code from the list of displayed.
Holiday Treatment
Select the option Yes / No from the drop-down box.
Revaluation Required
Select the checkbox if the revaluation required.
Rate Type Indicator
Select the Rate type from the drop-down box
- Mid
- Buy
- Sell
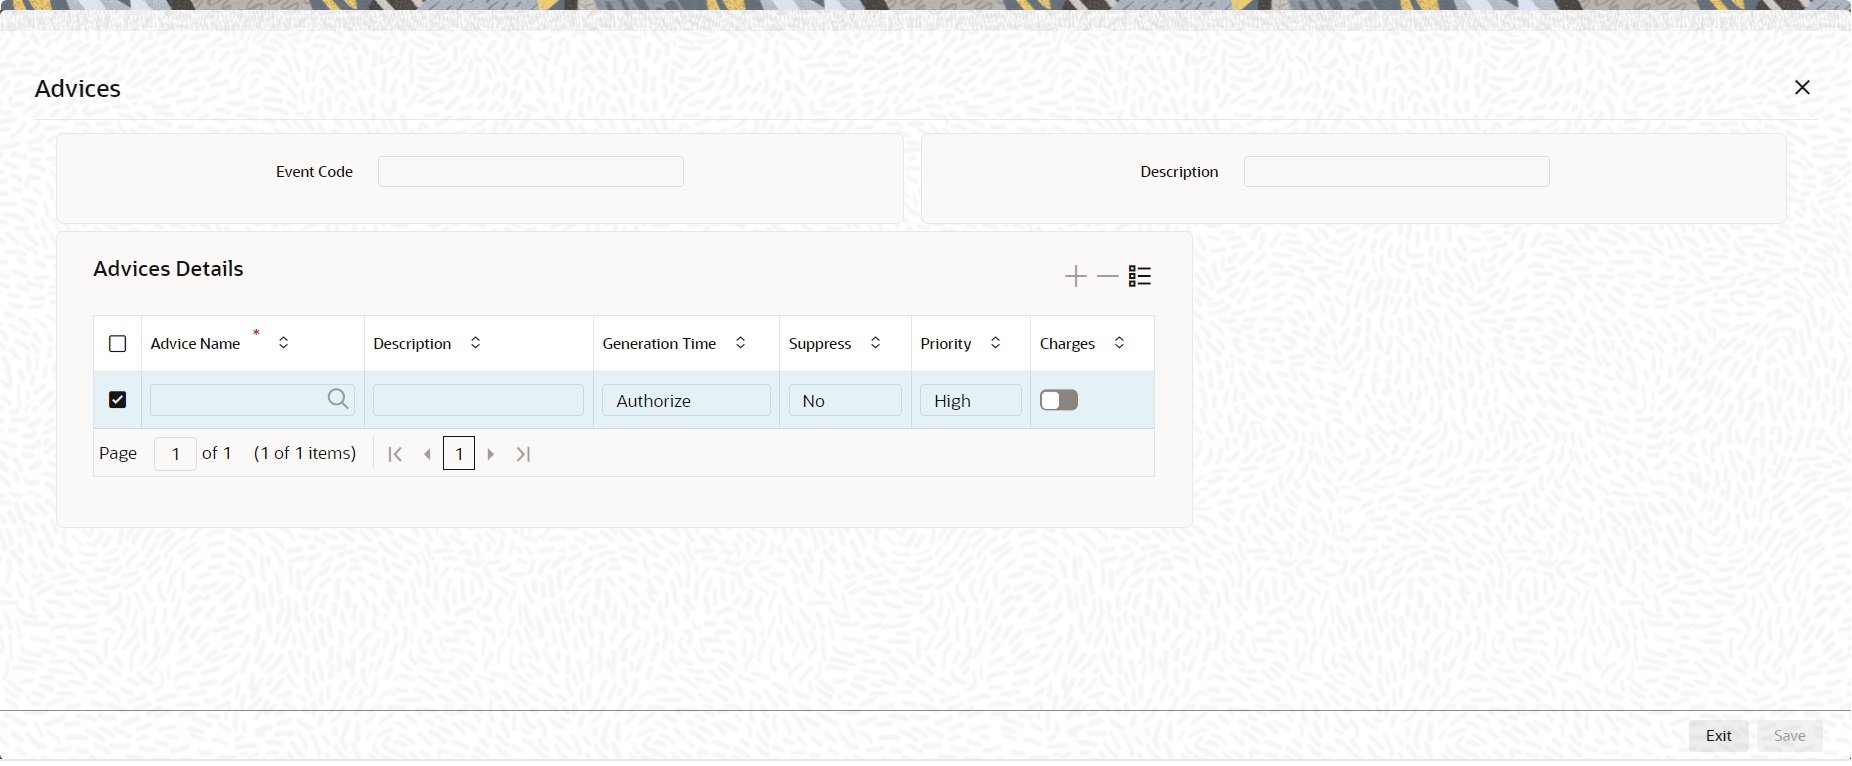
- On the Event screen, click Advices.
Advices screen is displayed.
- On the Advices screen, specify the details required.
The field description details are as follows:
Table 2-5 Advices - Field Description
Field Description Event Code
The Event Code details are displayed.
Description
The event code description is displayed.
Advice Name
Click the search icon and select the Advice Name as required.
Description
The description of the selected advice is displayed.
Generation Time
Select the generation time from the adjoining drop-down Box.
The options are:
- Input
- Authorize
Suppress
Select the option as required from the drop-down box.
The options available are:
- Yes
- No
Priority
Select the option as required from the drop-down box.
The options available are:
- Low
- Medium
- High
Charges
Select the check box to apply the charges.
- On the Securities Repo Product Screen, click Accrual Fee.
Accrual Fee Details screen is displayed.
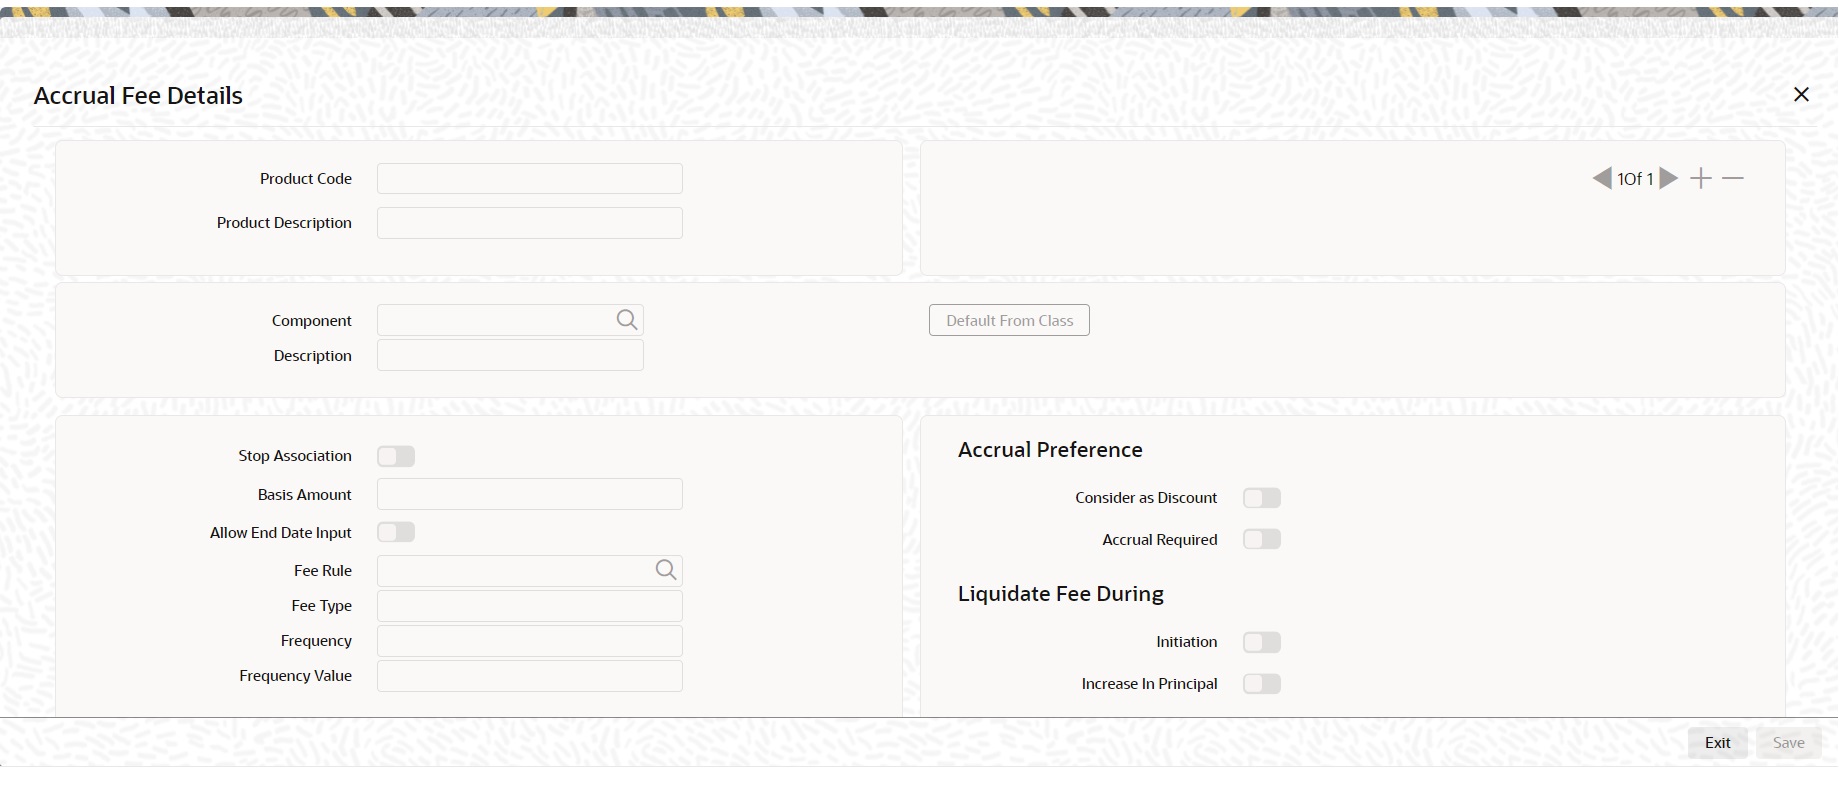
Description of the illustration srdprmnt__cvs_events_accrual-fee-details.png - On the Accrual Fee Details screen, click Default From Class to Associate Accrual Fee Details with a product.
The field description details are as follows:
Table 2-6 Accrual Fee Details - Field Description
Field Description Product Code
The Product Code defined in the product level is displayed.
Product Description
Enter a brief description of the product. This description is associated with the product for Information retrieval purposes.
Component
Specify the Fee component
Description
Displays the Component Description
Stop Association
Specify if the Accrual for the Fee component should be stop for the contract
Basis Amount
Specify the basis amount for Fee calculation
Allow End Date Input
Specify the End date
Fee Rule
Display the Fee rule associated to the component
Fee Type
Specify the Fee type
Frequency
Specify the accrual frequency for the fee component
Frequency Value
Specify the Fee frequency value
Consider as Discount
Specify if the Fee component should be considered for IRR calculation.
Accrual Required
Specify if accrual is required for the component.
Initiation
Specify if the fee component must be initiated
Increase in Principal
Specify the increase in principal amount
- On the Securities Repo Product Screen, click Discount.
Discount Accrual Preference Association screen is displayed.
Figure 2-6 Discount Accrual Preference Association
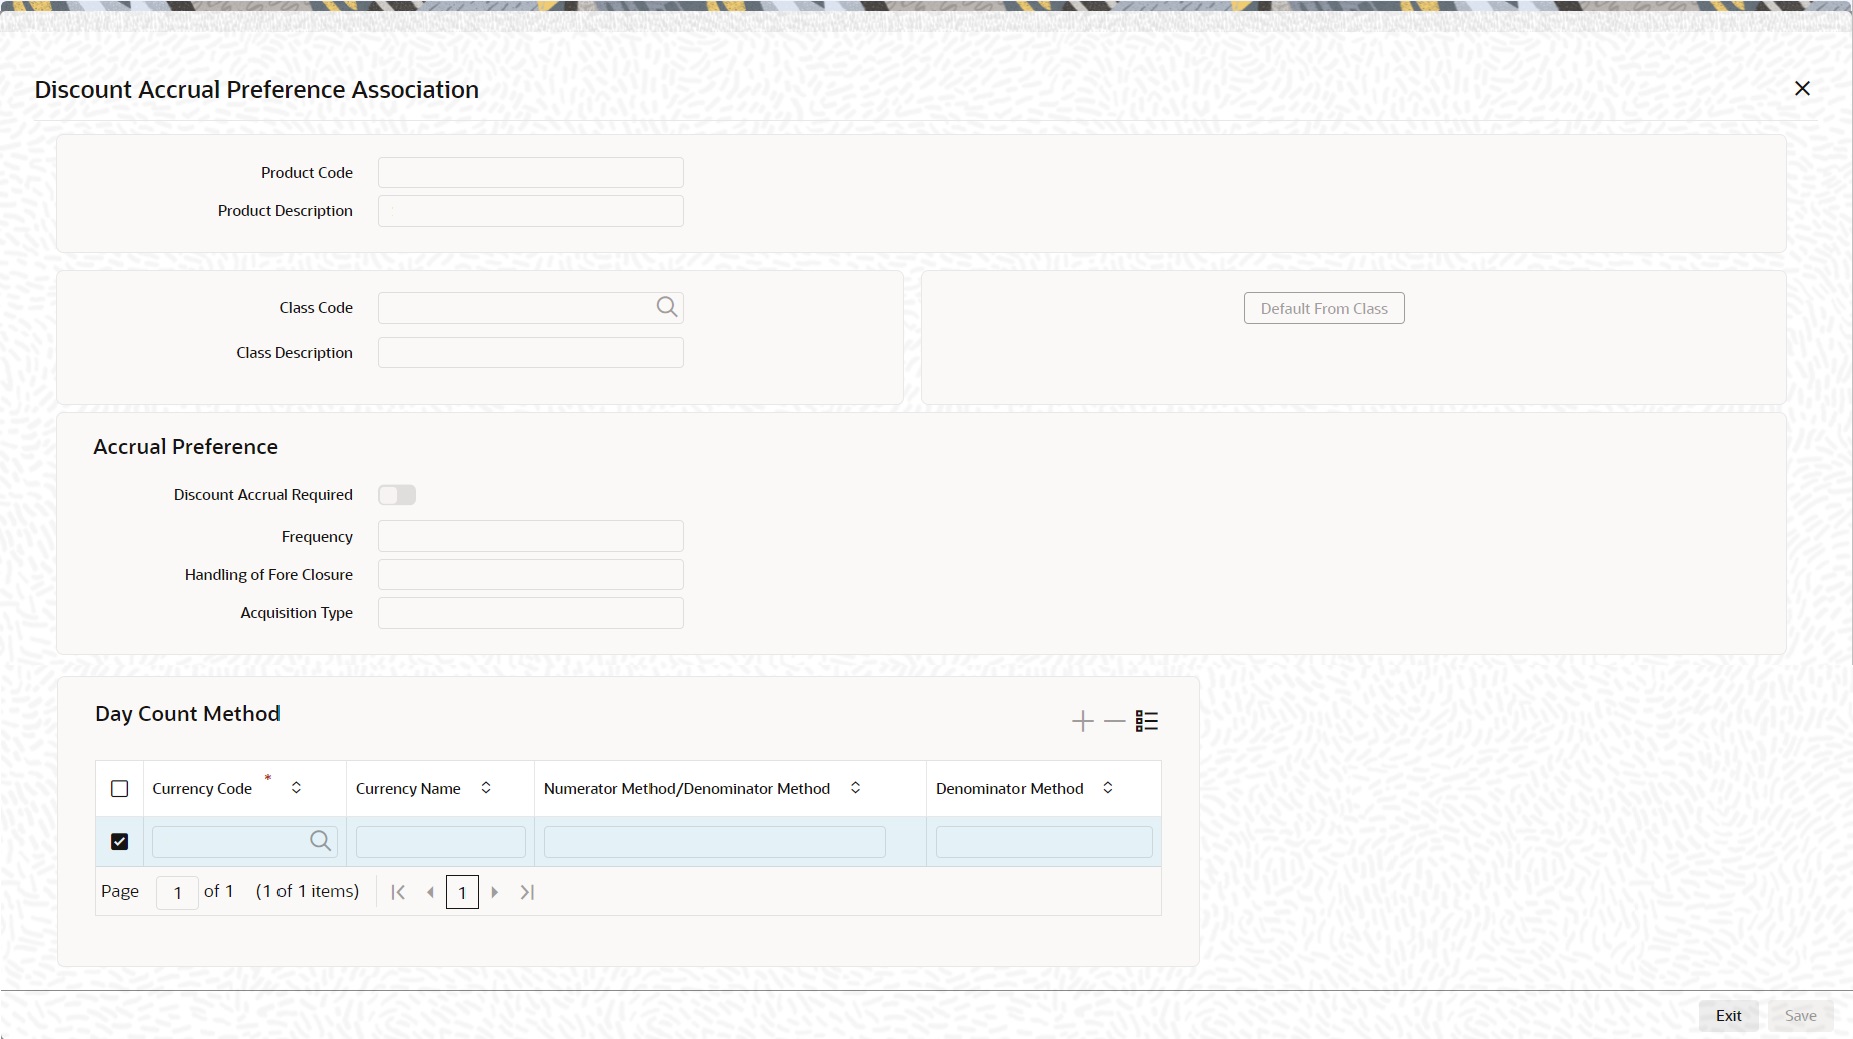
Description of "Figure 2-6 Discount Accrual Preference Association" - On the Discount Accrual Preference Association screen, specify the fields.
On the Discount Accrual Preference Association screen, specify the details as required.
For more information on fields, see the below table:
Table 2-7 Discount Accrual Preference Association - Field Description
Field Description Product Code
The product code defined at the product is displayed.
Product Description
The description of the selected product code is displayed.
Class Code
Click the search icon and select the class code details as required from the list of values displayed.
Class Description
The description of the selected class code is displayed.
Accrual Preference Specify the Accrual Preference fields. Discount Accrual Required
Select the check box if the Discount Accrual Required.
Frequency
Select the Frequency details from the drop-down list
The values available are:
- Daily
- Monthly
Handling of Fore Closure
Select the Fore Closure details from the drop-down list
The values available are:
- Refund
- Complete Accrual
Specify how foreclosures for the contracts is handled.
Note:
In case the Acquisition Type is Par, there are no refunds. Only the pending accruals are completed.
Acquisition Type
The Acquisition Type determines whether the initial cash flows for a C contract with more (Premium) or less (Discount) or equal (Par) to the bill amount.
The Acquisition Type determined by the cash flows of interest, charges and fees considering the Discount option is checked.
The drop-down list comprises of the following values:
- Par
- Par/Discount
- Par/Premium
- Par/Discount/Premium
Note:
The acquisition type of a contract can change from premium to par/discount or otherwise depending on the charges getting liquidated during the life cycle of the contract.
Day Count Method Specify the Day Count Method fields. Currency Code
Click the search icon and select the Currency Code from the list displayed as required.
Currency Name
The Currency name details associated
Numerator Method/ Denominator Method
Select the denominator method from the drop-down list.
This list displays the following values:
- Actual
- 30 Euro
- 30-US
Denominator Method
Select the denominator method from the drop-down list.
This list displays the following values:
- 360
- 365
- 364
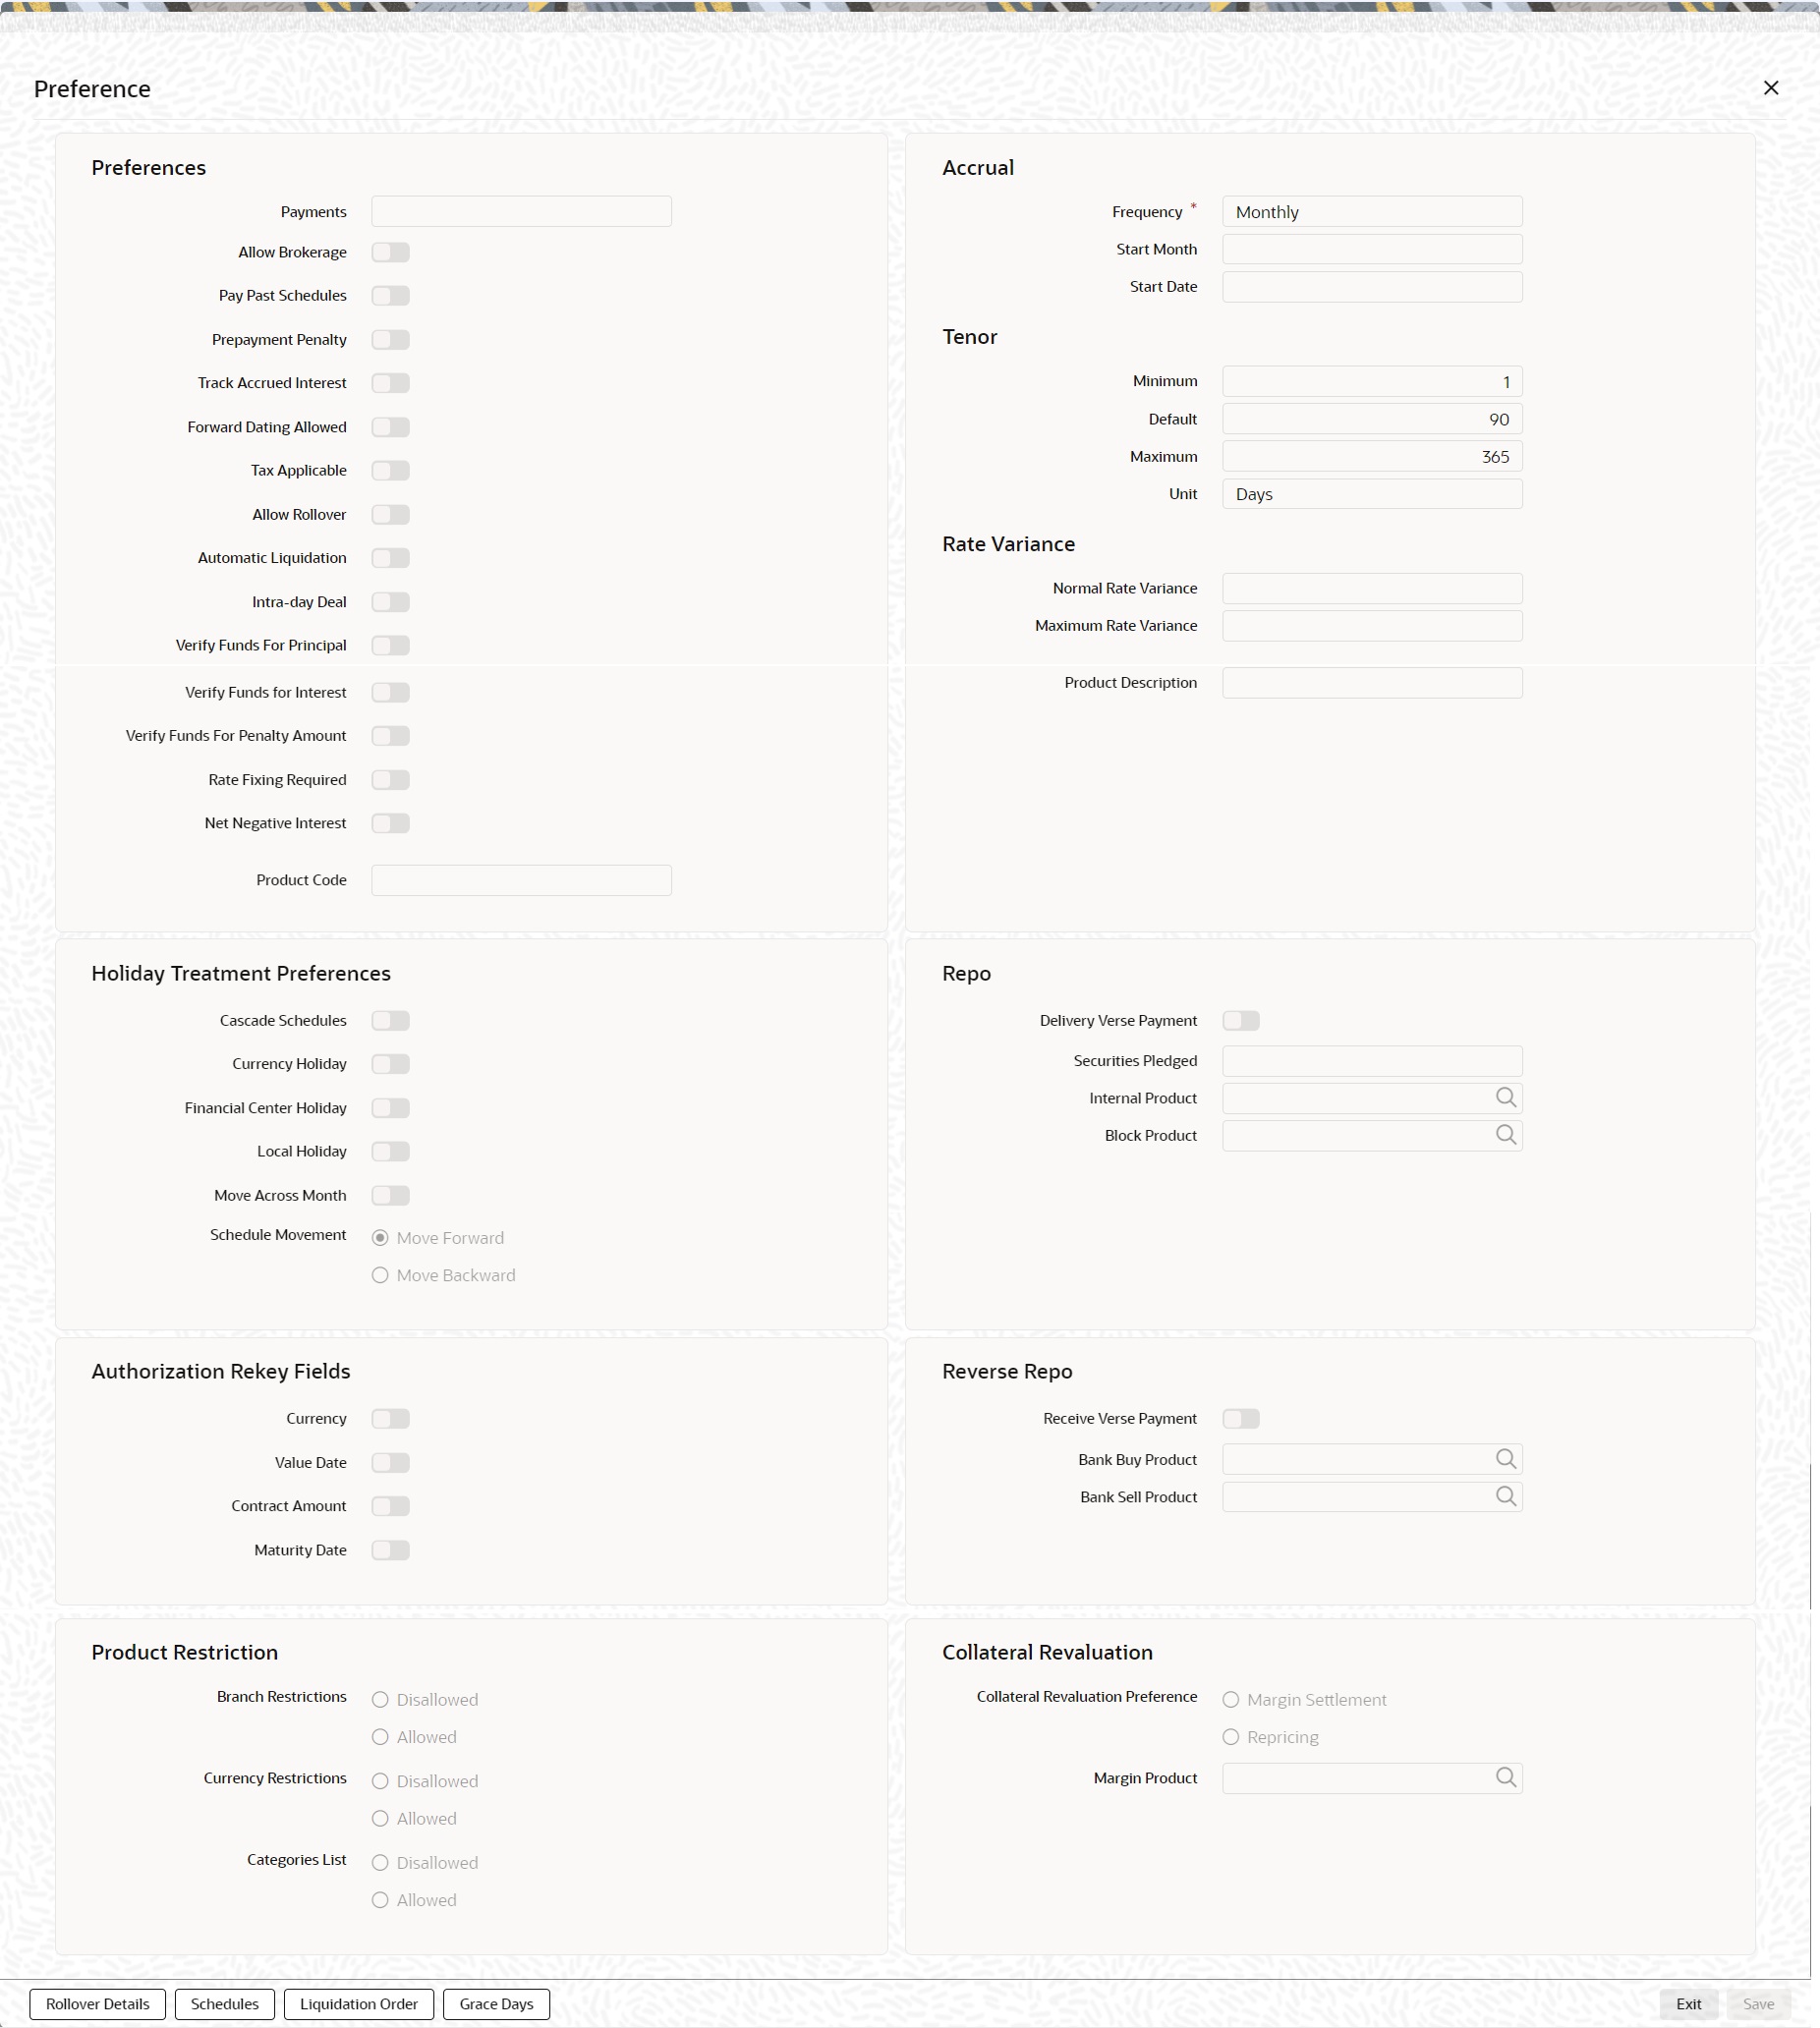
- On the Securities Repo Product Definition screen, click Preferences.
Preferences screen is displayed.
- On the Preferences screen, specify the details as required.
Preferences are the options that are available to the user for setting the attributes of a product. The options user choose ultimately shape the product.
For example, the user has the option of applying a tax on a product. If the user specifies that tax is applicable for a product, the deal involving the product will inherit the attribute. However, the user can waive tax (if it has been defined for the product the deal involves) at deal processing.
Similarly, the user can choose between the automatic liquidation of schedules and manual liquidation; the user can choose to allow rollover of deals involving the product or deny it, and so on.
For information on fields, see the below table:
Table 2-8 Preferences - Field Description
Field Description Payments
Specify whether the payment method for the main interest (specified while defining attributes for the interest, commission, charge or fee) components is to be bearing, discounted or true discount. This cannot be changed at the time of processing a deal.
Bearing:The interest is liquidated on the scheduled payment date(s).For example, the user has made a placement USD 100,000 for GreenvilleGlobal Bank at 20% interest for a month. Now, under the bearing type of interest payment method, the placement of USD 100,000 is advanced to Greenville Global Bank, and the interest on it is collected over the one month which is the tenor of the placement.
Discounted:In this interest payment method, the interest is deducted from the principal at the time of initiating the deal. Carrying forward the example of the placement for Greenville Global Bank of USD 100,000 at 20% interest for a month, under the discounted type of interest payment, the total interest calculated for the tenor of the deal, that is one month, USD 1,666.67 is deducted from the principal (USD 100,000)and only USD 98,333.33 is advanced.
True discounted:In this interest payment method, the interest is calculated on the principal in a manner differing slightly from the ‘Discounted’ method. The interest rate is applied to the Principal instead of Nominal, as it is done in the‘Discounted’ method.
For example, in the case of Greenville Global Bank’s placement of USD100,000 at 20% interest for a month, under the true discounted type of interest payment, the interest calculated on the principal, USD 98,333.5,(arrived at after deducting 20% interest on the nominal) is deducted fromthe nominal (USD 100,000) and USD 98,360.66 is advanced. This formsthe actual principal of the deal.
Allow Brokerage
Select this check box to add the brokerage to the product.
Pay Past Schedules
The user must indicate if the backdated deal that has schedules prior to today’s date; those schedules have to be liquidated when the deal is initiated. A back dated deal is one, which has a Value Date (initiation date)falling before the date on which it is booked.
For example, a money market deal is initiated as of today, a date in thefuture, or as of a date in the past. Today’s date is 15 October 1997. Suppose the user initiate a deal of 15,000 USD today, with the Value Date (date on which the deal comes into effect) as 15 September 1997, the system will pass accounting entries for initiation as of 15 September 1997. But if there had been an interest payment schedule for 30 September 1997, for 500 USD, and then if the user specify that back values schedules must be liquidated, the user can make the system pass accounting entries to liquidate this schedule also when the deal is initiated.
If the user specify that back dated schedules are not to be liquidated; only accrual entries are passed till today. Please note that the entries associated with each event (initiation and liquidation in this case) is passed only if they have been defined
Prepayment Penalty
The user specify if the penalty must be applied on prepayment of deals involving this product.
Track Accrued Interest
The user has to specify if the accrued interest of earlier placements (that has not been paid) must be considered as the utilized amount for the purpose of credit administration. (If more than one interest type of component is applicable on a product, the user must designate one as the ‘main’ interest.) The following example illustrates how this concept works.
If user opts to track accrued interest, then the interest accrued on deals is added on to the amount utilized by the customer, for credit administration.
The utilization is shown as the sum of the principal and the accrued interest in the reports generated by the credit administration (Limits) sub-system. Outstanding interest, if any, will also be shown in these reports.
Forward Dating Allowed
Choose the Value Date (That is the date on which it is initiated) for a deal from:
- The date on which it is input
- A date in the past or
- A date in the future
The user must indicate whether a deal involving a product could have a Value Date in the future. A deal must have a value date in the future only if the user has allowed it for the product that it involves. An Initiation date in the past, or today, indicated for any deal.
When a deal with a Value Date in the future is stored, no accounting entries is passed on the date of input. The deal is initiated by the Automatic Contract Update function during the Beginning-of-Day (BOD) processes on the Value Date (initiation date). All the necessary accounting entries is passed on this date.
However, if the Value Date falls on a holiday, the deal is initiated as per your holiday handling specifications in the Branch Parameters screen:
- If the user has specified that automatic processes are to be carried out for holidays, the deal slated for initiation on holiday is initiated during end-of-day processing on the last working day before the holiday.
- If the user has specified that the automatic processes are to be carried out only till System Date (today’s date), the deal slated for initiation on holiday is initiated on the next working day immediately after the holiday, during beginning-of-day processing.
Tax Applicable
As part of the preferences that the user define for a product, the user can specify whether any tax is applicable to the SR product that the user is creating. If tax is specified for a product, the user can waive it for specific deals. However, if the user specify that tax is not applicable to a product, the user cannot levy a tax on any deal involving the product.
Allow Rollover
The user must specify whether a deal, involving the product defined, is rolled over into a new deal if it is not liquidated on its Maturity Date.
If the user specify that rollover is allowed for the product, it is applicable to all the deals involving the product. However, at the time of processing a specific deal involving this product, the user can indicate that rollover is not allowed.
However, if the user specify that rollover is not allowed for a product, the user cannot rollover deals involving the product.
The terms of the rolled over deal is the same as those of the original deal, or they are different. If the terms must be different, they must be specified during deal processing.
Automatic Liquidation
Select this check box to allow the automatic liquidation of the product.
Intra-day Deal
Deals having the same Maturity and Value Date are known as Intra-day deals. The user are able to capture intra-day deals only if the user has indicated that the product for which the user specifies preferences is meant for intra-day deals.
Verify Funds For Principal
During auto liquidation if Verify Funds For Principal is checked at the contract level, the system checks the available balance in the Principal amount's settlement account.
Verify Funds for Interest
During auto liquidation if Verify Funds For Interest is checked at contract level, the system checks the available balance in the settlement account for the Interest amount
Verify Funds For Penalty Amount
If Verify Funds For Penalty amount is checked at the contract level during auto liquidation, the system checks the available balance in the settlement account for the Penalty amount.
Rate Fixing Required
Select this Check box to indicate if the Rate fixing is applicable for the product.
Net Negative Interest
Check this box to indicate that the system should internally net the positive and negative amounts being paid to the customer during interest liquidation.
The system allows you to check this box only for products with negative interest allowed for the main component.
Product Code
The selected product code is displayed.
Accrual Specify the Accrual fields. Frequency
This is a Mandatory Field.
Define the frequency at which the user would like to accrue the components. The frequency is one of the following:- Daily
- Monthly
- Half Yearly
- Yearly
- If the user has specified that automatic events are to be processed for a holiday(s) on a working day before the holiday, the accruals falling due on holiday (s) are processed during end-of-day processing on the last working day before the holiday.
- If the user has specified that the automatic events are to be processed for a holiday(s) on a working day following the holiday, the automatic events falling due on holiday (s) are processed on the next working day, during the beginning of day processing.
Start Month
Select the Start Month details as required from the drop-down list.
Start Date
Specify the Start Date as required.
Tenor The user can set the minimum and maximum tenor limits for a product that the user creates. The user can also set a default tenor. This is the tenor that is normally associated with a deal involving the product. However, the default tenor applied to a deal is changed during its processing.
Minimum
The user can set the minimum tenor for the product here. The tenor of the deals involving this product must be greater than or equal to the tenor the user has specified here. Only the number is specified here.
Default
The user can specify the default tenor of the product here. This default tenor applies to all deals involving the product, but the user can change it at the time of deal processing. Only the number is specified here. The unit (days,months, etc.) is specified in a subsequent field.
For example, the user has a Weekly Repo product. This product is for borrowings from customers for a maximum duration of one week. For such a product the user can set a minimum tenor of one day and a maximum tenor of one week. The user can also define a default tenor for the product, of, say,one week. This tenor is applicable to all the deals involving the product if the user do not specify any tenor at the time of its processing.
Maximum
The user can set the maximum tenor for the product here. The tenor of the deals involving this product must be lesser than or equal to the tenor the user has specified here. Only the number is specified here.
Unit
In the minimum, maximum and default tenor fields the user set the duration numerically. Here, the user specify the unit of the duration. It could be:
- Days
- Months or,
- Years
For example, to define the default tenor, in the Default tenor field, define the number and the unit - days, months, years, in the Unit field.
Suppose, for a product; the user want to define the default tenor as 150 days. Then it would be best if the user give the following values in these fields:
- Default tenor - 150
- Unit - Days
To define a default tenor of 10 months for a product, the user must give the following values in the fields:
- Default tenor - 10
- Unit - months
To define a default tenor of eight years for a product, the user must give the following values in the fields:
- Default tenor - 8
- Unit - years
Rate Variance Specify the Rate Variance fields.
Normal Rate Variance
The user needs to specify the minimum/normal variance allowed for the rate. Suppose the exchange rate variance between the exchange rate (specified for the product) and the rate captured for a Repo exceeds the value specified here. In that case, the system displays an overriding message before proceeding to apply the exchange rate. The normal variance must be less than the maximum variance.
For back valued transactions, the system applies the rate based on the exchange rate history. The variance based on the rate prevailing at that time.
Maximum Rate Variance
The user cannot apply an exchange rate on a deal, involving the product the user is creating, which is greater than the value the user specifies as the Maximum Variance. If the exchange rate variance exceeds the standard rate by the amount the user-specified as the maximum variance; the system will not store the contract.
For example, the user has specified the normal variance as 3% and the maximum variance as 6% for Product SR01. Suppose the user applies the exchange rate on a contract involving SR01 that varies from the applicable rate maintained for the day by less than 3%. In this case, the system will NOT display an overriding message.
If the user apply an exchange rate on a contract involving SR01 that varies from the Standard Rate by between 3% and 6%, the system will display an override message. If the user applies an exchange rate on a contract involving SR01 that varies from the day's rate by more than 6%, the system will not store the contract.
Note:
The exchange rate variance is a percentage
Holiday Treatment Preferences The schedule or maturity date of a contract might fall on a local holiday defined for your branch or on holiday specified for the currency involved in the contract. Therefore, the user needs to specify how the system must handle holidays.
Cascade Schedules
Select this check box, to execute the Cascade Schedules validation of the date and movement of schedules.
The cascading schedules arises only if:
- The user has specified that a schedule falling due on holiday has to be moved forward or backwards; and
- The schedule has been defined with a definite frequency.
If the user checks this box to cascade schedules, the scheduled date following the changed date is shifted following the changed date as per the frequency. If the user opt not to cascade schedules, even if one of the scheduled dates are changed, the schedules, which follow, are fixed as per the original definition.
Currency Holiday
Select this check box, to execute the Currency Holiday validation of the date and movement of schedules.
The movement of schedule date or maturity date is based on the holiday treatment that the user specified for the currency specified.
Financial Center Holiday
Select this check box, to execute the financial center holiday calendar validation of the dates and movement of schedules.
The movement of schedule date or maturity date is based on the holiday treatment that the user specify for the Financial Center specified.
Local Holiday
Select this check box, to execute the local holiday validation of the date and movement of schedules.
Move Across Month
If the user has chosen to move a schedule falling due on holiday either forward or backwards to the next or previous working day and it crosses over into a different month, the scheduled date is moved only if the user so indicate in this field. If not, the scheduled date is kept in the same month, on the last or first working day of the month, depending on whether the schedule is over the month-end or the beginning of the month. Check this box if the user want to allow movement across the month for a scheduled date that has been moved forward or backwards.
Schedule Movement
Select the Schedule Movement as required.
The options available are:
- Move Forward: Suppose the user has indicated that a currency holiday must not be ignored for the contract. In that case, the user need to specify whether the schedule date/maturity date must move forward to the next working day or move back to the previous working day. Check against this field to indicate that the security/ maturity date of the contract must be moving forward to the next working day
- Move Backward: The schedule date/maturity date must move forward to the next working day or move back to the previous working day. Check against this field to indicate that the scheduled date/maturity date of the contract must move back to the previous working day.
Repo Specify the Repo fields. Delivery Verse Payment
Select this check box to generate MT543/MT541 and payment message MT202 is suppressed on Repo booking and liquidation.
If the flag is unchecked MT540/MT542 along with payment message MT202 continues to generate.
Securities Pledged
Select the Securities pledged option as required from the drop-down list of values.
The Options available are:
- Move to Collateral Portfolio
- Block Securities
Securities pledged as part of the repo will either be moved to a collateral portfolio or blocked in bank portfolio.
Note:
When the preference for the securities pledged is selected as Move to Collateral portfolio, Internal Product is mandatory and Block product must be null. When the preference for the securities pledged is selected as Block Securities, Block Product is mandatory and Internal product must be null.
Internal Bank Product
This field captures the BankBuy BankSell deal product for moving pledged security from Banks portfolio to collateral Portfolio on repo booking.
Block Product
This field captures the Block product, to block the securities pledged on repo booking/margin call
Authorization Rekey Fields
Specify the values that the authorizer of a SR deal has to rekey at the time of authorization.
All operations on a deal (input, modification, reversal, manual liquidation or manual rollover) have to be authorized:
- By a user other than the one who carried out the operation
- Before the user can begin the end-of-day operations
When the user invoke a deal for authorization - as a cross-checking mechanism to ensure that the user are calling the right deal - the user can specify that the values of certain fields are entered before the other details are to be displayed. The complete details of the deal are displayed after the values to these fields are entered. This is called the ‘rekey’ option.
If no rekey fields are defined, the details of the deal are displayed immediately once the authorizer calls the deal for authorization. The rekey option also serves as a means of ensuring the accuracy of inputs.
The user can specify any or all of the following as rekeying fields:
- Currency
- Value Date
- Contract Amount
- Maturity Date
Note:
Re-key option is available only for SR Online screen and not for Payment.
Revere Repo Specify the Reverse Repo fields. Receive Verse Payment
Select this check box to generate MT541\MT543 and payment message MT202 is suppressed on Repo booking and liquidation. If the flag is unchecked MT540/MT542 along with payment message MT202 continues to generate.
Bank Buy Product
Select the Product from the list of values to capture Bank Buy Customer Sell deal product for transferring securities received from counterparty to Collateral Portfolio on Reverse Repo Booking.
Note:
Bank Buy Customer Sell product is Mandatory for a Reverse Repo.
Bank Sell Product
Select from the list of values to capture the Product for creating Bank Sell Customer Buy deal for transferring back the securities to counterparty from collateral portfolio.
Note:
Bank Sell Customer Buy is Mandatory for a Reverse Repo.
Product Restriction Specify the Product Restriction fields. Branch Restrictions
Indicate whether the user wants to create a list of allowed branches or disallowed branches by selecting one of the following options:
- Allowed
- Disallowed
Currency Restrictions
Indicate whether the user wants to create a list of allowed currencies or disallowed currencies by selecting one of the following options:
- Allowed
- Disallowed
Categories List
Indicate is the user wants to create a list of allowed customers or disallowed customers by choosing one of the following options:
- Allowed
- Disallowed
Collateral Revaluation Specify the Collateral Revaluation fields. Collateral Revaluation Preference
The Options available are:
- Margin Settlement
- Repricing
Margin Settlement :
Select this option Margin Call/Settlement to substitute the shortfall/ excess due to the price fluctuation.
Note:
Both Margin Settlement and Repricing cannot be selected at the same time. Choose any one option based on requirement.
Repricing
Select this option to Reprice of the repo contract notional amount.
Margin Product
Select the Product from the list of values to execute the Margin settlement.
Note:
This field is mandatory field if Margin Settlement is selected.
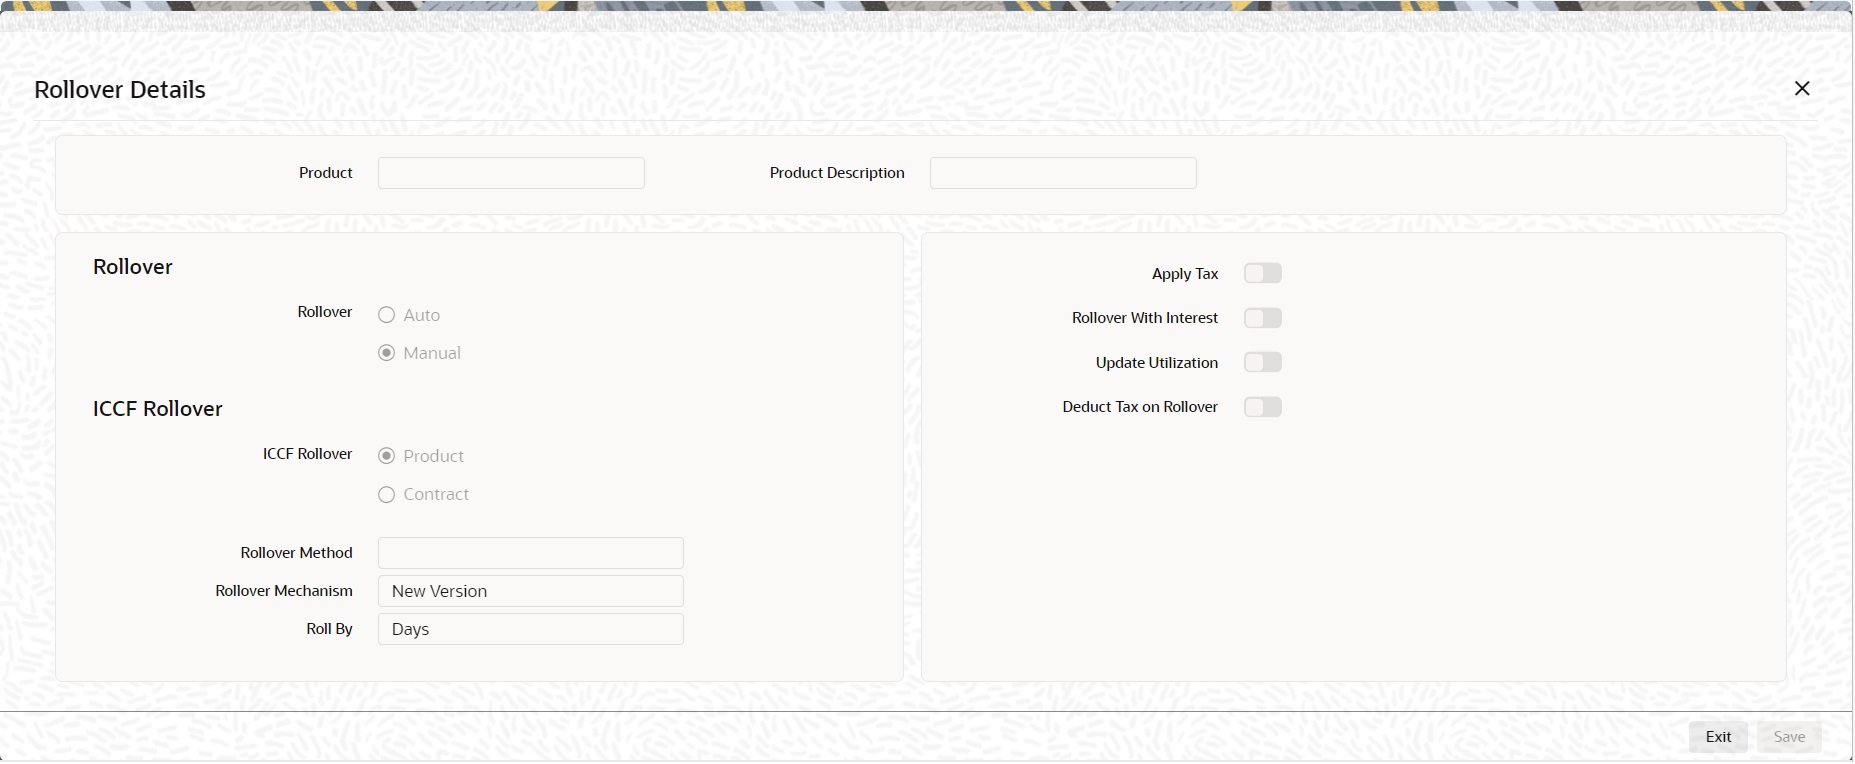
- On the Preference screen, click Rollover Details.
Rollover Details screen is displayed.
- On the Rollover Details screen, specify the details as required.
For information on fields, see the below table:
Table 2-9 Rollover Details - Field Description
Field Description Product
The Product details selected is displayed.
Product Description
The Product description details are displayed.
Apply Tax
Select the Check box to apply the tax component.
Rollover With Interest
Select the Check box to apply the rollover component.
Update Utilization
Select the Check box to apply the Utilization component.
Deduct Tax on Rollover
Select the Check box to apply the deduct tax on Rollover component.
Roll over
Select the Rollover option as required.
The options available are:
- Auto
- Manual
ICCF Rollover
Select the Rollover option as required.
The options available are:
- Product
- Contract
Rollover Method
Select the Rollover Method details as required form the drop- down list.
Rollover Mechanism
Select the Rollover Mechanism details as required form the drop- down list.
Roll By
Select the Roll By details as required form the drop- down list.
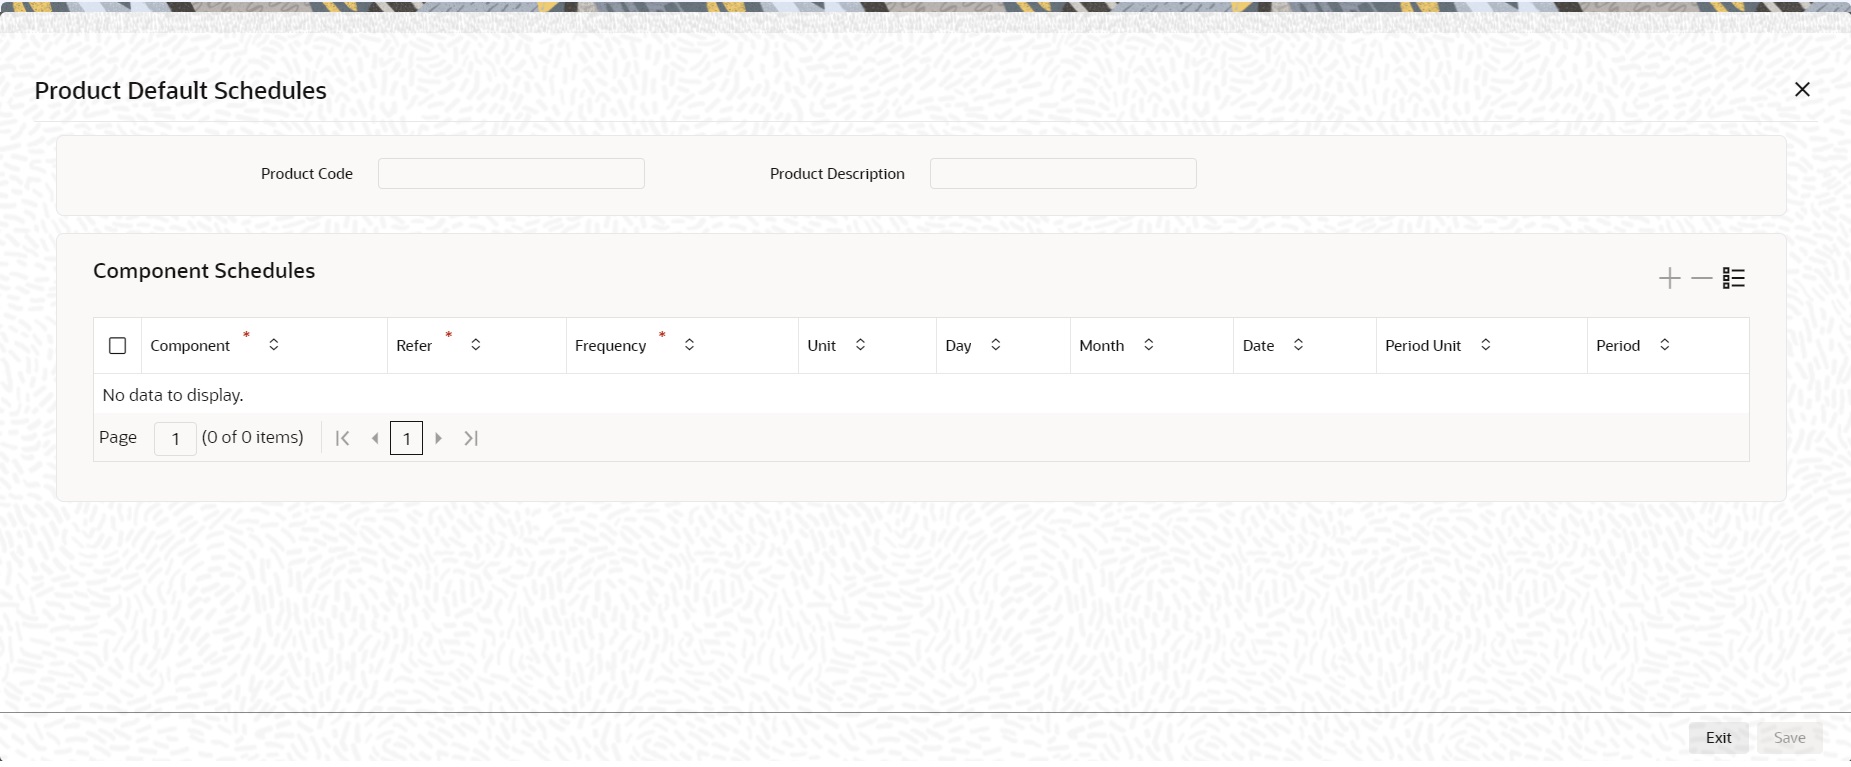
- On the Preference screen, click Schedules.
When creating a Repo product, the user can define schedule details such as the reference date, the frequency, the month and the date for each component. The user can capture these details in the Product Default Schedules screen.
The Product Default Schedules screen is displayed. - On the Product Default schedules screen, specify the details as required.
For information on fields, see the below table:
Table 2-10 Product Default schedules - Field Description
Field Description Product Code
The product code defined at the product definition is displayed.
Product Description
The description of the product selected is displayed.
Component
This is a mandatory field.
Click the search icon and select the Component from the list displayed.
Refer
This is a mandatory field.
Select the option from the drop down list.
The options are:
- Calendar
- Value Date
Frequency
This is a mandatory field.
Select the option from the drop-down list.
The options are:
- Daily
- Weekly
- Monthly
- Quarterly
- Half Yearly
- Yearly
- Bullet
Unit
Indicate here the number of units for the frequency the user has set for a particular component.
Day
Select the Day from the drop-down list.
Month
Select the Month from the drop-down list.
Date
Specify the Date as required.
Period Unit
Specify the Period unit from the drop down list.
Period
Specify the schedule period.
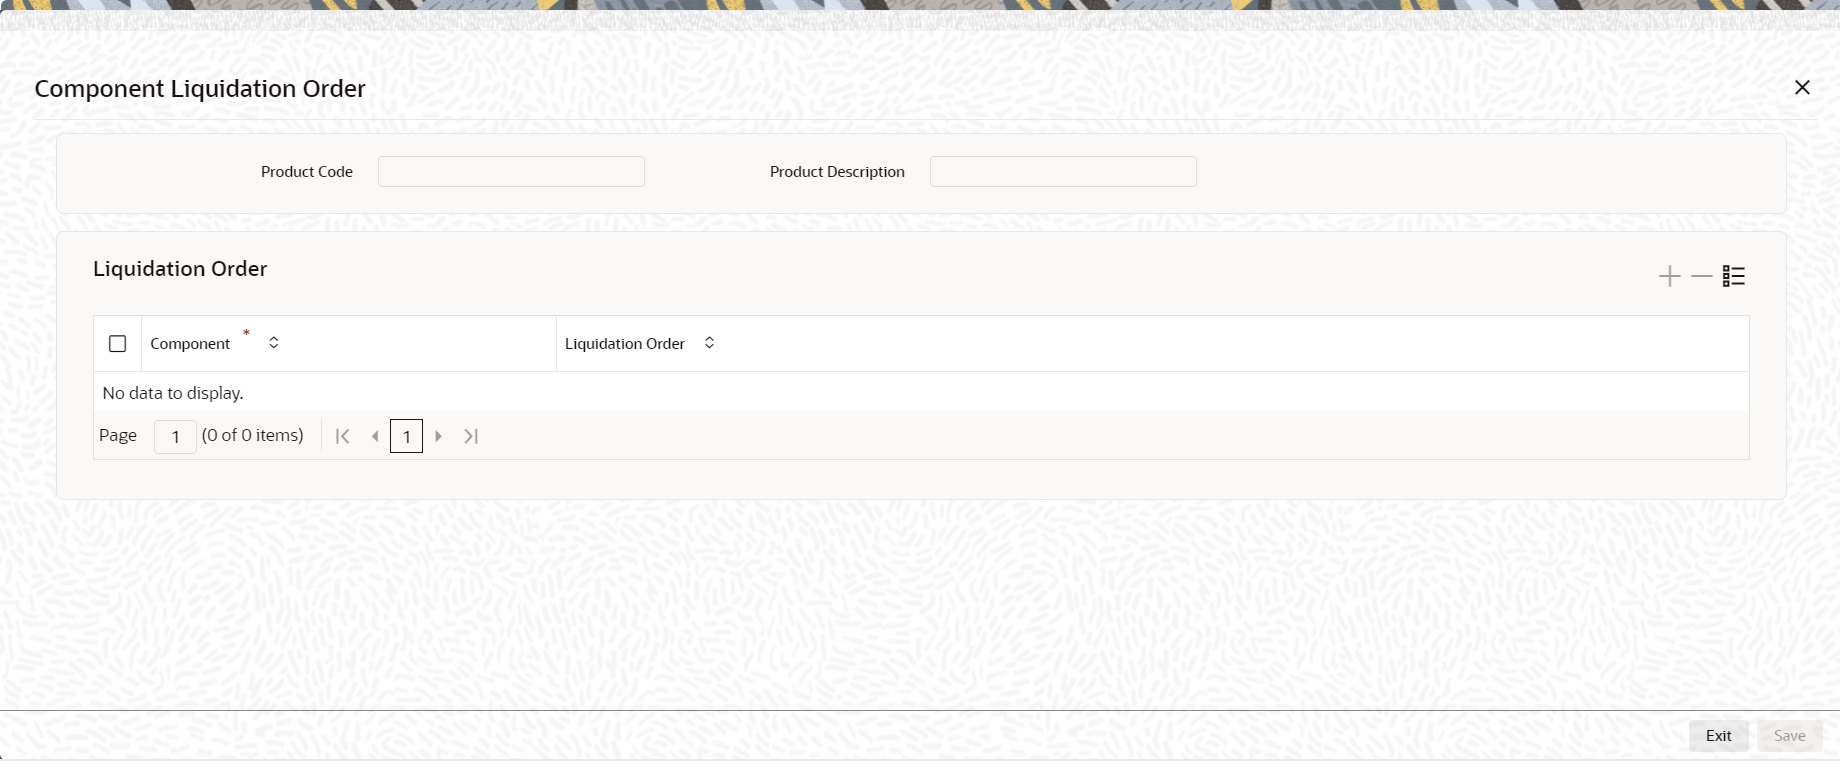
- On the Preference screen, click Liquidation Order.
The Component Liquidation Order screen is displayed.
- On the Component Liquidation Order screen, specify the details as required.
For a contract defined with manual liquidation of components, the Liquidation Order is considered when a payment has to be automatically distributed among the various outstanding components. For a contract with automatic liquidation, the order of liquidation becomes important when funds are insufficient in the repayment account on the day of liquidation, and more than one component has a schedule falling due on that day.
Under such circumstances, the user might want to allot priority to the recovery of certain components. For example, the user might want to recover the interest (or interest type of components) first and then the principal. The ageing analysis function takes over once a component is overdue, and an appropriate penalty is applied. For a component on which penalty interest has been applied, the user may wish to recover penalty interest first, the interest next and finally the principal.
Note:
The user can specify the liquidation order for all the interest type of components and the principal.
For information on fields, see the below table:
Table 2-11 Component Liquidation Order - Field Description
Field Description Product Code
The product code defined at the product is displayed.
Product Description
The description of the defined product is displayed.
Component
Click the search icon and select the Component details from the list of values displayed.
Liquidation Order
The Liquidation order details are displayed as required.
Specify Grace Days to Penalty
The grace period specifies the period within which the penalty interest (if one is defined for the product) will not be applied, even if the repayment is made after the due date. This period is defined as a specific number of days and will begin when the repayment becomes due.
Penalty interest is applied on repayments made after the grace period and is calculated for the entire period. It has been outstanding (that is, from the date the payment was due).
For example, an interest repayment on a borrowing deal is due on 15 June 1998. the user has specified a grace period of 5 days, after which a penalty interest of 2% is imposed.
If the customer makes the interest payment on 18 June, which falls within the grace period, he/she will not have to pay penal interest. But if the customer makes the payment after the expiry of the grace period, after 20 June, he/she is charged penal interest. It is calculated from 16 June onwards and not from 20 June. If the payment is made within the grace period, normal interest is applied to the scheduled repayment date.
Grace Days for Multiple Penal Components
If your bank has chosen to have multiple penal components, the user can define grace days (in days, months or years) to be applicable for each level.
The penalty is not applied if the payment made within the grace period that the user has defined for each level. It becomes applicable only after the expiry of the grace period. If applied, the penalty is calculated from the day the payment becomes overdue.
Note:
The number of grace days specified for a level must be more than the number of grace days specified for the previous level. Higher the level, higher the number of grace days defined for the level. For a product, the user can specify the grace period after which the penalty will start accruing, through the Grace Days Definition screen.
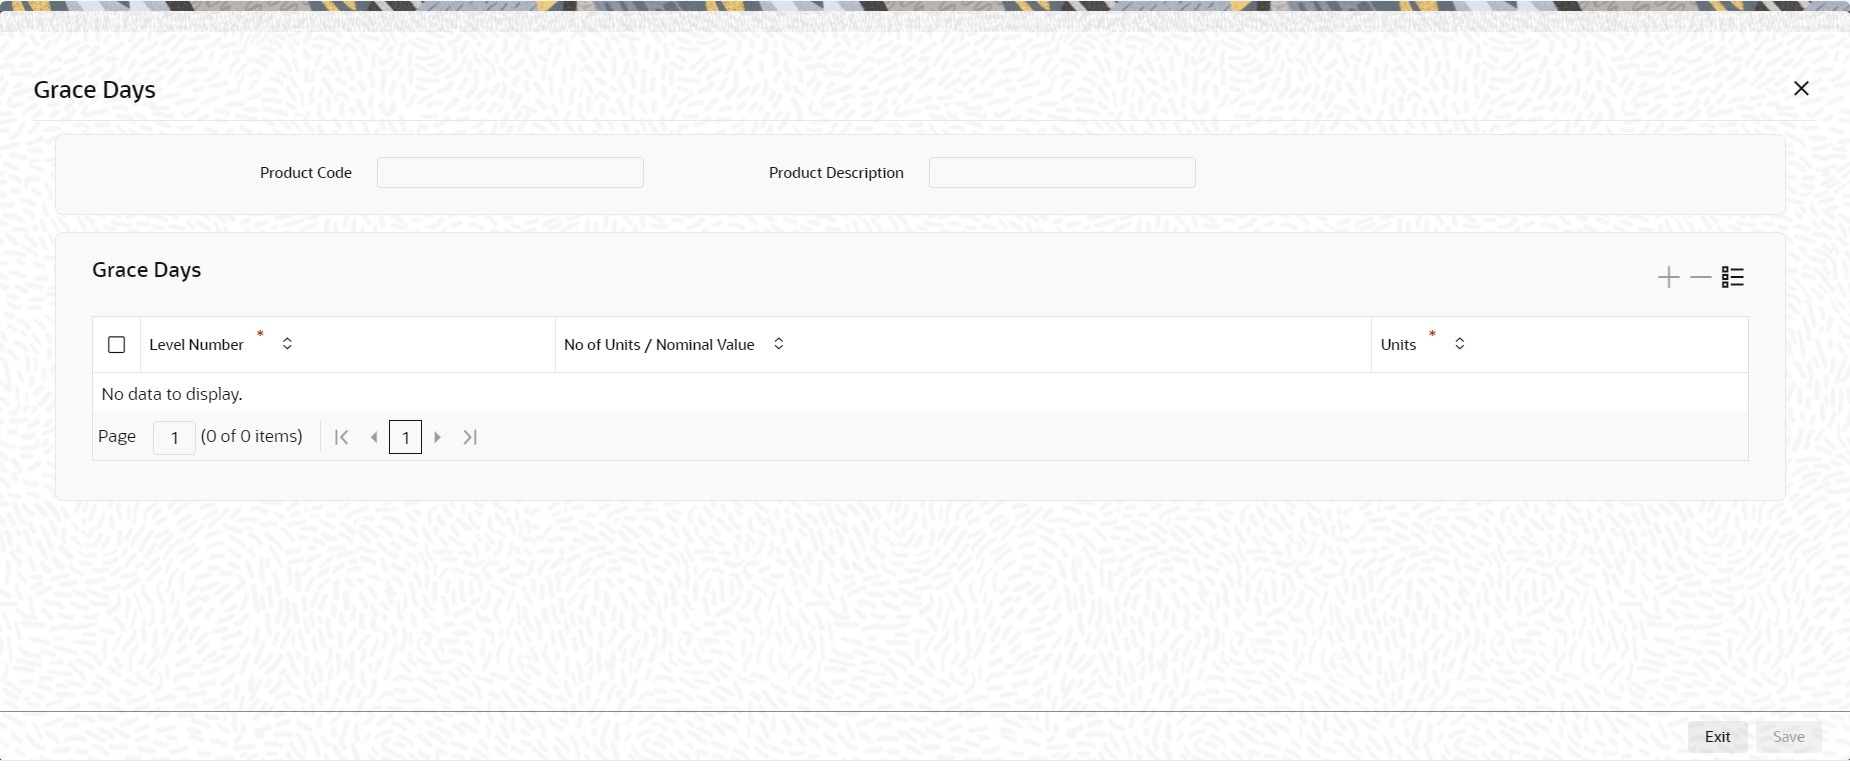
- On the Preference screen, click Grace Days.
Grace Days screen is displayed.
- On the Grace Days screen, specify the details as required.
For information on fields, see the below table:
Table 2-12 Grace Days - Field Description
Field Description Product Code
The Product code defined at the product level is displayed.
Product Description
The Product Description of the selected product are displayed.
Level Number
This is a Mandatory field.
The system updates the level of the intermediary in the hierarchy on saving the record.
The level numbers get defaulted depending on the number of levels defined in the ICCB Details screen, irrespective of the Basis Amount Type i.e. if the user define three levels of penalty for the Basis Amount type Principal and four levels of penalty for the Basis Amount type Interest, levels 1 to 4 are available to the user in the Grace days definition screen. The user will not be able to add levels in this screen. Since the level numbers get defaulted from the ICCB Details screen, it is imperative that the expected and overdue components are defined at the ICCB Details screen, prior to the definition of grace days for the levels.
Note:
Grace days are defined for a level. The user cannot specify different grace days for the same level for different Basis amount types. After the product has been saved and authorize, the user are not allowed to modify grace days.
No of Units/Nominal Value
Specify the number of units or nominal values.
Units
This is a Mandatory field.
The user must specify the grace period for each level. Each overdue component will come into effect when the grace period associated with the level expires. The grace period is expressed in:
- Days
- Months
- Years
Grace Days to Penalty
The grace period specifies the period within which the penalty interest (if one is defined for the product) will not be applied, even if the repayment is made after the due date. This period is defined as a specific number of days and will begin from the date the repayment becomes due.
Penalty interest is applied on repayments made after the grace period and is calculated for the entire period it has been outstanding (that is, from the date the payment was due).
For example, an interest repayment on a borrowing deal is due on 15 June 1998. The user has specified a grace period of 5 days, after which a penalty interest of 2% is imposed.
Now, if the customer makes the interest payment on 18 June, which falls within the grace period, he/she will not have to pay penal interest, but if the customer makes the payment after the grace period's expiry, that is, after20 June, he/she is charged penal interest. It is calculated from 16 June onwards and not from 20 June. If the payment is made within the grace period, normal interest is applied as of the scheduled repayment date.
Grace Days for Multiple Penal Components
If your bank has chosen to have multiple penal components, the user can define grace days (in days, months or years) to be applicable for each level. The penalty will not be applied if the payment made within the grace period that the user has defined for each level. It becomes applicable only after the expiry of the grace period. If applied, the penalty is calculated from the day the payment becomes overdue.
Note:
The number of grace days specified for a level must be more than the number of grace days specified for the previous level. Higher the level, higher the number of grace days defined for the level.For a product, the user can specify the grace period after which the penalty will start accruing, through the Grace Days Definition screen.
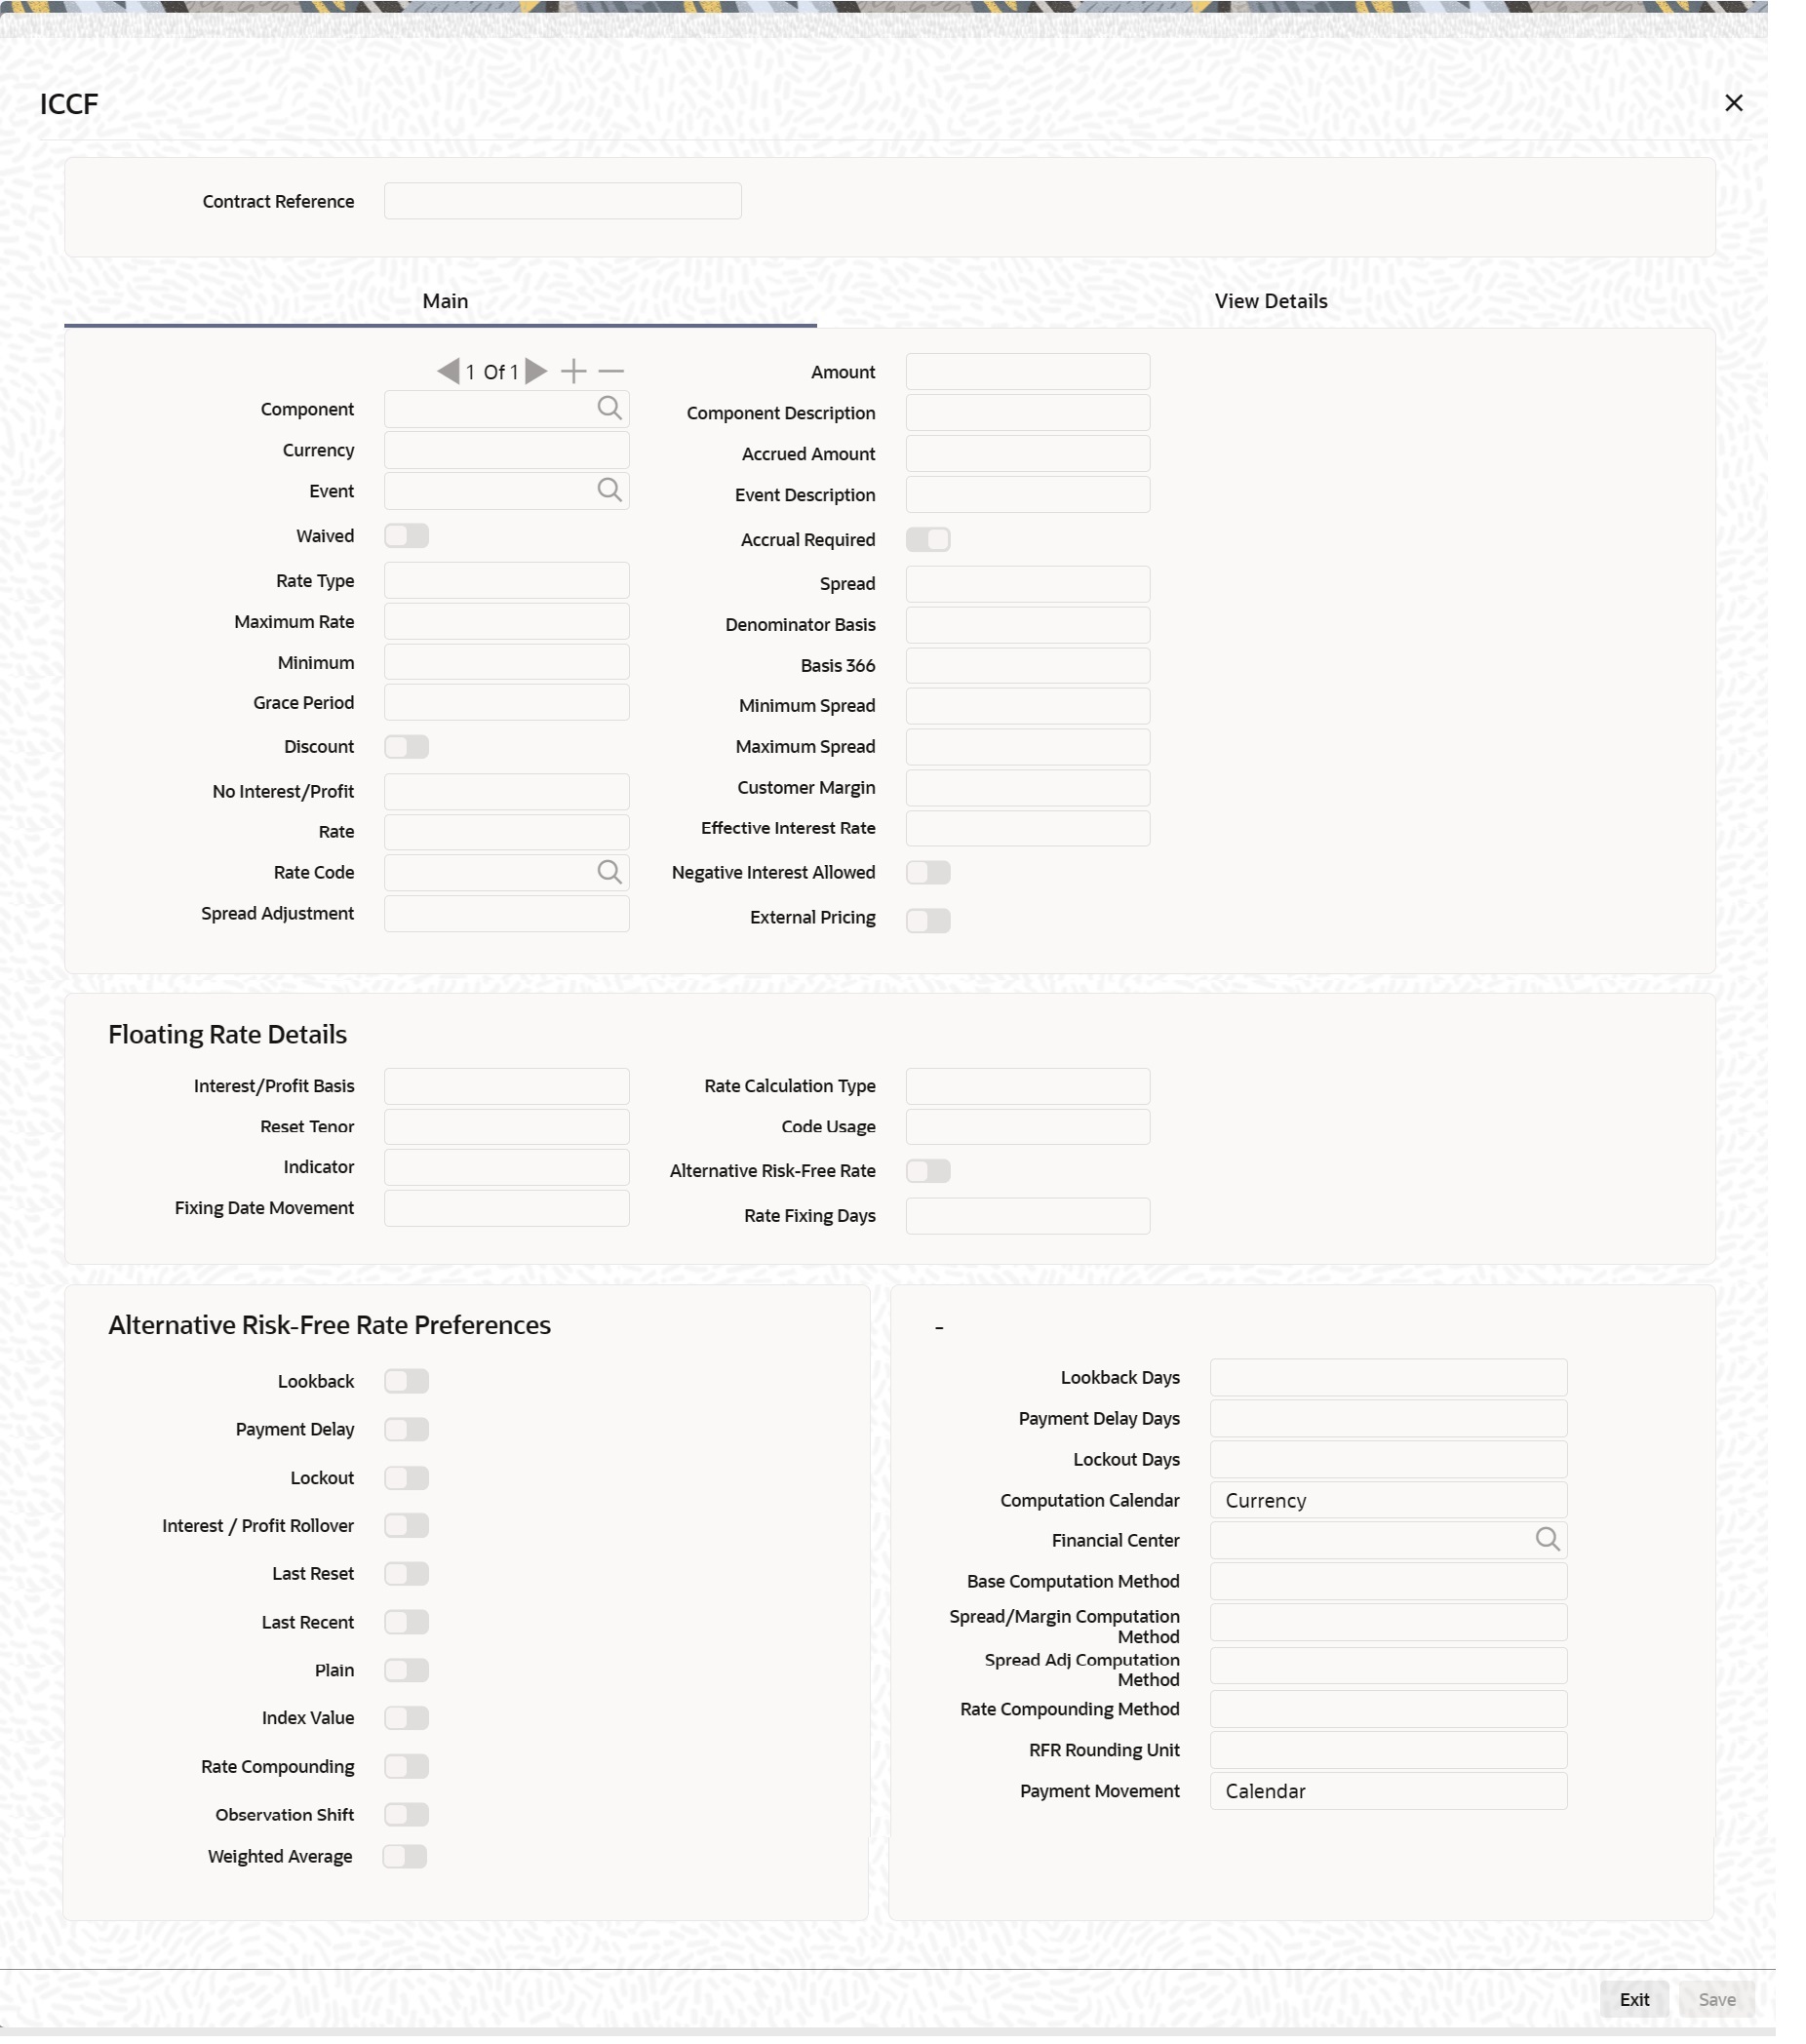
- On the Securities Repo Product Definition screen, click Interest.
ICCF Details screen is displayed.
- On the ICCF screen, specify the details as required.
For information on fields. see the below table
Table 2-13 ICCF - Field Description
Field Description Amount Type
Specify the basis on which interest has to be calculated. By default, the principal will be taken as the basis.
Pre Payment Method
The prepayment method identifies the computation of the prepayment penalty for the contract.
Stop Application
Select this check box to stop application.
The attributes defined for a product will be automatically applied to all contracts involving the product. If, for some reason, the user want to stop applying the Interest Rule defined for the product on contracts that are to be initiated in the future (involving the product), the user could do so through the Product ‘ICCB Details’ screen.
In effect, stopping the application of a component for a product would be equivalent to deleting the component from the product. By specifying that the application of the component must be stopped, the user has the advantage of using the definition made for the component again, by making it applicable.
Propagation Required
Select this check box if the propagation is required.
If the interest amount collected from the borrower must be passed on to participants of the contract, check the 'Propagation Required' check box.
Accrual Required
Select this check box if the accrual is required.
Allow Amendment
A change to a contract (after it has been authorized) that involves a change in its financial details constitutes an Amendment on the contract. The user can indicate whether such an Amendment, called a Value Dated Change, must be allowed for the interest component being defined.
The user can amend the following through this function:
- Interest rate
- Rate code
- Spread
- Interest amount
Consider as Discount
While defining an interest, the user can indicate whether the interest component is to be considered for discount accrual on a constant yield basis or whether accrual of interest is required.
If the user select the Consider as Discount option the interest received against the component is used in the computation of the constant yield and subsequently amortized over the tenor of the associated contract.
Checking the Consider as Discount also indicates whether the interest component is to be considered for IRR computations.
The Consider as Discount option is not available if the amount category is Penalty.
Collection Type
Select the collection type. The options are:
- Advance
- Arrear
Category
If the interest rate type is Fixed or Floating, the Amount Basis Category specifies the type of balance that has to be considered for interest application. It could be any one of the following:
- Expected
- Overdue
- Normal
- Outstanding
If the Basis Amount Category is Expected, the balance on which interest has to be applied will be the Expected balance (the balance assuming that all the scheduled repayments defined for the contract are made on time).
If the Basis Amount Category is Overdue, the balance on which interest has to be applied will be the amount that is overdue, based on the repayment method defined for the contract. An example of this category is the application of penalty interest on the Principal amount or interest, when a repayment has not been made, as per the date specified for the contract.
Settlement Currency
Specify the currency in which the interest, charge or fee component gets settled. The currency mentioned here must exist in the currency table. By default it is the local currency.
Level Number
Grace Period and Level Number
The user can apply interest at various levels:
- Main interest on principal – Level 0 (Category: Expected)
- Interest on overdue interest – Level 1 (Category: Overdue)
- Interest on Level 1 interest – Level 2 (Category: Overdue) … and so on.
For each interest component, starting from Level 1 and belonging to ‘Overdue’ category, the user can also specify the number of grace days, beyond the main interest due date, after which that interest component becomes applicable. For each such component, the default value for the number of grace days is:
Number of grace days for the previous level + 30 days
The user can change this value, provided that the number of grace days for a component (level) does not exceed the number of grace days for any successive level. At any point, an amendment of the number of grace days for any or more interest components at the Product ICCB level will only affect new contracts.
For interest components of Level 0 and ‘Expected’ category, the default value for grace days is 0 – this cannot be changed.
Main Component
The user can define any number of interest type of components (tenor based components) for a product. If the user has defined more than one interest type of component, the user can specify the main interest component as ‘Main Component’. This will be the interest component that will be used for capitalization or amortization purposes if the repayment schedules are defined thus.
The details of this Main Component will be shown in the Contract Details screen and the user can change them there without having to invoke the Contract ICCB Details screen. Components other than the main component have to be processed through the Contract ICCB Details screen.
Bulk Amount
When a contract gets rolled over, the user may wish to split it into 2 contracts - one for the interest amount (I) and the other for the principal amount (P). If the user want the floating rate pickup for both the new contracts (tenor/amount) to be based on P+I of the original contract, check the 'Bulk Amount' check box. For example, if the principal amount is Rs.1000 and Interest accrued is Rs.100. Upon rollover, your bank may require two contracts, one for Rs.1000 (Principal contract) and the other for Rs.100(interest contract). Lets say the slab rate followed by your bank is:
- 0 – 1000 - 3%
- 1001 – 2000 - 4%
In the normal course, system would apply 3% interest rate on both the contracts of Rs.1000 and Rs.100 (since both fall within 0 -1000 slab). But if the ‘Bulk Amount’ option is chosen, then 4% is applied on both the contracts (as if a single contract of Rs.1100 is rolled over where system would have applied 4pct).
Link Contract As Rate Code
The user can use this field to indicate whether a fixed rate contract may be linked to the floating rate component, instead of a rate code. Check this box to indicate that a fixed rate contract may be linked.
Grace Period
The grace days that user specify for any level of interest in the Product ICCF screen will default to contracts entered under that product.
Alternative Risk-Free Rate
Select the Alternate Risk-Free Rate check box to enable the Alternate Risk Free-Rate preferences. For more information on the
Alternate Risk Free-Rate preferences fields, refer to .Rate Type
The Rate Type indicates whether the interest is a Fixed Rate, a Floating Rate or a Special amount. When creating a product, the user must specify the Rate Type through the ‘Product - ICCB Details’ screen.
If the Rate Type is a Floating Rate, the user must also specify the Rate Code to which the product has to be linked.
Rate Code
Each Rate Code corresponds to a rate defined for a combination of Currency, Amount (if it is necessary) and an Effective Date. These details are maintained in the Floating Rates table.
This rate will be applied to contracts involving the product.
Borrow Lend Indicator
Floating rates are defined with a borrow or a lend tag attached to them. Here, the user indicate the nature of the floating rate that needs to be picked up for the interest component.
The options available are:
- Borrow
- Lend
- Mid
Rate Cycle Type
For floating type of interest components and fixed type with rate code attached, the user can indicate the manner in which floating rates must be applied.
The preference that the user specify here is used when an interest component does not fit into any direct parameter defined for the floating rate code. The options available are:
- Up – Choose this option to indicate that the rate of the upper tenor slab must be used.
- Down - Choose this option to indicate that the rate of the lower tenor slab must be used
- Interpolate - Choose this option to indicate that the rate must be interpolated between the rates of the upper and lower slabs
- Round Off - Choose this option to indicate that the tenor of the component must be rounded off to the nearest whole number. The rate defined for the derived tenor will be applied to the component
Event
The event is to which the component must be applied together with its description.
Rule
Rule associated to the Interest component
Component
The component for which the user are entering details together with its description.
Code Usage
The user must specify the method in which the rates in the Floating Rates table have to be applied. It could either be automatic application (meaning the rate has to be applied every time it changes), or periodic application (meaning the rate has to be applied at a regular frequency, defined for each contract involving the product).
Reset Tenor
Enter the tenor for which the floating rate (when applied automatically) needs to be picked up from the floating rates table, for contracts using this product. This field is applicable to floating type of interest components and fixed type with rate code attached.
Margin Basis
Indicate the basis for the interest margin and the method for applying the interest margin on the selected interest component for contracts using this product.
The user need to specify how the system must obtain the interest margin (if any) that must be applied on the selected interest component at the time of fixing the interest rate for contracts using the product. The available options are:
- Facility - The system defaults the margin from the borrower facility contract with which the drawdown is linked.
- Tranche - The system defaults the margin from the borrower tranche contract with which the drawdown is associated.
- Drawdown - If this option is chosen, the user must enter the applicable margin when the interest rate is fixed.
- This component which the user select is excluded from all the processing including liquidation and this calculation type is only used for margin application.
- After defining this component, booked formula for main interest component needs to be modified by replacing INTEREST_RATE with INTEREST_RATE + MARGIN_RATE. By doing this the interest gets calculated based on resolved interest rate (i.e. including floating rate and spread if applicable) and the margin.
- Customer - If this option is chosen, then the margin will be applicable to all draw down contracts under the selected customer.
Margin Application
Margin Application can be periodic or automatic
Event Description
Defaults event description
Rule Description
Defaults Rue description
Description
Defaults Component description
Pricing Details Specify the Pricing Details fields. External Pricing
Check this box for external pricing of interest component.
Product Limits Specify the Product Limits fields.
Currency
Specify the currency for which limits are maintained
Rate Fixing Days
Defaults fixing days from Rate fixing maintenance screen. User will be able to modify the same.
Fixing Date Movement
Defaults fixing date movement from Rate fixing maintenance screen. User will be able to modify the same
Default Rate
Specify the default rate on contract creation. User will be able to modify the same.
Minimum Rate
Specify the minimum rate on contract creation. If the interest rate specified for a contract is less than this minimum rate, the minimum rate is applied on the contract
Maximum Rate
Specify the maximum rate on contract creation. If the interest rate specified for a contract is greater than this maximum rate, this rate will be applied on the contract.
Default Spread
Specify the default spread for a Floating rate type on contract creation
Minimum spread
Specify the minimum spread for a floating rate type product. If the spread specified during contract processing is less than the value specified as the minimum spread, this value will be picked up as the spread.
Maximum Spread
Specify the maximum spread for a floating rate type product. if the spread specified during contract processing is more than the value specified as maximum spread, this value will be picked up as the spread.
Interest Basis
This field indicates how the system must consider the tenor basis upon which interest is computed over a schedule or interest period, in respect of the interest component being associated with the product.
Denominator Basis
This field indicates the interest methods which have their interest basis set to ACTUAL i.e. 30(EURO)/ACTUAL, 30(US)/ACTUAL and ACTUAL/ACTUAL. Denominator Basis is used to specify how the month of February is treated when the denominator is 'Actual'. There are two types of denominator basis methods:- Per Interest Basis – Here the computation would be done based on ACT/ACT–ISMA Interest Method. In this case, the '366 Basis' field will not be applicable.
- Per Annum (A) – Here the interest calculation will depend on the value the user specify for 366 Basis
366 Basis
This is applicable only if the Denominator Basis is set to 'Per Annum'. The user can select one of the following values here:
- Leap Year
- Leap Date - computation would be done based on ACT/ACT - FRF Interest Method
No of Interest Period
This is applicable if the Denominator Basis is 'Per Interest Period'. Here the user can specify the number of Interest periods (Schedules) in the financial year.
- On the Securities Repo Product Definition screen, click Charge
Charge Details screen is displayed.
- On the Charge Details screen, specify the details as required.
For information on fields, see the below table:
Table 2-14 Charge Details - Field Description
Field Description Product Code
The product code defined in the product screen is displayed.
Product Description
The product description of the selected product is displayed.
Component
This is a mandatory field.
Description
Defaults Charge component description
Charge Type
Charges can be collected from the counter party or from a third party. The user can select one of the following values from the adjoining drop-down list:
- Counter Party - This indicates that the customer is captured as part of the contract.
- Their Charges - This indicates that your bank is collecting other bank's charges
Net Consideration
The sum of the different components of a contract determines the net value of the contract.
The user can indicate that a charge component must be taken into account when determining the net value of a contract by choosing the Net Consideration option.
Advice Charge
The system defaults the local currency as charge currency when this check box is checked.
If unchecked, then the system defaults the charge currency as per the ICCB rule maintenance.
Stop Association
The user can instruct the system not to calculate charge for a product by clicking this option.
The charge details specified for a product will be automatically applied on all contracts involving the product. However, while processing a contract, the user can waive the application of all or specific charge rules for the contract.
Propagation Required
This option defaults from the ‘Charge Class Maintenance’ screen but can be modified here if required.
Debit/Credit
Specify if the charge must be debited or credited from the counterparty
Add/Subtract
If the user choose to include the charge component in the net value, the user must indicate if the charge component is to be added, while calculating the net consideration amount, or subtracted.
SWIFT Qualifer
The user can report the charge component of a contract in the SWIFT messages that the user generates. To do this, identify the component, when building it in the Charge Class Maintenance screen, with the appropriate SWIFT code.
Event Description
Event for Association
The event at which the user might like to associate a charge component to a contract is referred to as the Association Event.
Description
Associated Event description is defaulted
Event For Liquidation
The event at which the charge component is actually liquidated is referred to as the liquidation Event. Accounting entries are passed on liquidation
Description
Application Event description is defaulted.
Event for Application
The event at which the charge component is actually calculated is referred to as the Application Event.
At this event, no accounting entry (for the charge component) is passed.
Description
Application Event description is defaulted
Basis Amount Tag
The basis on which charge is calculated is referred to as the Basis Amount.
Description
System defaults the amount tag description
Settlement Currency
Charges or fees levied on a contract will be settled in the Settlement Currency that the user specify for the charge class associated with the product (under which the contract is processed).
However, when processing a contract, the user can choose to settle the charge in another currency.
Rule
The user can link a charge rule that the user has defined to the charge component that the user are building. When the user link a rule to a component, the attributes that the user has defined for the rule will default to the component.
Description
System defaults Rule description
Default Waiver
If the user want to indicate that the charge rule must be deemed as waived by default, select this option.
Capitalize
The user can capitalize the payment of charges and fees. If the charge is not paid on a scheduled date, the outstanding charge amount will be added to the outstanding principal and this becomes the principal for the next schedule. If a partial payment has been made, the unpaid amount will be capitalized (the unpaid charge is added to the unpaid principal and this becomes the principal for the next schedule).
Other Details Specify the Other Details fields. Allow Rule Amendment
If the user likes to allow the amendment of a rule for a charge component when linked to a contract, check this box.
Amend After Association
If the user likes to allow the amendment after association of a rule for a charge component, check this box. Once checked the system will allow the user to modify the rule after the association event is triggered for the linked contract.
Allow Amount Amendment
If the user likes to allow amendment of the charge amount calculated by the system as per the charge rule, check this box.
Accrual Required
Checking this indicates that the charges have to be accrued. Subsequently, the charges are accrued using the upfront fee system.
Amend After Application
If the user likes to allow the amendment of the charge amount after application of a rule for a charge component, check this box. Once checked the system will allow the user to modify the charge amount after the application event is triggered for the linked contract.
Consider as Discount
While defining a charge class for either the securities or the bills module, the user can indicate whether the charge component is to be considered for discount accrual on a constant yield basis.
If the user select this option the charge received against the component is used in the computation of the constant yield and subsequently amortized over the tenor of the associated contract.
Checking this option also indicates that the component is to be used for IRR calculation.
Discount Basis
While defining a charge class the user can define the discount basis for the purpose of IRR computation. The user can choose either of the following as discount basis:
- Inflow – If the user choose Inflow, the charge will be considered as an inflow for IRR computation
- Outflow – If the user choose Outflow, the charge will be treated as an outflow for IRR computation
The user can define discount basis only if the ‘Consider as Discount’ option is enabled.
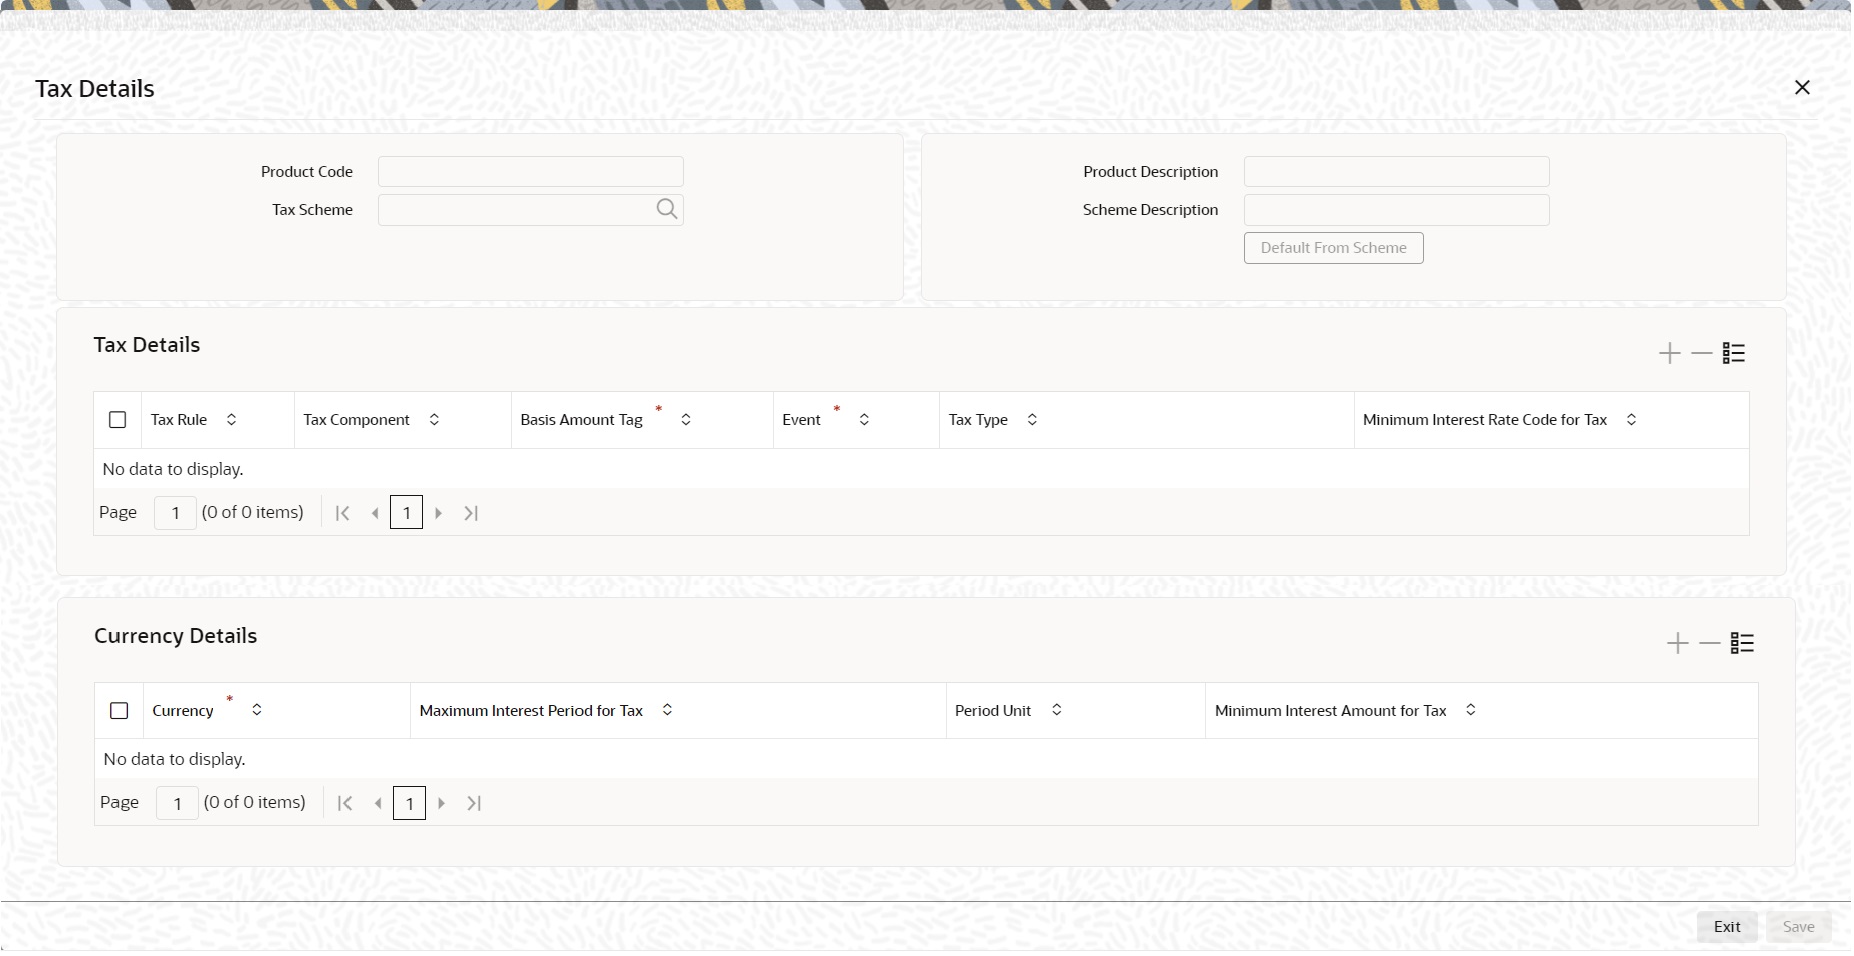
- On the Securities Repo Product Definition screen, click Tax.
Tax Details screen is displayed.
- On the Tax Details screen, specify the details as required.
For information on fields, see the below table
Table 2-15 Tax Details - Description
Field Description Tax Scheme
Choose A Tax Scheme from the Option list
Product Description
Add Product code and its description like other sub system
Scheme Description
System defaults scheme description
Tax Details Specify the Tax Details. Tax Rule
System defaults the Tax Rule mapped to the scheme for Tax computation
Tax Component
The method of tax application defined for the Tax Rule will be applied on this component
Basis Amount Tag
Amount tag on which Tax is computed
Event
The user must specify the event for which the tax is applicable.
Tax type
The type of tax, decides the bearer the tax. It could be the bank or the customer.
A customer bears withholding type of tax and the tax component is debited to the customer’s account. The bank bears an expense type of tax and the tax component is booked to a tax expense account.
Minimum Interest Rate Code for Tax
Specify the rate code for Tax
Currency Details
Currency
Specify the currency from the list of option.
Maximum Interest Period for Tax Specify the maximum interest period for the tax
Period Unit
Specify the period as- Days
- Months
- Year
Minimum Interest Amount for Tax
Specify the minimum Interest amount for the tax
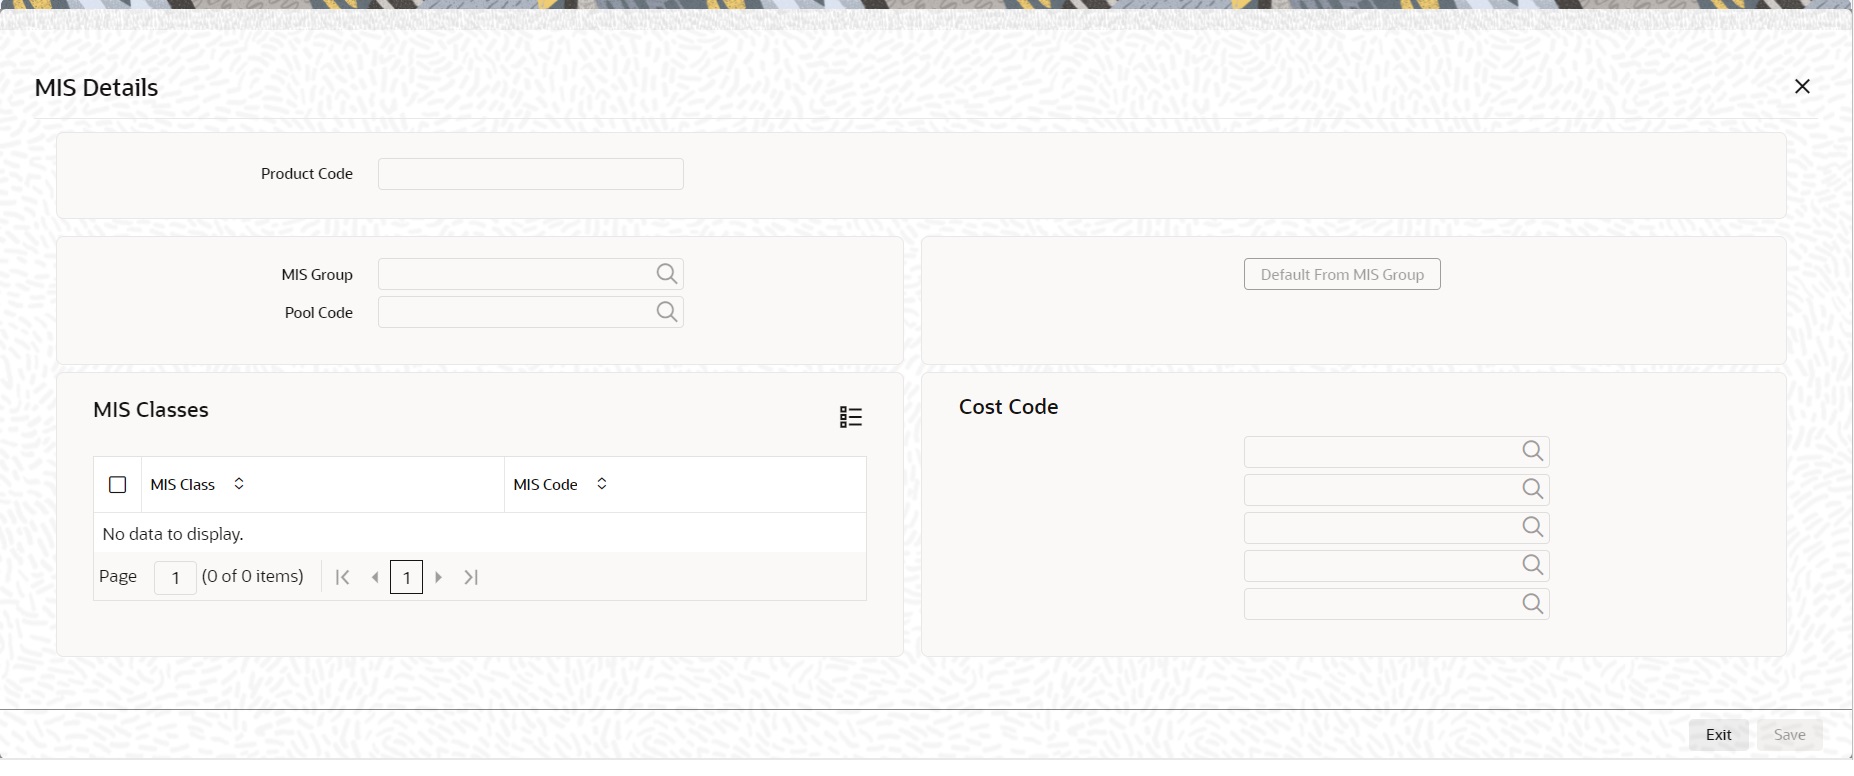
- On the Securities Repo Product Definition screen, click MIS.
The MIS Details screen is displayed.
- On the MIS Details screen, specify the details as required.
For information on fields, see the below table
Table 2-16 MIS Details - Field Description
Field Description MIS Group Select the MIS group details from the list of values displayed.
Pool Code
Select the Pool Code details from the list of values displayed.
MIS Classes Specify the MIS Classes details.
MIS Class
Define the MIS Class details for the security.
MIS Code
Specify the MIS Code details as required.
Cost Code
Select the Cost Code details as required.
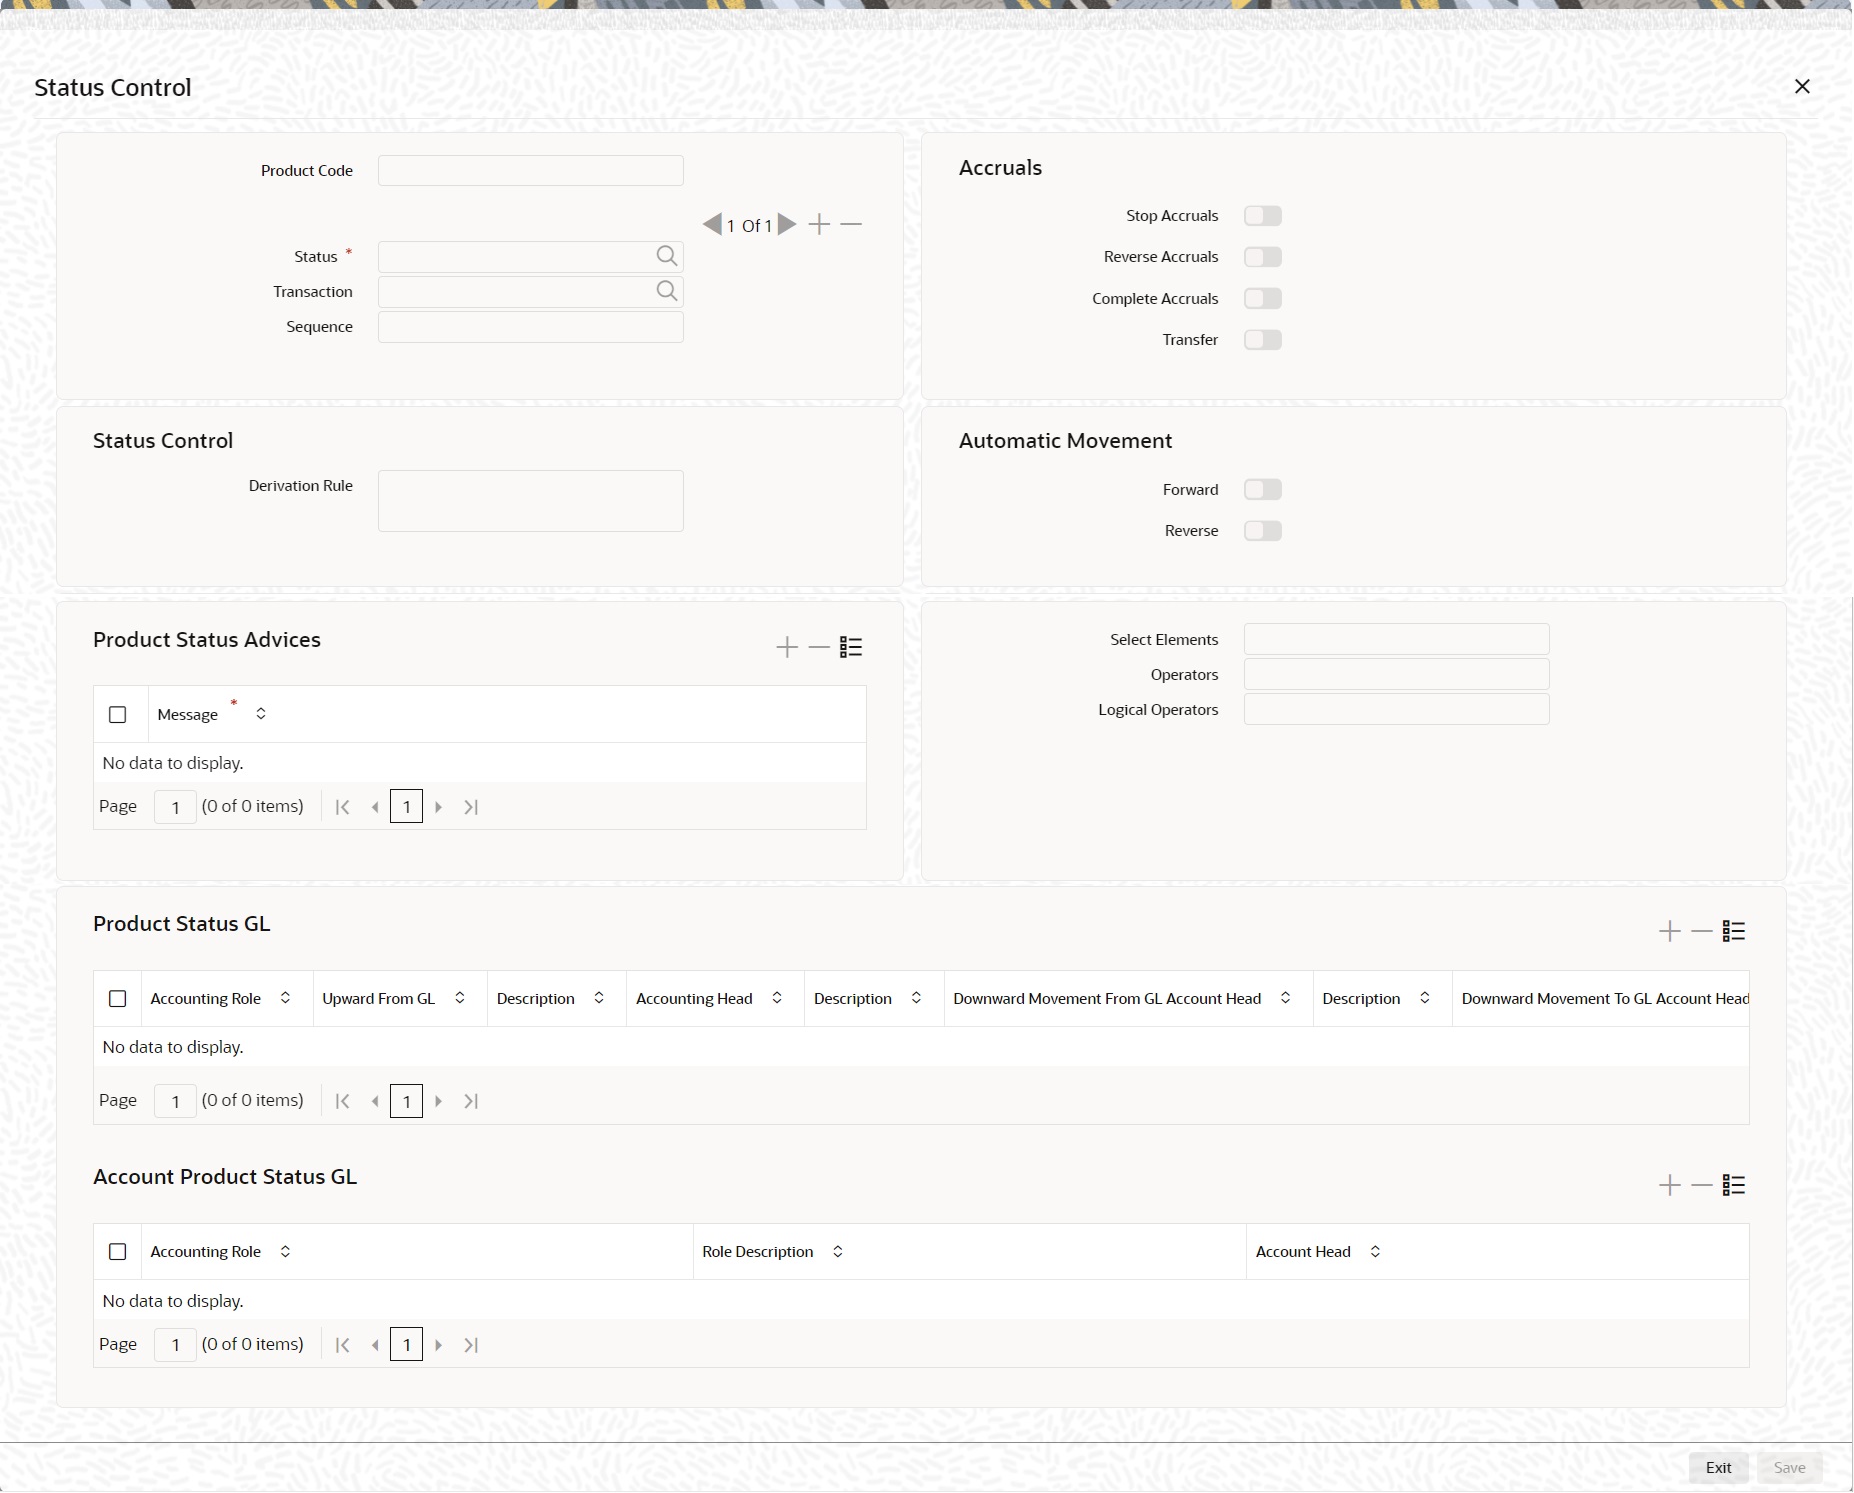
- On the Securities Repo Product Definition screen, click Status.
The Status Control screen is displayed.
- On the Status Control screen, specify the details as required.
For information in fields, see the table:
Table 2-17 Status Control
Field Description Product Code
The product code defined is displayed in this field.
Accruals Specify the Accruals Details.
Stop Accruals
Indicate that accruals (on all accruable components), must be stopped, when the contract moves to the status being defined. By doing so, ensure that your Receivable accounts, for interest and other components, are not updated for a contract on which repayment has been defaulted.
Reverse Accruals
Indicate that the outstanding accruals (where a component has been accrued but not paid) on the contract must be reversed when it moves to the status that the user are defining. If the user specify so, the accrual entries passed on the contract, will be reversed when the status change is carried out.
Future accruals must necessarily be stopped if accruals, done till the date of status change, have to be reversed
Complete Accruals
Check this option to complete accruals.
Indicating if status changes have to be carried out automatically. Indicate the movement preference for statuses.
Transfer
Check this option if accrual must be transferred from one GL to another GL
Status
This is the sequence in which, a contract must move to the status the user are defining.
Usually, more than one status is defined for a product.
Transaction
The user must indicate the Transaction Code to be used for the GL transfer entries, involved in the status change.
Sequence
User must indicate the sequence in which a contract moves from status to status
Status Control Specify the Status Control field.
Derivation Rule
If the user has opted for automatic status change, specify the criteria (rules) based on which the system will perform the status change
Automatic Movement
Add the Option
- Forward - A forward status change is one in which the status changes from one to the next.
- Reverse - A reverse status change is one in which the status changes from present status to the previous. Such a situation arises when a payment is made on a contract with a status other than Active
Status Advice Specify the Status Advice fields Message
Specify the advice or message that the user wants sent to the customer, when a contract moves automatically (forward) into the status the user is defining.
Select Elements
Select element based on which the user needs to build a condition for automatic status change of Repo. The drop-down list displays the following elements:
- Customer Risk
- Customer Group
- Transfer Days
- Maturity Days
Choose the appropriate one.
Operators
Select the operator for building a condition for automatic status change. Use multiple elements, in conjunction with the functions and arithmetic operators. The drop-down list displays the following operators:
- + (add)
- - (subtract)
- * (multiply)
- / (divide)
Logical Operators
Select the logical operator for building a condition for automatic status change. The system uses the logical operators in combination with the elements for creating derivation rules. The drop-down list displays the following logical operators:
- > (greater than)
- >= (greater than or equal to)
- < (less than)
- <= (less than or equal to)
- = (equal to)
- < > (not equal to)
Accounting Role
Specify the accounting role (asset, liability, contingent asset, etc), for the GL into which the repo has to be transferred, when its status changes.
Upward From GL
For each component, the user must indicate the GL from which it has to be moved, when there is a status change.
Description
System defaults the GL description
Accounting Head
Specify the new GL (accounting head), under which the repo has to be reported.
Select an option from the option list, which displays the description of the GL.
Description
System defaults Accounting Head description
Downward Movement From GL Account Head
For each component, the user must indicate the GL from which it has to be moved, when there is a status change.
Downward Movement To GL Account Head
For each component, the user must indicate the GL to which it has to be moved, when there is a status change. For principal, the GL will be changed, while for the other components, the receivable accounts will be moved to the new GL.
Accounting Role
Specify the accounting role (asset, liability, contingent asset, etc), for the GL into which the repo has to be transferred, when its status changes.
Role Description
Accounting role description is defaulted
Account Head
Specify the new GL (accounting head), under which the repo has to be reported.
Select an option from the option list, which displays the description of the GL.
Parent topic: Products
