- Customer and Accounts User Guide
- Account Input
- Create Account Input
8.1 Create Account Input
This topic describes the systematic instructions to configure the virtual account details.
- On Home screen, click Virtual Account Management. Under Virtual Account Management, click Accounts.
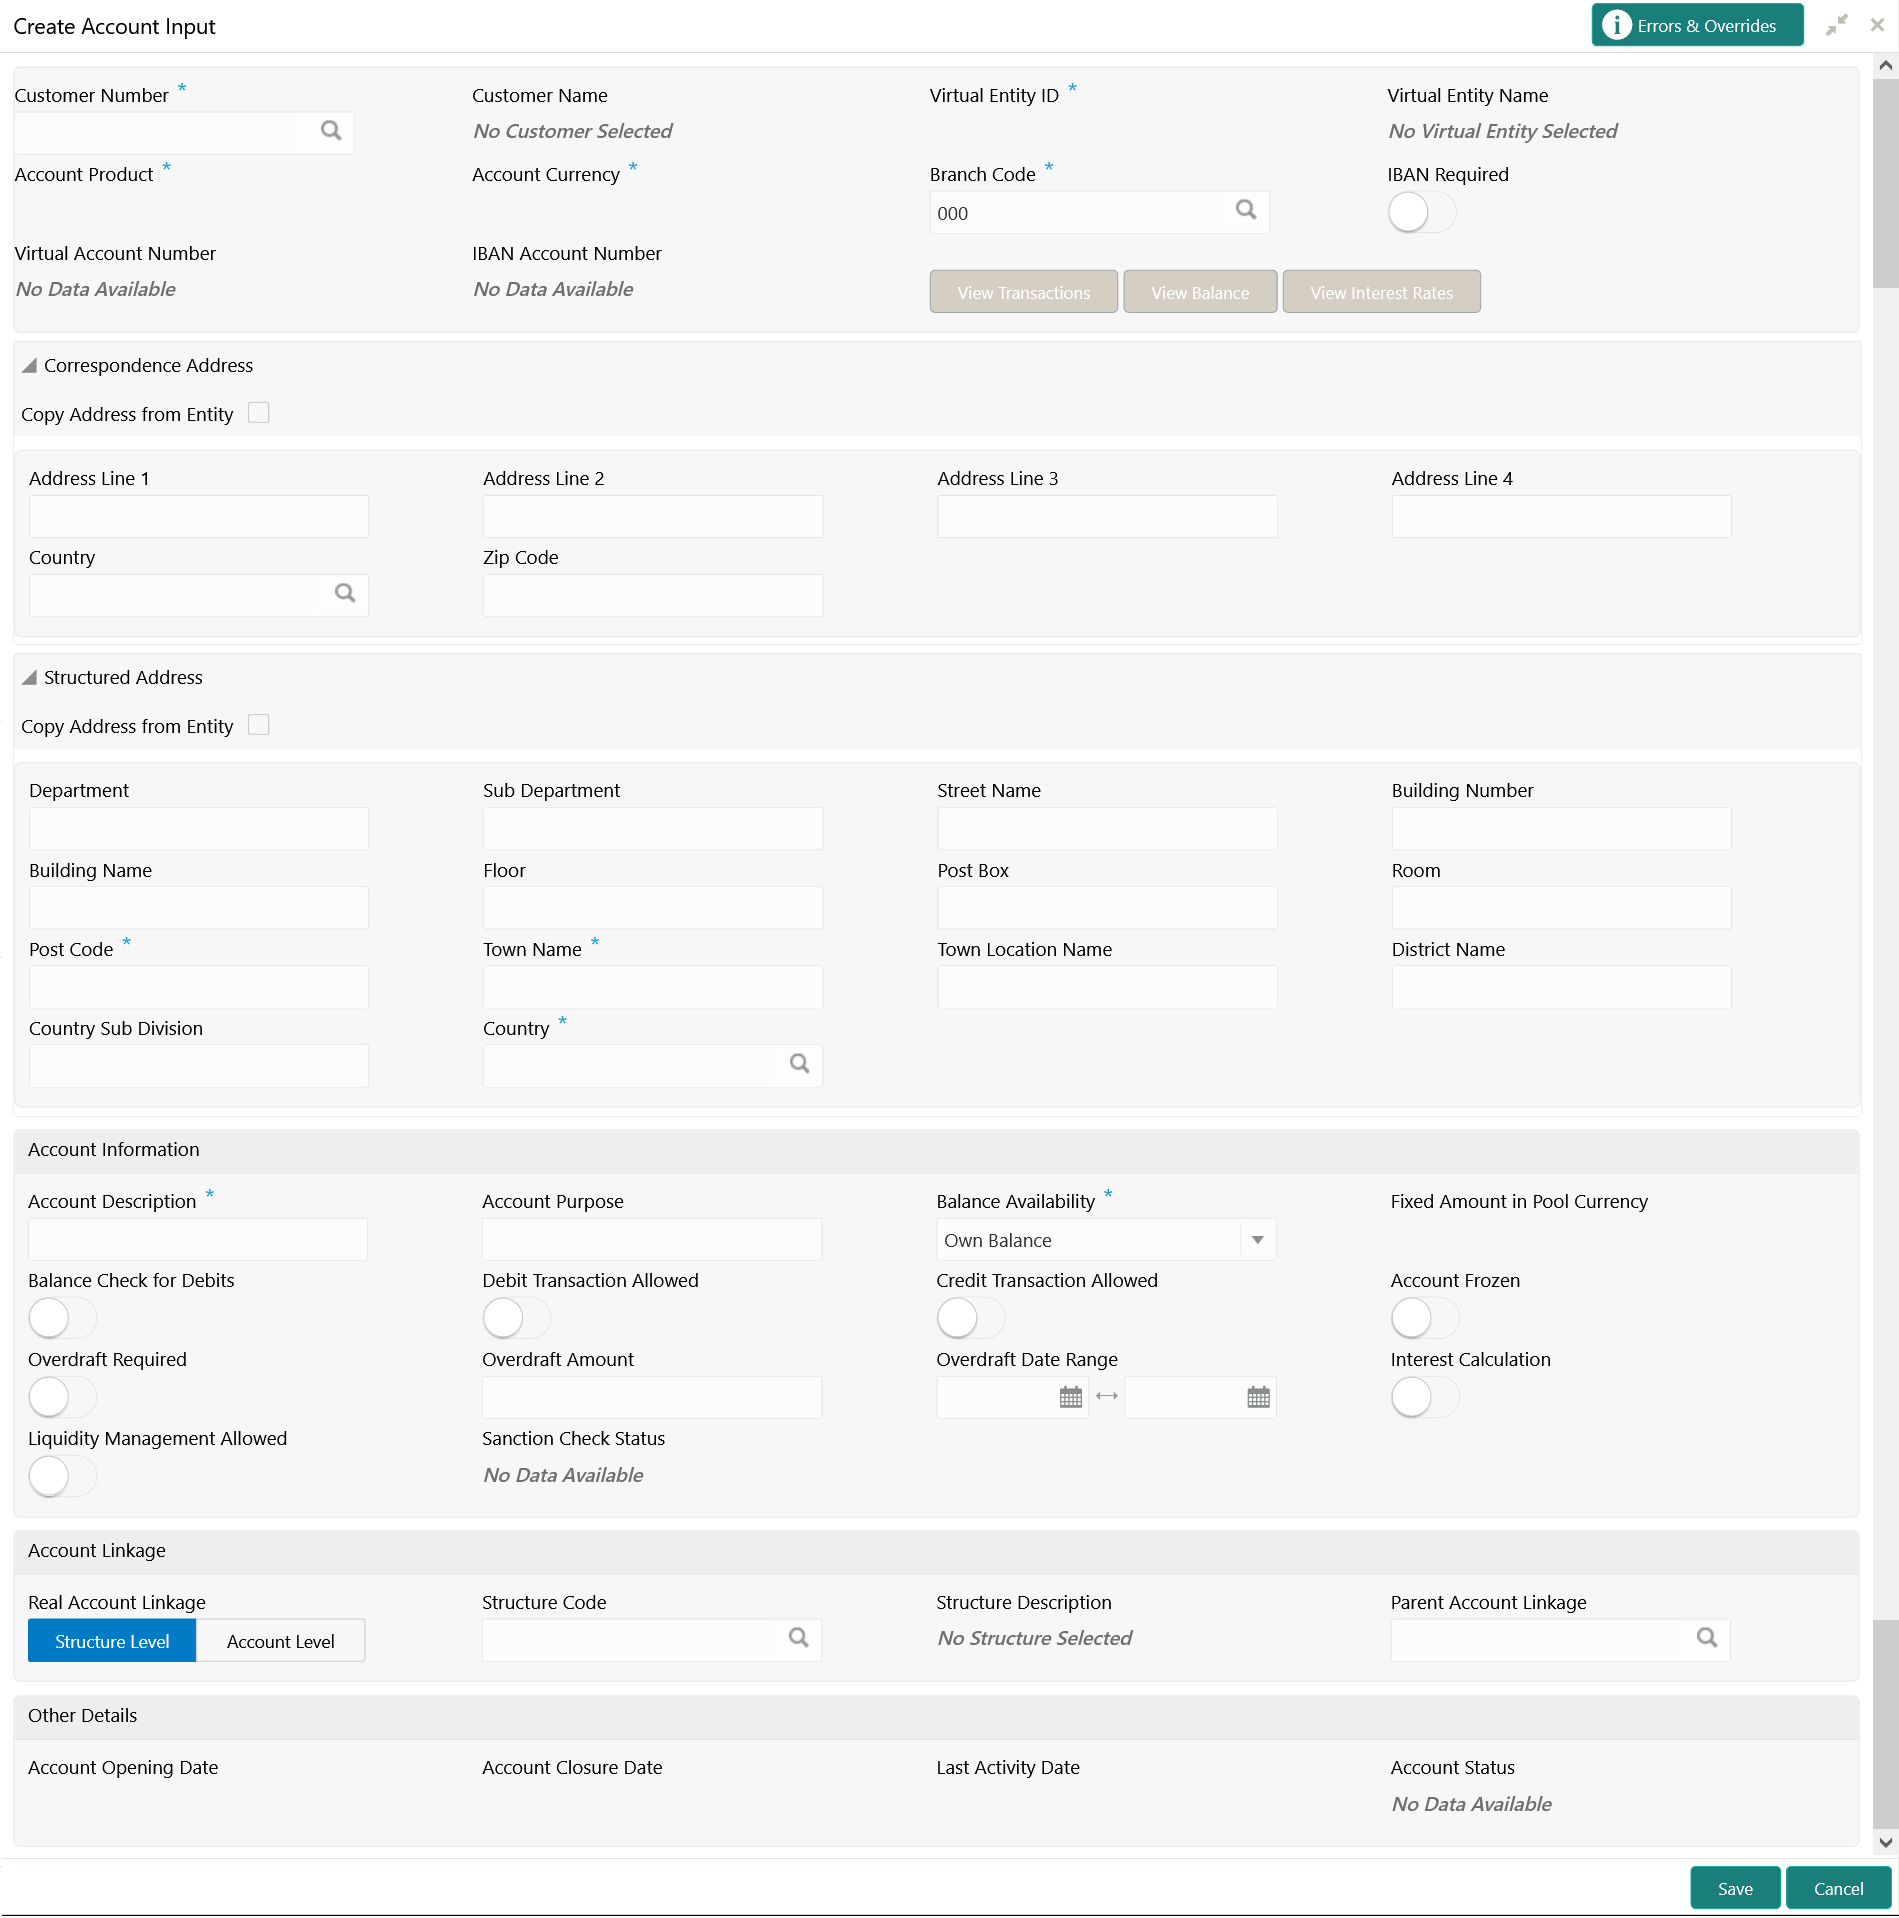
- Under Accounts, click Account Input. Under Account Input, click Create Account Input.The Create Account Input screen displays.
- Specify the fields on Create Account Input screen.For more information on fields, refer to the field description table.
Note:
The fields, which are marked with an asterisk, are mandatory.Table 8-1 Create Account Input – Field Description
Field Description Customer Number Click Search icon to view and select the required customer number. Customer Name Based on the Customer Number selected, the information is auto-populated. Virtual Entity ID Click Search icon to view and select the required virtual entity ID. Virtual Entity Name Based on the Virtual Entity ID selected, the information is auto-populated. Account Product Click Search icon to view and select the required account product. Account Currency Click Search icon to view and select the required account currency. Displays the list of currencies based on the currency restrictions configured in Customer Account Product.
Branch Code Click Search icon to view and select the required branch code. Displays the list of branches based on the Branch Restrictions configured in Create Account Facility for the customer.
IBAN Required By default, this is disabled. If enabled, indicates that an IBAN must be generated.
Virtual Account Number System generates the virtual account number based on account numbering mask and corporate specific range, if defined. - If the External Account Number is selected in Branch Parameters configuration, the system suppresses internal account number generation logic and accepts externally generated account number for the specific branch.
- If Corporate Specific Range Required is opted and the auto-generation of account number is also enabled, the system automatically allocates the virtual account numbers from the corporate specified range defined. In this case, the next incremental virtual account number from the corporate specified range will be allocated. In case a corporate has been allocated with multiple ranges, then the new virtual account number is allocated from lowest number in the defined range or ranges.
However, if all of the ranges are utilized for a corporate, the user needs to define a new corporate specific range for a given corporate. Until then, the user is not allowed to create a new virtual account for a given corporate.
- If Manual Account Number Generation is opted, the user has to manually provide account number from the corporate specific range defined.
IBAN Account Number System generates the IBAN based on IBAN numbering mask. If the External IBAN is selected in Branch Parameters configuration, system suppresses internal IBAN generation logic and accepts externally generated IBAN for the specific branch.
Copy Address from Entity Select the checkbox to copy the correspondence address captured at virtual entity level. However, you can also modify the address at the virtual account level. Address Line 1 Specify the address line 1 address details. Note:
This field is mandatory if Structured Address Applicable is not selected.Address Line 2 Specify the address line 2 address details. Address Line 3 Specify the address line 3 address details. Address Line 4 Specify the address line 4 address details. Country Click Search icon to view and select the require country. Note:
This field is mandatory if Structured Address Applicable is not selected.Zip Code Specify the zip code details of the address. Structured Address If Structured Address Applicable is selected in Create Bank Parameters, then the Structured Address is displayed to provide the required information.
Copy Address from Entity Select the checkbox to copy the structured address captured at virtual entity level. However, you can also modify the address at the virtual account level. Department Specify the department. Sub Department Specify the sub department. Street Name Specify the street name. Building Number Specify the building number. Building Name Specify the building name. Floor Specify the floor number. Post Box Specify the post box details Room Specify the room number. Post Code Specify the post code details. Town Name Specify the town name. Town Location Name Specify the location name of the town. District Name Specify the district name. Country Sub Division Specify the country sub division. Country Click Search icon to view and select the required country. This field is mandatory. Account Description This is auto-populated as virtual entity name. User can modify the auto-populated details. Account Purpose Specify the purpose of the virtual account. Balance Availability Select one of the following options: - Own Balance: This is the available balance of the virtual account including child contributions and internal limits if available.
- Pool Balance: The entire pool balance is available for this accounts irrespective of its own balance.
- Own Balance and Fixed Amount from Pool: Sum of own balance as mentioned above and a fixed amount from the pool balance. If Own Balance and Fixed Amount from Pool is selected, the Fixed Amount in Pool Currency field is available to provide the fixed amount.
Fixed Amount in Pool Currency Specify the fixed amount in the pool currency. Balance Check for Debits This is defaulted from the account product used. The default value can be modified. Debit Transaction Allowed This is defaulted from the account product used. Note:
This option can be disabled, but cannot enable it.Credit Transaction Allowed This is defaulted from the account product used. Note:
This option can be disabled, but cannot enable it.Account Frozen By default, this is disabled. If selected, indicates if the account is frozen.
Overdraft Required This is defaulted from the account product used. Note:
This option can be disabled, but cannot enable it.Overdraft Amount Specify the fixed amount that can be overdrawn by the account. This is applicable if overdraft is allowed. Interest Calculation This is defaulted from the account product used. Note:
This option can be disabled, but cannot enable it.Liquidity Management Allowed This is defaulted from the account product used. This option can be disabled but cannot enable. If enabled, the virtual accounts will be automatically created as Liquidity accounts in Oracle Banking Liquidity Management during Virtual Account creation. Note:
Any maintenances on virtual accounts in Oracle Banking Virtual Account Management or liquidity accounts in Oracle Banking Liquidity Management will have independent life cycles in the respective systems.Sanction Check Status System displays the sanction check status for the virtual account. The available options are :- Success
- Failed
- Pending
- Not Required
Note:
During the virtual account creation or modification, the Sanction Check Status is marked as Pending by default, if the Sanction Check Required is selected while configuring the bank parameters. If the customer is exempted from the sanction check, the Sanction Check Status is marked as Not Required. However, the user can update the sanction check status from Update Sanction Status.Real Account Linkage Select one of the options: - Structure Level: If selected, indicates that the real account for this virtual account is linked at the structure level.
- Account Level: If selected, indicates that the real account for this virtual account is linked at the account level.
Structure Code Specify the structure code to link the virtual account to an existing structure of the customer. This field is displayed if Real Account Linkage is selected as Structure Level.
Structure Description Based on the Structure Code selected, the information is auto-populated. This field is displayed if Real Account Linkage is selected as Structure Level.
Parent Account Linkage Select the required parent virtual account number from the drop-down list for linking the virtual account. The list of parent virtual accounts is based on the structure code selected. This field is displayed if Real Account Linkage is selected as Structure Level.
Real Account Number Click Search icon to view and select the required real account number, if real account linkage is at the account level. This field is displayed if Real Account Linkage is selected as Account Level.
Real Account Branch Based on the Real Account Number selected, the information is auto-populated. This field is displayed if Real Account Linkage is selected as Account Level.
Real Account Currency Based on the Real Account Number selected, the information is auto-populated. This field is displayed if Real Account Linkage is selected as Account Level.
Account Opening Date Displays the account opening date for the virtual account. Account Closure Date Displays the account opening date for the virtual account. Last Activity Date Displays the last date on which a transaction was performed for the virtual account. Account Status Displays the current account status for the virtual account.
Account Transactions Enquiry
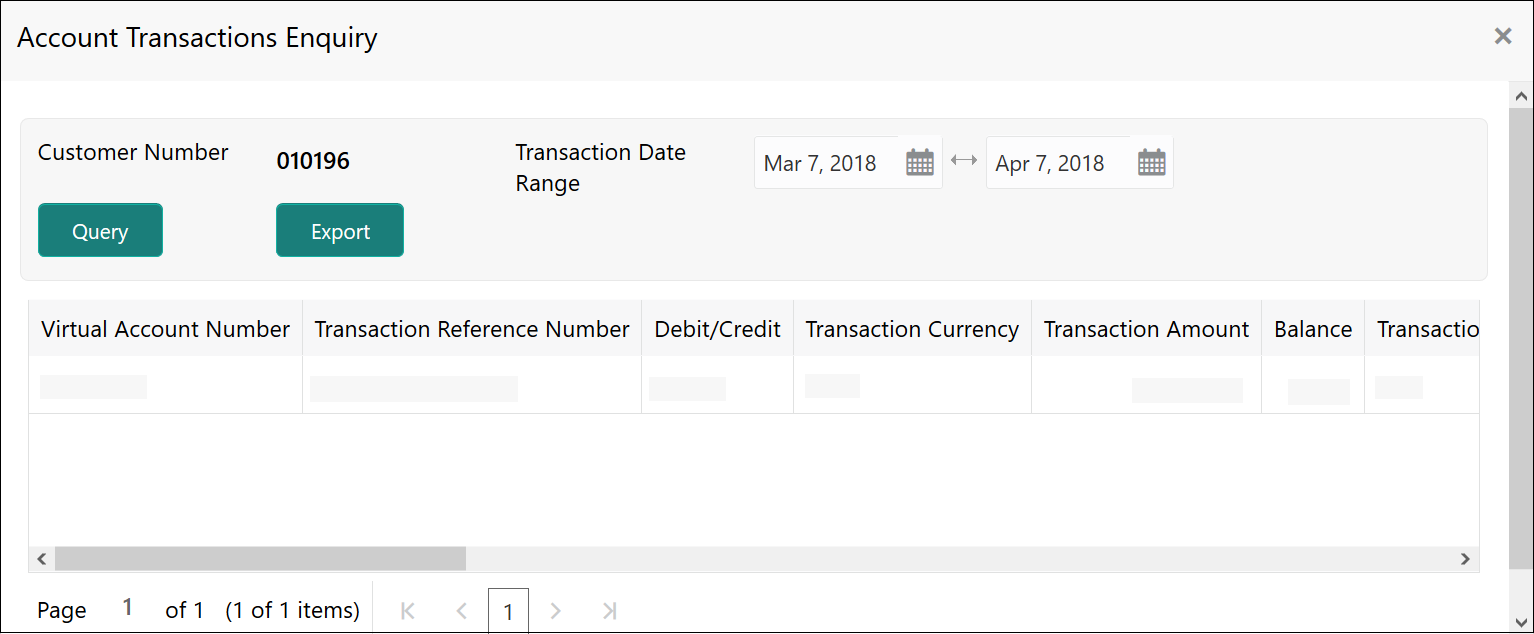
The Account Transactions Enquiry screen enables the user to view the virtual account transactions.
- On Create Account Input screen, select an account for which the user want to view the account transactions. The respective screen opens with the account details.
- Click View Transactions.The Account Transactions Enquiry screen displays.
Note:
By default, the last one month transactions are auto-populated. - Select the Transaction Date Range and click Query to view the list of transactions.For more information on fields, refer to the field description table.
Table 8-2 Account Transactions Enquiry – Field Description
Field Description Virtual Account Number Displays the virtual account number. Transaction Reference Number Displays the transaction reference number. Debit/Credit Indicates whether it is debit/credit transaction. Transaction Currency Displays the transaction currency. Transaction Amount Displays the transaction amount. Balance Displays the account balance. Transaction Code Displays the transaction code. Transaction Date Displays the transaction date. Value Date Displays the value date. Additional Information Displays the additional information about the transaction. Reconciliation Reference Number Displays the reconciliation reference number. Exchange Rate Displays the exchange rate. Real Account Displays the real account number. Real Account CCY Displays the real account currency. Real Account Branch Displays the branch of the real account number. Real Transaction Exchange Rate Displays the transaction exchange rate. Real Transaction Amount Displays the transaction amount in real account currency. Source Code Displays the source of transaction. Transaction Type Displays the transaction type. - Click Export to export the transaction details in .csv format.
Account Balance Details
After saving a record, the user can navigate to View Account Input screen and View Account Structure screen to view the account balance details.
- On Create Account Input screen, select an account for which the user want to view the account balance details. The respective screen opens with the configured details.
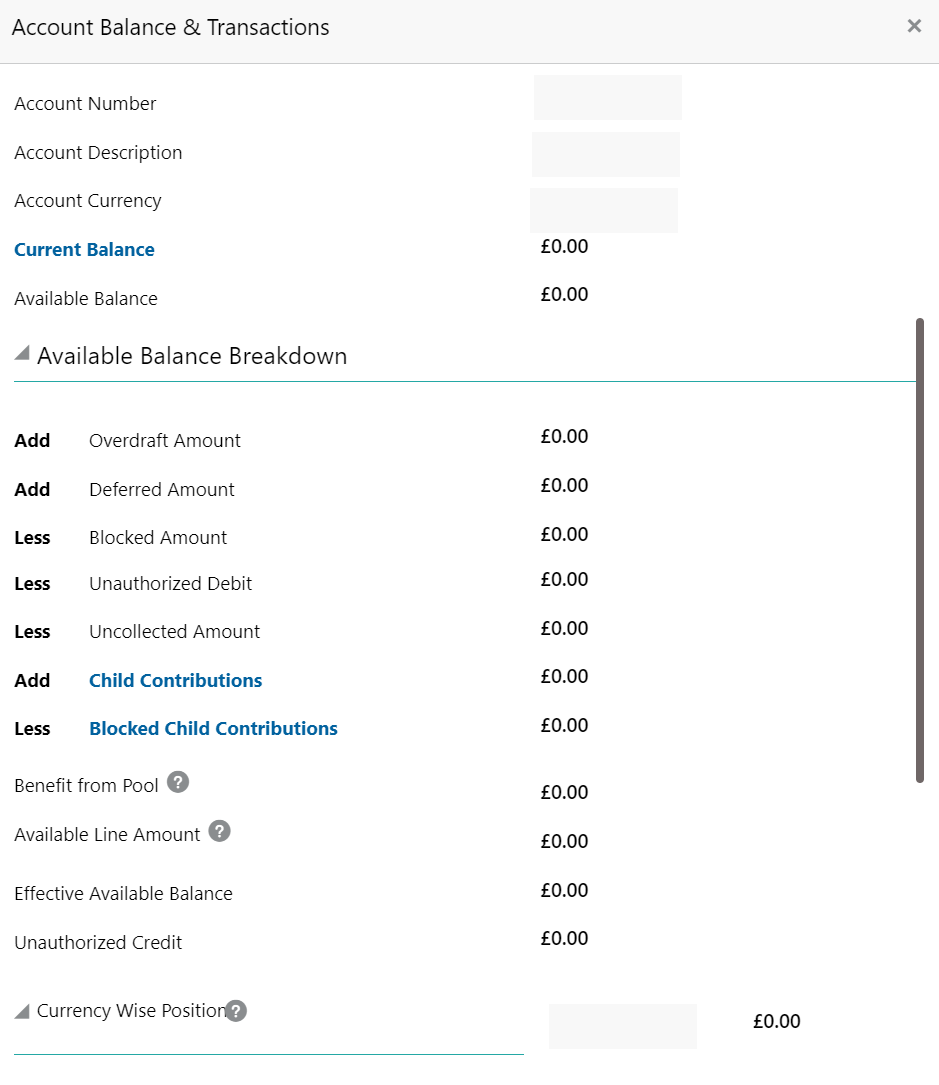
- Click View Balance.The Account Balance and Transactions screen displays.For more information on fields, refer to the field description table.
Figure 8-3 Account Balance and Transactions
Table 8-3 Account Balance and Transactions - Field Description
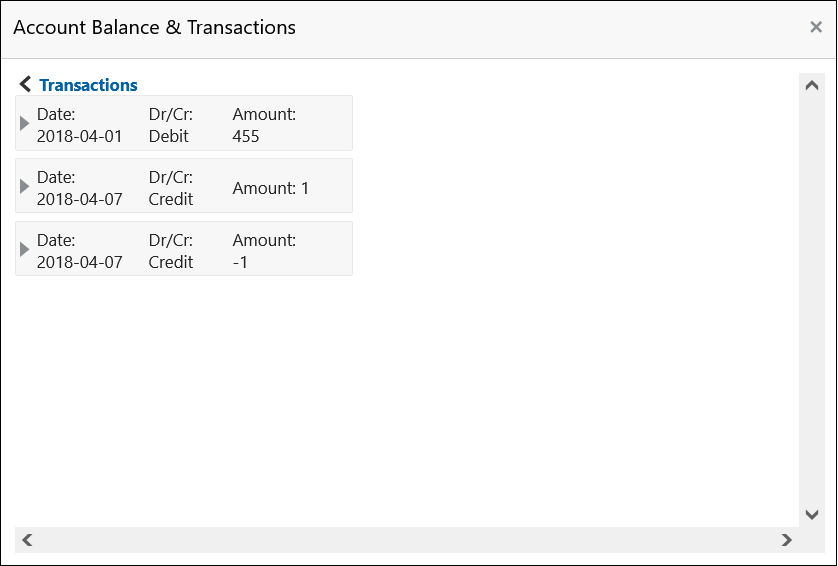
Field Description Account Number Displays the account number. Account Description Displays the account description. Account Currency Displays the account currency. Current Balance Displays the current balance. Available Balance Displays the available balance. Overdraft Amount Displays the overdraft amount. Deferred Amount Displays the deferred amount. Blocked Amount Displays the blocked amount. Unauthorized Debit Displays the unauthorized debit. Uncollected Amount Displays the uncollected amount. Child Contributions Displays the child account contribution. Blocked Child Contributions Displays the blocked child account contribution. Benefit from Pool Displays the benefit from the pool. Available Line Amount Displays the Available line amount. Effective Available Balance Displays the effective available balance. Unauthorized Credit Displays the unauthorized credit. Currency Wise Position Displays the currency wise position. - Click Current Balance.The Account Balance and Transactions - Transactions screen displays with the last one month’s transactions listed.
Figure 8-4 Account Balance and Transactions - Transactions
For more information on fields, refer to the field description table.Table 8-4 Account Balance and Transactions - Transactions - Field Description
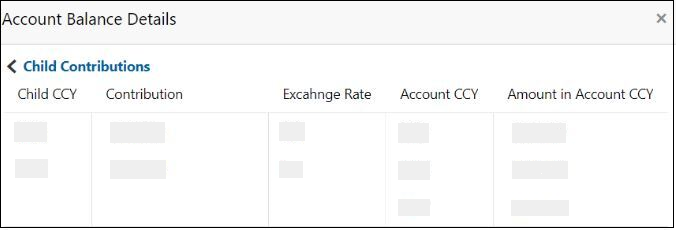
Field Description Date Displays the transaction date. Dr/Cr Displays the transaction type whether the transaction is Credit or Debit. Amount Displays the transaction amount. - Click Child Contributions.The Account Balance Details - Child Contributions screen displays with currency wise consolidated child contributions along with the applied exchange rate used for conversion for accounts in a structure.For more information on fields, refer to the field description table.
Figure 8-5 Account Balance Details - Child Contributions
Table 8-5 Account Balance Details - Child Contributions - Field Description
Field Description Child CCY Displays the child contribution currency. Contribution Displays the child contribution amount for a specific currency. Exchange Rate Displays the exchange rate applied to derive the equivalent amount in parent account currency. Account CCY Displays the parent account currency. Amount in Account CCY Displays the child contribution equivalent amount in parent account currency. - Click Blocked Contributions.The Account Balance Details - Blocked Contributions screen displays with currency wise consolidated child blocked contributions along with the applied exchanged rate used for conversion for accounts part of a structure.For more information on fields, refer to the field description table.
Table 8-6 Account Balance Details - Blocked Contributions - Field Description
Field Description Child CCY Displays the blocked child contribution currency. Contribution Displays the blocked child contribution amount for a specific currency. Exchange Rate Displays the exchange rate applied to derive the equivalent amount in parent account currency. Account CCY Displays the parent account currency. Amount in Account CCY Displays the blocked child contribution equivalent amount in parent account currency. - Click Close icon to close and navigate back to the selected screen.
Interest Rates
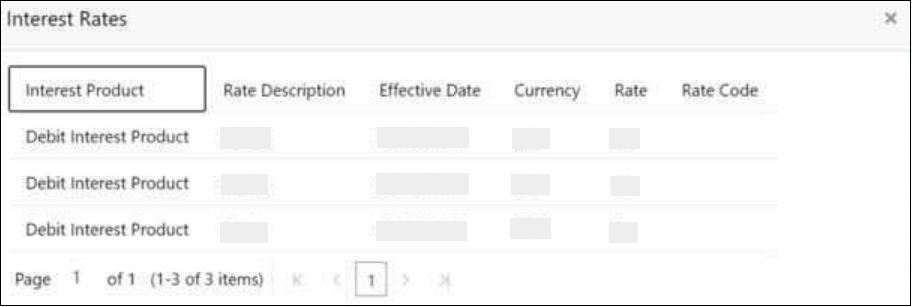
The Interest Rates screen enables the user to view the interest rates of virtual account. The View Interest Rates button is enabled only if Interest Calculations is selected during the virtual account opening.
- On Create Account Input screen, Click View Interest Rates.The Interest Rates screen displays. For more information on fields, refer to the field description table.
Table 8-7 Interest Rates - Field Description
Field Description Interest Product Displays the interest product. Rate Description Displays the interest rate description. Effective Date Displays the effective date. Currency Displays the currency of the interest product. Rate Displays the interest rate. Rate Code Displays the rate code. - Click Close icon to close and navigate back to the selected screen.
- Click Save to save the details.The user can view the configured account details in the View Account Input.
Parent topic: Account Input
