- Customer and Accounts User Guide
- Customer Account Product
- Create Customer Account Product
4.1 Create Customer Account Product
This topic describes the systematic instructions to configure the account products for a customer.
- On Home screen, click Virtual Account Management. Under Virtual Account Management, click Customer.
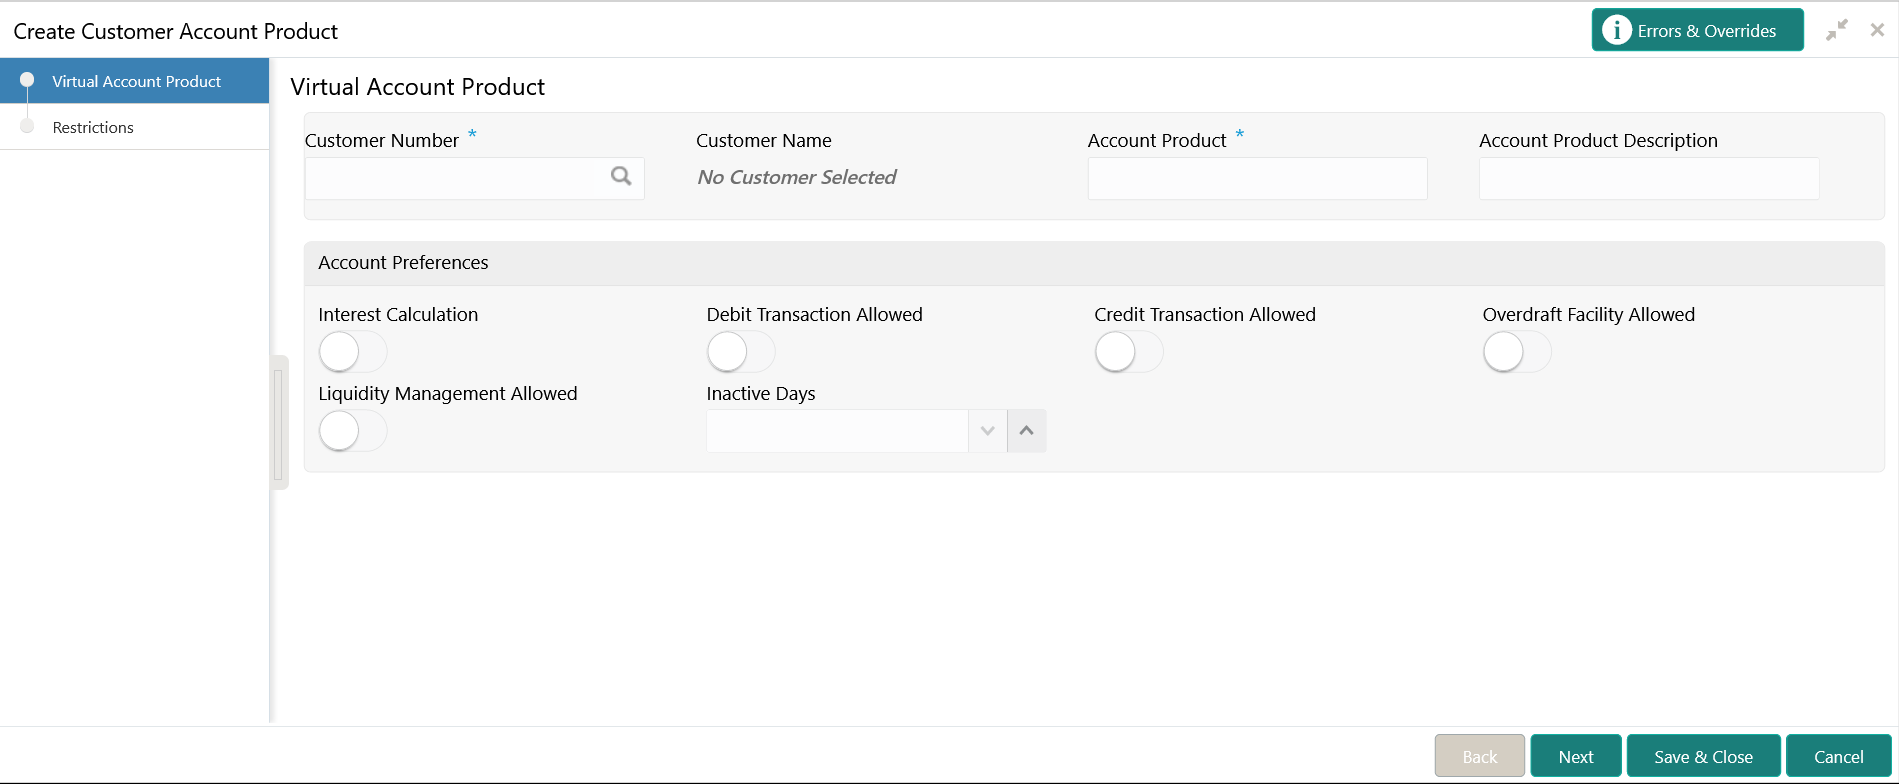
- Under Customer, click Customer Account Product. Under Customer Account Product, click Create Customer Account Product.The Create Customer Account Product - Virtual Account Product screen displays.
Figure 4-1 Create Customer Account Product - Virtual Account Product
- Specify the fields on Create Customer Account Product - Virtual Account Product screen.For more information on fields, refer to the field description table.
Note:
The fields, which are marked with an asterisk, are mandatory.Table 4-1 Create Customer Account Product - Virtual Account Product – Field Description
Field Description Customer Number Click Search icon to view and select the required customer number. Customer Name Based on the Customer Number selected, the information is auto-populated. Account Product Specify a name for the account product. Account Product Description Specify additional information about the account product. Interest Calculation By default, this is disabled. If enabled, indicates if interest calculation is required for the virtual accounts created under this product, and Interest Group Mapping screen is visible.
Debit Transaction Allowed By default, this is disabled. If enabled, indicates if the debit transactions are allowed for the virtual accounts created under this product.
Credit Transaction Allowed By default, this is disabled. If enabled, indicates if the credit transactions are allowed for the virtual accounts created under this product.
Overdraft Facility Allowed By default, this is disabled. If enabled, indicates if the overdrafts are allowed for the virtual accounts created under this product.
Liquidity Management Allowed By default, this is disabled. If enabled, indicates if the virtual accounts created under this product are allowed to be created as Liquidity Management accounts in Oracle Banking Liquidity Management.
Inactive Days Select the number of days to indicate after how many days of inactivity, the account must be marked inactive.
Restrictions
The Restrictions screen allows the user to configure product restrictions.
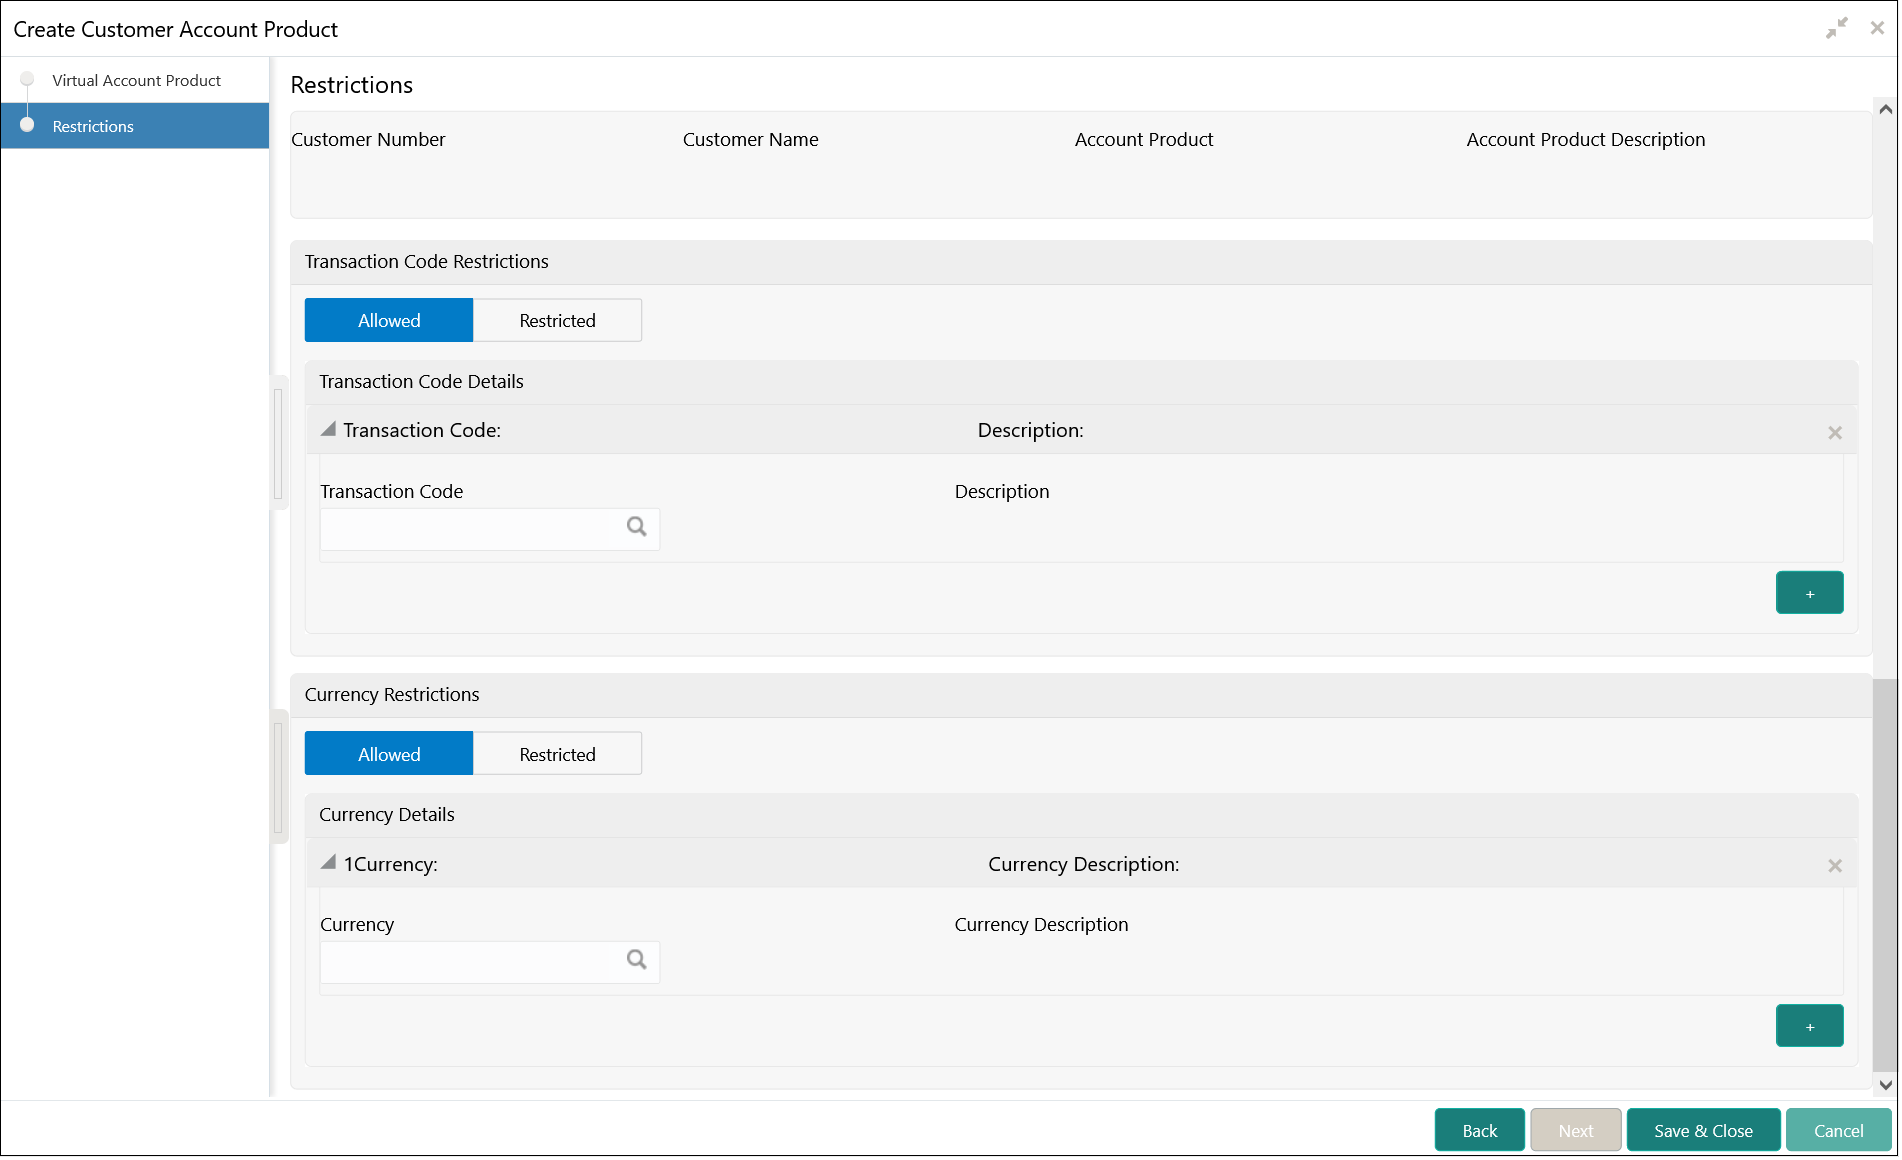
- Click Next.The Create Customer Account Product - Restrictions screen displays.
Figure 4-2 Create Customer Account Product - Restrictions
- Specify the fields on Create Customer Account Product - Restrictions screen.For more information on fields, refer to the field description table.
Note:
The fields, which are marked with an asterisk, are mandatory.Table 4-2 Create Customer Account Product - Restrictions – Field Description
Field Description Customer Number Based on the Customer Number selected in the Virtual Account Product screen, the information is auto-populated. Customer Name Based on the Customer Name selected in the Virtual Account Product screen, the information is auto-populated. Account Product Based on the Account Product selected in the Virtual Account Product screen, the information is auto-populated. Account Product Description Based on the Account Product Description selected in the Virtual Account Product screen, the information is auto-populated. Allowed / Restricted Select one of the options. This is used for allowing or not allowing transaction codes for virtual accounts opened under this product.
Transaction Code Click Search to view and select the required transaction code. To create a new transaction code, refer to Transaction Code Maintenance in the Common Core User Guide.
Description Based on the Transaction Code selected, the information is auto-populated. Allowed / Restricted Select one of the options. This is used for allowing or not allowing currencies for which the virtual accounts can be opened under this product.
Currency Click Search to view and select the required currency. To define a new currency, refer to Currency Definition topic in the Common Core User Guide.
Currency Description Based on the Currency selected, the information is auto-populated. - Click + to add a row and provide the required details.
Interest Group Mapping
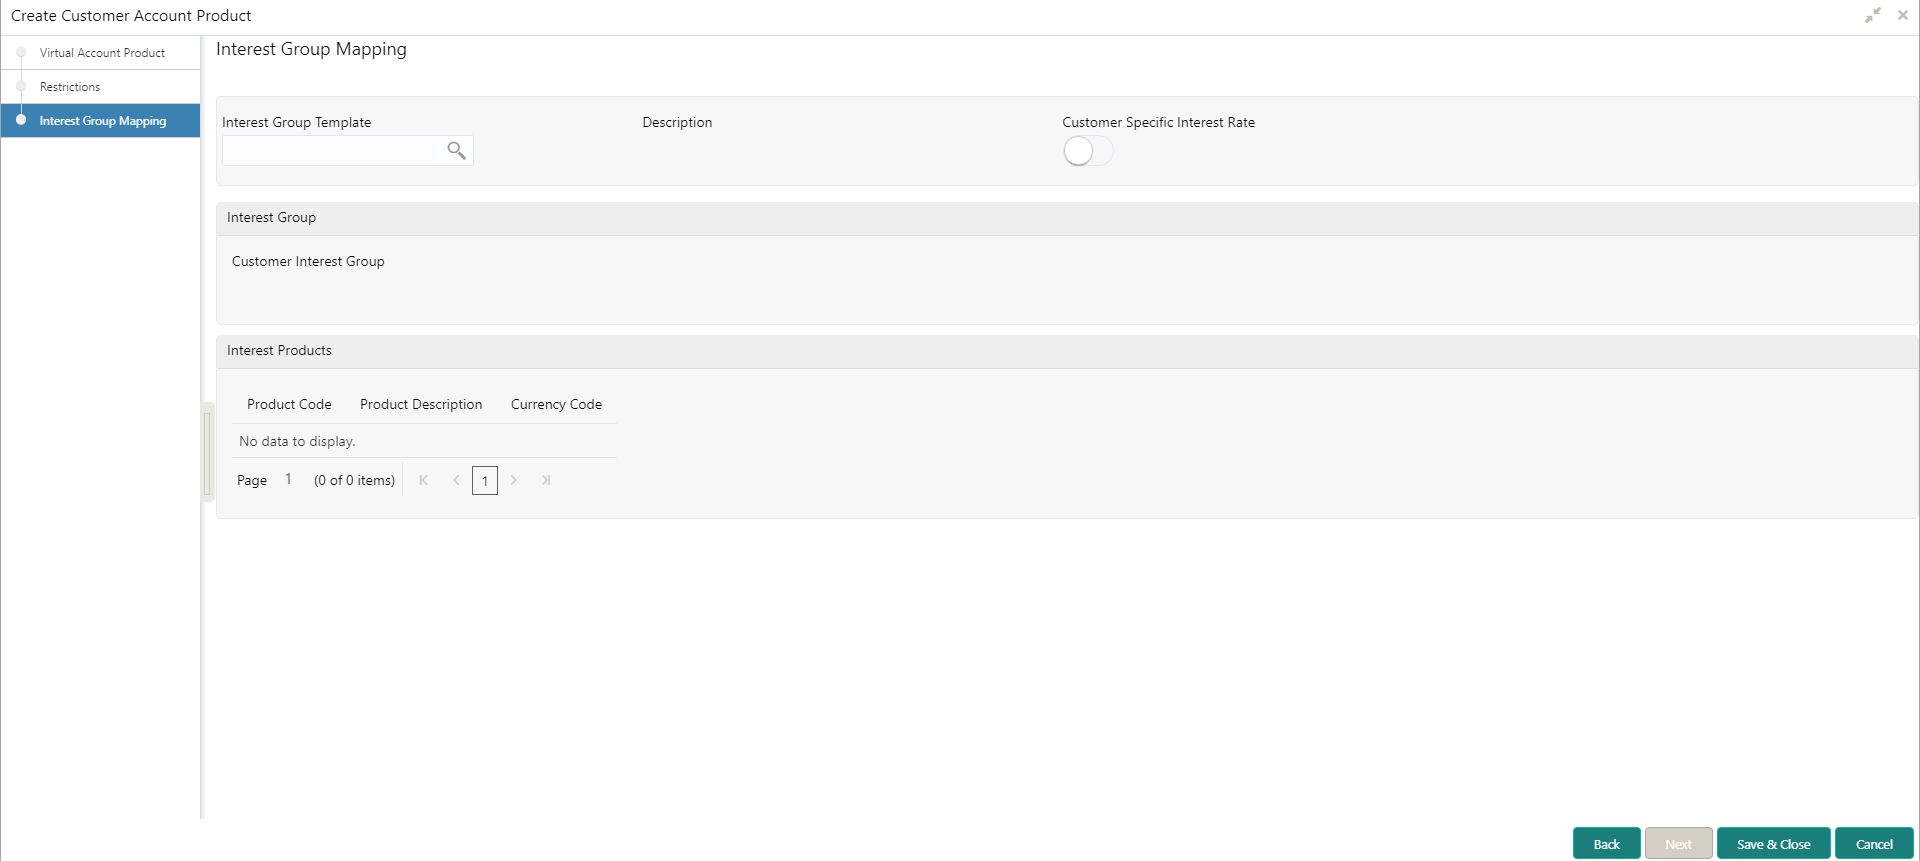
The Interest Group Mapping screen allows the user to map a Customer Virtual Account Product to an interest group. This screen displays only if the Interest Calculation is enabled in Virtual Account Product screen.
- Enable the Interest Calculation and click Next.The Create Customer Account Product - Interest Group Mapping screen displays.
Figure 4-3 Create Customer Account Product - Interest Group Mapping
- Specify the fields on Create Customer Account Product - Interest Group Mapping screen.For more information on fields, refer to the field description table.
Note:
The fields, which are marked with an asterisk, are mandatory.Table 4-3 Create Customer Account Product - Interest Group Mapping – Field Description
Field Description Interest Group Template Click Search icon to view and select the required interest group template. Displays the list of all the bank level Interest groups maintained in IC. Description Based on the Interest Group Template selected, the information is auto-populated. Customer Specific Rate By default, this is disabled. If enabled, indicates if a customer specific interest group needs to be maintained.
Customer Interest Group Displays the customer interest group. Note:
If Corporate Specific Rate is selected, a new Customer Interest group is created and mapped to the Customer and Virtual Account product in IC else the Interest Group template selected is mapped. The Interest products is based on the Interest Group template selected.Interest Products Displays a list of interest product/s mapped to selected Interest Group Template. Product Code Displays the Interest Product Code. Product Description Displays the Interest Product Description. Currency Code Displays the currency of Interest Product. - Click Save and Close.The user can view the configured account product details in the View Customer Account Product.
Parent topic: Customer Account Product


