- Customer and Accounts User Guide
- Virtual Entity
- Create Virtual Entity
Create Virtual Entity
This topic describes the systematic instructions to configure the virtual entity and its preferences.
- On Home screen, click Virtual Account Management. Under Virtual Account Management, click Customer.
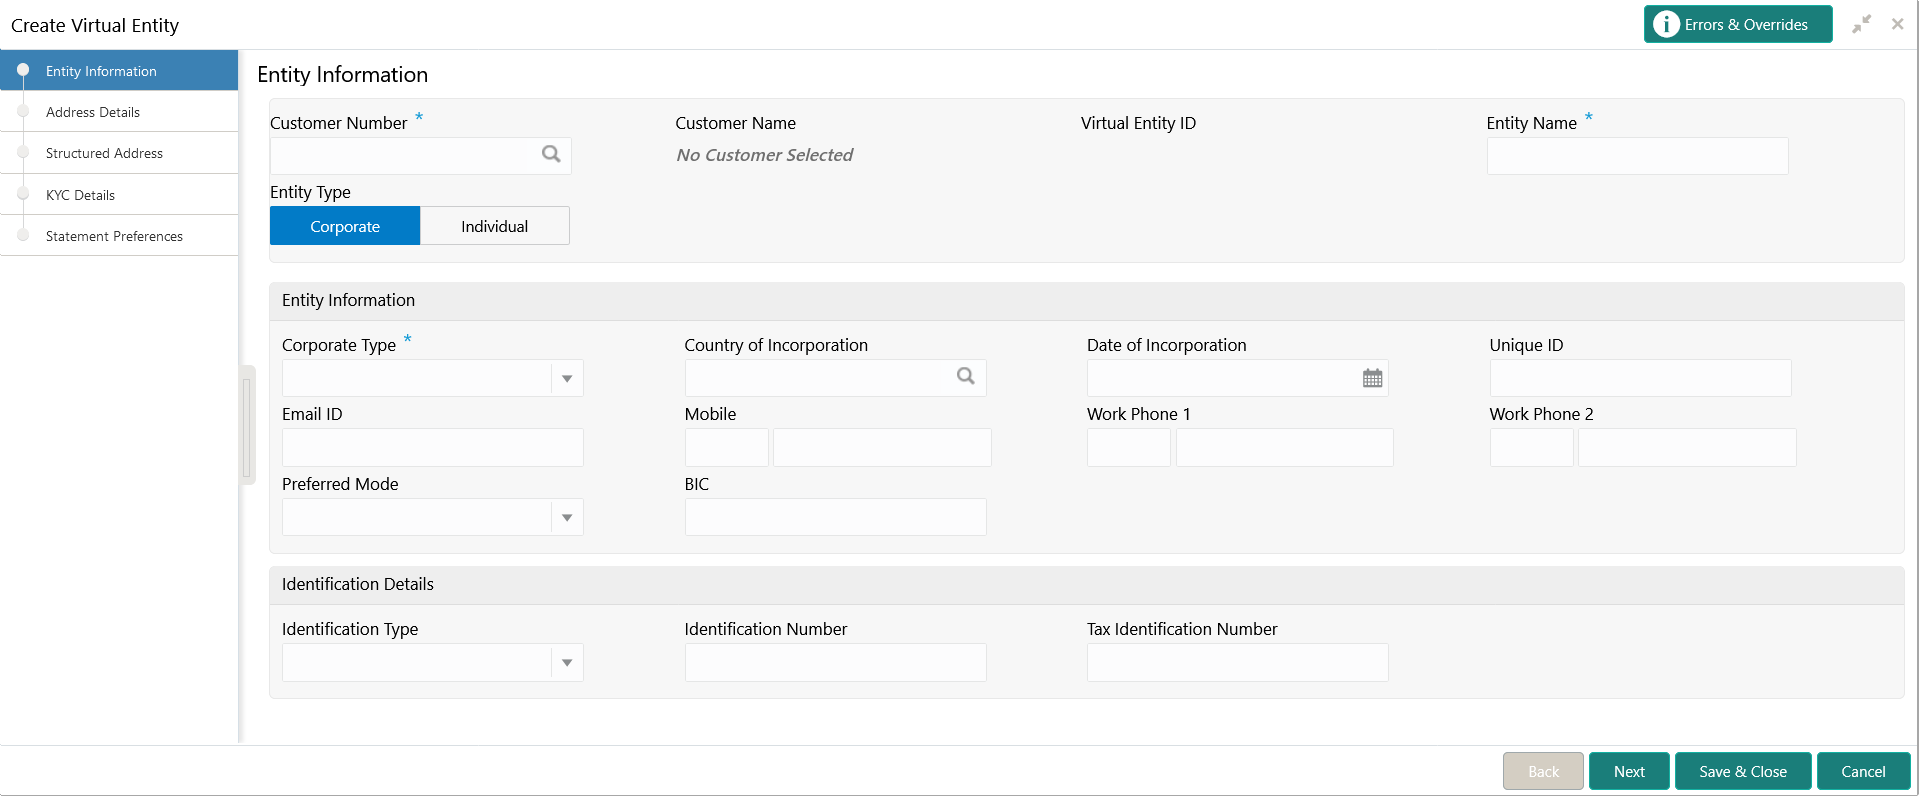
- Under Customer, click Virtual Entity. Under Virtual Entity, click Create Virtual Entity.The Create Virtual Entity - Entity Information screen displays.
Figure 5-1 Create Virtual Entity - Entity Information
- Specify the fields on Create Virtual Entity - Entity Information screen.For more information on fields, refer to the field description table.
Note:
The fields, which are marked with an asterisk, are mandatory.Table 5-1 Create Virtual Entity - Entity Information – Field Description
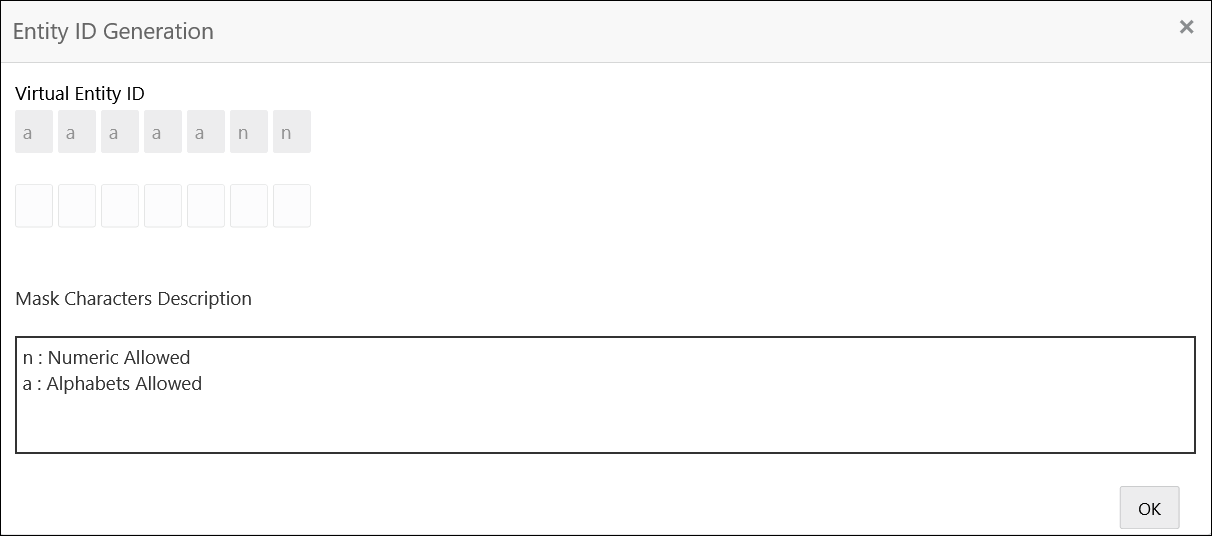
Field Description Customer Number Click Search icon to view and select the required customer number. Customer Name Based on the Customer Number selected, the information is auto-populated. Virtual Entity ID This field is disabled. Once the record is saved, an Entity ID Generation screen appears, where you can provide the information.
Entity Name Specify a name for the entity. Entity Type Select one of the following: - Corporate: If selected, the record configured is for a corporate entity.
- Individual: If selected, the record configured is for an individual entity.
Note:
Depending on the Entity Type selected, the Entity Information appears with different fields.Corporate Type Select the corporate type. The available options are: - Corporation
- Partnership
- Sole Proprietorship
- Micro Business
Note:
- The drop down values can be updated at bank level as a part of Day 0 setup.
- This field appears only if the Entity Type is selected as Corporate.
Country of Incorporation Click Search icon to view and select the required country for which you want to incorporate the virtual entity. Note:
This field appears only if the Entity Type is selected as Corporate.Date of Incorporation Select a date of incorporation from the drop-down calendar. Note:
This field appears only if the Entity Type is selected as Corporate.Unique ID Specify an unique ID for the virtual entity. Note:
This field appears only if the Entity Type is selected as Corporate.Email ID Specify the customer Email ID. Note:
This field appears only if the Entity Type is selected as Corporate.Mobile Specify the customer contact number. Note:
This field appears only if the Entity Type is selected as Corporate.Work Phone 1-2 Specify the customer work contact number. Note:
This field appears only if the Entity Type is selected as Corporate.Preferred Mode Select one of the following: - Mobile: If selected, mobile is the preferred mode to contact the customer.
- Email: If selected, Email is the preferred mode to contact the customer.
Note:
This field appears only if the Entity Type is selected as Corporate.BIC Specify the business identifier code. Note:
This field appears only if the Entity Type is selected as Corporate.First Name Specify the first name of an individual. Note:
This field appears only if the Entity Type is selected as Individual.Middle Name Specify the middle/maiden name of an individual. Note:
This field appears only if the Entity Type is selected as Individual.Last Name Specify the last name/surname of an individual. Note:
This field appears only if the Entity Type is selected as Individual.Date of Birth Select a DOB of the individual from the drop-down calendar. Note:
This field appears only if the Entity Type is selected as Individual.Gender Select a gender from the drop-down list. Note:
This field appears only if the Entity Type is selected as Individual.Nationality Click Search icon to view and select the required nationality. Note:
This field appears only if the Entity Type is selected as Individual.National ID Specify a national ID. Note:
This field appears only if the Entity Type is selected as Individual.Home Phone Specify the residential contact number of the individual. Note:
This field appears only if the Entity Type is selected as Individual.Work Phone Specify the official contact number of the individual. Note:
This field appears only if the Entity Type is selected as Individual.Mobile Specify contact number of the individual. Note:
This field appears only if the Entity Type is selected as Individual.Email ID Specify Email ID of the individual. Note:
This field appears only if the Entity Type is selected as Individual.Preferred Mode Select one of the following: - Mobile: If selected, mobile is the preferred mode to contact the customer.
- Email: If selected, Email is the preferred mode to contact the customer.
Note:
This field appears only if the Entity Type is selected as Individual.Identification Type Select an identification type from the drop-down list. The available options are:- National ID
- Passport
- SSN
Note:
The drop down values can be updated at bank level as a part of Day 0 setupIdentification Number Specify an identification number. Tax Identification Number Specify a tax identification number. - Click Next.The Entity ID Generation popup screen displays.
- Specify the required Entity ID in the format displayed.To create a new entity ID format, refer to Entity Mask Configuration Maintenance in the Configuration User Guide.
- Click OK to save the entity ID.
Address Details:
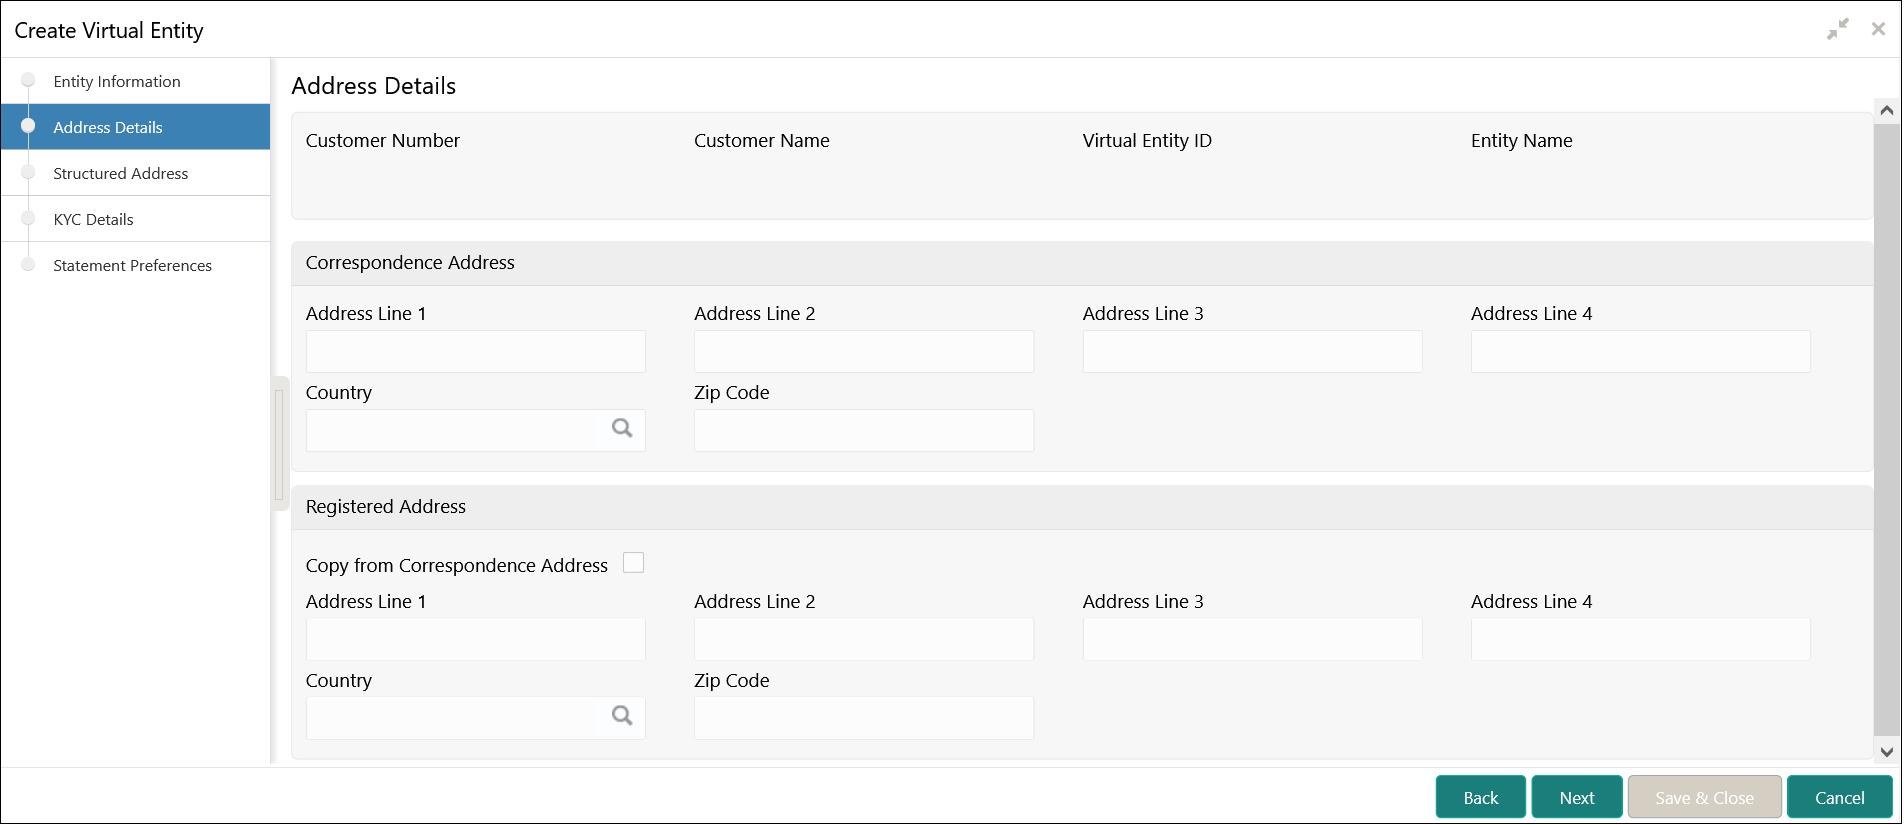
The Address Details screen allows the user to capture the address details for a customer.
- Click Next.The Create Virtual Entity - Address Details screen appears.
Figure 5-3 Create Virtual Entity - Address Details
- Specify the fields on Create Virtual Entity - Address Details screen.For more information on fields, refer to the field description table.
Note:
The fields, which are marked with an asterisk, are mandatory.Table 5-2 Create Virtual Entity - Address Details – Field Description
Field Description Customer Number Displays the customer number. Customer Name Displays the customer name. Virtual Entity ID Displays the Virtual Entity ID. Entity Name Displays the name of the entity. Address Line 1 Specify the address line 1 of the correspondence address. Note:
This field is mandatory if Structured Address Applicable is not selected.Address Line 2 Specify the address line 2 of the correspondence address. Address Line 3 Specify the address line 3 of the correspondence address. Address Line 4 Specify the address line 4 of the correspondence address. Country Click Search icon to view and select the require country of the correspondence address. Note:
This field is mandatory if Structured Address Applicable is not selected.Zip Code Specify the zip code details of the correspondence address. Copy from Correspondence Address Select the checkbox to copy the address from the correspondence address to registered address. Address Line 1 Specify the address line 1 of the registered address. Note:
This field is mandatory if Structured Address Applicable is not selected.Address Line 2 Specify the address line 2 of the registered address. Address Line 3 Specify the address line 3 of the registered address. Address Line 4 Specify the address line 4 of the registered address. Country Click Search icon to view and select the require country of the registered address. Note:
This field is mandatory if Structured Address Applicable is not selected.Zip Code Specify the zip code details of the registered address.
Structured Address
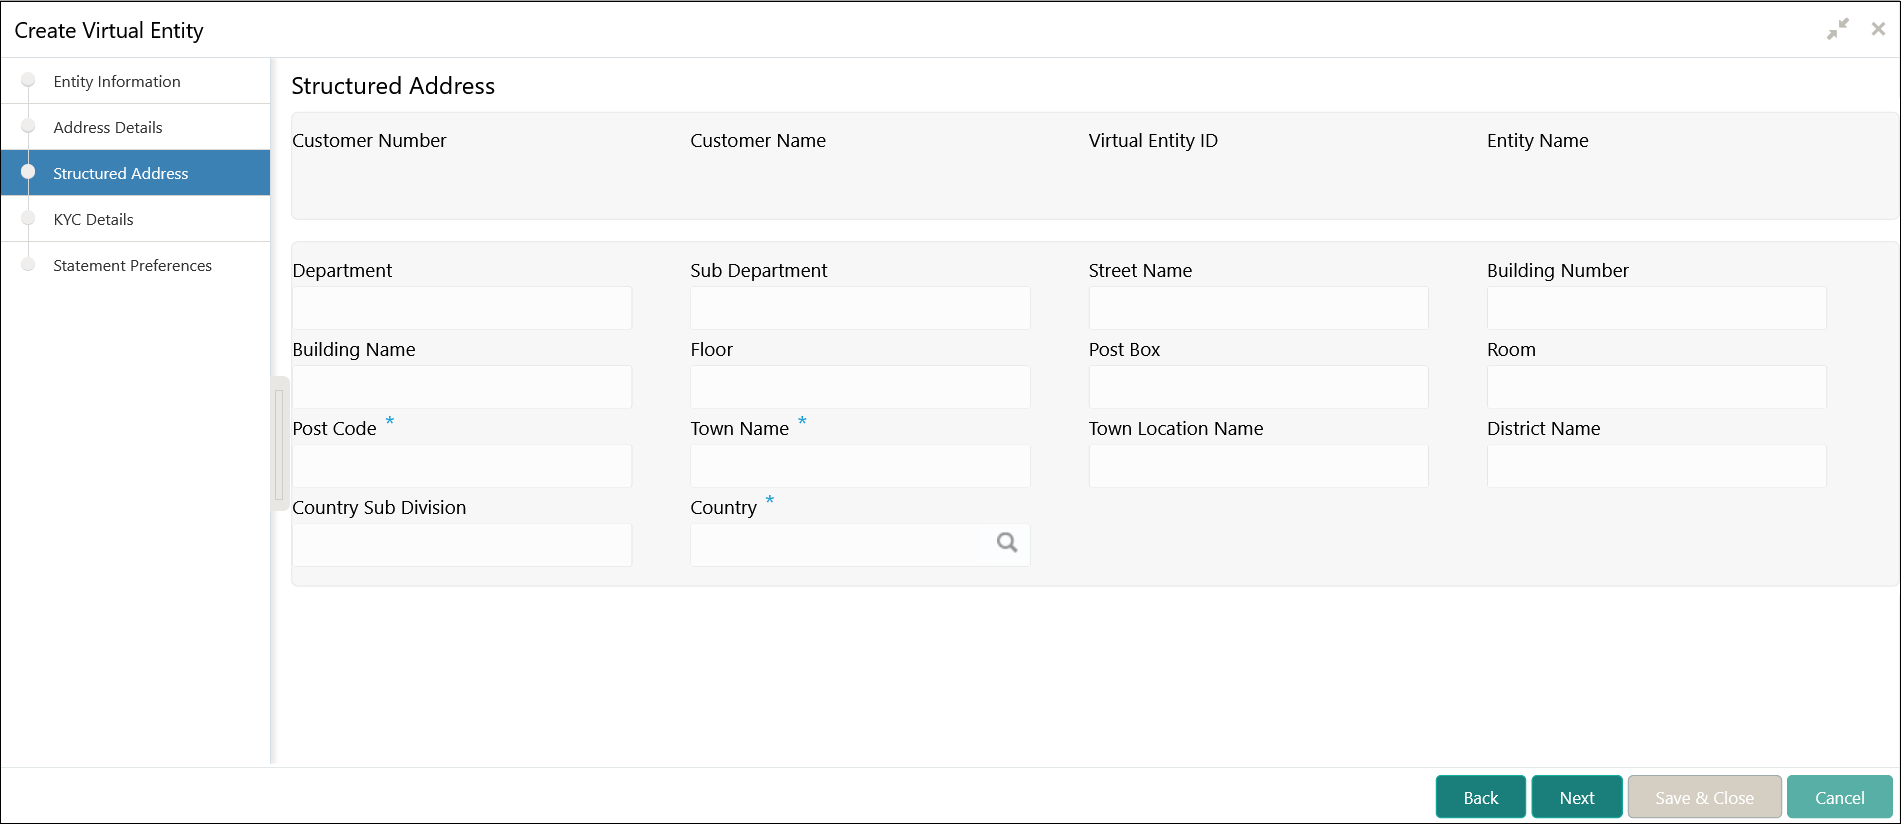
The Structured Address screen allows the user to capture the address details of a customer in a structured format.
If Structured Address Applicable is selected in Create Bank Parameters screen, then Structured Address is visible to provide the required information.
- Click Next.The Create Virtual Entity - Structured Address screen displays.
Figure 5-4 Create Virtual Entity - Structured Address
- Specify the fields on Create Virtual Entity - Structured Address screen.For more information on fields, refer to the field description table.
Note:
The fields, which are marked with an asterisk, are mandatory.Table 5-3 Create Virtual Entity - Structured Address – Field Description
Field Description Department Specify the department. Sub Department Specify the sub department. Street Name Specify the street name. Building Number Specify the building number. Building Name Specify the building name. Floor Specify the floor number. Post Box Specify the post box details Room Specify the room number. Post Code Specify the post code details. Town Name Specify the town name. Town Location Name Specify the location name of the town. District Name Specify the district name. Country Sub Division Specify the country sub division. Country Click Search to view and select the required country.
KYC Details
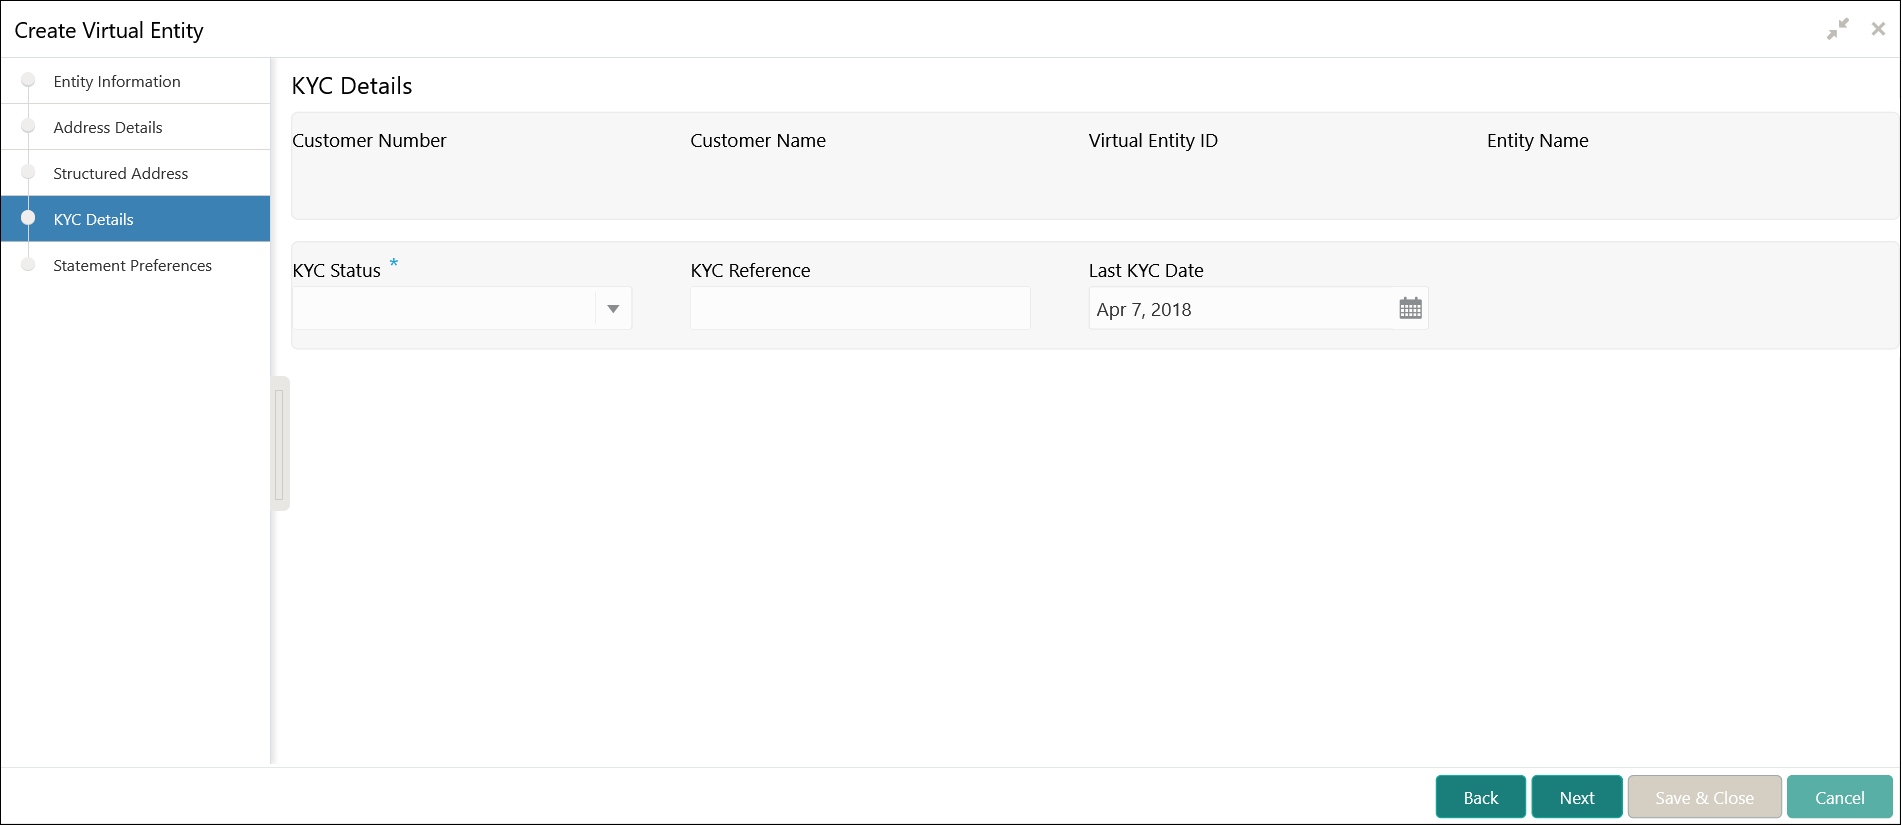
The KYC Details screen allows the user to capture the address details for a customer.
- Click Next. The Create Virtual Entity - KYC Details screen displays.
Figure 5-5 Create Virtual Entity - KYC Details
- Specify the fields on Create Virtual Entity - KYC Details screen.For more information on fields, refer to the field description table.
Note:
The fields, which are marked with an asterisk, are mandatory.Table 5-4 Create Virtual Entity - KYC Details – Field Description
Field Description KYC Status Select a KYC status from the drop-down list. KYC Reference Specify a KYC reference number. Last KYC Date Select the last KYC performed from the drop-down calendar.
Statement Preferences
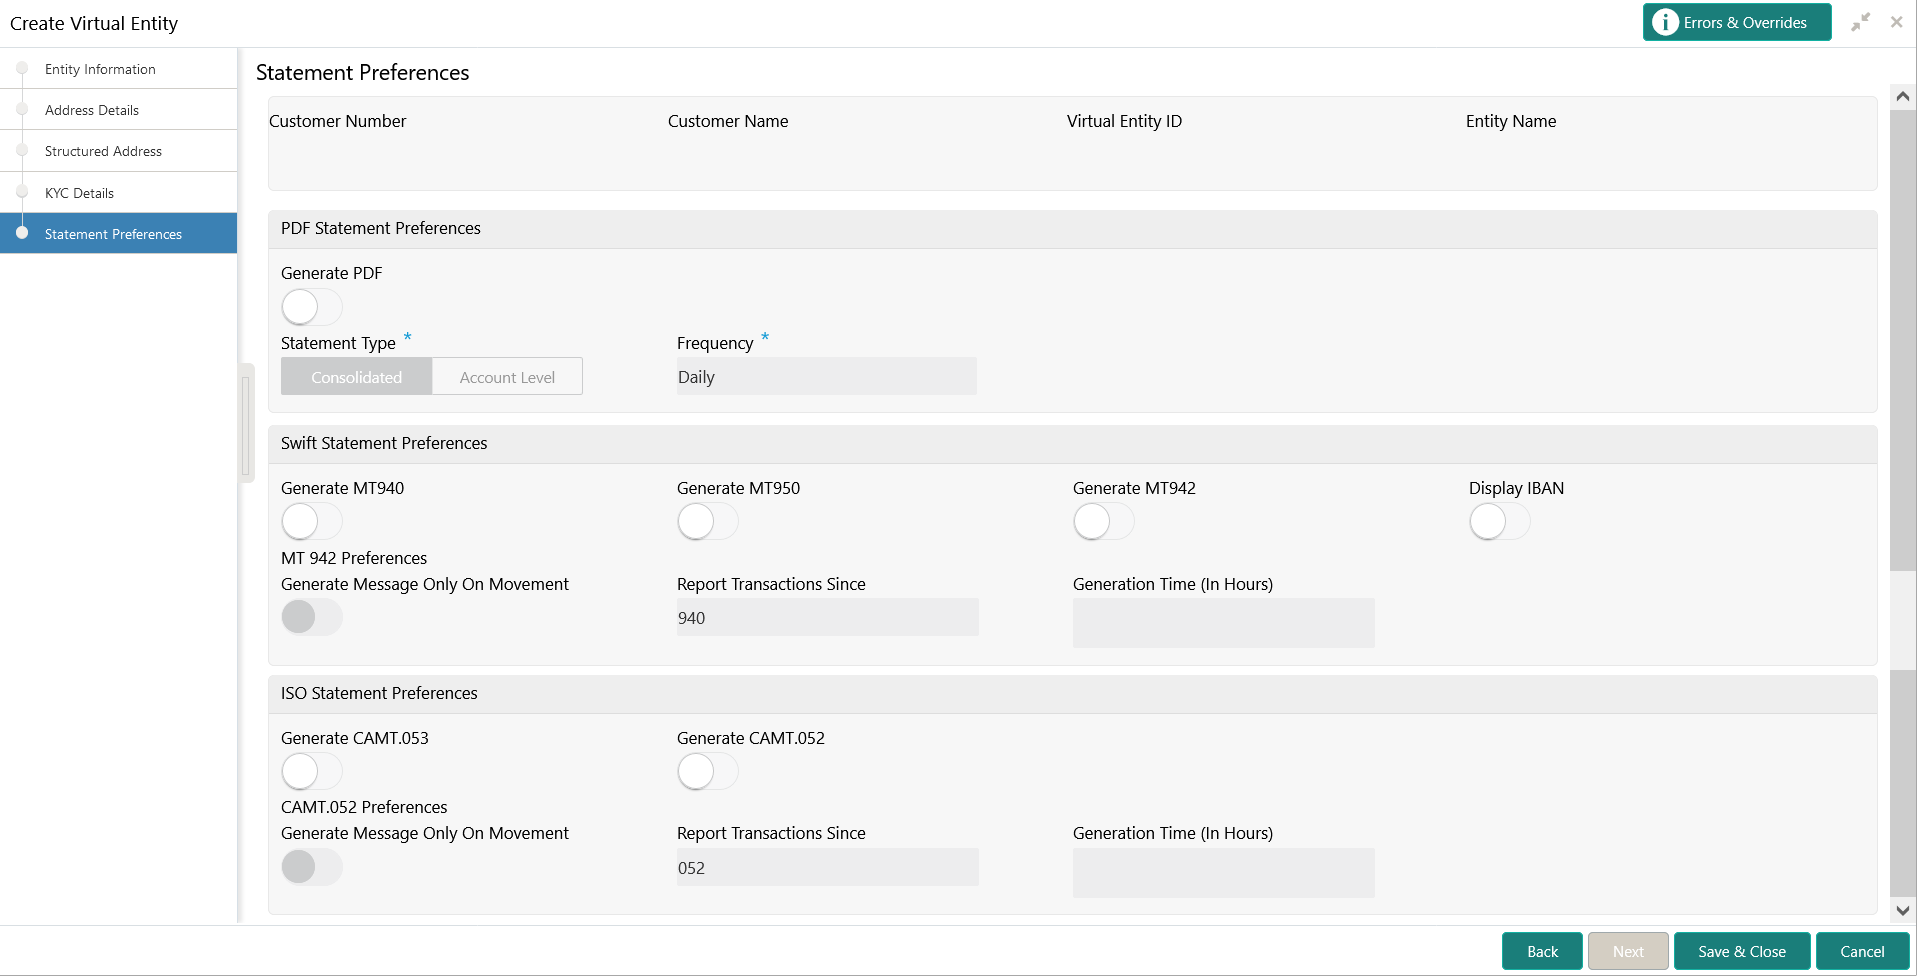
The Statement Preferences screen allows the user to configure the account statement preferences.
- Click Next.The Create Virtual Entity - Statement Preferences screen displays.
Figure 5-6 Create Virtual Entity - Statement Preferences
- Specify the fields on Create Virtual Entity - Statement Preferences screen.For more information on fields, refer to the field description table.
Note:
The fields, which are marked with an asterisk, are mandatory.Table 5-5 Create Virtual Entity - Statement Preferences – Field Description
Field Description Customer Number Displays the customer number. Customer Name Displays the customer name. Virtual Entity ID Displays the virtual entity ID. Entity Name Displays the entity name. Generate PDF If selected, an account statement is generated in PDF format. Statement Type Select one of the options: - Consolidated: If selected, a consolidated statement is generated.
- Account Level: If selected, an account level statement is generated.
Frequency Select a frequency from the drop-down list. Due On Select the due date to generate the account statement from the drop-down list. The available options based on the frequency selected are:- Daily - This field is not applicable and will not appear for Daily frequency.
- Weekly - Select the day when the account statement needs to be generated for the week.
- Monthly - Select the day of
the month when the account statement needs to be
generated for the
month.
Example: If Due On is selected as “31”, this will be considered as the last day of the month and the account statements will be generated on the last day for all the months.
- Quarterly - Select the end month of
quarter when the account statement needs to be
generated. Statement will always be generated on
the last day of the month
selected
Example: If Due On is selected as “March (3)”, the account statement will be generated on the last day of the month (31st March) for the period of 1st January to 31st March.
- Yearly - Select the month when the account statement needs to be generated for the year. Statement will always be generated on the last day of the month selected.
Note:
PDF Account statements can be generated in customer's language. Based on the media and advice created, and report locale selected while creating the advice, report can be generated in that language. Language specific templates will need to be provided by the bank.Generate MT940 If selected, the statement is generated in MT940 format. Generate MT950 If selected, the statement is generated in MT950 format. Generate MT942 If selected, the intra-day account statement is generated in MT942 format. Display IBAN If selected, generated statement is reported with IBAN Account Number instead of Virtual Account Number. Note:
System generates a statement automatically on the account closure day based on the statement preferences captured except the scheduled generation date.Generate Message Only On Movement By default, it is disabled. If enabled, system generates statement only if additional entries have been posted subsequent to the previous statement generation. Report Transactions Since Select one of the required options from the drop-down list: - 940: If selected, the current statement includes all of the transactions posted and authorized since the previous MT940 generation.
- 950: If selected, the current statement includes all of the transactions posted and authorized since the previous MT950 generation.
- 942: If selected, the current statement includes all of the transactions posted and authorized since the previous MT942 generation.
Generation Time (In Hours) Select a timing for MT942 generation from the multi-select drop-down list. Note:
System supports only hourly time intervals.Generate CAMT.052 If selected, the statement is generated in CAMT.053 format. Generate CAMT.053 If selected, the intra day account statement is generated in CAMT.052 format. Generate Message Only On Movement By default, it is disabled. If enabled, system generates statement only if additional entries have been posted subsequent to the previous statement generation.
Report Transactions Since Select the one of the required options from the drop-down list: - 052: If selected, the current statement will include all the transactions posted and authorized since the previous CAMT.052 generation.
- 053: If selected, the current statement will include all the transactions posted and authorized since the previous CAMT.053 generation.
Generation Time (In Hours) Select a timing for CAMT.052 generation from the multi select drop-down list. Note:
System supports only hourly time intervals. - Click Save and Close to save the details.The user can view the defined virtual entity in the View Virtual Entity.
Parent topic: Virtual Entity
