- Oracle Banking Common Core User Guide
- Core Maintenance
- Decision Grade Matrix
- Create Decision Grade Matrix
2.51.1 Create Decision Grade Matrix
This topic describes the systematic instructions to create decision and grade matrix by updating various details.
- On Home screen, click Core Maintenance. Under Core Maintenance, click Credit Decision.
- Under Credit Decision, click Maintenance. Under Maintenance, click Decision Grade Matrix.
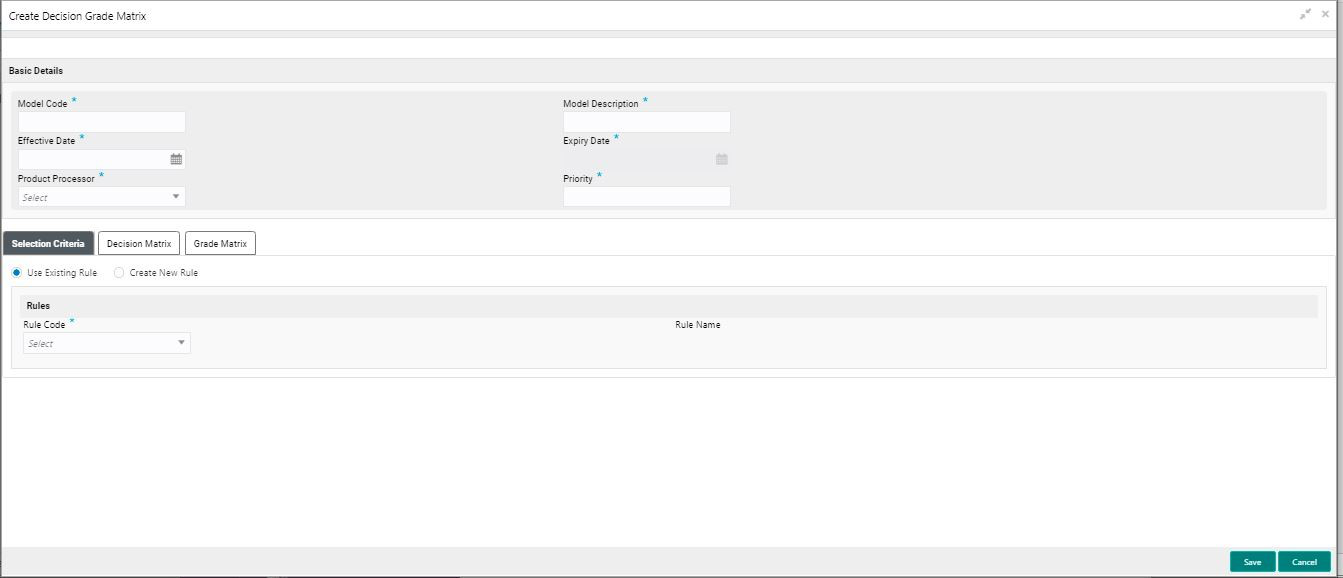
- Under Decision Grade Matrix, click Create Decision Grade Matrix.The Create Decision Grade Matrix screen displays.
- On Create Decision Grade Matrix screen, specify the fields. For more information on fields, refer to the field description table.
Note:
The fields, which are marked with an asterisk, are mandatory.Table 2-159 Create Decision Grade Matrix - Field Description
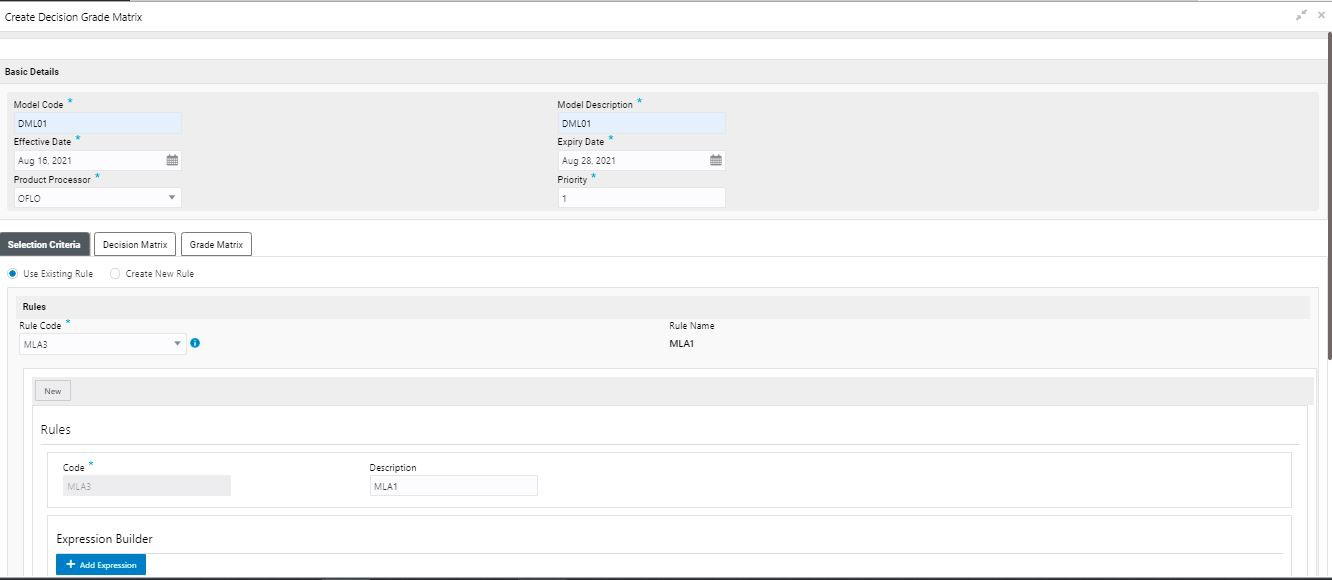
Field Description Model Code Specify the unique model code. Model Description Specify a short description for the model. Effective Date Specify the effective date. Expiry Date Specify the expiry date. Product Processor Specify the product processor for which the decision and grade matrix is being created. Priority Specify the priority of the model. - Click the Selection Criteria to configure the parameters based on which decision model is to be resolved.For more information on fields, refer to the field description table.
Figure 2-208 Create Decision Grade Matrix - Selection Criteria
Table 2-160 Create Decision Grade Matrix - Selection Criteria - Field Description
Field Description Use Existing Rule By default, this option is enabled. Indicates if the existing rule is linked. Rule Code Select the rule code from the drop down list. 
Click this icon to get the information about the rule. Rule Name Displays the rule name of the rule code. Create New Rule Select this option to create new rule. + icon Click this icon to add new expression. Fact / Rules Select the fact or rule from the drop-down list. Once the user selects the fact/rules, one more field opens adjacent to the output, update the same based on the selected output option.
Operator Select the comparison operator from the drop-down list. The available options are:- <
- >
- +
- =
- %
- !=
- -
- >=
- <=
- *
- /
- Contains
- In
- Like
- Matches
- NotMatches
- NotContains
- Notin
Data Type Select the data type for the fact or rule. Once the user select the data type, one more field opens adjacent to the output, update the same based on the selected output option.
The available options are:- Text
- Number
- Boolean
- Date
- Fact
- Rules
The below option appears if the Data Type is selected as Boolean.- True
- False
Output Select the output from the drop-down list. Once the user select the data type, one more field opens adjacent to the output, update the same based on the selected output option.
The available options are:- Text
- Number
- Boolean
- Date
- Fact
- Rules
The below option appears if the Data Type is selected as Boolean.- True
- False
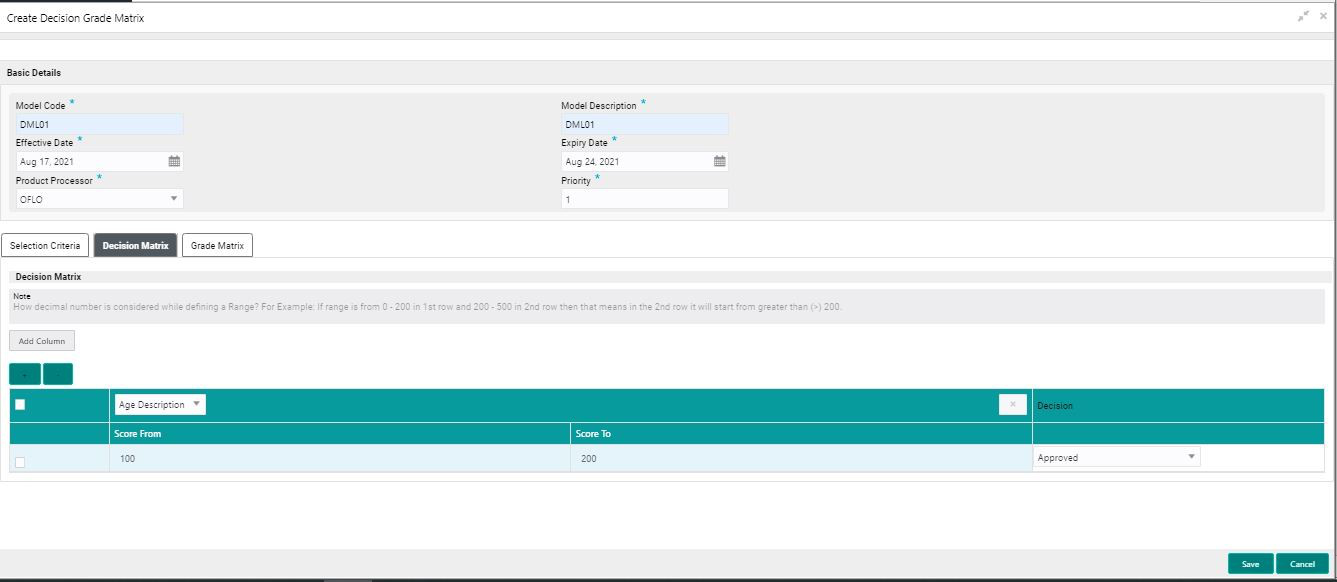
Expression Displays the expression updated in the expression builder. - Click the Decision Matrix to define decision on the application. The user can select the feature for which the decision needs to be maintained like Quantitative/Qualitative.The Create Decision Grade Matrix - Decision Matrix screen displays.For more information on fields, refer to the field description table.
Figure 2-209 Create Decision Grade Matrix- Decision Matrix
Table 2-161 Create Decision Grade Matrix- Decision Matrix - Field Description
Field Description Add Column Click Add Column, for addition of features for which decision has to be maintained. 
Click this icon to delete a column, which is already added. + icon Click this icon to add a new row. - icon Click this icon to delete a row, which is already added. Score From Specify the minimum range of score for the decision. Score To Specify the maximum range of score for the decision. Decision Specify the decision of an application from the drop-down list. The values are configurable based on the look up values maintained
The available options are:- Approved
- Manual
- Rejected
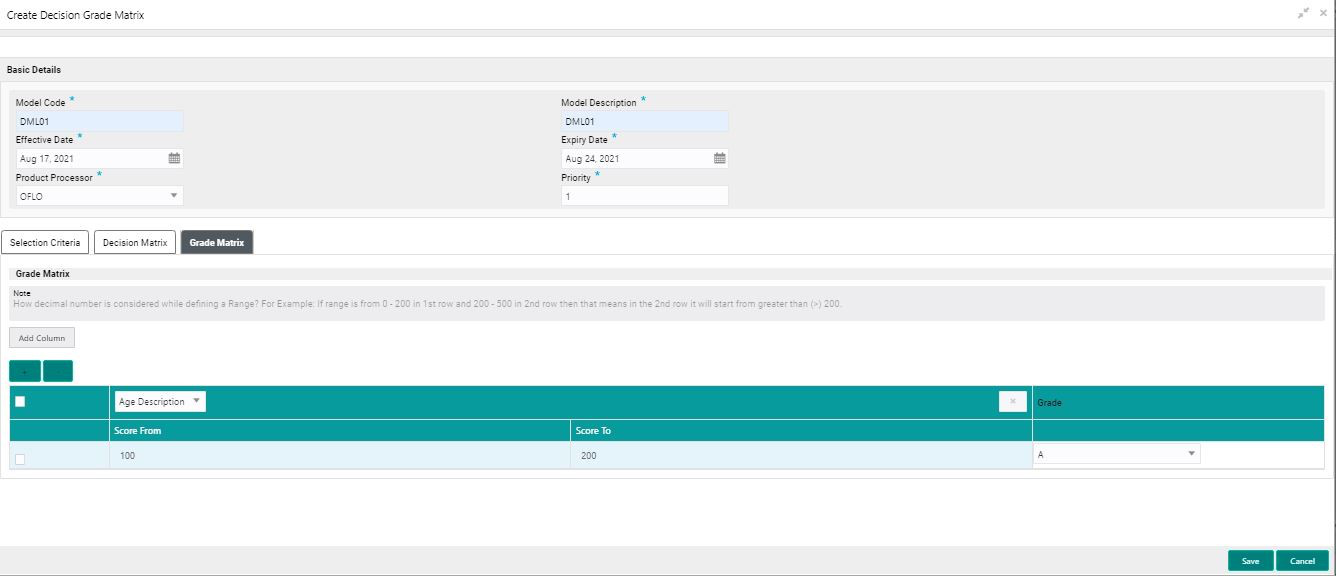
- Click the Grade Matrix to assign the grade to the application that is used during the pricing of the application. You can select the feature for which the grade needs to be maintained like Quantitative/Qualitative.The Create Decision Grade Matrix - Grade Matrix screen displays.For more information on fields, refer to the field description table.
Figure 2-210 Create Decision Grade Matrix - Grade Matrix
Table 2-162 Create Decision Grade Matrix - Grade Matrix - Field Description
Field Description Add Column Click Add Column, for addition of features for which decision has to be maintained. 
Click this icon to delete a column, which is already added. + icon Click this icon to add a new row. - icon Click this icon to delete a row, which is already added. Score From Specify the minimum range of score for the grade. Score To Specify the maximum range of score for the grade. Decision Specify the grade of the application based on the score scored. The values are configurable based on the look up values maintained. The available options are:- A
- B
- C
- Click Save to save the details.The Decision Grade Matrix is successfully created and can be viewed using the View Decision and Grade Matrix screen.
Parent topic: Decision Grade Matrix


