- Installer Guide
- Miscellaneous Tasks
7 Miscellaneous Tasks
This topic describes about the Miscellaneous Tasks while installing the application using Oracle Banking Microservices Architecture Installer.
7.1 Password Update in Databag
This topic provides the systematic instructions to update the password in databag.
- Launch putty and login to foundation VM with NIS user (eg.: dkarkera) and then switch to the root user.
- Navigate to the chef-repo path by executing the command,
cd /scratch/obma_installer/chef-repo - Set the required editor by executing the command,
export EDITOR=vim. - Execute the below command to open the databag file in edit mode,
knife data bag edit --local-mode <databag_sub_directory> <datasource_credential_json_file> --secret-file <secret_key_path>.Table 7-1 Databag File - Attribute Description
Attribute Name Attribute Description databag_sub_directory Name of sub directory where the datasource credential json file is located inside databag directory. Example: obma_weblogic, obma_java, obma_kafka etc
datasource_credential_json_file Name of the datasource credential json file where all the credential related to respective product is listed. Example: datasourceCred_obo, datasourceCred_obca, etc
Note:
Mention the filename without the json extension.secret_key_path Location to the secret key. Example:
/scratch/obma_installer_ssl/chef-repo/secrets/secret_keyExample:
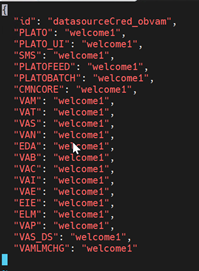
knife data bag edit --local-mode obma_weblogic datasourceCred_obvam --secret-file /scratch/obma_installer/chef-repo/secrets/secret_key - Post updating the credential file, Click Save and Close.
7.2 Certificate Sync Up between Foundation and Product VMs
This topic provides the systematic instructions to sync up the certification between the Foundation and Product VMs.
- Launch putty and login to foundation VM with OS user (i.e. ofssobp).
- Navigate to certificate directory by executing the command.
cd /scratch/ssl/cacerts - Copy the certificate file of foundation VM to Product VM by executing the command.
scp -r <cert_foundation> <credential_of_product>@<ip_product>:<cert_path_product>Example:Table 7-2 Certificate File - Attribute Description
Attribute Name Attribute Description cert_foundation Certificate of Foundation VM. Example: whf00map.crt
credential_of_product OS user of Product VM. Example: ofssobp
ip_product IP or Hostname of Product VM. Example: 10.40.73.66
cert_path_product Product Certificate Path. Example:
/scratch/ssl/cacertsscp -r whf00map.crt ofssobp@10.40.89.28:/scratch/ssl/cacerts - Launch putty and login to foundation VM with OS user (i.e. ofssobp).
- Navigate to certificate directory by executing the command.
cd /scratch/ssl/cacerts - Copy the certificate file of foundation VM by executing the command.
scp -r <cert_foundation> <credential_of_foundation>@<ip_foundation>:<cert_path_foundation>Example:Table 7-3 Foundation Certificate File - Attribute Description
Attribute Name Attribute Description cert_path_foundation Foundation Certificate Path. Example:
/scratch/ssl/cacertscert_product Certificate of product VM. Example: whf00gbl.crt
credential_of_foundation OS user of foundation VM. Example: ofssobp
ip_foundation IP or Hostname of foundation VM. Example: 10.40.73.66
scp -r whf00map.crt ofssobp@10.40.89.28:/scratch/ssl/cacerts - In product VM, navigate to the certificate path by executing the command,
cd /scratch/ssl/cacerts. - Sync the certificate of foundation VM by executing the command.
/scratch/obma/jdk-11.0.14/bin/keytool -import -v -trustcacerts -alias selfsigned6 -file <cert_foundation> -keystore <trust_certificate_product> --storepass wlcome1 -nopromptExample:Table 7-4 Sync Foundation Certificate File - Attribute Description
Attribute Name Attribute Description cert_foundation Certificate of foundation VM. Example: whf00gbl.crt
trust_certificate_product Trust certificate of product VM. Example: whf00map.in.example.com_trust.jks
/scratch/obma/jdk-11.0.14/bin/keytool -import -v -trustcacerts -alias selfsigned6 -file whf00gbl.crt -keystore whf00map.in.example.com_trust.jks --storepass wlcome1 -noprompt - Now, switch to foundation VM putty session and navigate to the certificate path by executing the command,
cd /scratch/ssl/cacerts. - Sync the certificate of product VM by executing the command.
/scratch/obma/jdk-11.0.14/bin/keytool -import -v -trustcacerts -alias selfsigned6 -file <cert_product> -keystore <trust_certificate_foundation> --storepass wlcome1 -nopromptExample:Table 7-5 Sync Product Certificate File - Attribute Description
Attribute Name Attribute Description cert_product Certificate of product VM. Example: whf00map.crt
trust_certificate_foundation Trust certificate of foundation VM. Example: whf00gbl.in.example.com_trust.jks
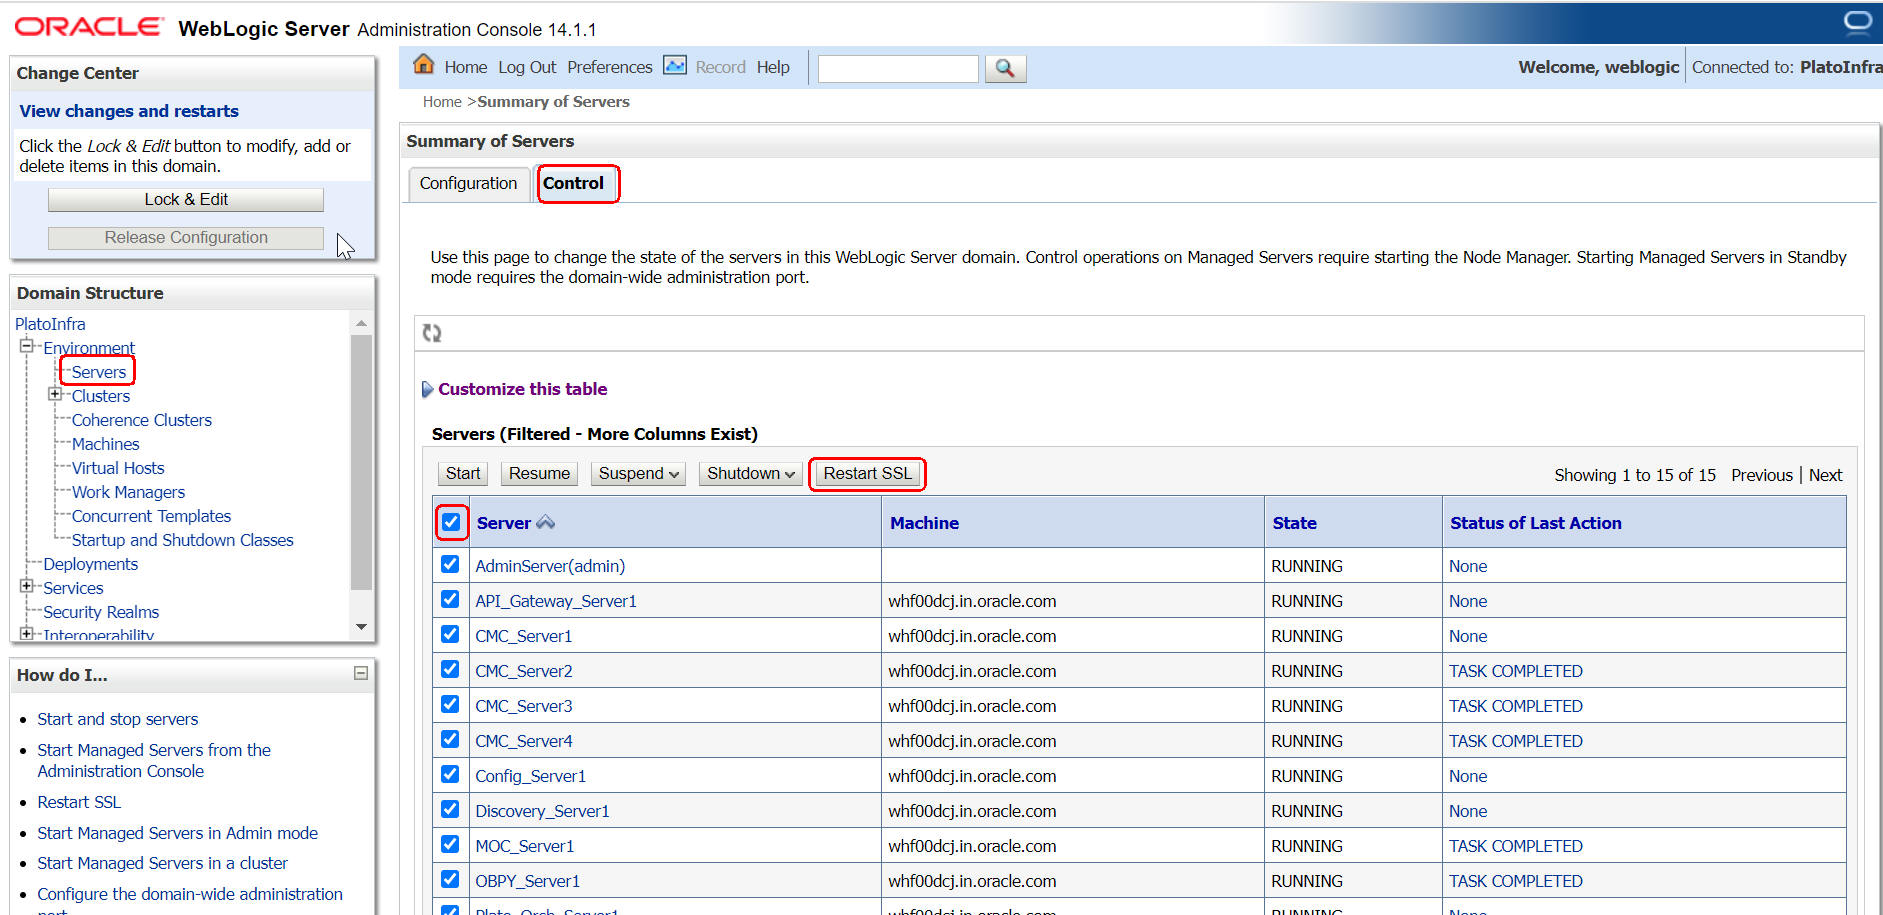
/scratch/obma/jdk-11.0.14/bin/keytool -import -v -trustcacerts -alias selfsigned6 -file whf00map.crt -keystore whf00gbl.in.example.com_trust.jks --storepass wlcome1 -noprompt - Post Syncup, launch the browser and login to Admin Console of Foundation setup.
- Navigate to Servers and then click on Control tab.
- Select all the servers and Click Restart SSL button.All the selected servers are restarted.
- Repeat the steps 11 to 13 in Admin Console of Product VM.


