- Oracle Banking Microservices Platform Foundation User Guide
- File Management
- View File Upload Status
4.2 View File Upload Status
This topic provides the systematic instructions to view the status of the uploaded files and approve the same in both File level and Record Level.
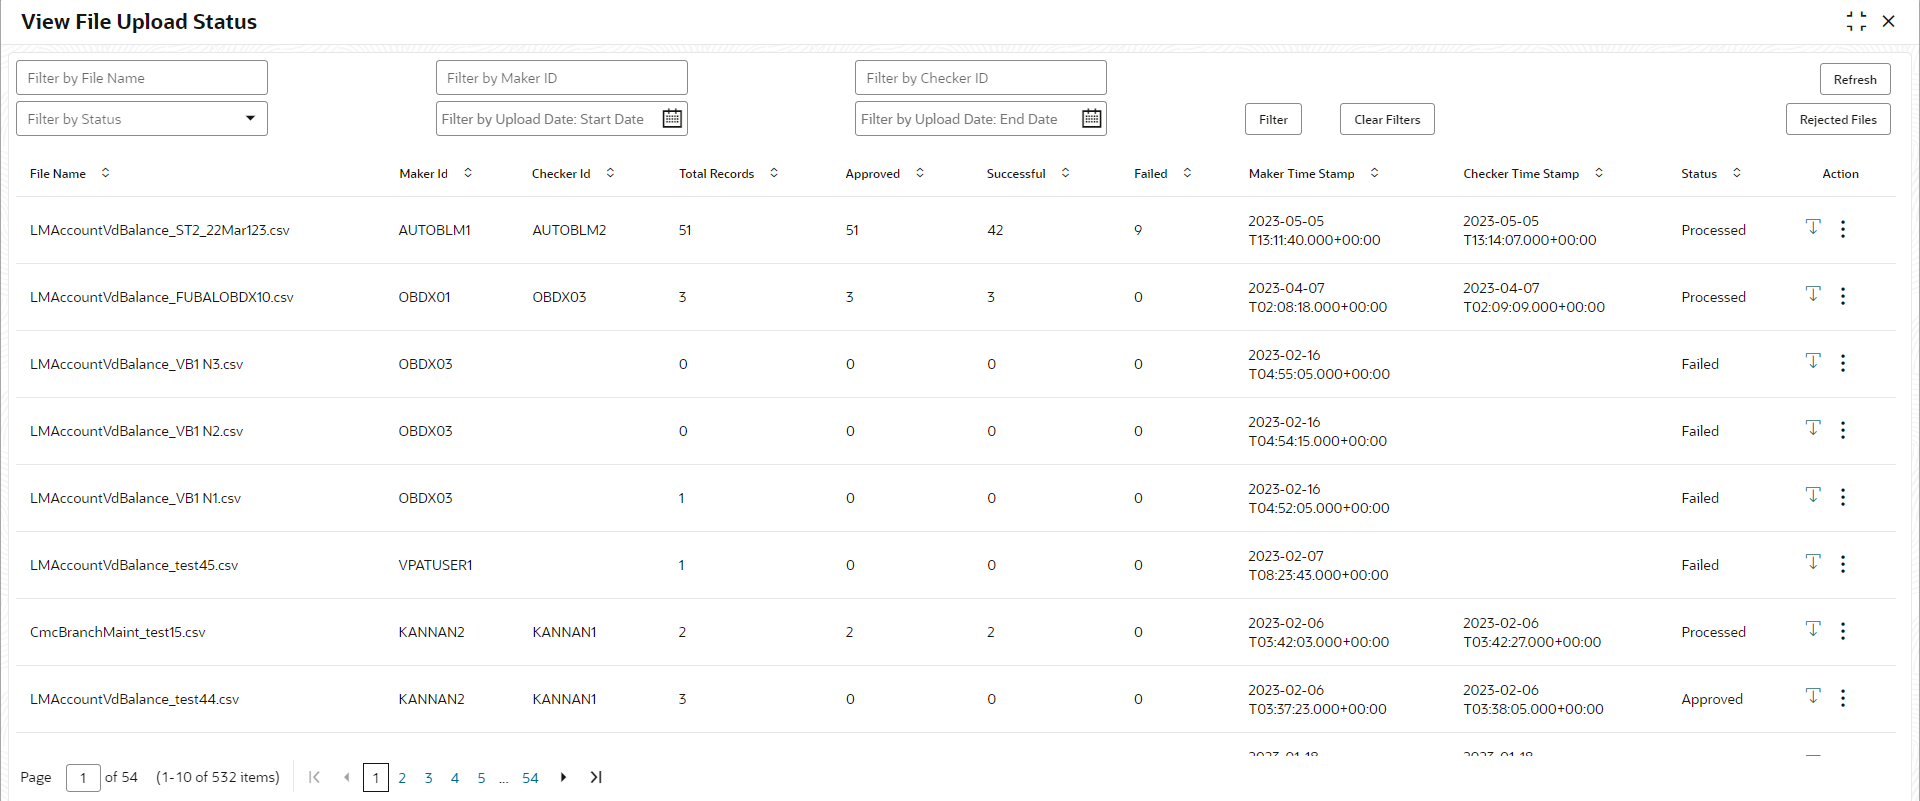
- On Home screen, click File Management. Under File Management, click View File Upload Status.The View File Upload Status screen displays.
- Specify the following parameters in the respective fields.
- File Name
- Maker ID
- Checker ID
- Status
- Upload Date: Start Date
- Upload Date: End Date
- Click Filter to filter the uploaded files in the list.
- Click Clear Filter to clear the filter criteria.
Table 4-1 View File Upload Status - Field Description
Field Description File Name Specify the unique file name. Maker ID Specify the Unique ID of the maker. Checker ID Specify the Unique ID of the checker. Status Select the status of the uploaded file.
The available options are:
- Approved
- Failed
- Processed
- Unprocessed
- Initiated
Upload Date: Start Date Select the upload start date (YYYY-MM-DD) from when the data needs to be filtered. Upload Date: End Date Select the upload end date (YYYY-MM-DD) till when the data needs to be filtered. File Name Displays the name of the file. Maker Id Displays the Unique ID of the maker. Checker Id Displays the Unique ID of the checker. Total Records Displays the total count of records in the file. Approved Displays the count of approved records in the file. Successful Displays the count of successful records in the file. Failed Displays the count of failed records in the file. Maker Time Stamp Displays the time stamp when the maker has uploaded the file. Checker Time Stamp Displays the time stamp when the checker has approved the file. Status Displays the status of the uploaded file. Action Displays the following actions on the file.
- Download
- View Details – This option appears only if the status is in Unprocessed, and the Record level approval flag is Yes.
- Approve – This option appears only if the status is in Unprocessed.
- Reject – This option appears only if the status is in Unprocessed.
- View Status – This option appears only if the status is in Processed.
- View Remarks – This option appears only if the status is in Processed.
- Click Refresh to refresh the file upload list.
- Click Rejected Files to view the rejected files.The Rejected File Data screen displays.
Table 4-2 Rejected File Data - Field Description
Field Description File Name Specify the unique file name. Maker ID Specify the Unique ID of the maker. Checker ID Specify the Unique ID of the checker. Upload Date: Start Date Select the upload start date (YYYY-MM-DD) from when the data needs to be filtered. Upload Date: End Date Select the upload end date (YYYY-MM-DD) till when the data needs to be filtered. File Name Displays the name of the rejected file. Version Displays the version number of the rejected file. Maker Id Displays the Unique ID of the maker. Checker Id Displays the Unique ID of the checker. Status Displays the status of the uploaded file. Remarks Click the remarks icon and view the remarks for the rejected file. Maker Time Stamp Displays the time stamp when the maker has uploaded the file. Checker Time Stamp Displays the time stamp when the checker has rejected the file. - Click
 to download the rejected file.
To approve the record in File Level:
If the Record level approval required property (RECORD_LEVEL_APPROVAL column in PLATO_TM_FEED table) is maintained as N, the user can only approve the complete file.
- Click
 icon and select Approve to approve the records in File Level.The Remarks - Approve screen displays.
 - Specify the remarks in the text box and click Confirm to approve the file.
To reject the record in File Level:
If the Record level approval required property (RECORD_LEVEL_APPROVAL column in PLATO_TM_FEED table) is maintained as N, the user can only reject the complete file.
- Click
 icon and select Reject to reject the records in File Level.The Remarks - Reject screen displays.
 - Specify the remarks in the text box and Click Confirm to reject all the records in the file.
To approve/reject the records in Record Level:
If the Record level approval required property (RECORD_LEVEL_APPROVAL column in PLATO_TM_FEED table) is maintained as Y, the user can approve or reject the records in Record level.
- Click
 icon and select View Details to approve/reject the records in Record Level.The File Data screen displays.
 - Click Approve All to approve all the records in the file.
- Click Reject All to reject all the records in the file.
- Select Approve or Reject button for all the records in the file.
- Click Submit to approve/reject the records in the file.
Note:
Submit button gets enabled once all the records are selected.
To view the file data for Processed files:
- Click
 icon and select View Status to view the status of the records in the file.
The File Data - Status screen displays.
To view the remarks:
- Click
 icon and select View Remarks to view the
remarks.
icon and select View Remarks to view the
remarks.The Remarks screen displays.


