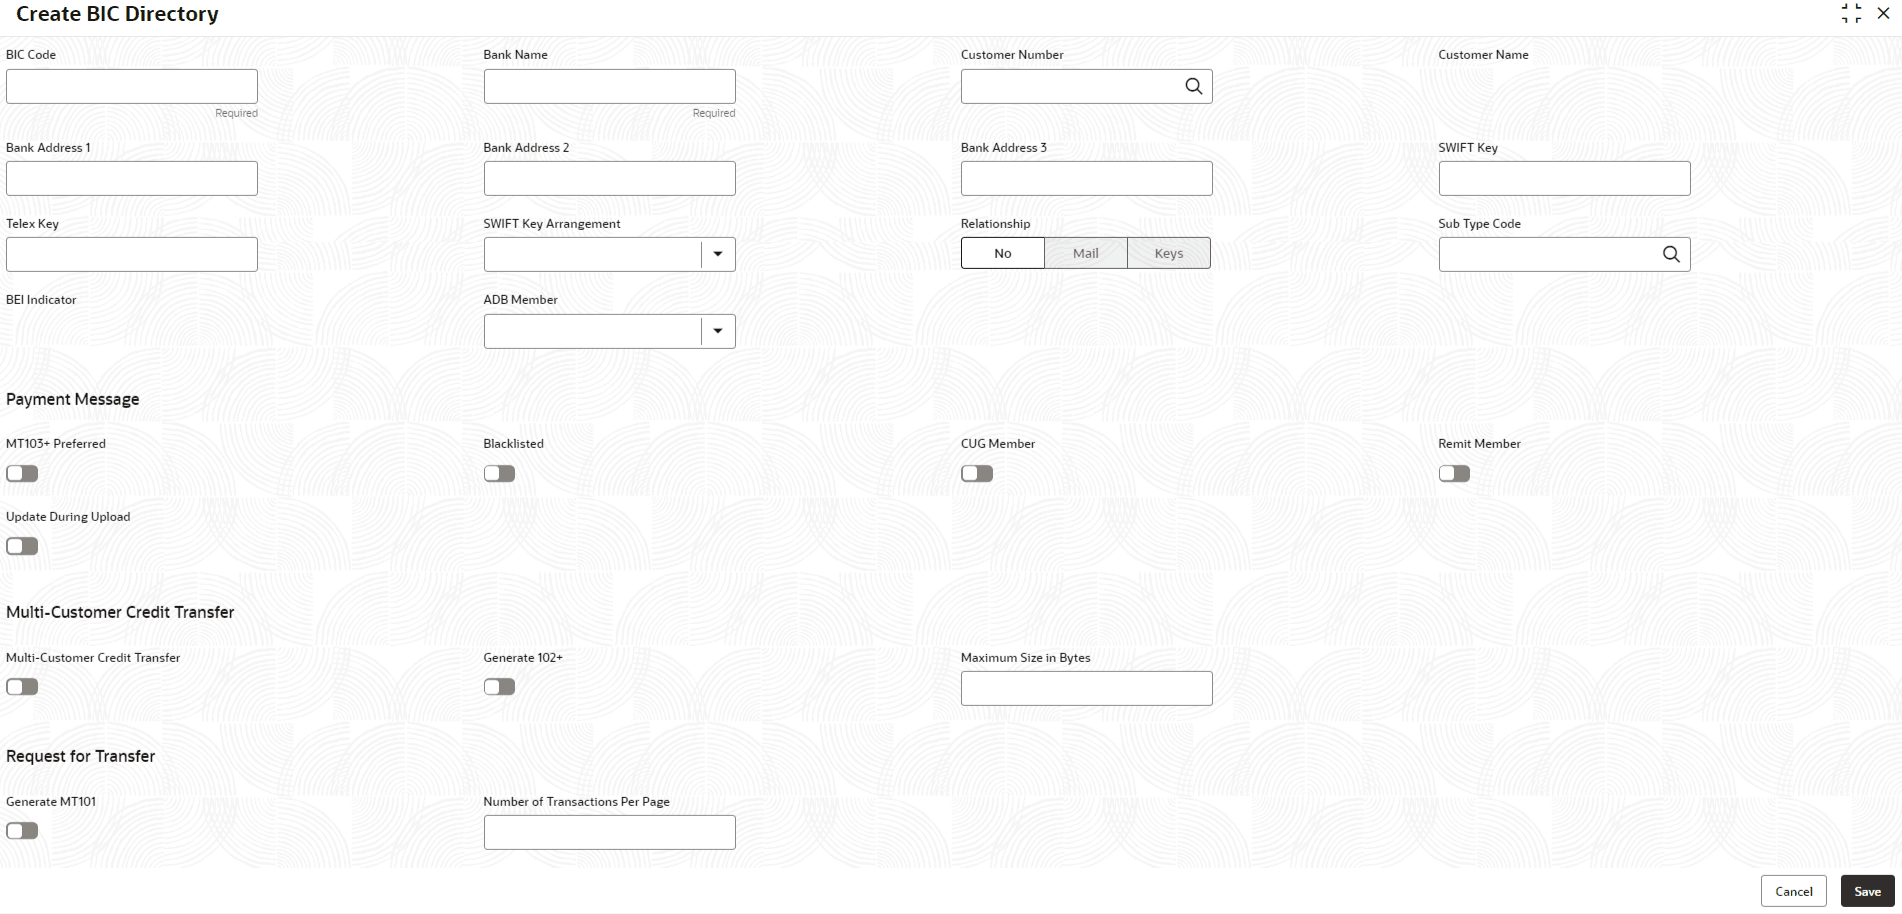
1.7.1 Create BIC Directory
This topic describes the systematic instructions to configure a BIC directory for a customer.
- From Home screen, click Core Maintenance. Under Core Maintenance, click BIC Directory.
- Under BIC Directory, click Create BIC Directory.The Create BIC Directory screen is displayed.
- Specify the fields on the Create BIC Directory screen.For more information on fields, refer to the field description table.
Note:
The fields marked as Required are mandatory.Table 1-15 Create BIC Directory – Field Description
Field Description BIC Code Specify the unique BIC Code by which the bank is identified by SWIFT. Bank Name Specify the name for the bank. Customer Number Click Search icon to view and select the required customer number. Customer Name Displays the customer name based on the selected Customer Number. Bank Address 1-3 Displays the bank address 1-3 based on the selected Customer Number. SWIFT Key Specify the swift key details. Telex Key Specify the unique telex key for the BIC directory. SWIFT Key Arrangement Select the SWIFT key arrangement from the drop-down list. The available options are:- Yes
- No
Relationship Select one of the following options: - No: If selected, indicates that the BIC Entity is not a customer of your bank
- Mail: If selected, the BIC entity is not a recognized SWIFT entity but an address internal to your bank. In such cases, all correspondence directed to the particular BIC entity is sent as mail messages.
- Keys: If selected, a SWIFT/Telex connectivity exists between your bank and the bank for which you are maintaining details. Subsequently, you must specify the SWIFT/Telex Key in the adjacent field.
Sub-type Code Click Search icon to view and select the required sub-type code. BEI Indicator Displays BEI Indicator based on the selected Sub-type Code. ADB Member Select the ADB member from the drop-down list. The available options are:- Not applicable
- Yes
- No
MT103+ Preferred Click the toggle to indicate the counter party's capacity whose BIC code details you are capturing to receive MT 103 payment messages. By default, this is disabled.
Blacklisted Click the toggle to blacklist the BIC entity. By default, this is disabled.
CUG Member Click the toggle to indicate the BIC entity is a closed user group member. By default, this is disabled.
Remit Member Click the toggle to indicate the customer is registered with the MT 103 extended remittance information multiple user group. By default, this is disabled.
Update During Upload Click the toggle to update the BIC directory during an upload. By default, this is disabled.
Multi-Customer Credit Transfer Click the toggle to indicate that multiple credit transfer (MT102) support exists between the bank and the BIC entity. By default, this is disabled.
Generate 102+ Click the toggle to enable 102+ message generation. By default, this is disabled.
Maximum Size in Bytes Specify the maximum size. Generate MT101 Click the toggle to indicate this BIC can send/receive MT101 messages. Select to generate an MT101 message. By default, this is disabled.
Number of Transactions Per Page Specify the number of transactions to view per page. If not specified, the value is defaulted to 10.
Real Customer Number Click Search icon to view and select the required real customer number. Real Customer Name Based on the Real Customer Number selected, the information is auto-populated. - Perform one of the following action:
- Click Save to save the details.
The BIC directory is successfully created and can be viewed using the View BIC Directory screen.
- Click Cancel to discard the changes and close the screen.
- Click Save to save the details.
Parent topic: BIC Directory
