1.1.1.1 Onboarding Initiation - Basic Details

This topic provides the details of the business such as the name, registration number, and registration date, tax ID, etc. along with personal details of the business owner including name, date of birth, and address in the Basic Details screen.

Note:

The fields marked as Required are mandatory.

Quick Initiation - Basic Details screen captures the following data segments to onboard the customer.

Table 1-3 Data Segment - Description

Sl.No Data Segment Name Mandatory / Optional / Conditional Description
1 Business Details Mandatory Data Segment to capture Business Details of the party.
2 Current Address Conditional Data Segment to capture current address of the party.
3 Previous Address Optional Data Segment to capture previous address of the party.
4 Social Profile Optional Data Segment to capture social profile of the party.

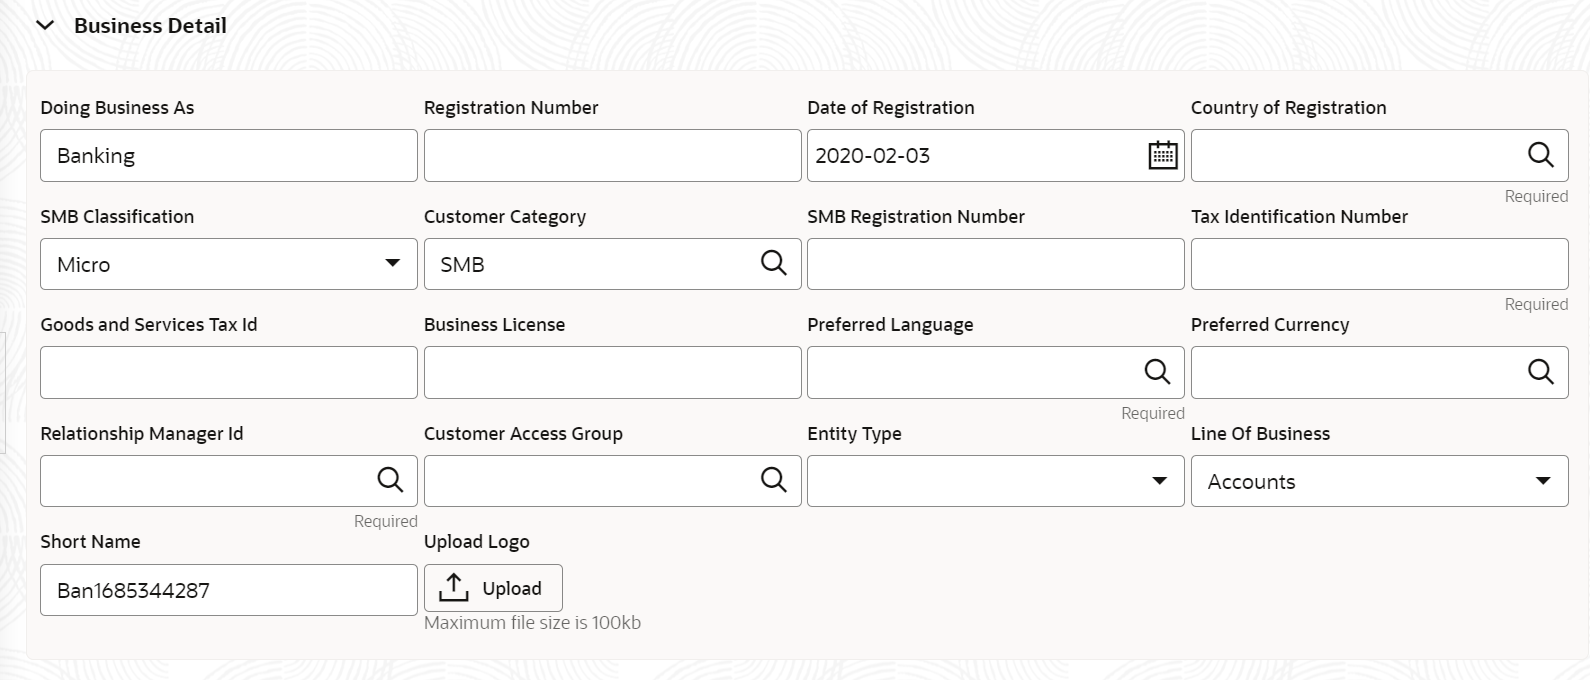
  1. On the Initiation - Basic Details screen, click and expand the Business Details section.
    The Business Details screen displays.

    Figure 1-4 Initiate - Business Details


  2. On the Business Details screen, specify the additional information related to the business.
    For more information on fields, refer to the field description table.

    Table 1-4 Business Details – Field Description

    Field Description
    Doing Business As Specify the role in the business.
    Registration Number Specify the registration number of the business.
    Date of Registration Specify the date of reregistration of business.
    Country of Registration Specify the country of registration.
    SMB Classification Specify the small and medium business classification.
    Customer Category Specify the customer category.
    SMB Registration Number Specify the Small and Medium Business registration number.
    Tax Identification Number Specify the tax identification number of the SMB customer.
    Goods and Services Tax Id Specify the goods and services tax Id.
    Business License Specify the business license.
    Preferred Language Click Search icon, and select the language code from the list.
    Preferred Currency Click Search icon, and select the currency code from the list.
    Relationship Manager Id Specify the relationship manager ID.
    Customer Access Group Click Search icon, and select the access group from the list.
    Entity Type Select the entity type from the drop-down list. The available options are:
    • Proprietorship
    • Pvt Ltd
    • Govt Owned
    • Clubs
    • Society
    • Associations
    • Foreign Bodies
    • NGO
    • Others
    • Limited Liability Partnership
    • Public Ltd
    • Trusts
    Line Of Business Select the business type from the drop-down list. The available options are:
    • Facility
    • Trade
    • Cash Management
    • Liquidity Management
    • Virtual Account Management
    • Accounts
    • Supply Chain finance
    • Lending
    Short Name Displays the short name of the party.
    KYC Verified Specify if KYC is verified for the party.

    Note:

    KYC verified can be captured for the parties without any KYC reference number created trough standalone KYC process. For more information, refer to the KYC Management section. KYC status as per standalone KYC process always supersede and overwrite KYC verified in Basic Info.
    Upload Logo Upload logo of the party.

    Note:

    Basic details provided in the Quick Initiation screen are automatically populated in the Initiation - Basic Details screen.
  3. Upload logo of the customer, if available.
  4. Click and expand the Address section.
  5. On the Basic Details screen, click and expand Previous Address segment.
    The Previous Address screen is displayed.
  6. On the Previous Address screen, click + icon.
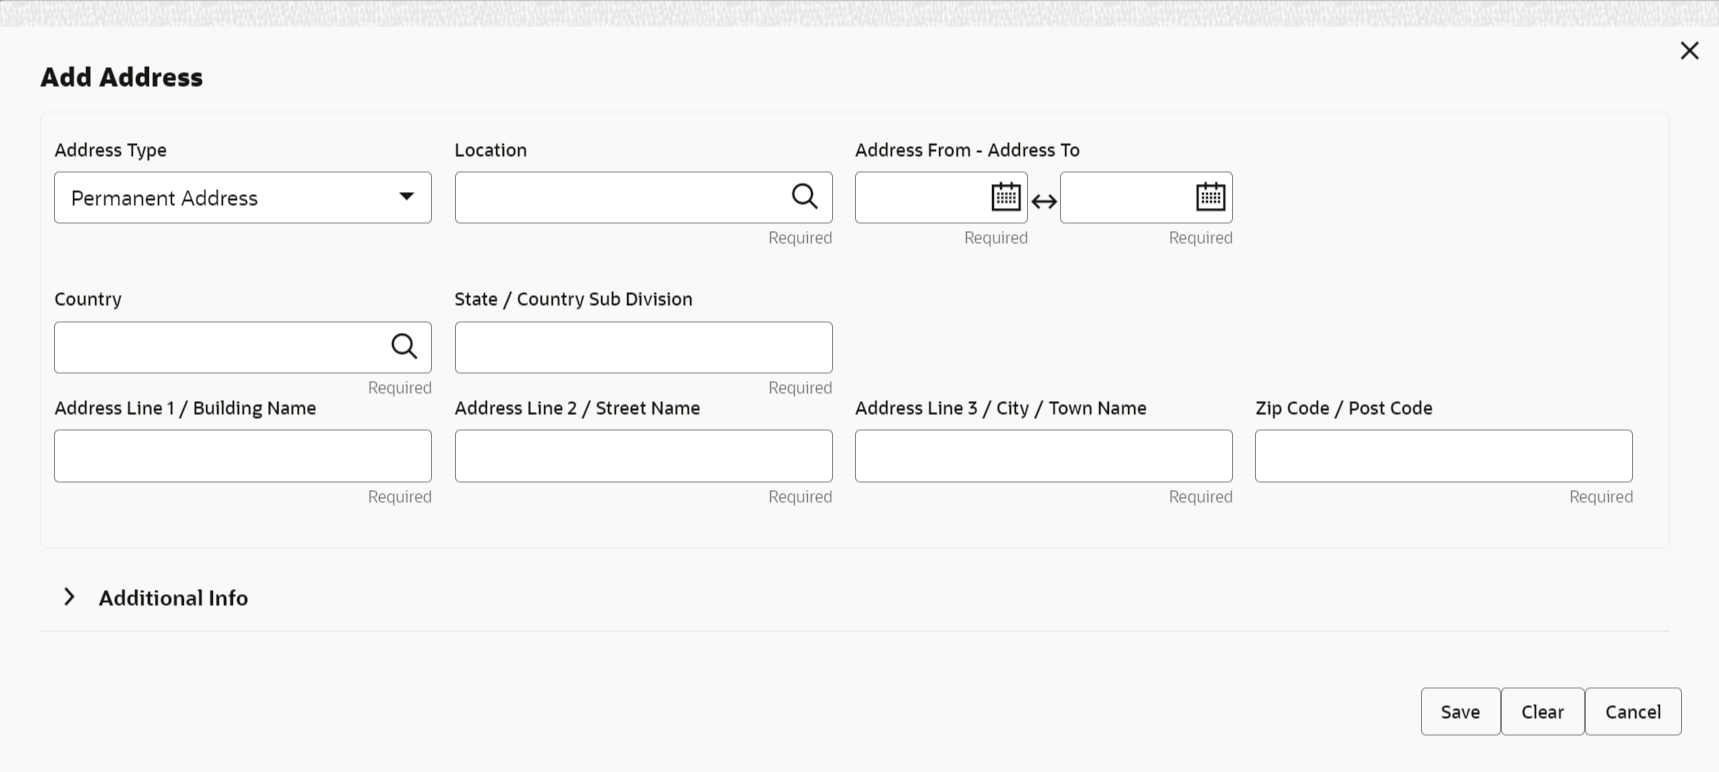
    The Add Address pop-up screen is displayed.
  7. On the Add Address pop-up screen, specify the fields. For more information on the fields, refer to the filed description table.

    Table 1-5 Add Address – Field Description

    Field Description
    Address Type Select the address type from the drop-down list. The available options are:
    • Permanent Address
    • Residential Address
    • Communication Address
    • Office Address

    Note:

    Address type can be configured as mandatory using Address Management. Refer to the Oracle Banking Party Configurations User Guide for more details.
    Location Click Search and select the preferred location from the list of values.

    Note:

    The list of values can be configured through Common Core Maintenance for Location Code.
    Address From Specify address start date.
    Address To Specify address end date.
    Country Click Search icon and select the country from the list of values.
    State / Country Sub-Division Specify State or Country Sub-division.
    Address Line 1 / Building Name Specify Address Line 1 or Building Name.
    Address Line 2 / Street Name Specify Address Line 2 or Street Name.
    Address Line 3 / City / Town Name Specify Address Line 3 or City Name or Town Name.
    Zip Code / Post Code Specify Zip Code or Post Code.
  8. On the Add Address pop-up screen, click and expand Additional Info segment.
    The Additional Info data segment is displayed.
  9. Specify the details in the Additional Info segment. For more information on fields, refer to the field description table.

    Table 1-6 Additional Info – Field Description

    Field Description
    Department Specify the name of the department for the customer.
    Sub Department Specify the sub-department for the customer.
    Building Number Specify the building number.
    Floor Specify the floor for the given address.
    Post Box Specify the post box.
    Room Specify the room for the given address.
    Town Location Name / Locality Specify Town Location or Locality Name.
    District Name Specify the district name.
    Landmark Specify the near Landmark to address.
    Contact Name / Narrative Specify Contact Name or Narrative for the address

    Note:

    Refer to the Oracle Banking Party Configurations User Guide for entity maintenance.
  10. Click and expand Social Profile section.
    The Social Profile screen displays.
  11. On the Social Profile segment, specify the fields.
    For more information on fields, refer to the field description table.

    Table 1-7 Social Profile – Field Description

    Field Description
    Facebook Select the address of the Facebook profile.
    Twitter Select the address of the Twitter profile.
    Instagram Select the address of the Instagram profile.
    LinkedIn Select the address of the LinkedIn profile.
    Blog Select the address of the Blog profile.
    Tumblr Select the address of the Tumblr profile.
  12. Click Next to move to the Stakeholders Details screen.