- Administration and Configuration Guide
- Generic Configurations
- Configuring OFSAA OIM Connector
- Configuring the Connector
Configuring the Connector
This section provides information to configure the OFSAA Connector with OIM
that enables mapping of policies from OFSAA and user configuration.
The following steps describe the procedure to configure the OFSAA OIM
Connector:
- Login to the OFSAA host with your OFSAA user credentials.
- Navigate to
$FIC_HOME/utilityfolder. - Copy the
OFSConnectordirectory to your local system.
- Navigate to
- Login to the OIM host with OIM user credentials.
- Copy the
OFSConnectordirectory from your local system to$OIM_ORACLE_HOME/connectors. - Check and ensure that the following environment variables are set in the OIM
host:
JAVA_HOME= <Path to Java Dir>For example,/u01/java/jdk1.7.0_91 MW_HOME=<Middleware Home Path>For example,/u01/oracle/products/fmw/10.3.6 WL_HOME=<Weblogic Home Dir>For example,$MW_HOME/wlserver_10.3 LD_LIBRARY_PATH=<Webtier lib path>For example,/u01/oracle/products/fmw/Oracle_WT1/lib APP_SERVER=<App server>For example,weblogic/websphere OIM_ORACLE_HOME=< OIM install dir>For example, /u01/oracle/products/fmw/10.3.6/Oracle_IDM DOMAIN_HOME=<OIM Domain path>For example,/u01/oracle/domains/idm_domain ANT_HOME=<Ant Home>For example,$MW_HOME/modules/org.apache.ant_1.7.1 PATH=$JAVA_HOME/bin:$ANT_HOME/bin:$PATH:$OIM_ORACLE_HOME/OPatch - Generate wlfullclient.jar by using the following procedure:
- Navigate to the
$DOMAIN_HOME/bindirectory and run the following command:./setDomainEnv.sh - Navigate to the
$WL_HOME/server/libdirectory and run the following command:java -jar wljarbuilder.jar - Copy the newly created
wlfullclient.jarfrom$WL_HOME/server/libto the path$OIM_ORACLE_HOME/designconsole/ext.
- Navigate to the
- Execute the following command from the $OIM_ORACLE_HOME/server/bin directory to
upload the OFSAA connector to OIM:
sh UploadJars.sh -username << Xellerate admin username>>
                        -password << admin password>> -serverURL << serverURL>>
                        -ctxFactory << context>> -ICFBundle <<Full path of OFS
                        connector>>
For example:sh UploadJars.sh -username xelsysadm -password Welcome1 -serverURL t3://whf00aum:14000 -ctxFactory weblogic.jndi.WLInitialContextFactory -ICFBundle /scratch/software/weblogic10.3.6/iam/connectors/OFSConnector/org.identityconnectors.ofs-1.0.0.jarNote:
ctxFactoryvalue isweblogic.jndi.WLInitialContextFactoryfor WebLogic andcom.ibm.websphere.naming.WsnInitialContextFactoryfor WebSphere. - Navigate to the $OIM_ORACLE_HOME/server/plugin_utility directory and set the
following values in the ant.properties file:
wls.home=<Path to WebLogic Server Dir>For example,/u01/oracle/products/fmw/10.3.6/wlserver_10.3 oim.home=<OIM Home Path>For example,/u01/oracle/products/fmw/10.3.6/Oracle_IDM/server login.config=<Login Configuration File Home Path>For example,${oim.home}/config/authwl.conf mw.home=<Middleware Home Path>For example,/u01/oracle/products/fmw/10.3.6 - Execute the following command from the
$OIM_ORACLE_HOME/connectors/OFSConnector/directory and upload the schedule task in OIM:sh deploySchTask.sh -username << Xellerate admin username>> -password << admin password>> -serverURL <<oim_server_url>> -id <<OFSAA_ID>> - Upload the OFSAA Connector metadata to OIM by executing the following command
from the
$OIM_ORACLE_HOME/connectors/OFSConnectordirectory:sh ImportMetadata.sh <xellerate admin username> <admin password> <oim_server_url> OFS-ConnectorConfig_<OIM_VERSION>.xml <OFSAA_ID> <OFS_USER> <OFS_PASSWD> <OFS_URL>Note:
For SSO, <OFS_USER > is a valid OIM user. If the setup is non-SSO, then <OFS_USER> is SYSADMN. Based on the OIM version 11.1.2.2 or 11.1.2.3, select the appropriate version of the files to upload.If the file upload from the shell script is successful, the following message is printed:File imported successfully: OFS-ConnectorConfig_11.1.2.2.xml - For other OFSAA environments such as DEV, UAT and PROD, use the following
command to create IT Resource and Access Policy:
sh ImportMetadata.sh <xellerate admin username> <admin password>
                        <oim_server_url> OFS-ITResource_<OIM_VERSION>.xml <OFSAA_ID>
                        <OFS_USER> <OFS_PASSWD> <OFS_URL>
Note:
- For SSO, <OFS_USER > is a valid OIM user. If the setup is non-SSO, then <OFS_USER> is SYSADMN.
- <OFSAA_ID> should always be unique for each environment. For example, UAT01.
- Based on the OIM version 11.1.2.2 or 11.1.2.3, select the appropriate version of the files to upload.
- Set the System Property XL.AllowAPHarvesting to TRUE. See the following steps
for the procedure to set the property:
- Login to the SYSADMIN console.
- Click System Configuration to view System Properties.
- Enter XL.AllowAPHarvesting in Search System Properties and click to view the property name in the search results pane.
- Click Allows access policy based provisioning of multiple instances of a resource in the results pane to view the System Property Detail: Allows access policy based provisioning of multiple instances of a resource window.
- Enter TRUE in the Value field.
- Click Save.
- Restart the OIM Server.
Figure 12-17 System Management window

Note:
Further instructions apply only if SSO is configured in OFSAA. If you use Native Authentication, skip these instructions and proceed to Configuring Entitlements. - Upload the OAM Policy file to set the authentication for REST APIs, which the
OFSAA Connector uses. The following is the procedure to upload:
- Edit the
oam-policies.xmlfile in a text editor. Replace the placeholders ${OHS_PORT}, ${OHS_HOST}, and ${IDM_HOST} with the respective values of OHS Port, OHS Host Name, and IDM Host Name of the server where the IDM is hosted and the Oracle HTTP Server (OHS)) is configured. - Execute the command wlst.
For example,
$OIM_ORACLE_HOME/common/bin/wlst.sh - Connect to the OAM Admin server using the
following:
wls:/offline> connect('<user_id>','<password>','t3://<IDM_HOST>:<ADMIN_PORT>') - Import the OAM Policies using the
following:
wls:/idm_domain/serverConfig>
                                    importPolicy(pathTempOAMPolicyFile="/<path>/oam-policies.xml")
- Edit the
- Perform OFSAA User Provisioning Configuration by applying Pre-authentication
Advanced Rules to the basic Authorization Policy for users in the system. It is
applied from the OAM console after IDM Provisioning and is done to switch to a
form-based authentication scheme if the authorization header is not a basic
scheme. Update the pre-authentication advanced rules to a form-based
authentication scheme using the following steps:
- Login to the OAM Administrator Console.
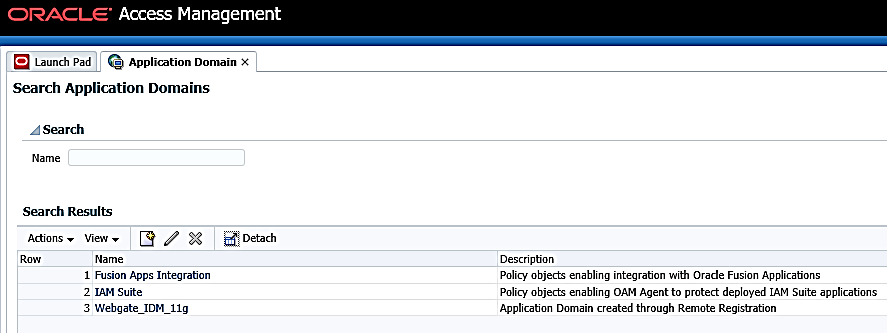
- From the Launch Pad, click Application
Domains from the Access Manager widget. The
Application Domain window is displayed.
Figure 12-18 Access Management Lauch Pad

- Search for the required application domain for which you want to switch
the authentication scheme and click Name from the
search results to display the details for the application domain.
Figure 12-19 Application Domain tab

- Click the Authentication Policies tab to view the
existing policies in the system.
Figure 12-20 Authentication Policies tab

- Click Basic Authentication Policy from the list
to view the details for the policy.
Figure 12-21 Authentication Policies tab

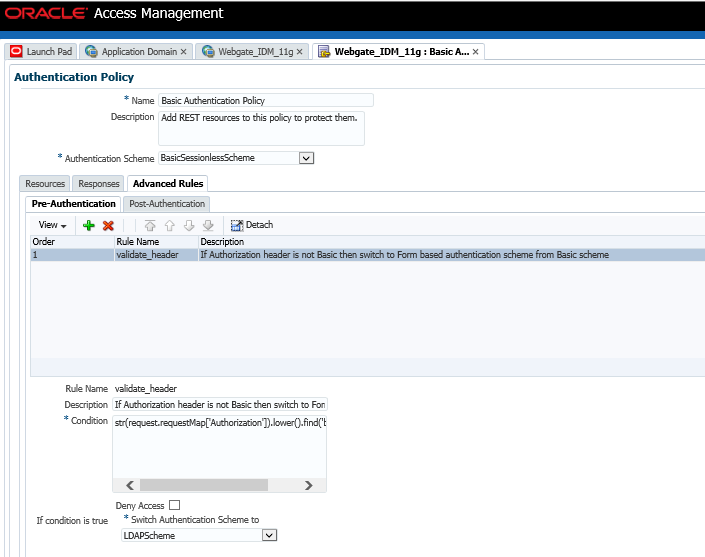
- Click Advanced Rules tab to view the details for Pre-Authentication.
Figure 12-22 Authentication Policies - Advanced Rules tab

- Click the Add button and create a rule with the
following information:
Figure 12-23 Authentication Policies - Advanced Rules tab

- Click Apply to save.