Creating Business Dimension
You can create a Business Dimension by specifying the Dimension definition details and defining the required Dimension. You can define a Business Dimension only if you have Dimension Write role mapped in the Infrastructure system.
To create a new Business Dimension from the Business Dimension window:
- Click Add button from the Business Dimensions toolbar. The
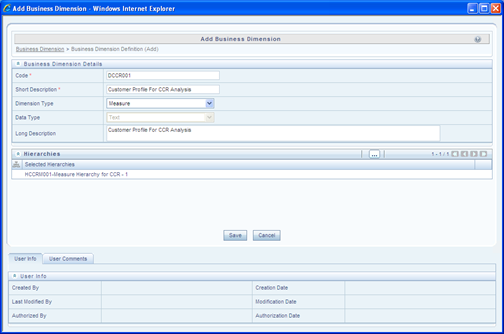
Add Business Dimension window is displayed.
Figure 9-42 Add Business Dimension window

- Enter the details in the Business Dimension Details section as tabulated:
The following table describes the fields in the Add Business Dimension Details window.
Table 9-19 Fields in the Add Business Dimension Details window and their Dimension
Field Description Code Enter a distinct code to identify the Dimension. Ensure that the code is alphanumeric with a maximum of eight characters in length and there are no special characters except underscore “_”.
Note the following:
The code can be indicative of the type of Dimension being created.
A pre-defined Code and Short Description cannot be changed.
Same Code or Short Description cannot be used for Essbase installation: "$$$UNIVERSE$$$", "#MISSING”, "#MI”, "CALC”, "DIM”, "ALL”, "FIX”, "ENDFIX", "HISTORY”, "YEAR”, "SEASON", "PERIOD”, "QUARTER”, "MONTH”, "WEEK”, "DAY".
In Unauthorized state, the users having Authorize Rights can view all the unauthorized Metadata.
Short Description Enter a Short Description based on the defined code. Ensure that the description is of a maximum of eight characters in length and does not contain any special characters except underscore “_”. Dimension Type Select the Dimension Type from the drop-down list. The available options are:
Regular: A regular dimension can have more than one hierarchy mapped to it. The option of mapping multiple hierarchies is available only for a non-SQLOLAP environment.
Time: In a time dimension, the hierarchy defined has leaves/nodes of high time granularity.
Measure: A measure dimension can have hierarchies of only type measure mapped to them it. The Measure hierarchy type is specific to Essbase MOLAP.
Data Type The Data Type is automatically selected based on the dimension type selected. The default data type for the Business Dimension definition is Text. Long Description Enter the Long Description if you are creating subject-oriented Dimension to help users for whom the Dimension is being created or other details about the type/subject. Ensure that description is of a maximum of 100 characters in length. - Click the View icon in the Hierarchies grid. The Hierarchy
Browser window is displayed.
Based on the dimension type, the hierarchies are displayed in the Members pane. You can expand and view the members under the Hierarchies by clicking “+” button.
- Select the hierarchies from the Members pane and click the Move button. The selected hierarchies are moved to the Selected Members pane.
- If you want to map all the available hierarchies, click Move All button.
- If you want to remove a selected hierarchy, select it from the Selected Members pane and click the Remove button. To deselect all the selected hierarchies, click Remove All button.
- Click OK and the selected hierarchies are listed in
the Hierarchies grid.
The User Info grid at the bottom of the window displays the metadata information about the Business Dimension created along with the option to add comments.
- Click Save in the Add Business Dimension window and save the details.