- Analytical Application Infrastructure User Guide
- System Configuration and Identity Management
- Identity Management
- System Administrator
- Segment Maintenance
- Creating Segment
Creating Segment
To create segment in the Segment Maintenance window:
- Select the Add icon from the Segment Maintenance tool bar. Add
button is disabled if you have selected any checkbox in the grid.
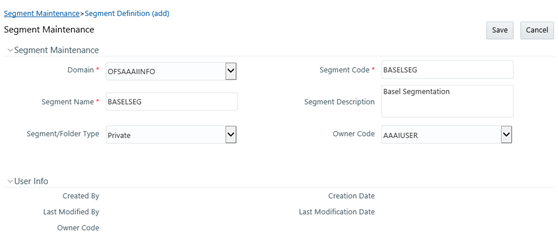
The New Segment window is displayed.
Figure 15-42 Segment Maintenance (add) window

- Enter the segment details as tabulated. The following table describes the fields in the Segment Maintenance (add) window
Table 15-25 Fields in the Segment Maintenance (add) window and their Descriptions
Field Description Fields marked in red asterisk (*) are mandatory. Domain Select the required domain for which you are creating a segment, from the drop-down list. Segment Code Enter a unique segment code. Ensure that the segment code does not exceed more than 10 characters and there are no special characters except underscore or extra spaces. Segment Name Enter a unique name for the segment. Ensure that there are no special characters in the name entered. Segment Description Enter the segment description. Ensure that there are no special characters in the description entered except spaces, “(“, “)”, “_”, “-“, and “.”. Segment/Folder Type Select the type of the segment/folder from the drop-down list. The options are Public, Private, and Shared. Owner Code Select the owner code from the drop-down list. - Click Save to upload the segment details. The User Info grid at the bottom of Segment Maintenance window displays metadata information about the segment created.