Mapper Maintenance
The Mapper Maintenance feature allows you to define the mappings among the participating hierarchies in the Mapper Definition window. You should select at least one member from each hierarchy to define a mapping. You can add multiple mappings among the hierarchies. The mappings will be stored in the database entity/table you have created during the mapper definition for further processing i.e. push down operation. After defining all mappings, you can push down the mappings to be effective in the system (The push down will be implicit if the same was opted at the mapper definition time). You need to be mapped to the role Mapper Access to access the Mapper Maintenance feature.
To define the mappings:
- From the Map Maintenance window, select the mapper definition and click
Mapper Maintenance. The Map window is displayed.
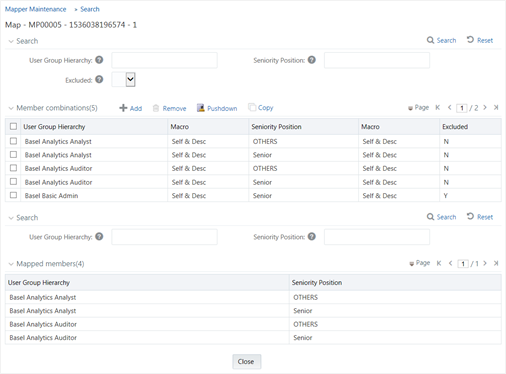
Figure 9-36 Map Maintenance window

Based on the hierarchies participating in the mapper definition, the search fields will be displayed. The Search fields are enhanced with the autocomplete drop-down feature. You need to enter at least 4 characters to display the drop-down options.
- Click Add on the Member Combinations toolbar.
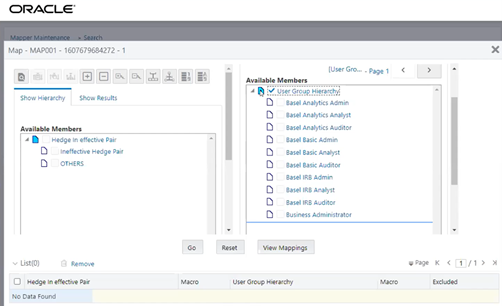
The hierarchies that were selected in the Mapper Definition window appear in the Map window, along with their members.
Figure 9-37 Mapper Definition window

You can select the Pagination icon to view more options under the selected member.
- Select the required hierarchy members from each hierarchy and click View
Mappings to view the already available mapping combinations with the
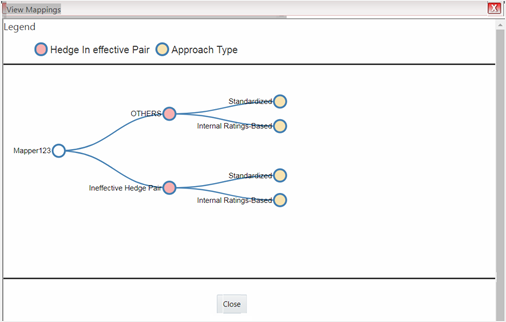
selected hierarchy members. The View Mappings window is displayed.
Figure 9-38 View Mapping Dialog window

- Click Close.
- To add a new mapping from the Add Mappings window, select the required hierarchy
members from each hierarchy and the corresponding user group to which you want to
map in case of security mapper and click Go. Each mapping
definition gets listed in the below grid. You should select at least one member from
each hierarchy to obtain a complete mapping.
Note:
If a child is mapped and parent is not mapped, the parent will be displayed as disabled in the hierarchy browser window.You can perform the following actions:
- Click the Sort Member icon to sort members based on path.
- Click the Sort Hierarchy icon to sort hierarchy (top to bottom).
- Click the Sort based on level icon to sort based on level.
- Click the Collapse icon or Expand icon to collapse or expand the members under a node respectively.
- Click the Collapse Branch icon or Expand Branch icon to collapse or expand the selected branch respectively.
- Click the Focus icon to focus only on the selected branch. The Available Values pane shows the members of the selected branch only. Click the Normal View icon to go back to normal view.
- Click the Numbers Right icon to display member's numeric codes on the right. The icon changes to Numbers Left icon.
- Click the Numbers Right icon to display member's numeric codes on the left. The icon changes to Show Number icon.
- Click the Show Number icon to show only member names. This is the default view. The icon changes to Numbers Right icon.
- Click the Number and Name Right icon to display member's alphanumeric codes on the right. The icon changes to Number and Name Left icon .
- Click the Number and Name Left icon to display member's alphanumeric codes on the left. The icon changes to Number and Name icon.
- Click the Number and Name icon to display only member names. This is the default view. The icon changes to Number and Name Right icon.
- Enter the mapping details as tabulated:
The following table describes the fields in the Mapping Definition window.
Table 9-16 Fields in the Mapping Definition window and their Description
Field Description Macro This drop-down list allows you to define conditions based on which the members will be mapped. The options are:
Self Only: Select this option if you want only the selected member to be mapped. If this option is selected, the hierarchy browser will display the selected member in enabled mode. If it has any descendants, those will be displayed in disabled mode.
Self & Desc: Select this option if you want the selected members along its descendants to be mapped.
Exclude Select Yes if you want to exclude certain members from being mapped.
For example, if you want to map a hierarchy to all user groups except one user group say UG1, then map the hierarchy to UG1 and select the Exclude option as Yes. This will ensure that all users belonging to user groups except UG1 can access all the members of the hierarchy.
- Click Save. All the mappings will be listed in the Member Combinations grid.
- You can use the copy functionality to copy an already created mapping and edit the
required fields. To copy a mapping,
- Select the mapping you want to copy, from the Member Combinations grid and
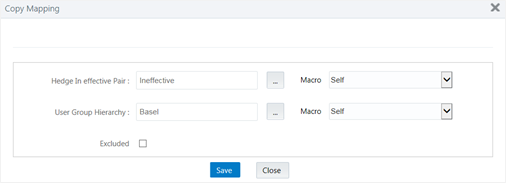
click Copy. The Copy Mapping window is displayed with
all Hierarchies participating in the mapping.
Figure 9-39 Copy Mapping window

- Select the Macro and Excluded information for the mapping and click Save. The copy of the mapping will appear in the Member Combinations grid.
- Select the mapping you want to copy, from the Member Combinations grid and
click Copy. The Copy Mapping window is displayed with
all Hierarchies participating in the mapping.
- Click Pushdown to refresh the mapping of participating hierarchies available in the system. A service will push down the mappings based on Config Schema Data (used combinations having macros) in to the atomic schema (exploded mappings). The pushed down mapping i.e. the exploded mappings will be displayed in the Mapped members pane.
- Select a mapping from the first panel and click Remove if you want to remove the mapping from the mapper. You should click Pushdown to effect these changes in the system.