4.3.13.3 Create Dynamic Deterministic Process
To create a new Dynamic Deterministic Process, perform the following steps:
- Navigate to the Dynamic Deterministic Process Summary page.
- Click Add . The Create Dynamic Deterministic Process page is displayed.
- Enter the details in the Process Details section.
Figure 4-127 Dynamic Deterministic Process

Table 4-81 List of process details used for Creating Dynamic Deterministic Process
Parameter Description Name Enter the name of the Dynamic Deterministic Process. Folder Select the Folder where the Dynamic Deterministic Process needs to be saved. Description Enter the description of the Dynamic Deterministic Process. Access Type Select the Access Type as Read Only or Read/Write. Reporting Currency Select the currency for consolidation of results Currency Provider This field will be active once you select Reporting Currency. Select the Currency Provider as Default. - Click Apply to navigate to the Balance Sheet Selection
section.
Figure 4-128 Balance Sheet Selection

- Enter the Balance Sheet Structure details as shown in the following
table:
Table 4-82 List of Balance Sheet Structure details used for Creating Dynamic Deterministic Process
Parameter Description Time Bucket Rule Folder Select the Folder from which you want to apply Time Bucket Rule. Time Bucket Rule Select the time horizon/aggregation for process Balance Sheet Source Select the Balance Sheet Source from Balance Sheet Source drop-down list. After selecting the Balance Sheet Source, Data Source details block is activated.Figure 4-129 Data Source details of Balance Sheet Selection

Enter the Data Source details of Balance Sheet.
Table 4-83 Data Source details used for Creating Dynamic Deterministic Process
Parameter Description Member Tree This shows the hierarchical structure and allows you to define rules by selecting the node members from the browser. Select Node and Click Menu icon next to it to view the available options. Figure 4-130 Member Tree Selection

Status of node is also displayed in Member Tree section, for example Selected, and so on. To select member hierarchy, following options are available:
- Expand self, child and descendants: Allows to expand the selected node itself along with its child and descendants.
- Expand selected member/branch: Allows to expand the selected node
- Select self, child: Allows to select the selected node itself along with its child.
- Select self, child and descendants: Allows to select the selected node itself along with its child and descendants.
- UnSelect self, child and descendants: Allows to unselect the selected node itself along with its child and descendants.
You can also search the members based on the filters.
To search a member , follow these steps:
- Navigate to Assumption Browser section of the Rule Definition page.
- Enter the Member ID, Name, Status, or Is Leaf in Search Criteria.
- Click Search. The
searched member(s) will be displayed in
Search Results section of
Assumption Browser .
Figure 4-131 Searching Members

Click Show Parentage icon to view the Parent-child Node level hierarchy details of selected Node.
Use Show Numeric Code Values (Left) icon to view the code value left to the Node name.
Use Show Numeric Code Values (Right) icon to view the code value right to the Node name.
Here, you can perform the following tasks on the searched node(s):
- Add
- Edit
- View
- Delete
Assumption Browser Select the Product from Assumption Browser and click Add under Action option. MDBSS Folder Select the MDBSS folder MDBSS Hierarchy Select the MDBSS hierarchy Data Filter Folder Select the Folder from which you want to apply Data Filter. Data Filter This field allows you to select a subset of data for processing by selecting a filter. You can select a filter that was previously created, or define a new filter on the fly. Note:
Data filter defined on PORTFOLIO table only can be used in Balance Sheet selection.
Currency Filter Optionally apply a currency filter on the selected data. - Click Apply to navigate to the Calculation Elements
section.
Figure 4-132 Calculation Elements
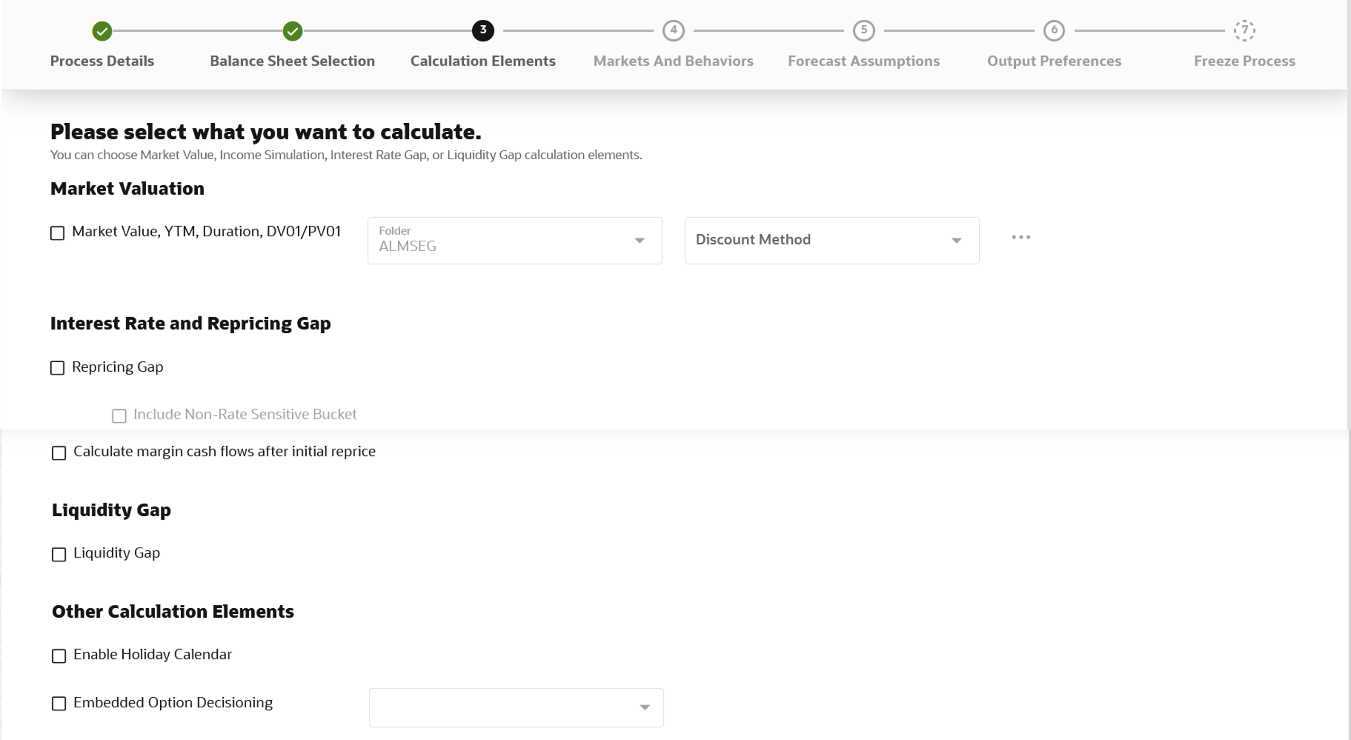
- Enter the Calculation Elements details as shown in the following table:
Table 4-84 List of Calculation Elements details used for Creating Dynamic Deterministic Process
Parameter Description Market Valuation Select the Market Value, YTM, Duration, DV01/PV01 option if you want to perform present value (MV) calculations. Discount method is required. You can select from predefined rules, or create one on the fly. Discount Method Folder Select the folder from where discount rules are saved. Discount Method Select Discount Method you want to be applied to the process. See Discount Method section to set up the Discount Method Rules. Also, following options are available when you click Action button next to Discount Method field.Figure 4-133 Discount Method
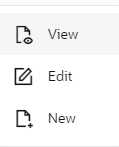
Repricing Gap Select Repricing Gap check-box if you want to include Interest Rate gap risk measures. Note, this requires a time bucket with IR Gap buckets defined. Include Non- Rate Sensitive Bucket Include Non Rate Sensitive Bucket check-box gets enabled when ‘Repricing Gap’ is selected. The Attribute of product dimension ‘Interest Rate Sensitivity Category’ identifies products as Interest Rate sensitive or Non Interest Rate sensitive. Once ‘Include Non Rate Sensitive Bucket’ is enabled, reprice gap output of Products which are mapped as Non Interest Rate sensitive, would move into Non Interest Rate Sensitive bucket.
For more information on Non Interest Rate Sensitive Bucket, see Time Buckets. If ‘Include Non Rate Sensitive Bucket’ is not enabled, engine will ignore ‘Interest Rate Sensitivity Category’ product attribute, and would treat all products as Interest Rate Sensitive. Reprice Gap output would move into respective Reprice Gap buckets.
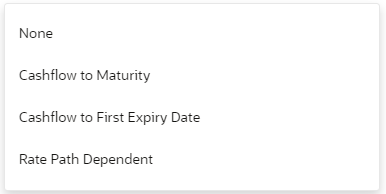
Calculate Margin Cash Flow After Initial Reprice If 'Calculate Margin casflows as After Initial Reprice' check-box is enabled, the engine will use the margin of adjustable rate instruments to continue generating interest cash flows after a gap repricing event up until total runoff occurs. Liquidity Gap Select the Liquidity Gap if you want to include liquidity gap risk measures. Note, this requires a time bucket with LR gap buckets defined. Enable Holiday Calendar Enable the Holiday Calendar cash flow dates falling on a holiday to adjust as per defined conventions. Holiday calendar criteria is defined on the instruments. Embedded Option Decisioning If your processed data contains fixed rate bonds with embedded options, you can select the behavior of the option to force it to maturity of the instrument, force it to first option expiry date, or let it be rate path dependent. This drop-down has following options:
Figure 4-134 Embedded Option Decisioning
- Click Apply to navigate to the Markets and Behaviors
section.
Figure 4-135 Markets and Behaviors

- Enter the Markets and Behaviors details as shown in the
following table:
Table 4-85 List of Market and Behavior details used for Creating Dynamic Deterministic Process
Parameter Description Forecast Rates Select the Folder and Forecast Rates Rule you want to be applied to the process. See Forecast Rates to define rate scenarios. You can select a Forecast Rates Rule that was previously created, or define a new rule on the fly. Figure 4-136 Forecast Rates

Prepayment Rules and Early Redemptions Select the Folder and Prepayment Rule you want to be applied during cash flow calculation. See Prepayment Methods to set up Prepayment Methods. This is an optional step. You can select a Prepayment Rule that was previously created, or define a new rule on the fly. Figure 4-137 Prepayment Rules

- Enter the following details in Other Behavioral Characteristics
sub-section of Market and Behaviors section.
Figure 4-138 Other Behavioral Characteristics

Table 4-86 Product Characteristics details used for Creating Dynamic Deterministic Process
Parameter Description Product Hierarchy Folder You can specify additional processing parameters at a product-currency level.
Select the Folder from the Product Hierarchy Folder list.
Product Hierarchy Select the Product Hierarchy on which you want to specify the parameters. To add a Product Hierarchy, follow these steps:
- Click Open Hierarchy Browser button next to the Hierarchy field.
- Select one or more products using the corresponding check-box and click Done.
Figure 4-139 Product details

- After clicking Add, the list of products is displayed with the
following details:
Table 4-87 Product details used for Creating Dynamic Deterministic Process
Parameter Description Product Shows the selected product details. Currency Shows the currency of the selected product. Interest Credited Yes or No status of Interest Credited. This option shows the interest payments to be capitalized as principal on simple or non-amortizing instruments. Model With Gross Rates If the institution has outsourced loan serving rights for some of the assets (most typically mortgages), the rates paid by customers on those assets (gross rates) are greater than the rates received by the bank (net rates). For these instruments, both a net and gross rate is calculated within the cash flow engine and both gross and net rate financial elements are the output. The gross rate is used for prepayment and amortization calculations. The net rate is used for income simulation and the calculation of retained earnings in the auto-balancing process. Currency Gain/Loss If you are consolidating to a reporting currency, select one of the following methods - Historical
- Temporal
- Currency Rate
- Click Apply to navigate to the Forecast Assumptions
section.
Figure 4-140 Forecast Assumptions
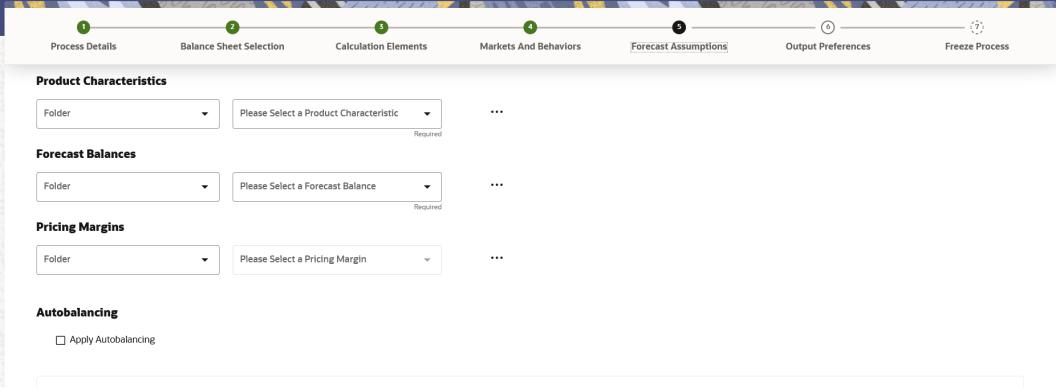
- Enter the Forecast Assumptions details as shown in the following table:
Table 4-88 List of Forecast Assumptions details used for Creating Dynamic Deterministic Process
Parameter Description Product Characteristics Select the Folder and Product Characteristics Rule you want to be applied to the process. See Product Characteristics to define the Product Characteristics rules. Figure 4-141 Product Characteristics

Forecast Balances Select the Folder and Forecast Balance Rule you want to be applied to the process. See Forecast Balances to define the Forecast Balances rules. Figure 4-142 Forecast Balances

Pricing Margins Select the Folder and Pricing Margin Rule you want to be applied to the process. See Pricing Margins to define the Pricing Margins rules. Figure 4-143 Pricing Margins

Autobalancing Select Apply Autobalancing check-box to enable the Autobalancing. Use autobalancing to maintain a balanced balance sheet, and generate retained earnings, dividends and taxes. Product leaf members used during the autobalancing process must be defined within your Application Preferences, including: Assets Liabilities Retained Earnings Dividends Federal Tax State Tax Accumulated Translation Balance
If you do not completely define the required autobalancing leaves in Application Preferences, an error message is generated during processing.
- Click Apply to navigate to the Output Preferences
section.
.
Figure 4-144 Output Preferences
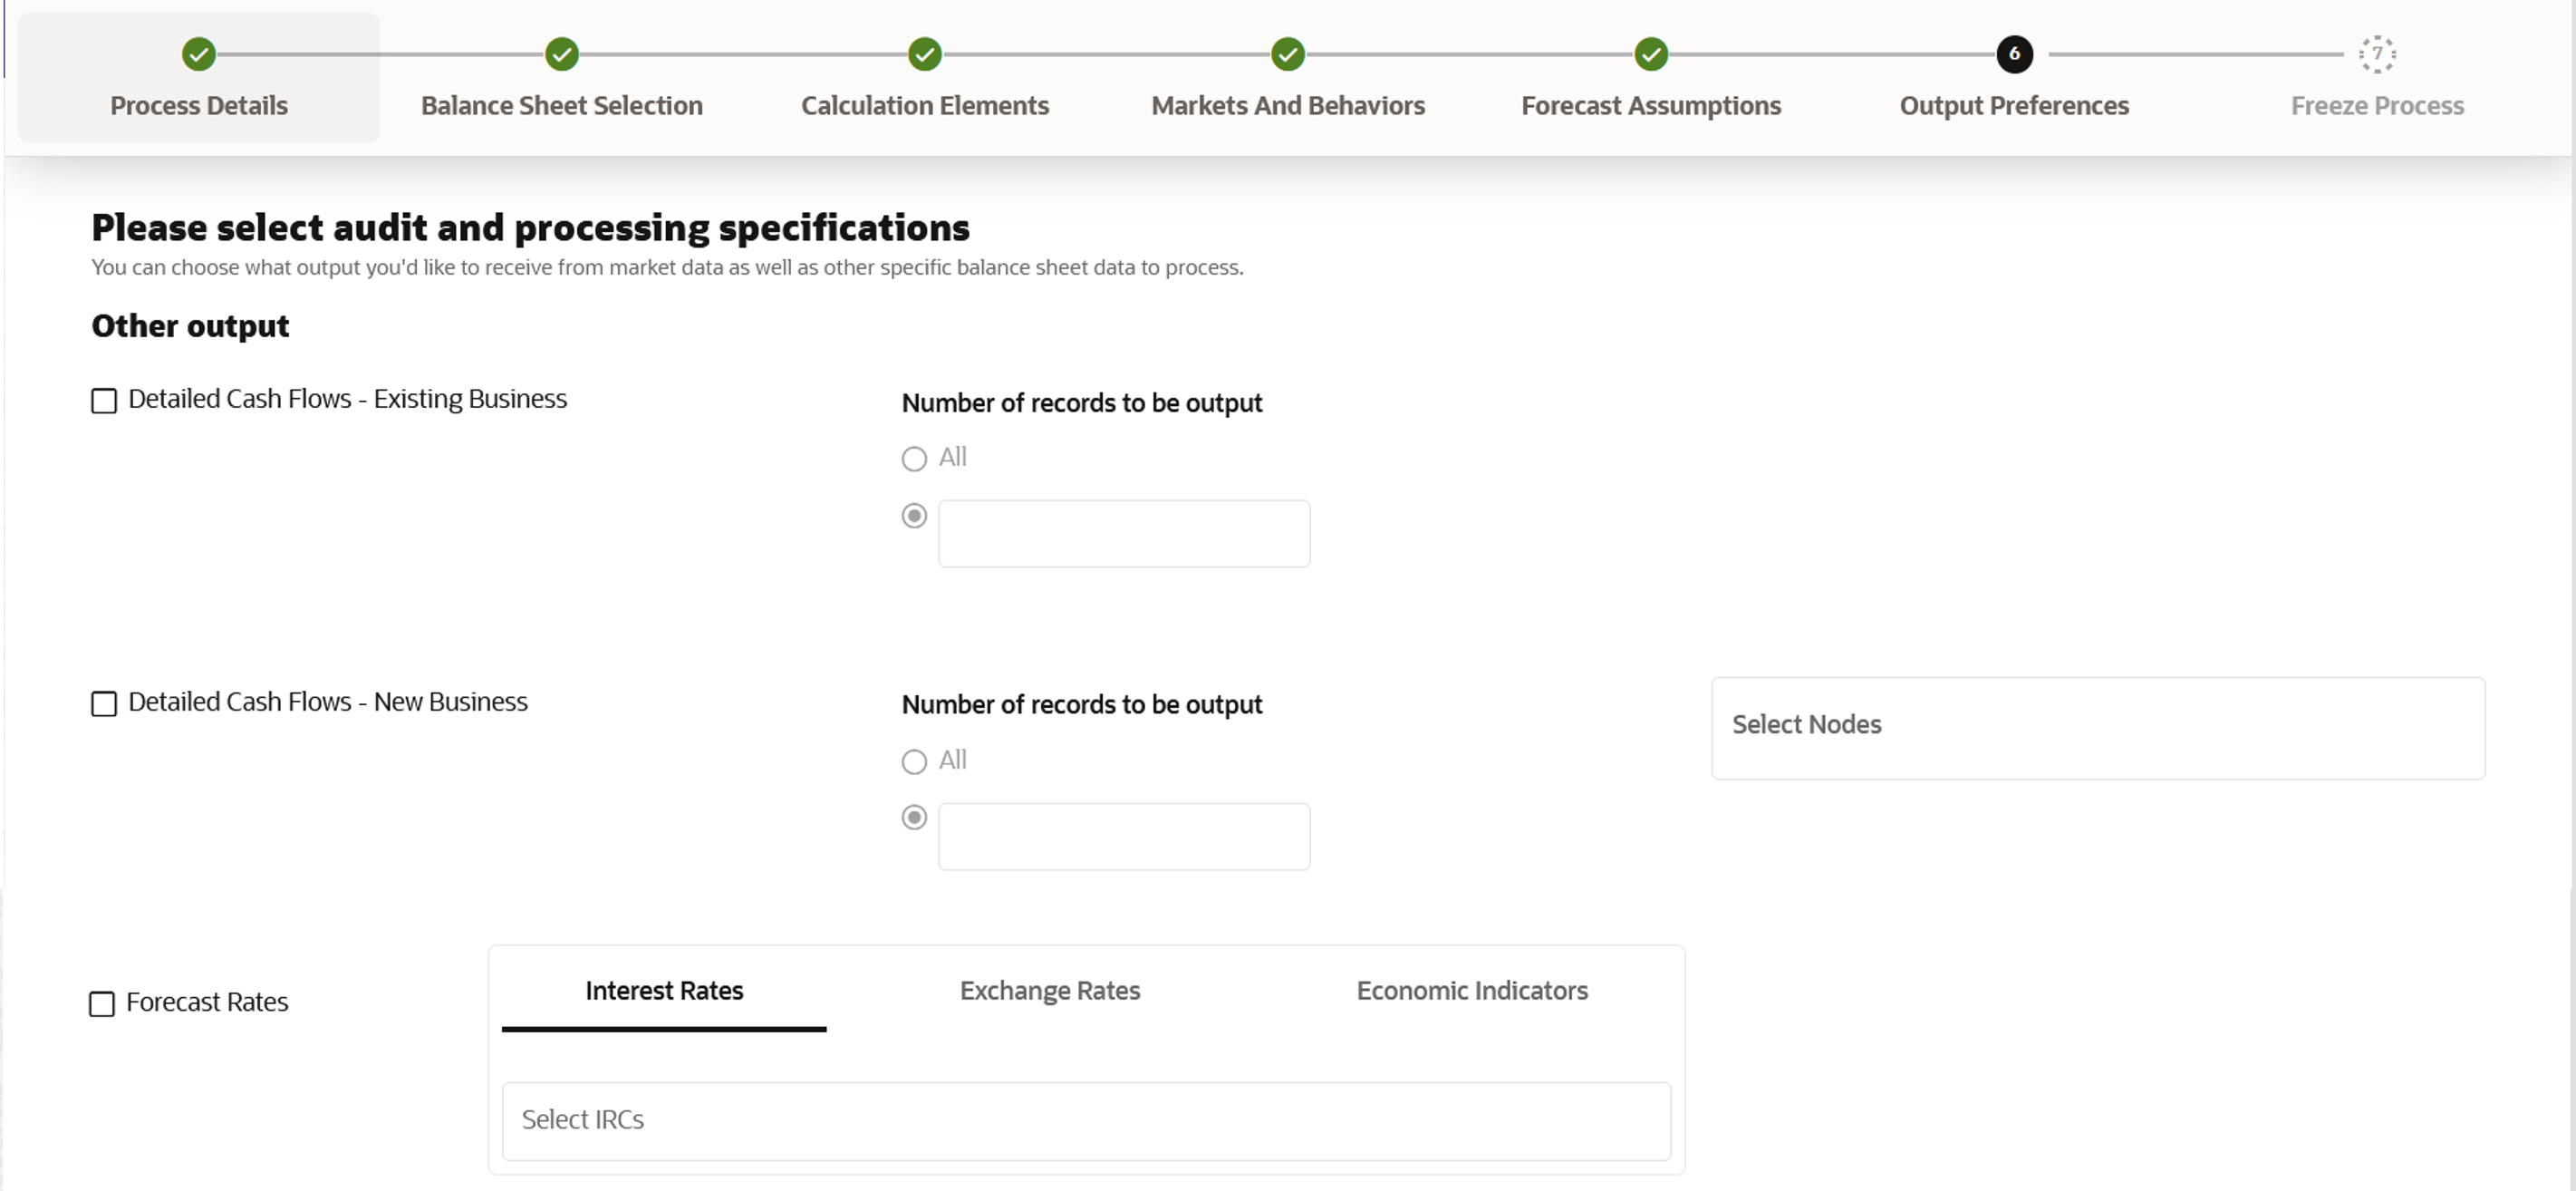
- Enter the Output Preferences details shown in the following table.
Table 4-89 List of Output Preferences details used for Creating Dynamic Deterministic Process
Parameter Description Detailed Cash Flow - Existing Business Check the box to record the instrument detail cash flows occurring for the desired number of records processed. For each record, daily cashflow and market value results are written to the
FSI_ALM_CASHFLOW_OUTPUT_HISTandFSI_ALM_CASHFLOW_DYN_MV_OUTPUT_HISTtables.Enter desired number of Records in the box or select all records to be output.
Note:
The number of records output directly impact processing time. It is recommended to use this as an Audit function only, with few records chosen.Detailed Cash Flow - New Business Check the box to record the instrument detail cash flows occurring for the desired number of records processed. For each record, daily cashflow and market value results are written to the
FSI_ALM_CASHFLOW_OUTPUT_HISTandFSI_ALM_CASHFLOW_DYN_MV_OUTPUT_HISTtables.Enter the desired number of Records in the box or select all records to be output.
Note:
The number of records output directly impact processing time. It is recommended to use this as an audit function only, with few records chosen.NOTE:
You can also select the specific MDBSS node to record the instrument detail cash flows occurring for the desired number of records processed. The number of new business records created depends on new business definition, and can range from few to many for a specific MDBSS node.
For example, forecast balance method of Rollover with multiple Maturity Mix Terms, defined for many modeling time bucket, can create many number of new business records, whereas for forecast balance method of New Add with single Maturity Mix Term, defined for few modeling time bucket, will create few business records.
Forecast Interest Rates Select the Interest Rate Curves for which you want the engine to write forecasted interest rates in the database table. Forecast Exchange Rate Select the Exchange Rates for which you want the engine to write forecasted exchange rates in the database table. Forecast Economic Indicators Select the Economic Indicators for which you want the engine to write forecasted interest rates in the database table. - Click Apply to navigate to the Freeze Process section.
Figure 4-145 Freeze Process
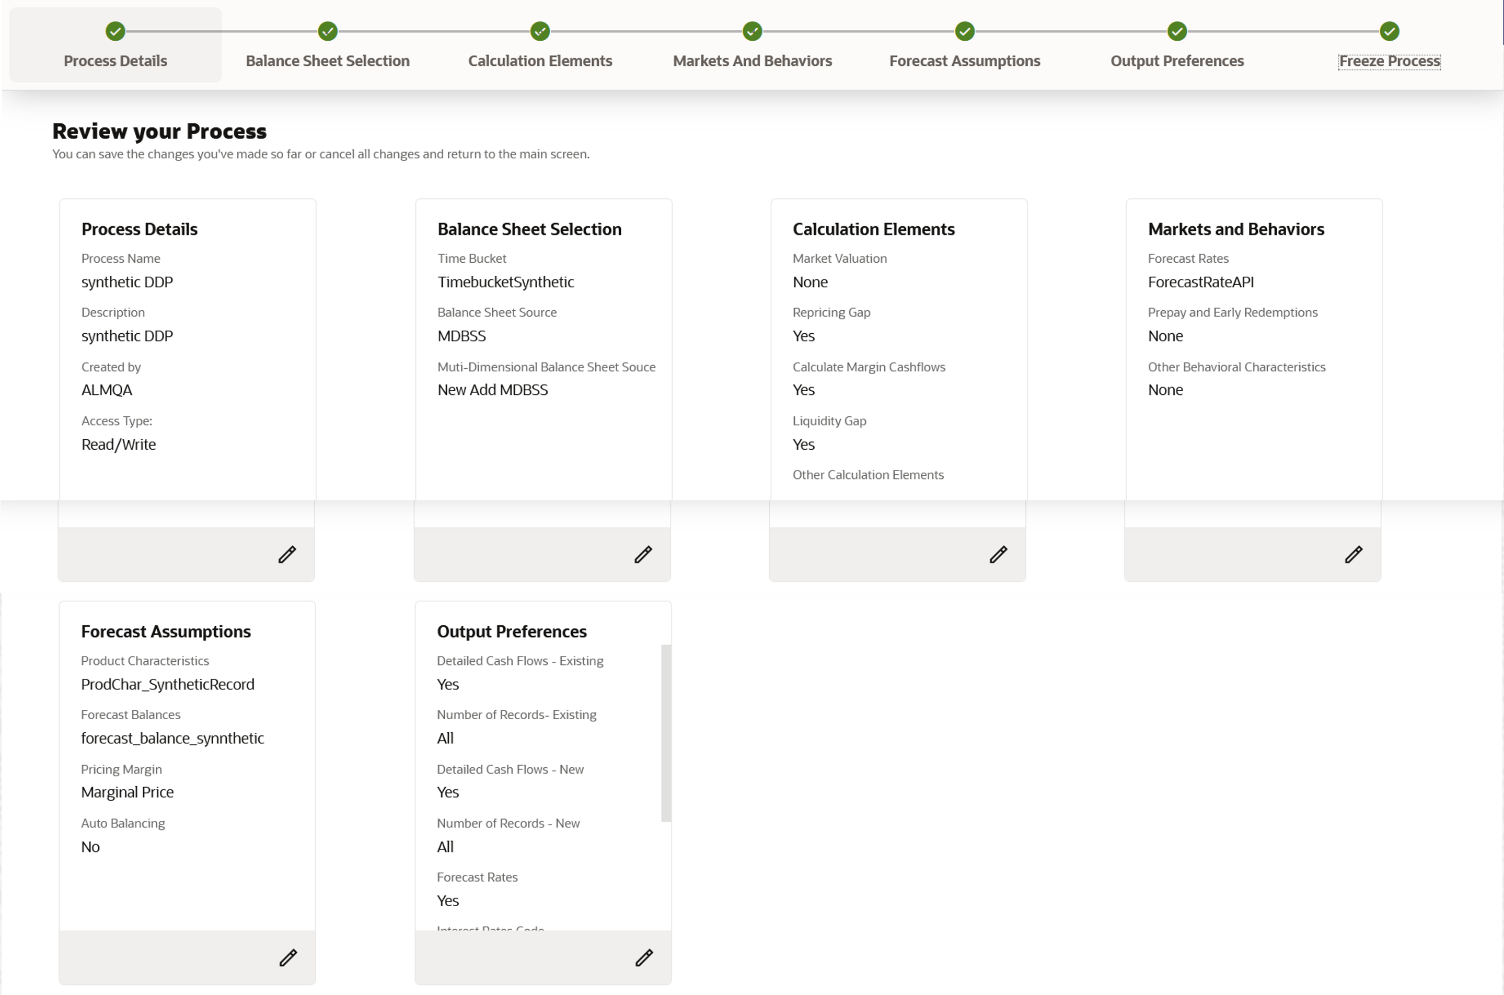
- Verify the changes and click Save.