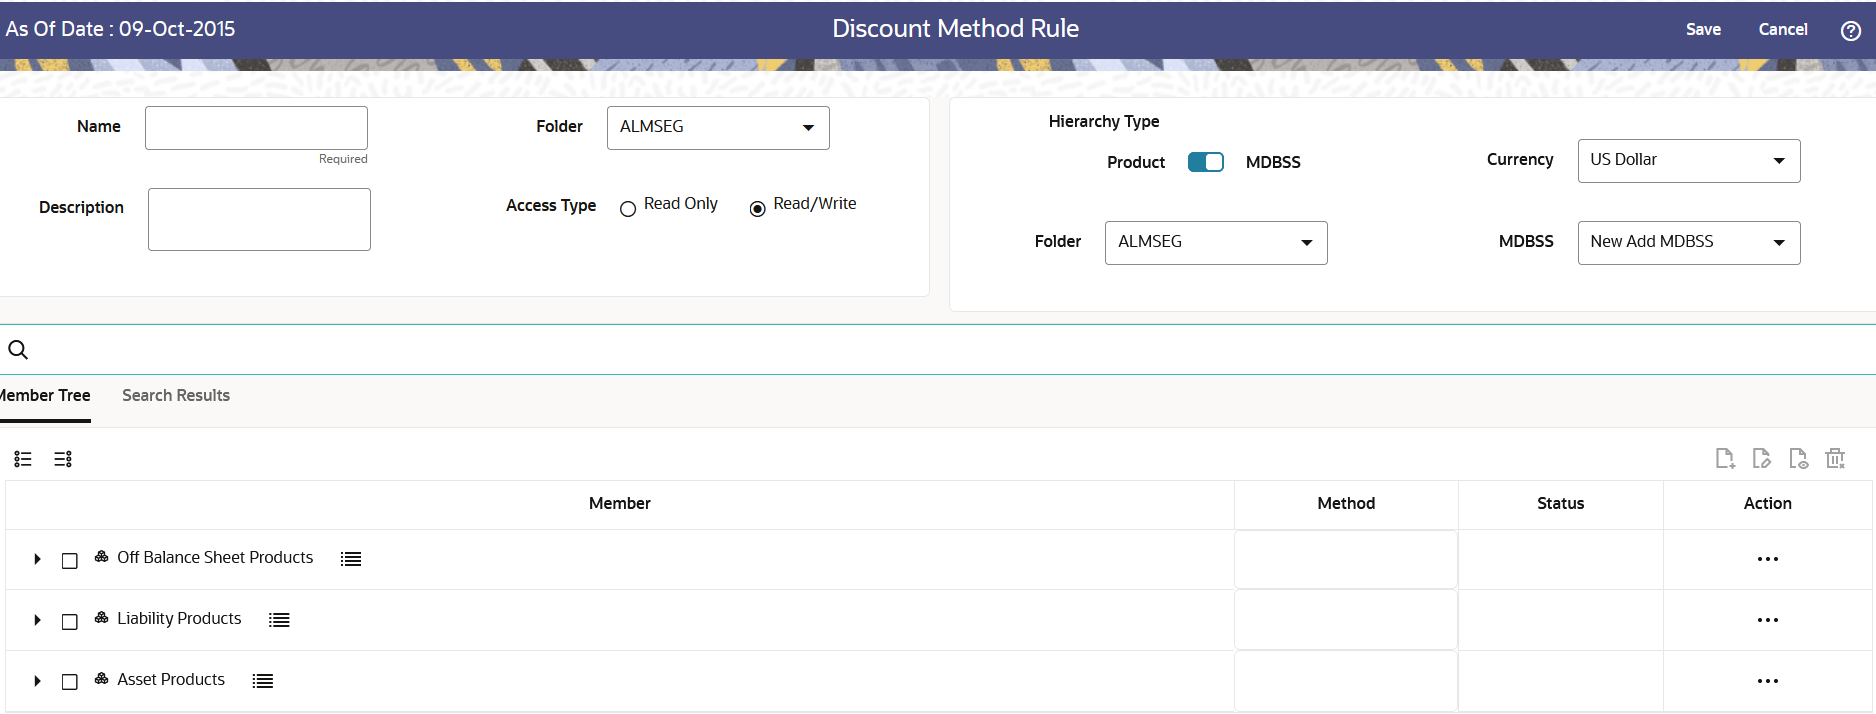
5.3.1.6.1 Create Discount Method Rule
You create a Discount Methods rule to assign Discounting Methods to your products. To create a Discount Method Rule, follow these steps:
- Navigate to the Discount Methods Rule Summary page.
- Click Add. The Discount Method Rule page is displayed.
- Enter the following details:
Table 5-31 Discount Method Details
Fields Description Name Enter the name of the Discount Method Rule. Description Enter the description of the Discount Method Rule. This is an optional field. Folder Select the Folder where the Discount Method Rule needs to be saved. Access Type Select the Access Type as Read-Only or Read/Write. - Select a Product Hierarchy. You can define methodologies at any level of the
hierarchical product dimension. The hierarchical relationship between the nodes
allows inheritance of methodologies from Parent Nodes to Child Nodes. Enter the
following details for Product Hierarchy selection:
Table 5-32 Product Hierarchy Details section
Fields Description Folder Select the Folder where Product Hierarchy is previously created Hierarchy Select the Hierarchy of the product Currency Select the Currency. - Select the Hierarchy Type as Product or MDBSS
Note:
MDBSS is enabled only in ALM Cloud Service.If any member is a currency in the MDBSS hierarchy (for example, INR) and selected currency is different (for example USD), then the member and its children nodes cannot be defined.
- If you select Hierarchy Type as MDBSS,
then following options are available:
Figure 5-126 Hierarchy Type as MDBSS

- Select a Currency.
- Select a MDBSS Folder and MDBSS.
- SelectMDBSS Node(s) from Member Tree of
Assumption Browser. The Assumption Browser has following two tabs:
Member Tree and Search Results
- Member Tree: Member Tree
tab shows the hierarchical structure and allows you to
define rules by selecting the node members from the browser.
Select Node and Click Menu icon next to it to view the
available options.
Figure 5-127 Member Tree

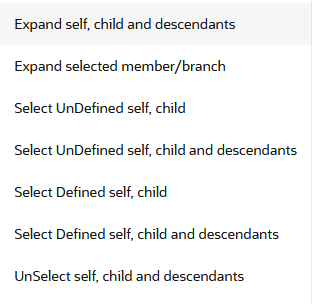
Status of node is also displayed in Member Tree section, for example Selected, and so on. To select member hierarchy, following options are available:
- Expand self, child and descendants: Allows to expand the selected node itself along with its child and descendants.
- Expand selected member/branch: Allows to expand the selected node
- Select UnSelect self, child: Allows to unselect the selected node itself along with its child
- Select UnSelect self, child and descendants: Allows to unselect the selected node itself along with its child and descendants.
- Select Defined self, child: Allows to select the selected node itself along with its child.
- Select Defined self, child and descendants: Allows to select the selected node itself along with its child and descendants.
- UnSelect self, child and descendants: Allows to unselect the selected node itself along with its child and descendants.
Use Show Numeric Code Values (Left) icon to view the code value left to the Node name.
Use Show Numeric Code Values (Right) icon to view the code value right to the Node name.
Here, you can perform the following tasks on the selected node(s):
- Add
- Edit
- View
- Delete
- Copy
- Search Results: You can
also search the members based on the filters. This section
shows the searched node(s). To search a member , follow
these steps:
- Navigate to Assumption Browser
section of the Rule Definition page.
Note:
Before using the Member Search in Assumption Browser, you must execute the batch Member_Browser_Refresh. For more information, see note in Create MDBSS section. - Enter the Member ID, Name, Status, or
Is Leaf in Search Criteria.
Figure 5-128 Search Criteria

- Click Search. The searched
member(s) will be displayed in Search Results
section of Assumption Browser.
Figure 5-129 Searching Members

Here, you can perform the following tasks on the searched node(s):
- Add
- Edit
- View
- Delete
- Copy
Click Show Parentage icon to view the Parent-child Node level hierarchy details of selected Node.
Use Show Numeric Code Values (Left) icon to view the code value left to the Node name.
Use Show Numeric Code Values (Right) icon to view the code value right to the Node name.
- Navigate to Assumption Browser
section of the Rule Definition page.
- Member Tree: Member Tree
tab shows the hierarchical structure and allows you to
define rules by selecting the node members from the browser.
Select Node and Click Menu icon next to it to view the
available options.
- If you select Hierarchy Type as Product,
then following options are available:
Figure 5-130 Hierarchy Type as Product

- Select a Currency.
- Select a Product Folder and Product Hierarchy.
- Select Product from Member Tree of Assumption
Browser. The Assumption Browser has following two tabs: Member Tree
and Search Results
- Member Tree: Member Tree
tab shows the hierarchical structure and allows you to
define rules by selecting the node members from the browser.
Select Node and Click Menu icon next to it to view the
available options.
Figure 5-131 Member Tree

Status of node is also displayed in Member Tree section, for example Selected, and so on. To select member hierarchy, following options are available:
- Expand self, child and descendants: Allows to expand the selected node itself along with its child and descendants.
- Expand selected member/branch: Allows to expand the selected node
- Select UnSelect self, child: Allows to unselect the selected node itself along with its child
- Select UnSelect self, child and descendants: Allows to unselect the selected node itself along with its child and descendants.
- Select Defined self, child: Allows to select the selected node itself along with its child.
- Select Defined self, child and descendants: Allows to select the selected node itself along with its child and descendants.
- UnSelect self, child and descendants: Allows to unselect the selected node itself along with its child and descendants.
Use Show Numeric Code Values (Left) icon to view the code value left to the Node name.
Use Show Numeric Code Values (Right) icon to view the code value right to the Node name.
Here, you can perform the following tasks on the selected node(s):
- Add
- Edit
- View
- Delete
- Copy
- Search Results: You can
also search the members based on the filters. This section
shows the searched node(s). To search a member , follow
these steps:
- Navigate to Assumption Browser section of the Rule Definition page.
- Enter the Member ID, Name, Status, or
Is Leaf in Search Criteria.
Figure 5-132 Search Criteria

- Click Search. The searched
member(s) will be displayed in Search Results
section of Assumption Browser.
Figure 5-133 Searching Members

Here, you can perform the following tasks on the searched node(s):
- Add
- Edit
- View
- Delete
- Copy
Click Show Parentage icon to view the Parent-child Node level hierarchy details of selected Node.
Use Show Numeric Code Values (Left) icon to view the code value left to the Node name.
Use Show Numeric Code Values (Right) icon to view the code value right to the Node name.
- Member Tree: Member Tree
tab shows the hierarchical structure and allows you to
define rules by selecting the node members from the browser.
Select Node and Click Menu icon next to it to view the
available options.
- If you select Hierarchy Type as MDBSS,
then following options are available:
- Click Add from Assumption Browser section.
- Define Conditions for Product Definitions. For more information see Conditional Assumptions section.
- After defining the conditions, navigate to Discount Method
section.
Figure 5-134 Discount Method section

- Enter the following details:
Table 5-33 Discount Method Section
Fields Description Discount Method Select the Discount Method from Discount Method List. Discount Rate Enter Discount Rate if Spot Input Method is selected. Interest Rate Curve From Interest Rate Code List, select an appropriate Interest Rate Code.
The list of Interest Rate Codes depends on the selected currency. If the selected currency is the default currency, all Interest Rate Codes appear. For other currency selections, the list of interest rate codes includes only interest rate codes whose reference currency is the same as the selected currency.
Spread Source You can optionally choose to add a spread of margin over the Interest Rate derived from IRC. Spread can be defined in the Discount Method Rule or it can be given along with Instrument record.
You can select source of the spread as Discount Rule or Account Data is method is Spot IRC, Forecast (Original Term) and Forecast (Remaining Term).
Spread When Discount Rule is selected as Spread Source then you can specify the amount of spread/margin here.
Spread field is enabled when spread Source is given as Account Data.
Type the percentage difference (+ or -) between the selected rate index and the value you want to use for the discount rate(s) within market value calculations.
Input a Rate Spread, type 1.0000.
A spread of 1% returns a discount rate of 1.00% above the reference interest rate. Type a negative number for a spread below the reference interest rate.
Note:
You can use negative product IDs when defining the Discount Method Rule. - Navigate to Cash Flow Details section. The Cash Flow Definition Details section is used in unique instances to specify the portion of the Cash Flow that is used to calculate a Market Value.
- Enter the following details:
Table 5-34 Cash Flow Details Section
Fields Description Cash Flow Type - Interest Only : ignores all principal runoff for market value purposes. Use this option for Off-balance sheet items where principal is equal to Notional Principal and is therefore not a true Cash Flow.
- Principal & Interest : calculates principal and interest both for Market Value purposes.
- Principal Only : ignores all interest rate Runoff for market value purposes.
Interest Type The Cash Flow Interest Type determines which interest component is included in the cash flow definition. The Cash Flow Interest Type can be one of three values:
- Net Rate
- Gross Rate
For typical processing, you will use the Net Rate for the interest component of the cash flow. Special processing objectives, such as valuation of the funding center, may require you to use the other cash flow interest types.
Mature at Repricing Calculates a market value and YTM for a given transaction up to the repricing date. For market value and YTM purposes the transaction is assumed to mature on the repricing date. Duration is always calculated to the next reprice date, not to maturity, regardless of the mature at repricing selection. Ignore Origination Cash Flows for Forward-Starting Instruments This feature allows the cash flow engine to ignore the origination Principal Cash Flows of any forward-starting instrument. The corresponding market value, duration, convexity and yield calculations will not reflect the Origination Amount. Origination principal Cash Flow will still be reported. Use Principal in Market Value Calculations (Off-Balance Sheet Only) This feature allows the Cash Flow Engine to consider principal in the calculation of market value, duration, convexity and yield calculations, even if principal is not actually exchanged. - Click Apply.
- Click Save.