5.3.2.3.1 Create Pricing Margin
To create the Pricing Margin, do the following:
- Navigate to the Pricing Margin summary page.
- Click Add icon. The Add Pricing Margin page is
displayed.
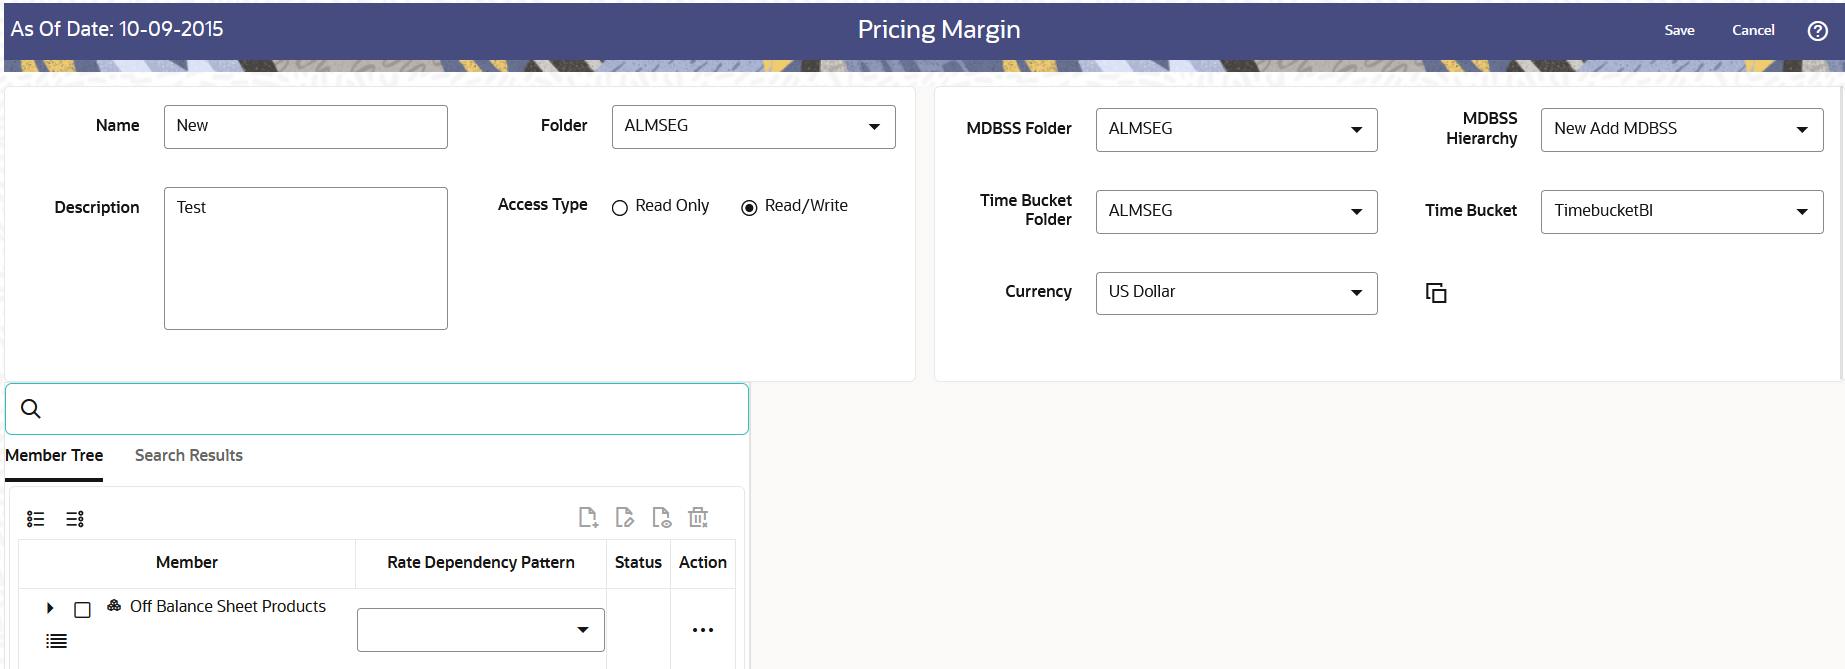
Figure 5-169 Pricing Margin Page

- Enter the following Details.
Table 5-44 Create Pricing Margin Rule
Fields Description Name Enter the name of the Pricing Margin Rule. Description Enter the description of the Pricing Margin Rule. This is an optional field. Folder Select the Folder where the Pricing Margin Rule needs to be saved. Access Type Select the Access Type as Read-Only or Read/Write. MDBSS Folder Select the MDBSS folder MDBSS Hierarchy Select the MDBSS hierarchy Time Bucket Folder Select the Folder from which you want to apply Time Bucket Rule. Time Bucket Rule Select the time horizon/aggregation for rule. Currency Select the currency for Pricing Margin. Copy Definition to another Currency This functionality provides the option to copy, in total or selectively, the product assumptions contained within the PBSM assumption Rules from one currency to another currency or a set of currencies, or from one product to another product or set of products. Copy of assumptions enhances the usability of PBSM Cloud in a multi-currency environment. For example, if you have 10 currencies enabled in the application and you must input only one set of assumptions, then copy those assumptions across all enabled currencies, instead of having to input 10 full sets, thereby saving a significant amount of input time. This functionality also reduces the risk associated with data input errors as you must audit inputs for a set of assumptions before executing the copy procedure.
This process requires you to select a replacement yield curve for each target currency. These currency-specific IRCs replace the IRC selection made for each product in the source currency selection set. It is possible to edit the target assumptions after the initial copy processes have been completed.To use this functionality, follow these steps:
- Click Copy Definition to another
Currency icon next to Currency field.
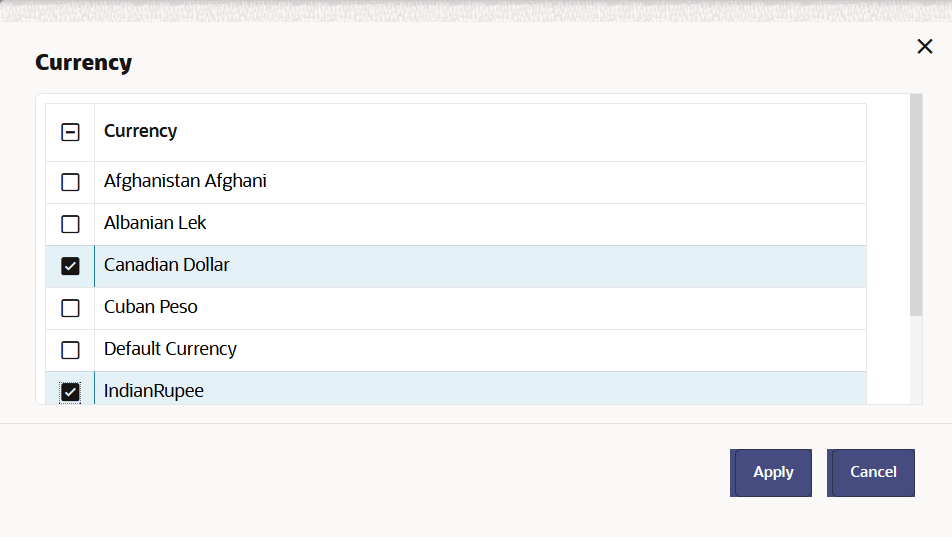
The Currency window is displayed.
Figure 5-170 Copy Definition to another Currency

- Select Currency(ies) and click Apply.
- Click Copy Definition to another
Currency icon next to Currency field.
The Currency window is displayed.
- Select the MDBSS node(s) from Assumption Browser. The Assumption Browser
has following two tabs: Member Tree and Search Results
- Member Tree: Use the Member Tree tab to view the hierarchical
structure and define rules by selecting the node members from the browser.
Select Node and click the menu icon next to it to view the available
options. Select Node and Click Menu icon next to it to view the available
options.
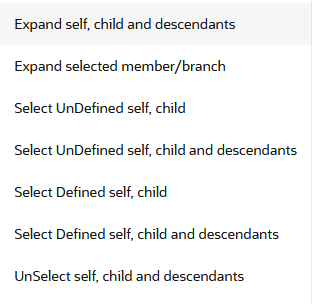
Figure 5-171 Member Tree

Status of node is also displayed in Member Tree section, for example Selected, and so on. To select member hierarchy, following options are available:
- Expand self, child and descendants: Allows to expand the selected node itself along with its child and descendants.
- Expand selected member/branch: Allows to expand the selected node
- Select UnSelect self, child: Allows to unselect the selected node itself along with its child
- Select UnSelect self, child and descendants: Allows to unselect the selected node itself along with its child and descendants.
- Select Defined self, child: Allows to select the selected node itself along with its child.
- Select Defined self, child and descendants: Allows to select the selected node itself along with its child and descendants.
- UnSelect self, child and descendants: Allows to unselect the selected node itself along with its child and descendants.
Use Show Numeric Code Values (Left) icon to view the code value left to the Node name.
Use Show Numeric Code Values (Right) icon to view the code value right to the Node name.
Here, you can perform the following tasks on the selected node(s):
- Add
- Edit
- View
- Delete
- Copy
- Search Results: You can also search the members based on the
filters. This section shows the searched node(s). To search a member ,
follow these steps:
- Navigate to Assumption Browser section of the Rule Definition page.
- Enter the Member ID, Name, Status, or Is Leaf in Search
Criteria.
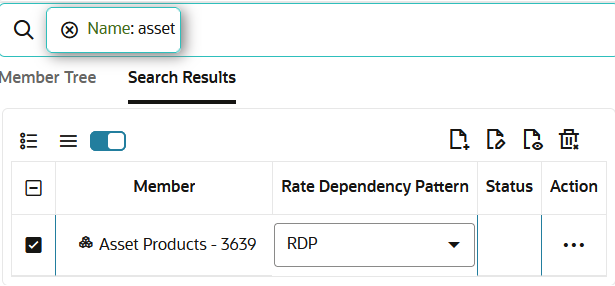
Figure 5-172 Search Criteria

- Click Search. The searched member(s) will be
displayed in Search Results section of Assumption
BrowserHere, you can perform the following tasks on the searched node(s):
Figure 5-173 Searching Members

- Add
- Edit
- View
- Delete
- Copy
Click Show Parentage icon to view the Parent-child Node level hierarchy details of selected Node.
Use Show Numeric Code Values (Left) icon to view the code value left to the Node name.
Use Show Numeric Code Values (Right) icon to view the code value right to the Node name.
- Member Tree: Use the Member Tree tab to view the hierarchical
structure and define rules by selecting the node members from the browser.
Select Node and click the menu icon next to it to view the available
options. Select Node and Click Menu icon next to it to view the available
options.
- Select Rate Dependency Pattern from corresponding Rate Dependency Pattern drop-down. This drop-down lists all the predefined Rate Dependency Patterns. For more information, see Rate Dependency Pattern.
- Click Add from Assumption Browser section.
- Click Save