6.4.1.1.1 Creating a Prepayment Data Creation Process
To create a new Prepayment Model Data Creation Process, perform the following steps:
- Navigate to the Prepayment Model Data Creation Process Summary page.
- Click Add. The Create Data Creation Process page is displayed.
- Follow the steps mentioned in below sections:
- Process Details
- Portfolio Selection
- Market Rate and Process Parameter Definition
- Review and Submit
- Click Submit/Save after entering all details in above sections.
Step 1: Process Details
- From Prepayment Model Data Creation Process
tab, click Start. The Process Details page is
displayed.
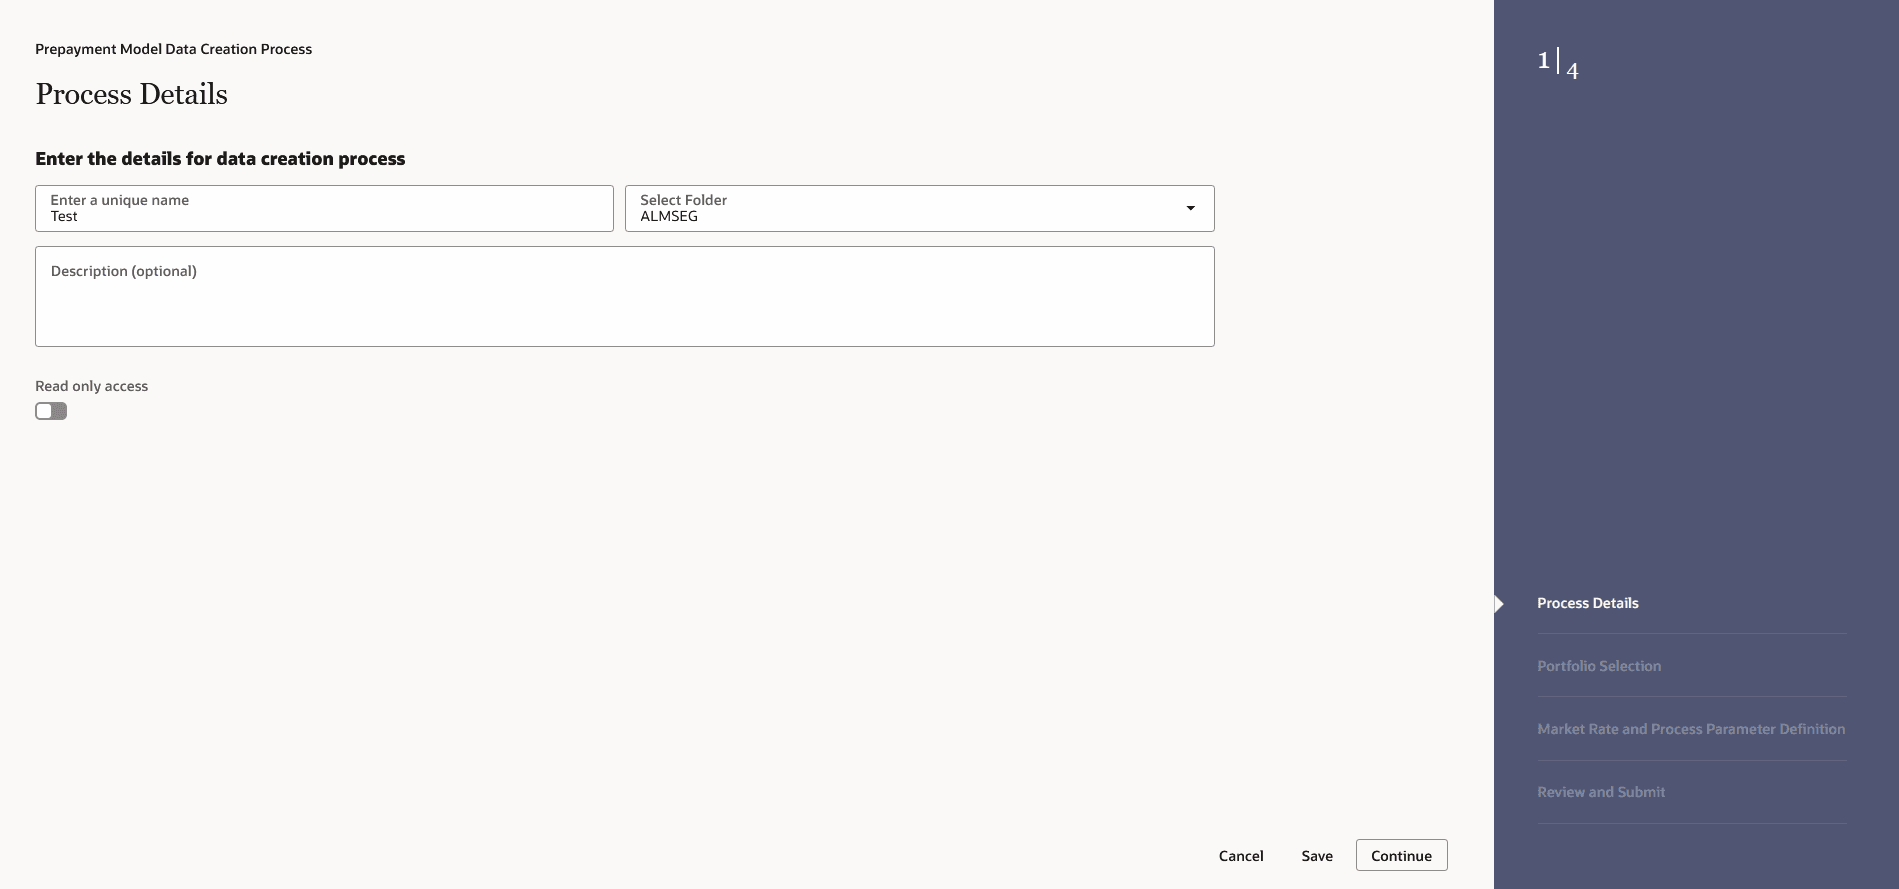
Figure 6-335 Process Details

- Enter the following details:
- Process Name: Name of Process. The Data Creation Process Name should be unique. Any special characters are not applicable.
- Folder: Folder Name where you want to save the process.
- Description: Description of Process. The maximum limit of this field is 300 characters. You can enter special characters in this field.
- Read only Access: Select this option, if you want to make the process Readonly.
- Click Continue.
Step 2: Portfolio Selection
- Navigate to the Portfolio Selection section.
The Portfolio Selection window is displayed to set
Portfolio.
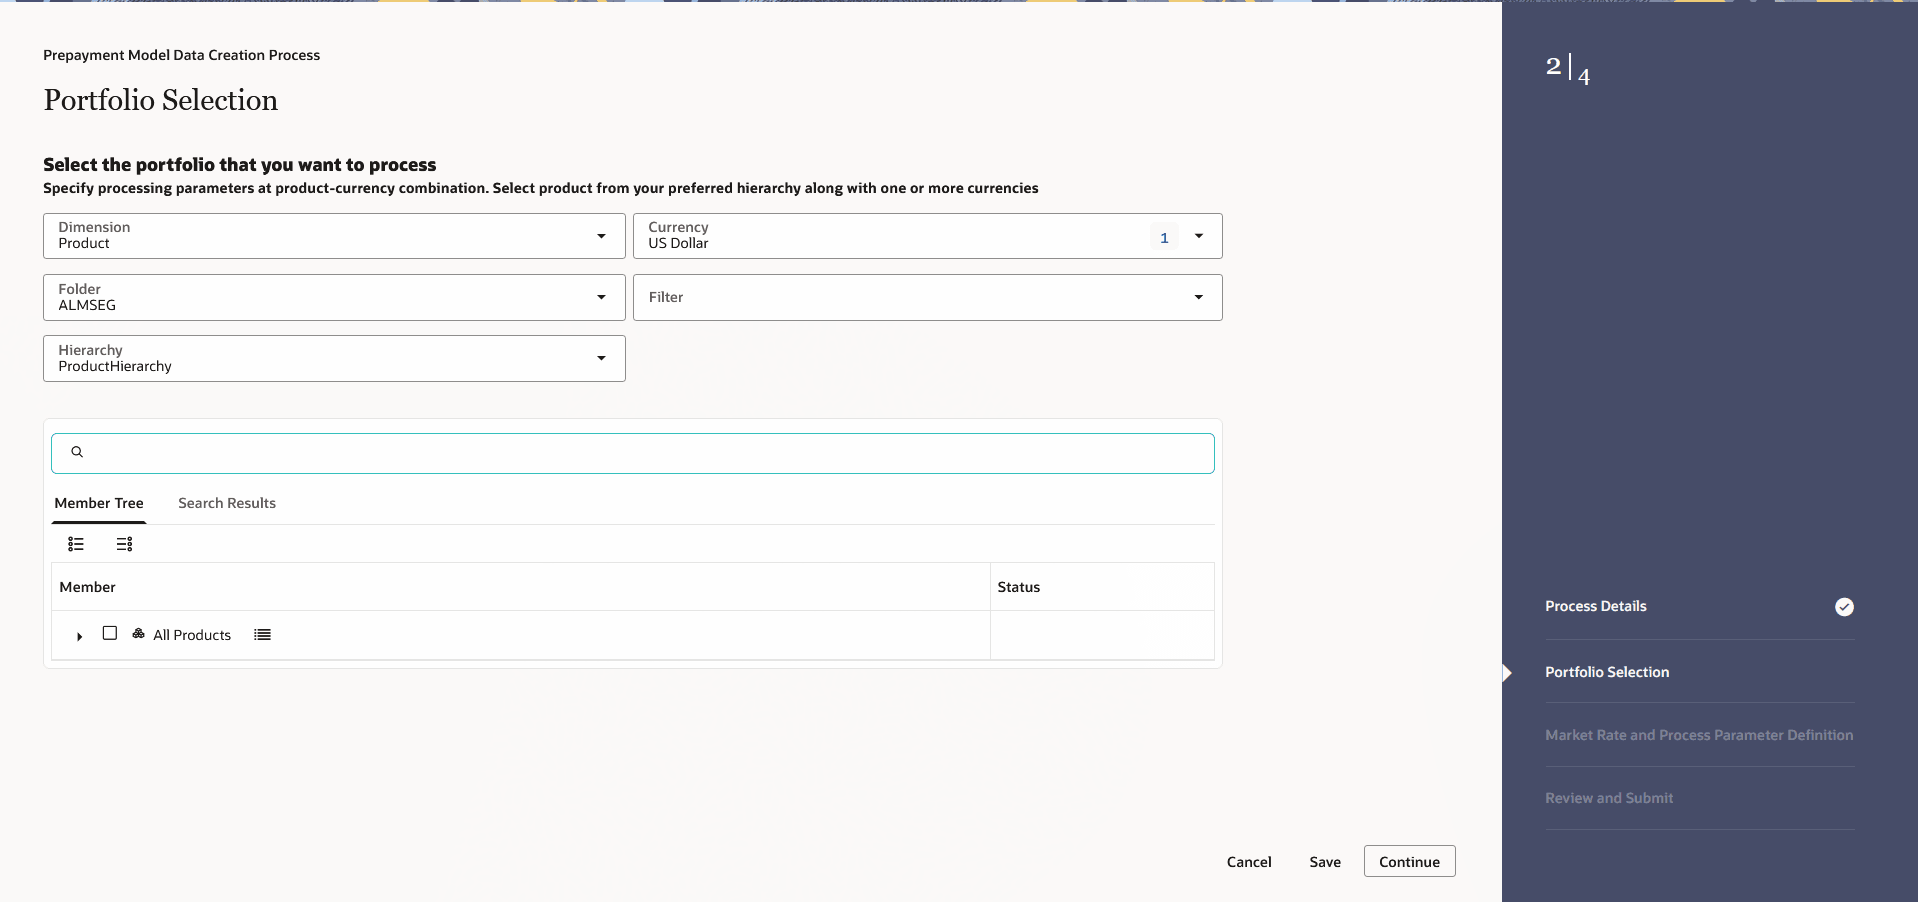
Figure 6-336 Portfolio Selection

- Enter the following details:
- Dimension:Select the Dimension.
- Currency: Select the Currency. The Currency drop-down displays the list of active currencies.
- Folder: Select the Folder from which you want to pick the Hierarchy.
- Filter: Select the Filter.
- Hierarchy: You can specify some processing parameters at product-currency combination. Hierarchies in selected Folder will be listed and you can select one from the available list of hierarchies.
- Select Product(s) from Member Tree of
Assumption Browser. The Assumption Browser has following two tabs:
Member Tree and Search Results
- Member Tree: Member Tree tab
shows the hierarchical structure and allows you to define rules
by selecting the node members from the browser. Select Node and
Click Menu icon next to it to view the available options.
Status of node is also displayed in Member Tree section, for example Selected, and so on. To select member hierarchy, following options are available:
- Expand self, child and descendants: Allows to expand the selected node itself along with its child and descendants.
- Expand selected member/branch: Allows to expand the selected node
- Select UnSelect self, child: Allows to unselect the selected node itself along with its child
- Select UnSelect self, child and descendants: Allows to unselect the selected node itself along with its child and descendants.
- Select Defined self, child: Allows to select the selected node itself along with its child.
- Select Defined self, child and descendants: Allows to select the selected node itself along with its child and descendants.
- UnSelect self, child and descendants: Allows to unselect the selected node itself along with its child and descendants.
Use Show Numeric Code Values (Left) icon to view the code value left to the Node name.
Use Show Numeric Code Values (Right) icon to view the code value right to the Node name.
Here, you can perform the following tasks on the selected node(s):
- Add
- Edit
- View
- Delete
- Copy
- Search Results: You can also
search the members based on the filters. This section shows the
searched node(s). To search a member, follow these steps:
- Navigate to Assumption Browser section of the Rule Definition page.
- Enter the Member ID, Name, Status, or Is Leaf in Search Criteria.
- Click Search. The searched member(s)
will be displayed in Search Results section of
Assumption Browser .
Here, you can perform the following tasks on the searched node(s):
- Add
- Edit
- View
- Delete
- Copy
Click Show Parentage icon to view the Parent-child Node level hierarchy details of selected Node.
Use Show Numeric Code Values (Left) icon to view the code value left to the Node name.
Use Show Numeric Code Values (Right) icon to view the code value right to the Node name.
- Member Tree: Member Tree tab
shows the hierarchical structure and allows you to define rules
by selecting the node members from the browser. Select Node and
Click Menu icon next to it to view the available options.
Step 3: Market Rate and Process Parameter Definition
- Navigate to the Market Rate and Process Parameter
Definition section. The Market Rate and Process
Parameter Definition window is displayed to define Market Rates
and Process Parameter.
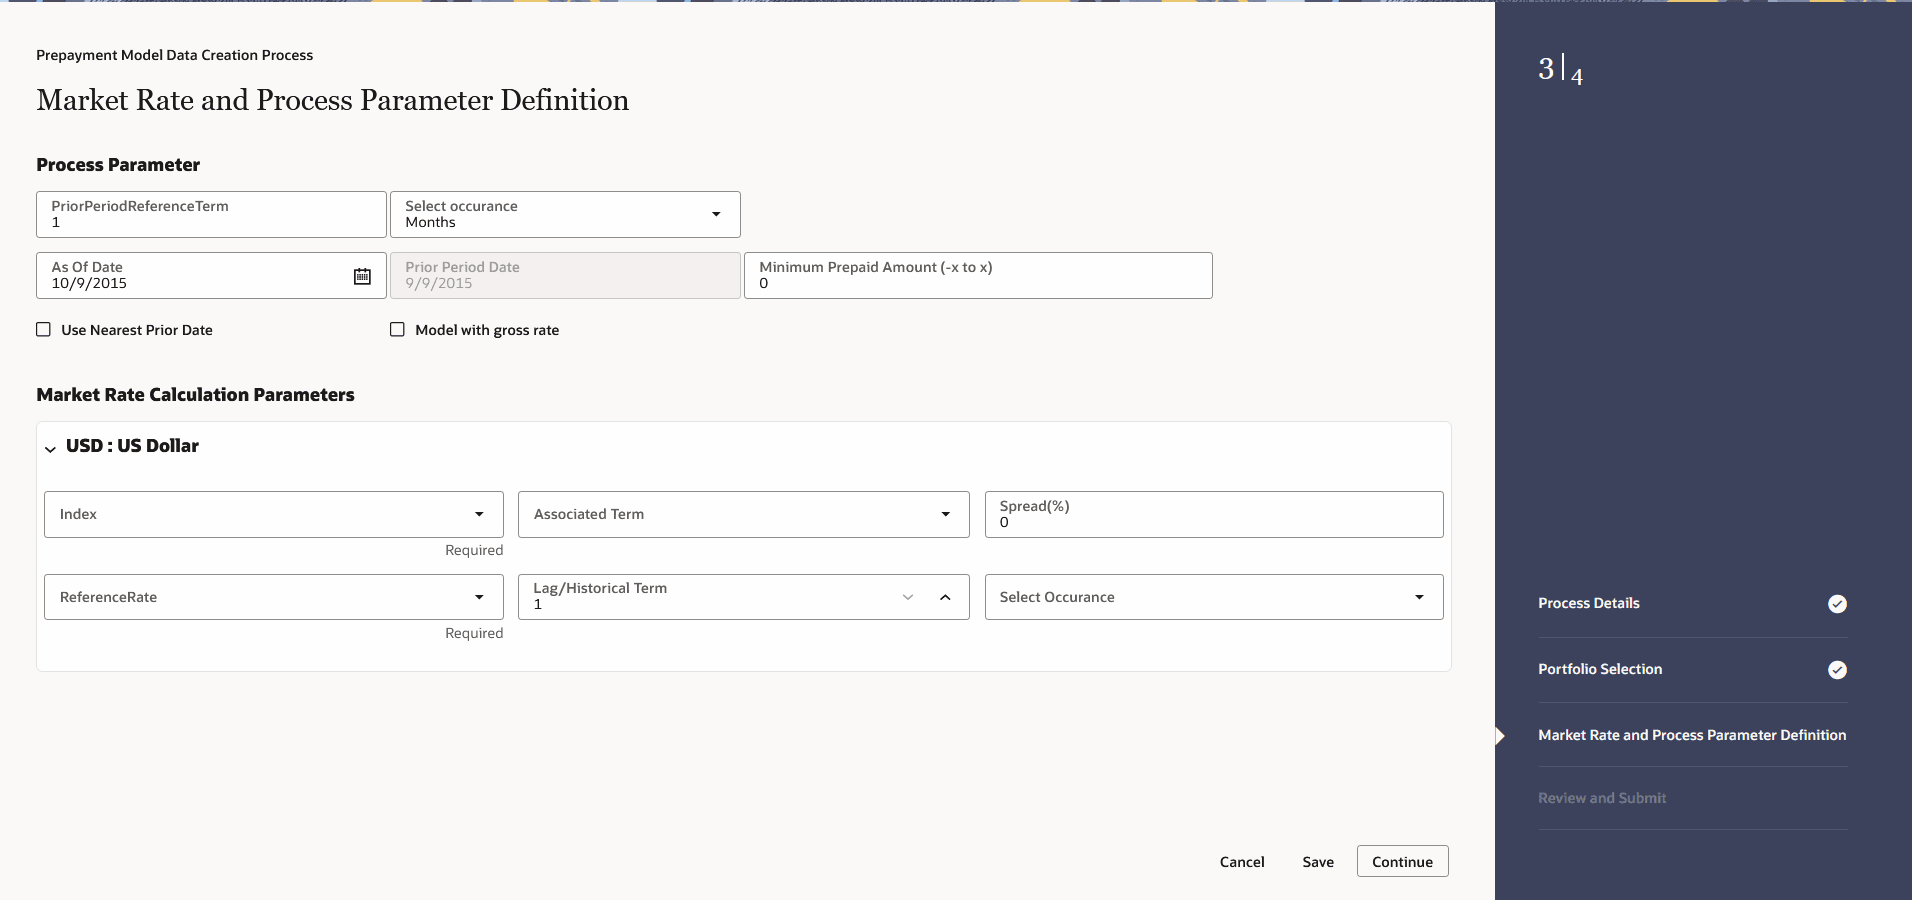
Figure 6-337 Market Rate and Process Parameter Definition

- Enter the following details:
- Prior Period Reference Term:Enter Prior Period Reference Term and based on the current As-of-Date set in application preferences, the Prior Period Date will be calculated,
- Select Occurrance:Select the occurrence of Prior Period Reference Terms day, month, or year.
- As of Date: Enter the As of Date
- Prior Period Date: The value of this field is calculated based on Prior Period Reference Term and As of Date. This field is not editable.
- Minimum Prepaid Amount (-x to x):Enter the Minimum Prepaid Amount as a positive value. The engine applies the absolute value of the amount input ranging from - input amount to + input amount. For example, if the input is 100, then prepaid amounts between -100 and +100 is excluded. This input allows you to filter very small / insignificant prepaid amounts, reducing the amount of data copied into risk factor table for further modelling process.
- Use Nearest Prior Date: If you select the Use Nearest Prior Date option, then the engine looks back at the historical data to determine the nearest prior As-of-Date and uses this as Prior Period Date.
- Model with gross rate: If Model with Gross Rate check-box is selected, then CUR_GROSS_RATE is picked from the instrument record.
- Index:Select the per-defined IRC. The selected IRC (Index in Parameter screen) provides the base value for the market rate.
- Associated Term:Specify the
associated term you want to use for IRCs that are yield curves.
- Original Term: The calculation retrieves the interest rate from the term point equaling the original term on the instrument.
- Reprice Frequency: The calculation retrieves the interest rate from the term point equaling the reprice frequency of the instrument. If the instrument is fixed rate and, therefore, does not have a reprice frequency, the calculation retrieves the interest rate associated with the term point equaling the original term on the instrument.
- Remaining Term: The calculation retrieves the interest rate from the term point equaling the remaining term of the instrument.
- Spread%: Spread can be positive as well as negative values and both are to be added to base market rate. Therefore, if the base market rate is 5 and spread given is 1.2, the final rate is be 5+(1.2) = 6.2. Similarly, if spread is -1.2, then final market rate is 5+(-1.2) = 3.8
- Reference Rate: Select the Reference
Date. Following options are available:
- Rate on Prior As of Date: Select the reference rate as per the given curve for prior As-of-Date
- Rate on Prior As of Date-Lag Term: Select the market rate with some lag say 15 days, 30 days. Lag Term can be defined with a drop-down containing days, months and years.
- Rate on Prior As of Date-Historical Term: The market rate can be defined as arithmetic average over historical range of 1 month, 6 months starting prior As-of-Date. Historical term is also given with a drop-down containing days, months and years.
- Lag/Historical Term:This option is available if the Reference Rate is selected as Rate on Prior As of Date-Lag Term or Rate on Prior As of Date-Historical Term .
- Select Occurrence: Select the occurrence of Lag or Historical Term.
Step 4: Review and Submit
- Navigate to Preview and Submit section. Review the process details.
- Click Submit to create the Data Creation process. The created process will be displayed on Prepayment Model Data Creation Process Summary page.