6.5 Adding a Forecast Set
To add a Forecast Set, follow these steps:
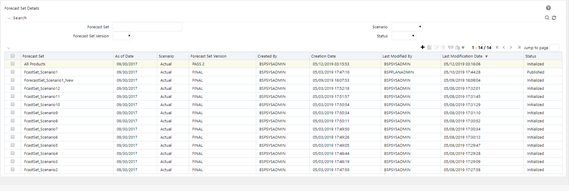
- Navigate to Financial Planning and Forecasting and select Forecast Set to display
the Forecast Set Details window.
Figure 6-1 Forecast Set Details window

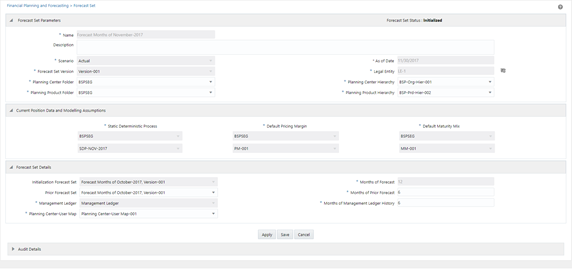
- Click the + icon to display the Forecast window.
Figure 6-2 Forecast Window

- Populate the following details:
Under the Forecast Set Parameters section of the window:
- Name: The name of the Forecast Set.
- Description: The description for the Forecast Set.
- Scenario: Select a relevant scenario from the drop-down list.
- Forecast Set Version: Select a relevant version for the Forecast Set from the drop-down list. The versions are user-defined members defined under the bsp_version dimension.
- As-of-Date: Auto-populated based on the application preferences. This will be defaulted to the last day of the month. However, you can change the date as required.
- Legal Entity: Select a relevant legal entity from the Hierarchy Browser.
Under the Current Position Data and Modelling Assumptions section of the window, select relevant values for the following:Note:
These values will be defined by the BSP system administrator.- Statis Deterministic Process
- Default Pricing Margin
- Default Maturity Mix
Under the Forecast Set Details section of the window:- Initialization Forecast Set: Select a Forecast Set as a reference. The drop-down list displays the forecast sets that are defined earlier that are with Initialized or Published status. This is used to select/copy Balance Driver or/and Pricing Margin Driver methods to the current Forecast Set. You can select any of the Forecast Sets as a reference here.
- Prior Forecast Set: Select the Previous Forecast as a reference. This is for viewing the results of the Previous Forecast. If you select a Forecast Set here, then you need to enter the Months of Prior Forecast in the following field. The number of months you enter here determines the number of months you want to see the history data in the Detailed Planning Window.
- Management Ledger: Select the Management Ledger from which you want to include the historical data to the Forecast Set.
- Planning Center-User Map: Select a relevant Planning Center-User Map from the drop-down list.
- Months of Forecast: Enter the number of months you want to include in the Forecast Set. l. Months of Prior Forecast: Enter the number of months from the prior forecast.
- Months of Management Ledger History: Enter the number of months from the Management Ledger History that you want to include in the Forecast Set.
Note:
The BSP system/planning administrator should use public folders or shared folders (i.e. provided this folder is shared to all the BSP users) for the selection of Hierarchy Folders and Assumption Folders. - Click Save. This action creates the Forecast Set on the Forecast Set Details screen. The Workflow Status of the newly created Forecast will be set as Defined.