4.2.1 Planning Center Statistics
To begin planning, follow these steps:
- Navigate to Balance Sheet Planning, select Financial Planning and Forecasting, and then select Planning to display the Planning window.
- Select the Forecast Set that you want to work with.
Note that there may be several Forecast Sets available to you. Click the icon to view the details of the Forecast Set.
Figure 4-3 Forecast Set Details

Note:
System Admin and Planning Admin Users can see all Initialized and Published Forecast Sets in the drop-down list. A Planning User can see only the Forecast Sets that are mapped to him/her. If a Forecast Set is not mapped to the Planning User, then this field does not display any Forecast Sets. For information on mapping Forecast Sets to Planning Users, see OFS Balance Sheet Planning and Planning Center - User Maps sections. - If you click the Search button, the system displays
statistics for all of the Planning Centers to which you are allowed access within
your selected Forecast Set. You can optionally refine the Planning Centers that are
displayed by using filtering criteria. These optional filtering criteria are as
follows:
- Planning Center: Click the Hierarchy icon to open the Hierarchy window that displays Planning Centers. You can filter on individual Planning Centers from a list of Planning Centers or you can use the Hierarchy search to select Planning Centers. The Hierarchy type of search also allows you to select Planning Center nodes. When you select a Planning Center node, the system will filter on all of the Planning Centers to roll up to the node value you selected. Click Ok after making your selection.
- Currency: This allows you to filter by Currency.
- Planning Product: This hierarchy search functions identically to the Planning Center hierarchy search described above.
- Forecast Status: Forecast Statuses include All, New Business Product, Planning Required, Processed, Processing Required, Review Required, and Reviewed.
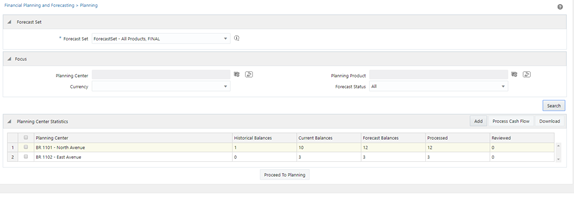
- Click Search to generate Planning Center Statistics for your chosen Forecast
Set.
The system will now display Planning Center statistics for your Forecast Set (optionally filtered down to a smaller list). From here, you can select a single Planning Center, multiple Planning Centers, or all Planning Centers. Click the checkbox on the left side of each row to select one or more Planning Centers. Click on the top row (next to "Planning Center") to select all Planning Centers.
Figure 4-4 Planning Center Statistics

Before selecting any Planning Centers, you can add one or more "New Business Products" to your Forecast Set. New Business Products are products that do not have any current balances but for which you want to start forecasting new business originations at a future point in time. You can also forecast New Business Products on the detailed planning screen described in the next section. See the next section for additional details on adding New Business products.
After selecting one or more Planning Centers, you can either:- Process Cash Flows: Click Process Cash Flow to generate total (current and new) business results for the Planning Centers you have selected.
- Download: Click Download to download the forecast results for the Planning Centers you have selected. This downloads the forecast results in a CSV format.
- Proceed to Planning: Click Proceed to Planning to navigate to the detailed planning interface -- see next section below for details.