4.1.3 Adding Excel-Entity Mappings
To define the mapping in the Excel-Entity Mappings Window:
- From the LHS menu of DEFQ- Excel Upload Window, click Excel-Entity Mappings . The Excel-Entity Mappings Window is displayed.
Figure 4-2 Excel-Entity Mappings Window

- Click the Add button in the Mappings Summary toolbar. The Add Excel-Entity Mappings Window is displayed.
- Enter the Mapping Name and a brief Description .
- Click Browse .
The Choose File to Upload dialog is displayed.
- Select the required Excel file to be used as the template and click the Move button.
The columns in the selected Excel template are listed in the Select Excel Columns Grid and the Database Tables are listed in the Select Entities Grid.
Figure 4-3 Excel-Entity Mappings Window
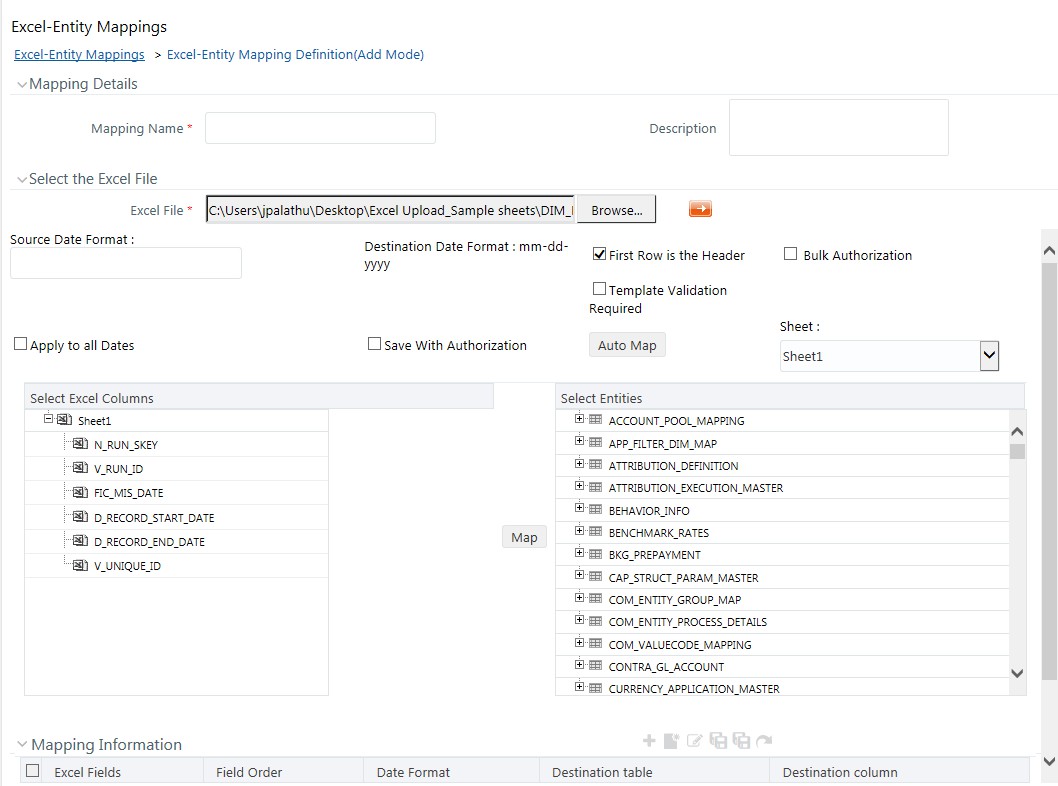
- Enter the format in which the dates are stored in the excel sheet in the Source Date Format Field.
- Select the Apply to all Dates check box if you want to apply the Source Date format to all date fields in the Excel Sheet.
- Select the First Row is the Header check box if your Excel Template has a header row.
- Select the
Template Validation Required
check box to validate whether the Excel Template you use is the
same as the Excel Sheet you use during the Excel Upload
Window. The validation is done when you upload the excel sheet. The
error will be displayed if there is any mismatch between the Excel
Template you use to map and the actual Excel Sheet you upload.
This field is displayed only if you have selected the First Row as the Header check box.
- Select the Bulk Authorization check box to assign the “Excel_Name” across the selected column. For example, the selected column “v_fic_description” will have the Excel Name assigned.
Note:
Ensure that the selected “Varchar2” column contains the required length to hold the Excel Name. To select Bulk Authorization, you need to have Save with Authorization check box selected. - Select
Save with Authorization
check box to authorize the data upon successful data load. The
three mandatory fields namely Maker ID, System Date, and
Authorization Status are displayed in the Select Excel Columns
Grid.
You need to map these fields to the corresponding columns in the Select Entities Grid. The value for the Maker ID Column is updated with the User ID of the user who is performing the Excel Upload. The value for Maker Date is updated with the current System Date during which the upload is
performed and the value for Authorization Status is updated with the flag 'U'. See Save with Authorization to create a Form where the uploaded data can be authorized.
- Select a column from the Select Excel Columns grid and select an attribute or column from the required table from the Select Entities grid. Click Map .
- Click Automap .
The respective columns with similar names in the Excel sheet and the database are mapped. You need to manually map the other columns. The mapping details are displayed in the Mapping Information grid which facilitates you to edit the details as required.
- Click Save Mapping .
The Excel-Entity Mapping Window displays the Excel-Database Table Mapping details. In the Excel-Entity Mappings Window, you can also do the following:
- Click the View button in the Mappings Summary toolbar to View the mapping details.
- Click the Edit button in the Mappings Summary toolbar to Edit the mapping details.
- Click the Delete button in the Mappings Summary toolbar to Delete the mapping details.
- Click the Download Excel button to download the Excel template used in the mapping.