15.3.1 Procedure
From the Time Bucket details screen, you have one tab available for creating Time Bucket definitions.
- Income Simulation Buckets (required)
- Interest Rate GAP Buckets, including Non-Interest Rate Sensitive Bucket (required only if Repricing Gap is selected during processing). For Non-Interest Rate Sensitive Bucket, both Repricing Gap and Include Non-Rate Sensitive Bucket are required selections.)
- Liquidity GAP Buckets (required only if Liquidity Gap is selected during processing)
The first step is to define your Income Simulation buckets.
From the Income Simulation tab, do the following:
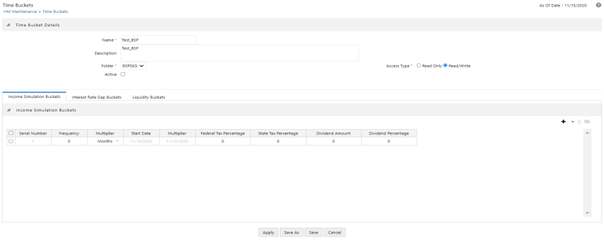
- Click the Add Rows button and input the desired number of rows corresponding to the
number of Income Simulation Buckets you would like to create.
Figure 15-2 Income Simulation tab

Note:
You can select a pre-defined number of rows from the list, For example, 3, 5, or 10, or you can input the exact number of rows you would like to add. The maximum number of buckets you have under any tab is 240. - Under Frequency, input a numeric value, For example, 1. The Frequency column
displays the duration of the multiplier. The frequency in conjunction with the
multiplier displays the duration of the buckets. The frequency can be any number
from 1 to 999. Under Multiplier, select an appropriate value from the list. The
Multiplier column includes Daily, Monthly, or Yearly choices.
Note:
Limit the definition of Income Simulation buckets to the date range that is relevant to your reporting requirement. It is not necessary to create "catch-all" buckets at the end of the series. When large buckets are created, for instance, 99 Years, this can result in the following error: INSERT Oracle Error: ORA- 01426: numeric overflow Driver Function: drv_oci::Execute() - Continue adding frequencies and multipliers as needed.
Table 15-1 Frequencies and Multipliers
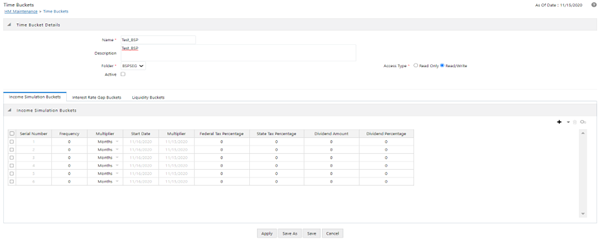
Frequency Multiplier 1 Month 1 Month 1 Month 1 Month 1 Month....... - After you fill in the frequencies and multipliers, the start and end dates are
calculated automatically based on the As of Date, defined in your Application
Preference settings.
Figure 15-3 Income Simulation Tab

Note:
You may want to utilize the Data Input Helper to copy from a row where you have already defined the time bucket definition or apply a fixed value down the page. The following optional steps describe how to use this feature.- Select the check box next to the rows that you want to work with or use the " Select ALL" option by selecting the check box on the header row.
- Select the Data Input Helper icon.
- From the Data Input Helper – popup screen, select Method – "Keep Current Values" or some other appropriate method.
- Select the Frequency and/or Multiplier from the left side of the shuttle box.
- Select APPLY to copy assumptions to the selected rows.
Note:
Steps 5, 6, and 7 are utilized in ALM's auto-balancing function but are not used in BSP. - After defining time bucket frequencies, move across each row to input the
appropriate Federal Tax Percentages and State Tax Percentages.
Tax percentages are used in BSP when processing with the auto-balancing option selected. Type 35.00 for 35%. The tax rate entered is interpreted as the tax rate for that bucket regardless of the frequency of the bucket. That is, 35% entered for a monthly bucket is applied as a 35% monthly rate to the taxable income forecast for that month.
- Under Dividend Amount, type a value. Dividend amounts are used in HM when processing with the auto-balancing option selected. The values you enter here will be paid out as dividends for all rate scenarios.
- Under Dividend Percentage, type a value. Dividend percentages are used during
auto-balancing calculations. The dividend percentage is defined as a percent of the
net income after tax that will be paid out as dividends for the period.
Total Dividends = Dividends Amount + (Dividends Percent x Net Income after Tax)
- Select SAVE if you are finished.
Note:
For BSP, no other steps are required. BSP does not support Interest Rate GAP Time Buckets and BSP does not support Liquidity GAP Time Buckets.Otherwise, navigate to the Interest Rate GAP Buckets tab.
After defining Income Simulation buckets, navigate to the Interest Rate GAP Buckets tab. The Interest Rate GAP bucket detail page provides two important inputs. The first is the ability to define Interest Rate GAP buckets and optionally add a Non-Interest Rate Sensitive bucket for Non-Rate Sensitive products. The second capability allows you to define one or more Dynamic Start Dates. The following steps explain how to complete each of these setup tasks.Note:
The Interest Rate GAP bucket can be defined from Bucket count 1 till Bucket count 239 in all dynamic start dates. The last time series time bucket in all dynamic start dates will default to 99 years as a “catch-all” bucket. This is used to verify the total runoff for reporting requirements.From the Interest Rate GAP Buckets tab, do the following:
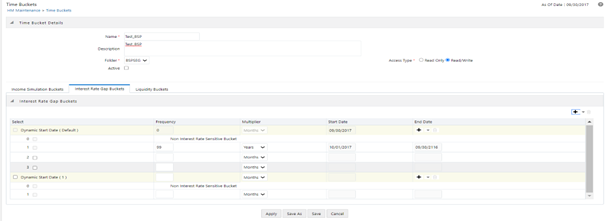
- Click the Add Rows button corresponding to the Default Dynamic Start Date and input
the desired number of rows for your Interest Rate GAP Buckets.
Note:
By default, the first-time bucket in Interest Rate Gap Buckets (bucket count 0) is defined as Non-Interest Rate Sensitive Bucket.A new Attribute of the product dimension ‘Interest Rate Sensitivity Category’ is introduced to identify products as Interest Rate sensitive or Non-Interest Rate sensitive. Once a product is mapped as Non-Interest Rate sensitive, the user also needs to enable ‘Include Non-Interest Rate Sensitive Bucket’ in Process Rules (see BSP Processing). This would move to reprice gap output from Non-Interest Rate Sensitive products into Non-Interest Rate Sensitive Bucket.
Figure 15-4 Interest Rate Gap Buckets Tab

- Follow steps 2 — 4 described above under Income Simulation buckets, to complete the setup of your Interest Rate GAP buckets and Non-Interest Rate Sensitive Bucket for the default Dynamic Start Date.
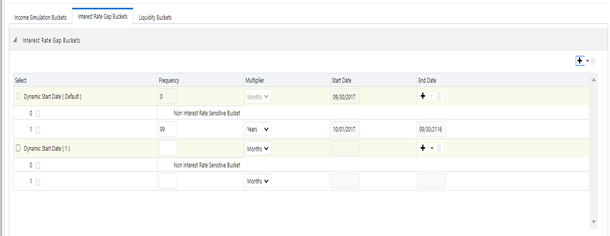
- If you would like to define additional – forward dated, Dynamic Start Dates, Click
the “Add Dynamic Start Date” button to add one or more parent nodes to the bucket
hierarchy.
Figure 15-5 Interest Rate Gap Buckets Tab

- For each additional Dynamic Start Date row, input a Frequency and Multiplier to determine future start date(s).
- Click the Add Rows button corresponding to each new Dynamic Start Date and repeat the Interest Rate GAP Bucket definition steps described above to complete the setup.
- For a more detailed example on creating additional Dynamic Start Dates.
After defining Interest Rate GAP buckets, navigate to the Liquidity Buckets tab. The Liquidity Buckets detail page has the same structure as the Interest Rate GAP details page. It allows you to define the Liquidity GAP Buckets for the default Dynamic Start Date and also allows you to add one or more additional Dynamic Start Dates. The use of Dynamic Start Dates will allow you to forecast your liquidity position as of some future point in time, considering all relevant assumptions, including amortization, prepayments, early withdrawals, and rollovers.
Note:
By default, the last time series time bucket in all dynamic start dates will default to 99 years as a “catch-all” bucket. This is used to verify the total runoff for reporting requirements.From the Liquidity Buckets tab, do the following:
- Click the Add Rows button corresponding to the Default Dynamic Start Date and input the desired number of rows for your Liquidity Buckets.
- Follow steps 2 – 4 described above under Income Simulation buckets, to complete the setup of your Liquidity Buckets for the default Dynamic Start Date.
- If you would like to define additional – forward dated, Dynamic Start Dates, Click the “Add Dynamic Start Date” button to add one or more parent nodes to the bucket hierarchy.
- If needed, input a Frequency and Multiplier for the new Dynamic Start Date to determine the future start date.
- Click the Add Rows button corresponding to the new Dynamic Start Date and repeat the Liquidity GAP Bucket definition steps described above.
- For a more detailed example on creating additional Dynamic Start Dates, see Example.
- Once you have completed the setup for all bucket types, click the SAVE button.