- Enterprise Modeling User Guide
- Managing Stress Testing
- Variable Shock Library
- Adding Variable Shock Definition
Adding Variable Shock Definition
- Select the Add icon from the Variable Shock
List toolbar. The Add button is disabled if you have selected
any checkbox in the grid. The Variable Shock Definition (New
Mode) window is displayed.
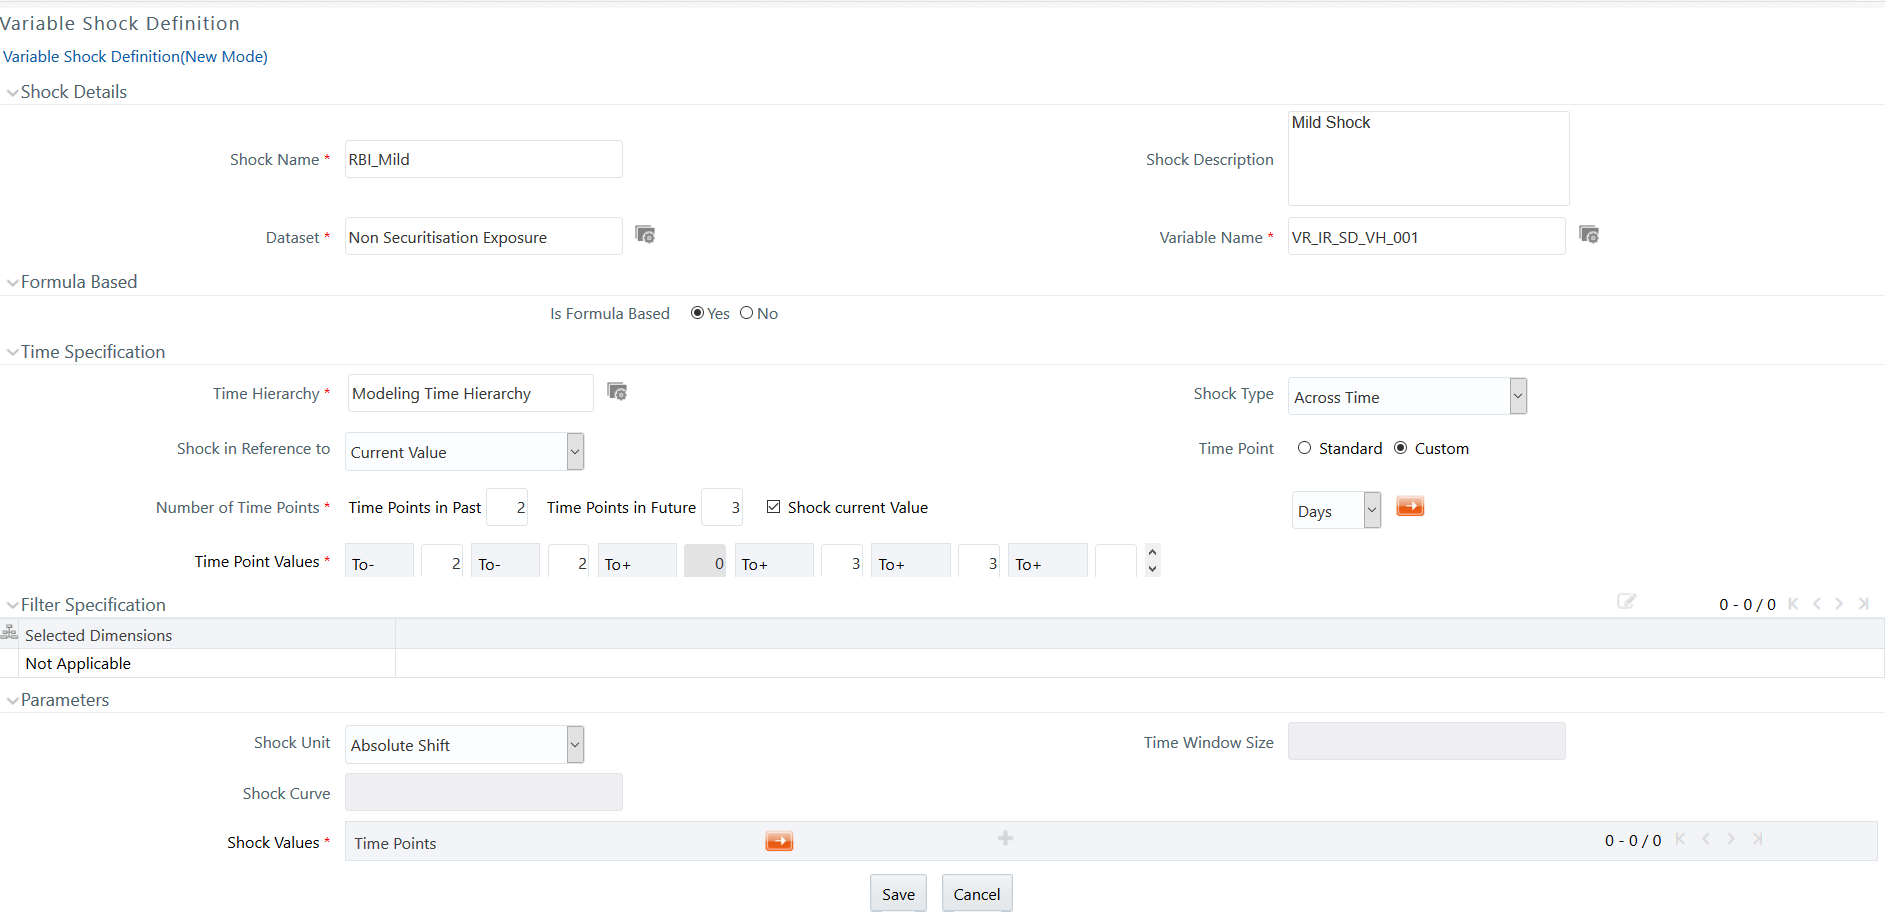
Figure 10-5 Variable Shock Definition window

- Enter the Variable shock details as described in the following table:
Table 10-3 Variable Shock Definition - Field Descriptions
Field Description Shock Name Enter a name for the variable shock. Ensure that there are no special characters like `, {,},", ', ~, <,>, /, \, and multiple spaces. Shock Description Enter the required description for the variable shock. Dataset - Click and open the Dataset browser. The available datasets are listed in the Members pane.
- Select the required Dataset based on which the variable shock is to be created and click the Forward Arrow icon.
- Click OK.
Note:
The Datasets based on Derived Entities are not supported.Variable Name - Click and open the Variable browser. The defined variables are listed in the Members pane.
- Select the required variable based on which the variable shock is to be created and click the Forward Arrow icon. If you want to create Categorical Shock, select Nominal or Ordinal Variable.
- Click Ok.
Is Formula based Select Yes if the variable shock is based on a formula. Time Specification: Specify the shifts in the value across multiple time points. Time Hierarchy - Click and open the Hierarchy browser. The available Time Hierarchies are listed in the Members pane.
- Select the required Time Hierarchy based on which the variable shock is to be created and click the Forward Arrow icon.
- Click Ok.
Shock Type Select the shock type from the drop-down list, as either: - Across Time - to specify shocks at multiple time points and the occurrence of which can be in the past or the future.
- Instantaneous - if you do not have specific time points and want to shock the data based on the current values. Selecting Instantaneous will disable the other options in the Time Specification of Shock grid.
If the Across Time option is selected in the Shock Type The Shock in Reference is selected as Current Value. Select Time Point as either Standard or Custom.- Standard- Select this
option if you want to use system-generated
standard Time Point
values.
- Specify the Number of Time Points and click theForward Arrow icon. TheTime Point values are auto-populated.
- Custom - Select this
option if you want to specify custom
Time Point Values.
- Specify the Number of Time
Points and click the
Forward Arrow icon. Enter
required Time Point
Values.
Specify the frequency from the drop-down list as Days, Weeks, Months, or Years.
- Specify the Number of Time
Points and click the
Forward Arrow icon. Enter
required Time Point
Values.
Filter Specification: Define the filtering criteria for the specified shock. The option is available only for Idiosyncratic Variables. Multiple shocks can be applied across filters that are specified based on combinations of dimensions.Note:
While defining a Variable Shock across time, a Dataset with Date Filter should be selected. For more information, see the Creating Data Set section in the Oracle Financial Services Analytical Application Infrastructure User Guide.- Click the Edit icon in the Filter Specification toolbar and open the Filter Browser window.
- Click the Edit icon to open the Hierarchy Browser window.
- Select the required hierarchy(s) and click the Forward Arrow icon.
- Click OK and return to the Filter Browser.
- In the Hierarchical list, click the Add icon to expand a node and select the required checkbox.
- Click the Forward Arrow icon and move the selection to the Selected Hierarchies pane.
- Click OK. The selected hierarchies are displayed in the Selected Dimensions pane.
Shock Parameters: Specify quantum of shifts in variables, based on time specification and shock curve. Shock Unit This field is not displayed for Idiosyncratic Variables (categorical variable). Select the shock unit from the drop-down list. The available options are: - Percentage Shift
- Absolute Shift
- Absolute Value
- Standard Deviation Shift
- Long Standard Deviation Shift
A shock value may be positive or negative.
Time Window Size If you have selected Standard Deviation Shift or Long Standard Deviation Shift as Shock Unit, this field is enabled with a default value "2". You can change the same by entering the required value. Shock Curve Shock Curve is enabled for term structure variables. Select any of the following options from the drop-down list. - Parallel
- Twist
- Inversion
Sampling Percentage This field is displayed for categorical variables. By default, the sampling percentage is selected as 100. Specify the percentage of data for which you want to apply shock.
Seed Value Seed is the start point of the sequence, which is used to ensure the same set/ sequence of data is selected every time for applying shock since each seed value corresponds to the same sequence. Select Enter seed value from the drop-down list and enter the Seed Value as required. By default, 1234 is selected.
Select Random seed value if you want to use system-generated random value as Seed Value.
- Click Save. The new variable shock details are saved and displayed in the Variable Shock Library window.