- Enterprise Modeling User Guide
- Managing Sandbox
- Workflow
- User Roles
- Managing Sandbox
- Creating Sandbox
- Creating Schema-based Sandbox Definition
Creating Schema-based Sandbox Definition
- Select the Add icon from the Sandbox Definition toolbar. The Sandbox Definition window is displayed.
- Enter the following details:
Note:
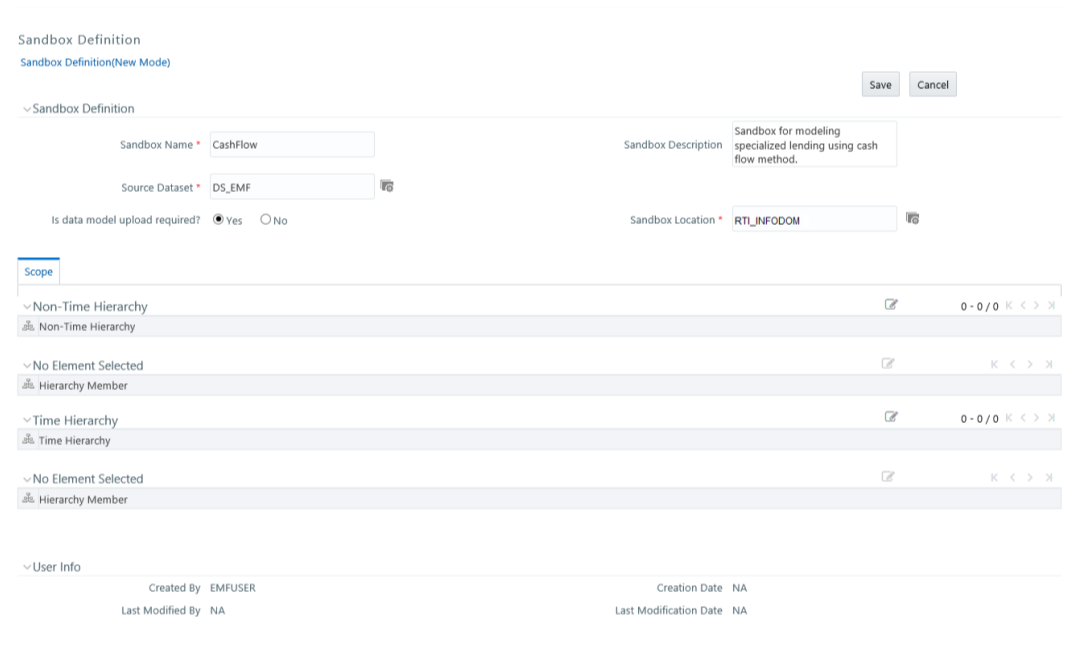
The Add button is disabled if you select a checkbox in the grid.Figure 6-3 Schema-based Sandbox Definition window

Table 6-1 Field and Description
Field Description Sandbox Name Enter a name for the sandbox.
Note: Ensure that there are no special characters like `, {,},", ', ~, <,>, /, \, and multiple spaces.
Note:
Enter the alphabetical characters for the Sandbox Name in either uppercase or lowercase. If you enter the Sandbox Name in mixed case, then the EMF-R Execution fails with errors.
For example, Sandbox Name can be ofssdbox180 or OFSSDBOX180.
If you have existing Sandbox Names in mixed case, then you must edit and update them from the Database Details window.
For more information, see the Database Details section in the Oracle Financial Services Advanced Analytical Applications Infrastructure User Guide.Sandbox Description Enter a brief description of the sandbox. Source Dataset Select the required datasets. The datasets you want to select should match the Data Model of the sandbox.
- Click and open the Source Dataset Browser. All the Authorized Datasets in the selected production Infodom are listed in the Hierarchical Browser.
Select the required dataset from the Datasets pane and click the Forward Arrow icon.
To deselect a dataset select it from the Selected Datasets pane and click the Backward Arrow icon.
- Click to view the details of the selected datasets.
- Click the Add icon to create a dataset.
For more details on creating a dataset, see Creating Data Set section in the Oracle Financial Services Analytical Applications Infrastructure User Guide.
Note: The Datasets based on Derived Entities are not supported.Is data model upload required? By default, the Yes option is selected.
- Select Yes to upload the data model while saving the sandbox definition.
- Select No if the data model is already uploaded.
Sandbox Location This is the information domain you want to implement as a sandbox.
Click and open the Sandbox Location Browser.- If Yes is selected for the Is data model upload required? option, the Sandbox Location pane displays the list of the Information Domains where the data model is not uploaded and the sandbox has not been defined.
- If No is selected for the Is data model upload required? option, the Sandbox Location pane displays the list of the Information Domains where the data model is uploaded and sandbox has not been defined.
Non Time Hierarchy - Click in the Non Time Hierarchy toolbar. The Hierarchy Browser displays all the Hierarchies/Filters from each selected Datasets. You can click "+" to expand the node to view the sub levels.
Select the required hierarchies and click .
To deselect hierarchy by select it from the Selected Members pane and click .
- Click OK.
Hierarchy Member Click the Edit icon in the Hierarchy Member toolbar and specify the members or nodes in the Hierarchy browser. You can click "+" to expand the node to view the sub levels.
When you select a hierarchy member, the data belonging to that hierarchy will be copied to the sandbox.Time Hierarchy - Click in the Time Hierarchy toolbar. The Hierarchy browser displays the available Time Hierarchies which is common across all the selected Datasets. You can click "+" to expand the node to view the sub levels.
- Select the required time hierarchy and click to move it to the Selected Hierarchies pane.
To deselect Time Hierarchies select from the Selected Hierarchies pane and click .
- Click OK.
Note: Time hierarchy selection is optional. However, if you do not select a time hierarchy, the following will occur:
- Time referencing will not be applicable for model definitions.
- For the model definitions, the variable browser will not show any variable definitions that have filters.
- The shocking of transition matrix multi-factor models will not work in sandboxes
Hierarchy Member Click the Edit icon in the Hierarchy Member toolbar and specify the members or nodes in the Hierarchy browser.
You can click "+" to expand the node to view the sub levels.
Time hierarchy is used to group data based on time (year or month). When you select a time hierarchy member, the data belonging to that time hierarchy will be copied to the sandbox. - Click Save. The tables of the selected dataset get populated in the sandbox information domain.