Requesting and Authorizing Model Deployment

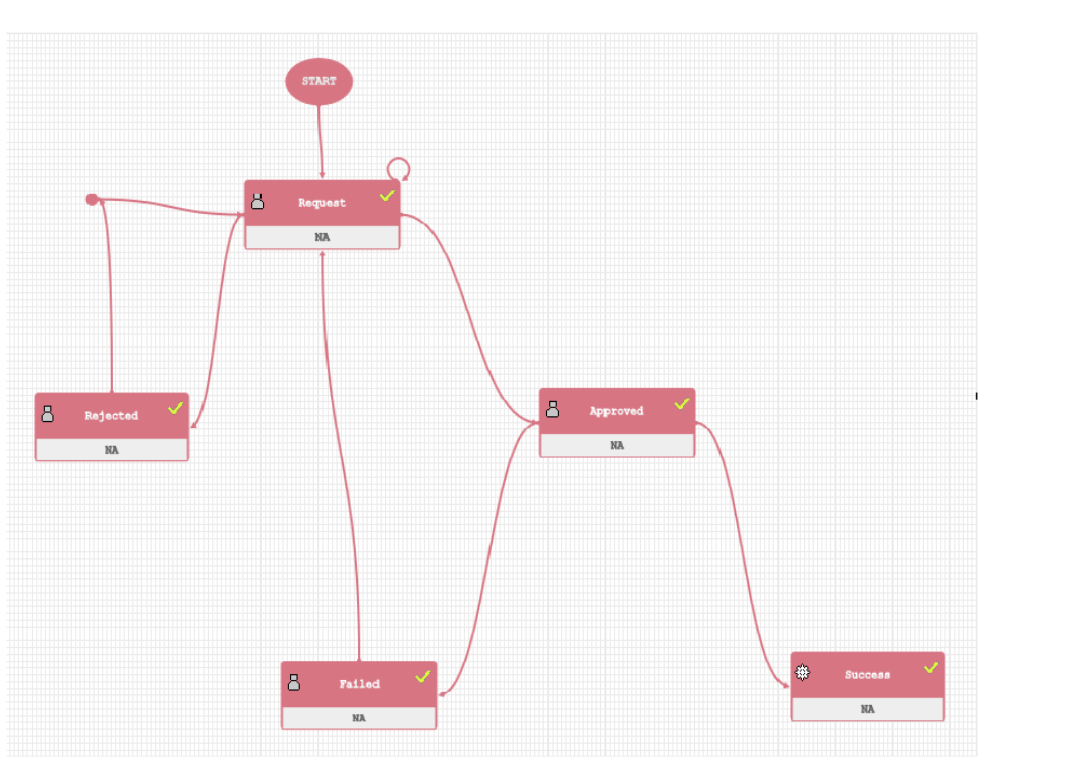
You can request a model for deployment and view its status in the Processing Modeling Framework (PMF). You can view the current status of the model deployment life-cycle and click on the various symbols in the PMF diagram to view details for the specific state in the workflow.

Note:

For more information on PMF, see the OFSAAI User Guide.
To request and authorize a model for deployment, perform the following steps:
  1. Select the checkbox adjacent to Model ID and click the icon to display the Model Deployment Authorization window.
  2. Select the Request for Deployment checkbox in the Model Deployment grid.
  3. Once you have requested deployment, you can view the status for the model deployment in the PMF.
  4. Click from the header to display the Administration tools in the Tiles menu. Click Processing Modeling Framework from the Tiles menu to view a list of links. Click Process Monitor from the list and search for the Model that was requested for deployment. Click the link to display the PMF window. The window displays the state of the Model deployment.
  5. Select Authorize from the Authorize and Deploy checkbox to authorize the deployment request. This radio button is enabled if you are mapped to the MDLAUTH function role. If you are not mapped to the role, an authorizer mapped to the role has to approve the deployment.

    Note:

    Click the My Inbox link and then click My Task from the Navigation list. This link is available on the menu if your administrator has configured the required privileges to your user profile in the system. You can view notifications for the approval or rejection of the Model deployment here.
    For rejected requests, you can click the Sandbox icon and edit the model from the Model Creation window. For more information, see Creating and Executing a Model. Once you have edited the Model, you can request again for approval to deploy and the process is a repeat of steps 1 to 3.
    Authorizers approving or rejecting model deployment requests can access from My Inbox > My Task as described previously. Click Task ID in the notification to display the Model Deployment Authorization window and approve or reject the model deployment.
  6. Click Save to process the model deployment.
    On successful deployment, the model is available in the Run Rule Framework as a component. Run filter and process filter are supported for models stitched in a Run for execution.
    To execute Open R models, pass the value for $HOST as a Run-Time parameter.

    Note:

    Once deployed, you can view the success or failure of the Model deployment in the PMF window.
  7. Click the Tools icon from the header to display the Administration tools in the Tiles menu. Click Processing Modeling Framework from the Tiles menu to view a list of links. Click Process Monitor from the list and search for the Model that was deployed. Click on the link to display the PMF window. The window displays the state of the Model deployment as either Successful or Failed. You can click on the symbols to view more details. The following screenshot of the Model deployment on the PMF window is an example that has been through a cycle of model rejection and approval, and deployment failure and success.

    Figure 9-13 Model deployment states on PMF window


    This image displays the Model deployment states on PMF window.