2.8.4.1 Importing OOB Graph Definition and related Metadata
This section describes how to import OOB Graph Definition and its related Metadata.
Creating the Graph Data Store
- Log in to the Compliance Studio UI.
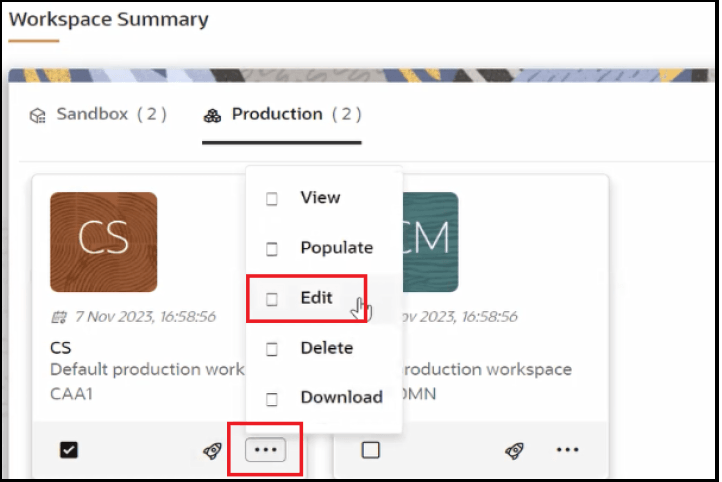
- On the CS workspace, click Action icon.
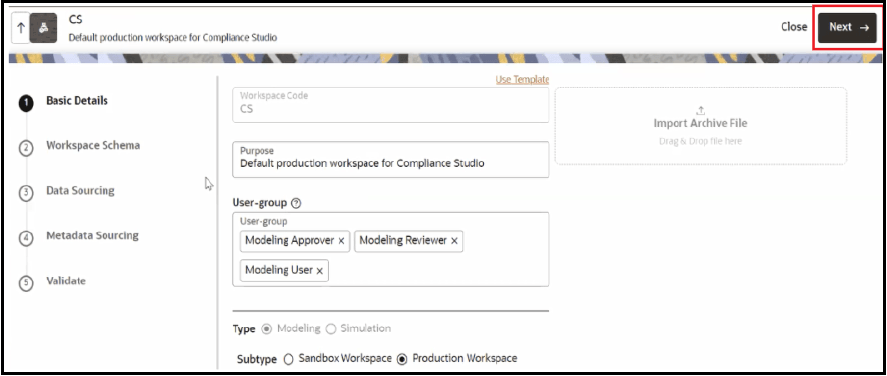
- Click Edit. The Basic Details pane is displayed.
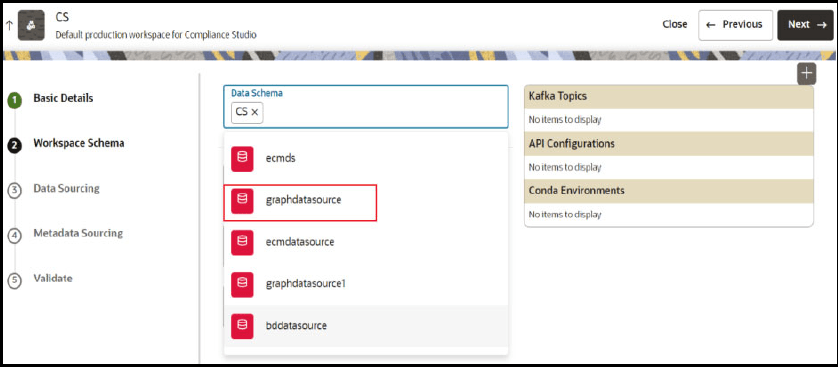
- Click Next. The Workspace Schema pane is displayed.
Note:
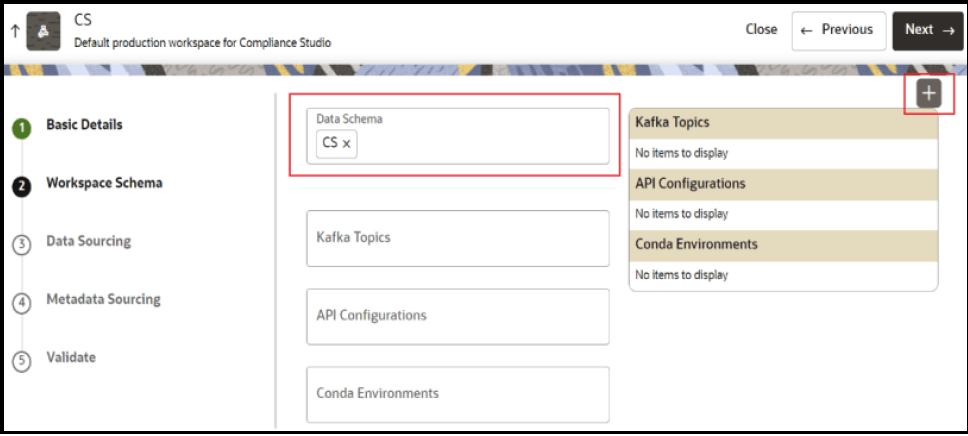
By default, studio schema is mapped to the workspace and you need to map graph schema and graph data store respectively for using graph functionality. - Click Create Data Store
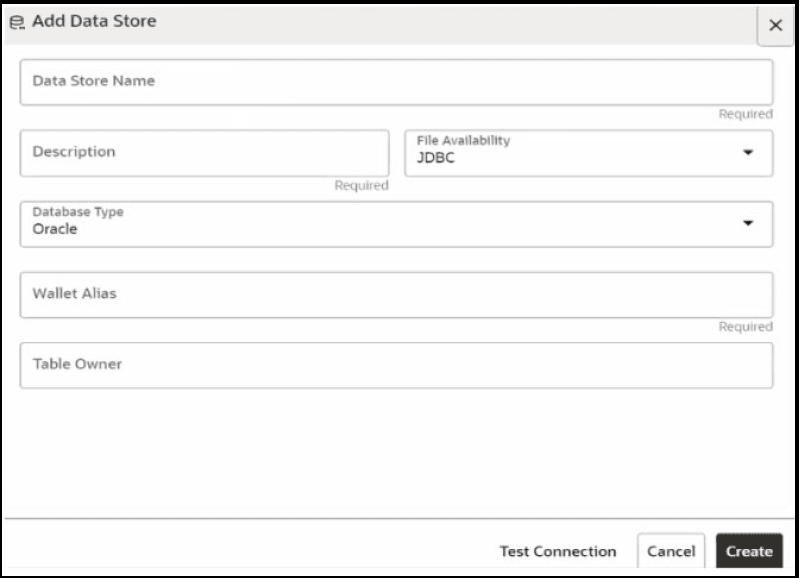
 The Add Data Store pane is displayed.
- Enter the Name and Description of the data store for the
graph.
Note:
Retain default settings in the File Availability and Database Type drop-down lists. - Enter the Wallet Alias.
- Enter the Oracle Database schema name in the Table Owner.
- Click Test Connection. A Success confirmation message is displayed.
- Click Create. The Data Store is saved successfully.
- Select graph data store from the Data Schema drop-down list.
- Click Next. The Data Sourcing pane is displayed.
- Click Next. The Metadata Sourcing pane is displayed.
- Click Update. The data store for the graph is updated successfully in the CS workspace.
- Click Close to exit the process.
Note:
If you are planning to use the OOB graph "FINANCIAL_CRIME_GLOBAL_GRAPH" based on the ECM data model or "FINANCIAL_CRIME_GLOBAL_GRAPH_BEHAVIOUR_DETECTION" based on the BD data model, then create the additional data store.
For "FINANCIAL_CRIME_GLOBAL_GRAPH," create the additional data store for ECM's Atomic Schema. This will be required later in the schedule part.
For "FINANCIAL_CRIME_GLOBAL_GRAPH_BEHAVIOUR_DETECTION," create the additional data store for BD's Atomic Schema. This will be required later in the schedule part.
Importing OOB Graphs
Note:
- If you want to import both graphs, execute the command:
./importGraph.sh - If you need any help about graphs, execute the command:
./importGraph.sh -h
- Navigate to
<COMPLIANCE_STUDIO_INSTALLATION_PATH>/deployed/ficdb/graphmetadata/
                            bin
directory. - If ENABLE_MATCHING_FOR_GRAPH parameter is set to “false” in the
config.shfile, then import the graph as follows:- If you are importing
"FINANCIAL_CRIME_GLOBAL_GRAPH_BEHAVIOUR_DETECTION" OOB graph, then
execute the following.
./importGraph.sh -b - If you are importing "FINANCIAL_CRIME_GLOBAL_GRAPH" OOB graph, then
execute the following.
./importGraph.sh -e
- If you are importing
"FINANCIAL_CRIME_GLOBAL_GRAPH_BEHAVIOUR_DETECTION" OOB graph, then
execute the following.
- If ENABLE_MATCHING_FOR_GRAPH parameter is set to “true” in the
config.shfile, then import the graph as follows:- If you are importing
"FINANCIAL_CRIME_GLOBAL_GRAPH_BEHAVIOUR_DETECTION" OOB graph with
matching component enabled, then execute the
following.
./importGraph.sh -b(OR)
If you are importing "FINANCIAL_CRIME_GLOBAL_GRAPH_BEHAVIOUR_DETECTION" OOB graph with matching component disabled, then execute the following.
./importGraph.sh -b -sm - If you are importing "FINANCIAL_CRIME_GLOBAL_GRAPH" OOB graph with
matching component enabled, then execute the
following.
./importGraph.sh
                                    -e
(OR)
If you are importing "FINANCIAL_CRIME_GLOBAL_GRAPH" OOB graph with matching component disabled, then execute the following.
./importGraph.sh -e
                                    -sm
Note:
If you want to import both the graphs with matching component disabled, then execute the following../importGraph.sh -sm
- If you are importing
"FINANCIAL_CRIME_GLOBAL_GRAPH_BEHAVIOUR_DETECTION" OOB graph with
matching component enabled, then execute the
following.
The OOB graphs are imported to the Compliance Studio UI.
Registering Graph Data Store
- Log in to the Compliance Studio and navigate to the workspace summary.
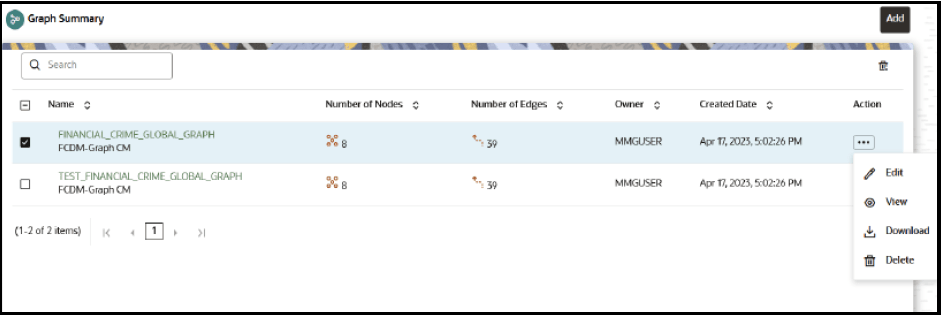
- On the Modeling menu, click Graphs. The Graph Summary page is displayed.
- Select the appropriate graph, click Action icon
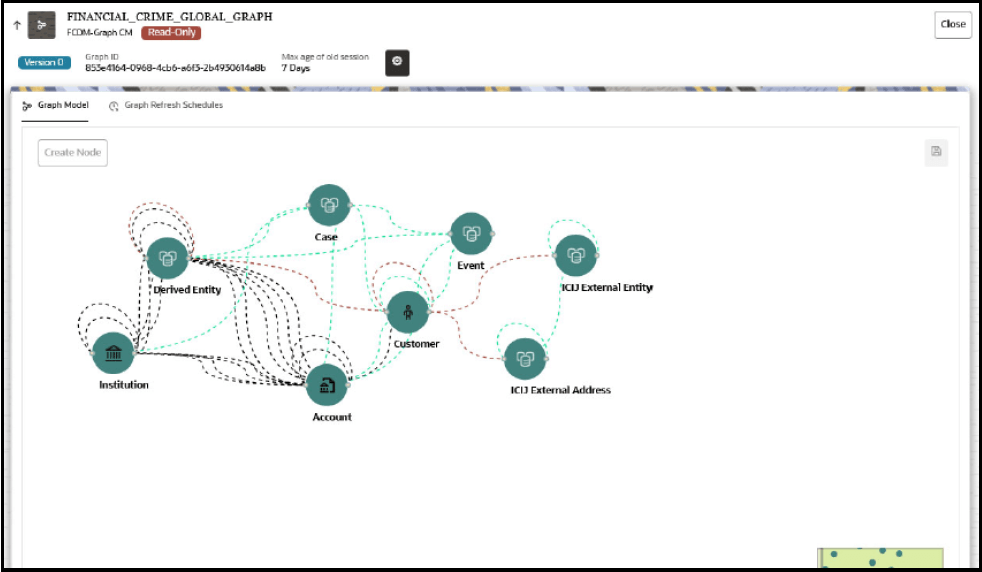
 and select Edit to view the graph.
- To edit the Node, hover over the Node icon and click Edit. The Node Details page is displayed.
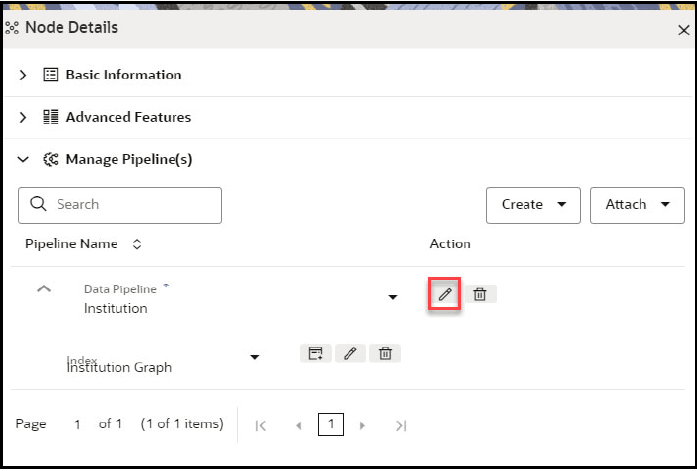
- Expand Manage Pipeline(s) and click Edit icon on the data pipeline to view the Pipeline Designer page.
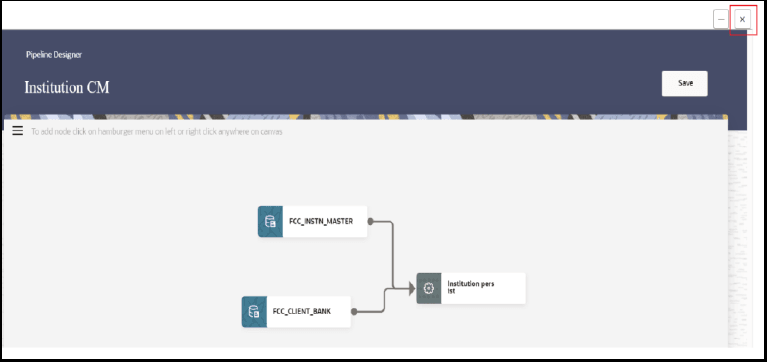
- You need to wait for the UI to load, Close Pipeline Designer page and then Close the graph panel.
Initializing Metadata Indexes
Note:
Before executing the script, OpenSearch should be up and running.- Navigate to
<COMPLIANCE_STUDIO_INSTALLATION_PATH>/deployed/ficdb/graphmetadata/
                            bin
directory. - Execute the
following.
./CreateMetadataIndexes.shThe metadata indexes will be created.Note:
- If the ENABLE_MATCHING_FOR_GRAPH
parameter is set to “false” in the
config.shfile, then skip the Step 2. - Before executing the command, if metadata indexes are available for OpenSearch, then it will not be updated until F_IS_RECENTLY_CHANGED column values are set to "Y" in the FCC_IDX_M_LOOKUP table.
- If the ENABLE_MATCHING_FOR_GRAPH
parameter is set to “false” in the
Initializing Schemas
To initialize schemas:
- Navigate to
<COMPLIANCE_STUDIO_INSTALLATION_PATH>/deployed/ficdb/graphmetadata/
                        bin
directory. - If you are using "FINANCIAL_CRIME_GLOBAL_GRAPH_BEHAVIOUR_DETECTION" OOB graph,
then execute the following.
./InitializeBDSchema.sh -bdw <bd_atomic_wallet_alias> - If you are using "FINANCIAL_CRIME_GLOBAL_GRAPH" OOB graph, then execute the
following.
./InitializeECMSchema.sh -w <ecm_schema_wallet_alias> - To initialize graph schema based on the selected OOB graphs, execute the
following.
- For initializing FINANCIAL_CRIME_GLOBAL_GRAPH_BEHAVIOUR_DETECTION,
./InitializeGraphSchema.sh -gw <graph_wallet_alias> -bs <bd_schema_name> - For initializing FINANCIAL_CRIME_GLOBAL_GRAPH,
./InitializeGraphSchema.sh -gw <graph_wallet_alias> -es <ecm_schema_name> - For initializing FINANCIAL_CRIME_GLOBAL_GRAPH_BEHAVIOUR_DETECTION and
FINANCIAL_CRIME_GLOBAL_GRAPH in the same graph schema,
./InitializeGraphSchema.sh -gw <graph_wallet_alias>
                                -es <ecm_schema_name> -bs <bd_schema_name>
- For initializing FINANCIAL_CRIME_GLOBAL_GRAPH_BEHAVIOUR_DETECTION,
Starting OpenSearch
- Navigate to the
<OPEN_SEARCH_EXTRACTED_PATH>/opensearch/opensearch-<version>/
                            bin
directory. - Execute the following.
nohup ./opensearch &Note:
To check the OpenSearch logs, execute the command -tail -f nohup.out.
Initializing OOB Graph Batch Schedules
Note:
If you want help on the graph batch schedule, then execute the following commands:./InitializeOOBGraphBatchScheduleECM.sh -h./InitializeOOBGraphBatchScheduleBD.sh -h
- Navigate to
<COMPLIANCE_STUDIO_INSTALLATION_PATH>/deployed/ficdb/graphmetadata/bindirectory. - If ENABLE_MATCHING_FOR_GRAPH parameter is set to “false” in the
config.shfile, then initialize the graph batch schedule as follows:- If you are initializing
"FINANCIAL_CRIME_GLOBAL_GRAPH_BEHAVIOUR_DETECTION" schedule, then
execute the
following.
./InitializeOOBGraphBatchScheduleBD.sh
                                        -bw <datasource name of the BD atomic schema> -s
                                        <start_date> -e <end_date> -gd
                                        <graph_datasource> - u
                                        <complianceStudioUserName>
Note:
The Data source value for BD atomic schema should be in exact same case where it was created while editing workspace from the UI. - If you are initializing "FINANCIAL_CRIME_GLOBAL_GRAPH" schedule,
then execute the
following.
./InitializeOOBGraphBatchScheduleECM.sh
                                        -ew <datasource name of the ECM atomic schema> -s
                                        <start_date> -e <end_date> -gd
                                        <graph_datasource> -u
                                        <complianceStudioUserName>
Note:
The Data source value for BD atomic schema should be in exact same case where it was created while editing workspace from the UI.The format of start date and end date should be yyyy_mm_dd.
The dates present in the batch schedule are only used to filter transaction edges. All the nodes are considered irrespective of the dates, and the dates are used to control the volume of transactions to be processed in a batch.
For example, if a customer has millions of transactions for each date, then instead of one batch that processes the complete date range, they can execute multiple batches in slices (let's say 3 months) for better performance, monitoring, and less resource constraint, etc.
By default, the graph has a retention period of 1 year which means transactions with a date older than 1 year will be ignored by the graph. So, if you want all the older transactions in the graph, then edit the OOB graph and update the retention period of transaction edges (pluggable edges) accordingly before executing the graph batch.
- If you are initializing
"FINANCIAL_CRIME_GLOBAL_GRAPH_BEHAVIOUR_DETECTION" schedule, then
execute the
following.
- If ENABLE_MATCHING_FOR_GRAPH parameter is set to “true” in the
config.shfile, then initialize the graph batch schedule as follows:- If you are initializing
"FINANCIAL_CRIME_GLOBAL_GRAPH_BEHAVIOUR_DETECTION" schedule with
matching component enabled, then execute the
following.
./InitializeOOBGraphBatchScheduleBD.sh
                                        -bw <datasource name of the BD atomic schema> -s
                                        <start_date> -e <end_date> -gd
                                        <graph_datasource> - u
                                        <complianceStudioUserName>
(OR)
If you are initializing "FINANCIAL_CRIME_GLOBAL_GRAPH_BEHAVIOUR_DETECTION" schedule with matching component disabled, then execute the following.
./InitializeOOBGraphBatchScheduleBD.sh -bw
                                    <datasource name of the BD atomic schema> -s
                                    <start_date> -e <end_date> -gd
                                    <graph_datasource> - u <complianceStudioUserName>
                                    -sm
Note:
The Data source value for BD atomic schema should be in exact same case where it was created while editing workspace from the UI. - If you are initializing "FINANCIAL_CRIME_GLOBAL_GRAPH" schedule with
matching component enabled, then execute the
following.
./InitializeOOBGraphBatchScheduleECM.sh
                                        -ew <datasource name of the ECM atomic schema> -s
                                        <start_date> -e <end_date> -gd
                                        <graph_datasource> -u
                                        <complianceStudioUserName>
Note:
The Data source value for ECM atomic schema should be in exact same case where it was created while editing workspace from the UI.(OR)
If you are initializing "FINANCIAL_CRIME_GLOBAL_GRAPH" schedule with matching component disabled, then execute the following.
./InitializeOOBGraphBatchScheduleECM.sh
                                        -ew <datasource name of the ECM atomic schema> -s
                                        <start_date> -e <end_date> -gd
                                        <graph_datasource> -u <complianceStudioUserName>
                                        -sm
- If you are initializing
"FINANCIAL_CRIME_GLOBAL_GRAPH_BEHAVIOUR_DETECTION" schedule with
matching component enabled, then execute the
following.
Start the PGX Service
- Navigate to the
<PGX_INSTALLATION_PATH>/pgx/pgx-server/bindirectory. - Execute the following.
./pgx-server.sh -sThe PGX service is up and running.Note:
To verify if PGX service is up, check the logs.
